
Dragon Quest IX: Walkthrough Chapter 7
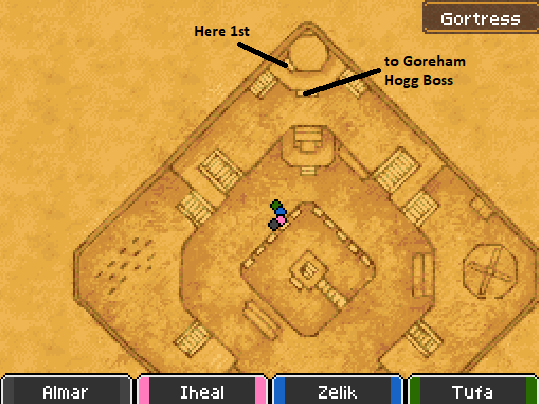
After the riot scene at Gortress the very first thing you'll want to do is return to Stornway and pick up the rest of your party. I covered this in the previous chapter too but just incase you didn't see it then - you NEED to do it now. Back in Gortress the first thing you will need to do is go into the watch tower where you will need to turn off the shield generator, a lethal armor will be guarding it which you'll need to dispatch.
Sterling will talk to you when you exit the watch tower and open the door for you leading to Goreham Hogg, the boss of this place. Before going down to L1 with Goreham Hogg on it, step into the blue light to fully heal your party.
Goreham Hogg is actually a pretty easy boss since all of his attacks are melee attacks. He has an AoE attack which will hit your entire party for about 70 damage and a single target attack that does 70 damage as well but comes with an extremely high chance of dealing critical damage - bringing the total up to about 170 - 200 a hit.
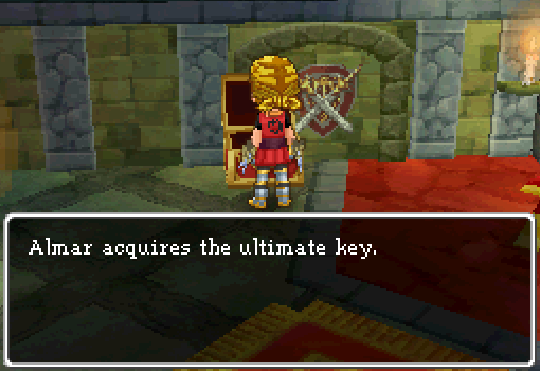
When the fight is over grab your treasure chest to retrieve the Ultimate Key. This key can open the majority of locked doors that we've been unable to open until this point in the game, I'll give you a list of treasures you can go back for in a little bit when we get to the side quest part of this chapter.
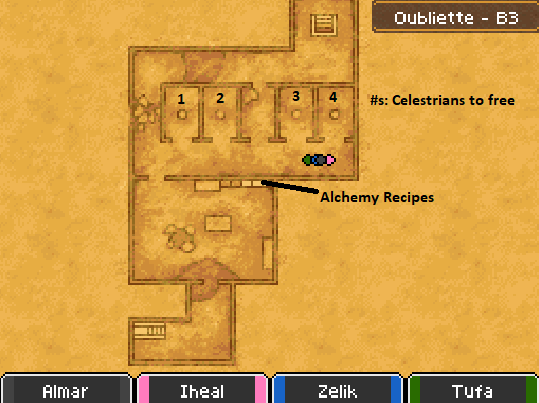
In the mean time you're going to want to go downstairs and use the Ultimate Key to open all of the prison doors, freeing all of the Celestrians. Talk to Sterling once all of the Celestrians are freed to advance the story forward.
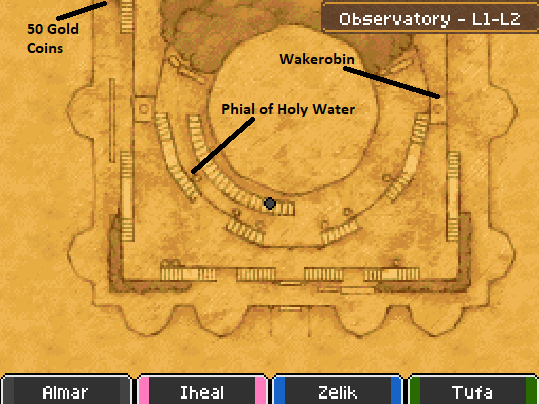
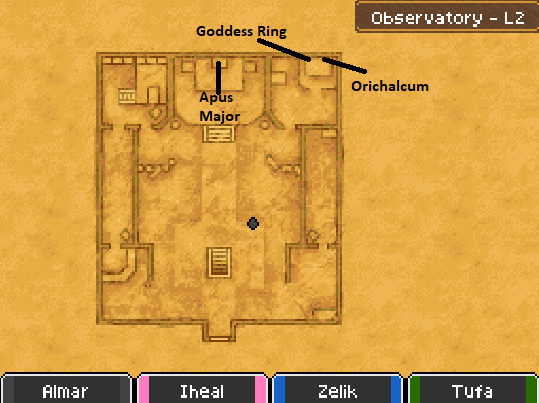
At the Celestrian Observatory you'll want to speak with Apus Major on L2 and grab the goodies in the chests northeast of him with your Ultimate Key. Head up to L4 after speaking with Apus Major on L2 and speak with him again standing next to the Starflight Express. Then head inside of the Starflight Express and speak with Sterling to continue the story.
You'll now find yourself in the Realm of the Almighty which is a brief dungeon without any monsters. Basically all you have to do is travel up the stairs and into the main building where you'll have another scene on the top floor of L2. After the scene step into the light and offer up the fyggs you have collected for another scene.
When the scene is over speak with Stella and Sterling then back inside the Starflight Express speak with Sterling again and head over to Alltrades Abbey. Before continuing with the story I highly recommend you complete as many side quests as possible. There's a lot you can do right now from Alchemy to collecting the Ultimate Key treasures to unlocking/leveling other classes. We're already almost done the game so you may as well stretch it out a bit by doing some interesting things first.
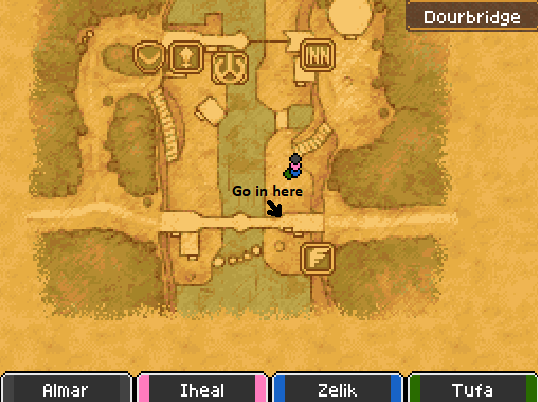
The first thing I am going to recommend you do is Zoom over to Dourbridge and turn in all of the Mini Medals you've collected thus far & also open the chests inside of the tent Cap'n Max is in. Once you've done that you'll want to pay a visit to the shop in Dourbridge which can only be accessed with the Ultimate Key.
It sells a couple upgrades for you at this point in the game and it's definitely worth checking out. Below is a screen shot of where you can find the entrance, it's just a tad bit to the south of Cap'n Max's tent.
Aside from the two things in Dourbridge, there's a handful of other tasks that you can accomplish before continuing forward with the game. It's up to you whether or not you want to do any of this stuff since none of it is required. You can easily beat the game without ever leveling two classes on the same character or completing even a single side quest.
The only reason I recommend you even do any of this stuff is because of if you don't - the game is stupidly short. We're literally almost done it right now, there's only two dungeons left and three bosses until the end boss. Of course there is post game content too but I know many people don't care about that sort of stuff.
Pick and choose what you want to do side quest wise from the list below.
Magic Key Door/Chest Locations
Ultimate Key Door/Chest Locations
Gladiator Class Unlock Sidequest
Armamentalist Class Unlock Sidequest
Paladin Class Unlock Side Quest
When you are ready to continue the story you'll want to Zoom over to Gortress and travel east where you'll find Gittingham Palace, the next dungeon. Approach the entrance to have it opened up for you and prepare for a boss fight the moment you enter.
Hootingham-Gore is who you're going to be fighting again and he comes with two companions this time, Bad Karmours. Take them out first then go after Hootingham who mostly only uses status ailment magic throughout this fight. He does have high magic resistance though so when you're ready to fight him, use all melee attacks.
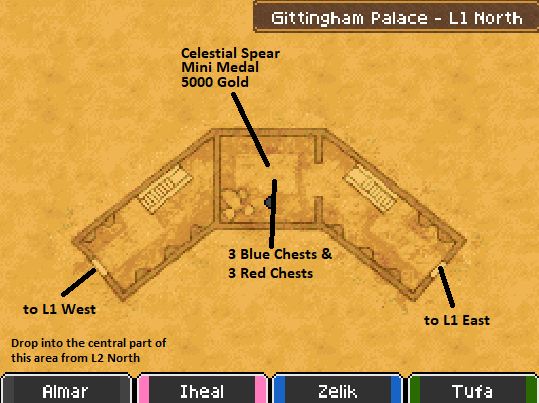
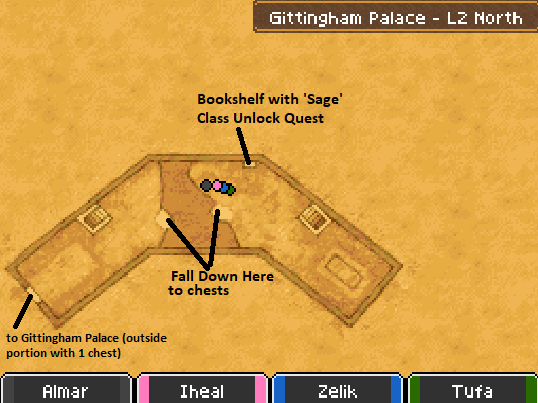
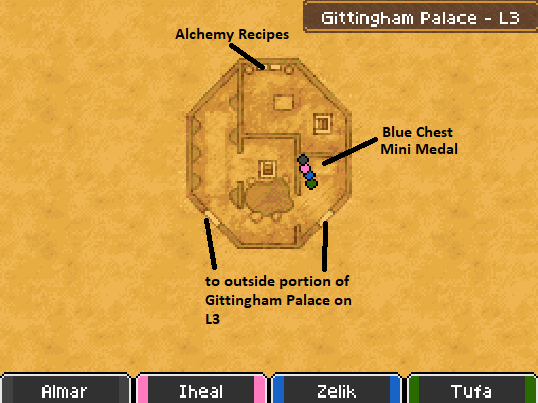
The dungeon of Gittingham Palace is quite a long one - early on in the dungeon too you'll find a bookshelf in L2 North which offers up the Sage Class Unlock Sidequest. I would recommend picking this up and completing it with a secondary class on all of your characters before continuing onward throughout the game. However if you're not trying to stretch the Dragon Quest IX experience then F it and do whatever you want.
L1 East Treasure Chests (not pictured): Mini Medal & Reckless Necklace
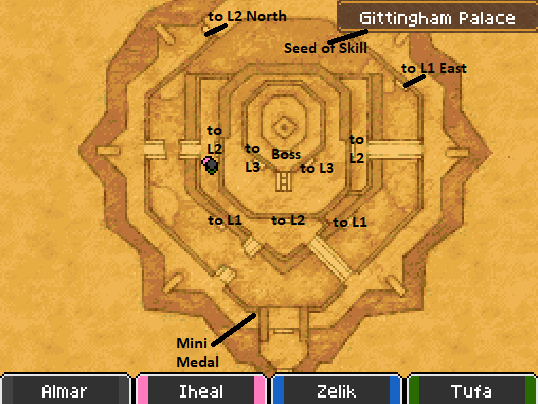

At the top of the outside portion of this dungeon you'll find a boss, Goresby-Purrvis who is much more difficult than the guy we fought at the entrance! He has a multislash attack that can hit the entire group for about 60 damage but it often just hits two or three targets. There's also a single target attack called upward slice which has a high chance of dealing critical damage & incapacitates the target for a round or two.
Besides these abilities he also has two other abilities called Flame Slash and Kacrackle Slash that deal a larger amount of damage than a regular physical hit but he rarely ever uses them. Once the fight is over you'll want to go through the door, watch a scene and then when you're ready go up the stairs and speak with King Godwyn, the next boss.
King Godwyn's first form is easy and you don't need a strategy for it. His second form attacks twice a turn and uses high damaging single target as well as AoE spells against your group. To make matters worse, he also constantly dispels buffs from your team so using things like Oomph and Acceleratle are a waste of time.
Kafrizz and Inferno will be the two main spells he uses to damage your group with while Disruptive Wave is the AoE dispel that he'll use. It's highly recommended you have someone in your group with Multiheal for this fight or have two or three classes with you that can cast heal. It'll make things much easier if you do.
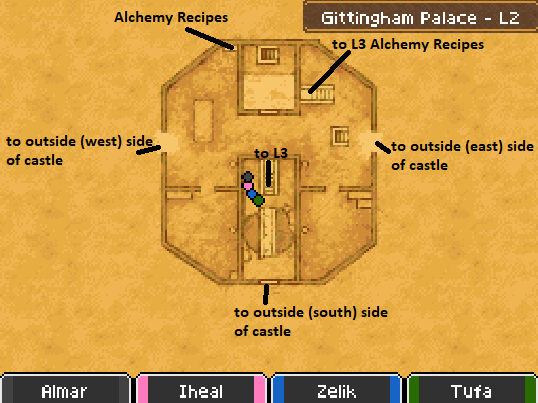
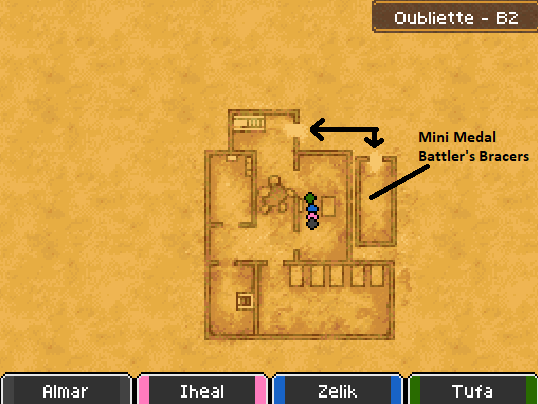
We're not done yet! Before Evacing out and leaving this place you'll want to return to L2 of Gittingham Palace where we saw the door that was sealed earlier - now that we've beaten the boss and lifted the curse the door is unsealed! Go through it and down into the Oubliette dungeon.
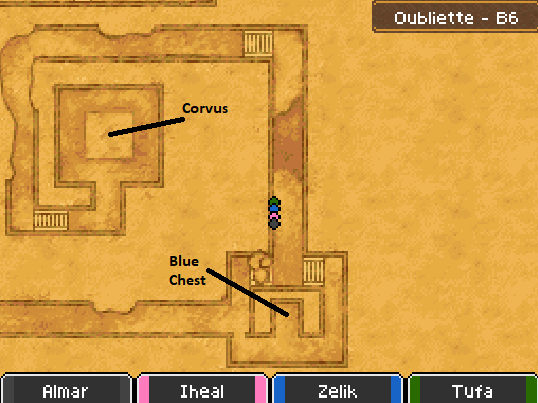
Our destination is B6 of Oubliette where you will find Corvus chained up in the central room. Speaking with him and freeing him will trigger an unwinnable battle and lengthy scene. When the scene is finally over you'll find yourself back in the Celestrian Observatory.
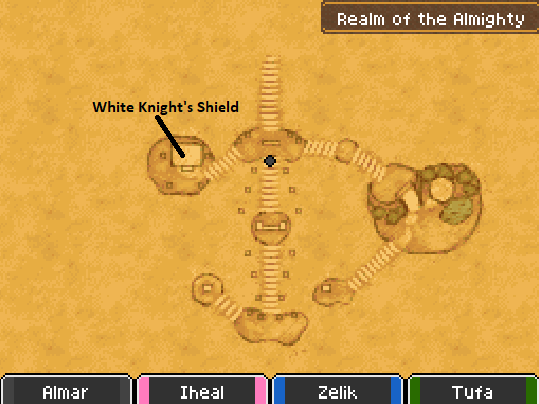
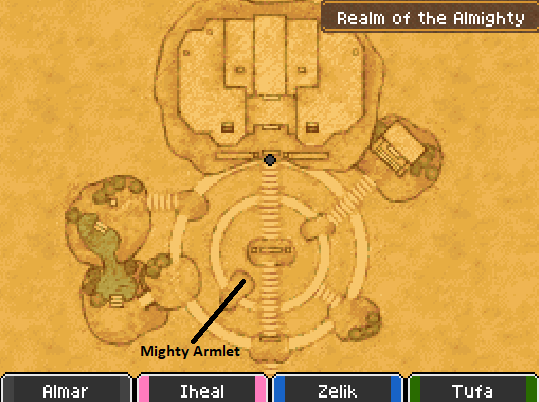
Inside the Celestrian Observatory you'll want to go up to the Yggdrasil Tree and accept the Fygg it offers you - then board the Starflight Express. Talk to Sterling, eat the Fygg and then talk to Sterling again. He gives you a list of destinations you can go - one of them being Realm of the Almighty which is the final dungeon. We've been here once already but when you try to return this time it morphs into something much more resembling an ominous final dungeon.
Before we finish the game though, now is one of your last chances to extend this game's life by doing some side quests! In addition to all the stuff I mentioned last time another side quest is available to unlock the Sage class.
Magic Key Door/Chest Locations
Ultimate Key Door/Chest Locations
Gladiator Class Unlock Sidequest
Armamentalist Class Unlock Sidequest
Paladin Class Unlock Side Quest
*New* Sage Class Unlock Side Quest
Along with all of the above mentioned quests there's a TON of side quests you can do in Swinedimples if you have 100 points spent in a weapon skill. Many of these quests will also give you passive upgrades or abilities when equipped with those weapons. An example of this is completing the 100 Shields quest will prevent you from suffering any critical attacks. Whereas 100 Swords gives you the Gigaslash Ability.
Side Quest #064 (Turn In Your Badges)
Pre-req: Sword Skill 100 and Side Quest #063 Complete
Location: Swinedimples Academy; Man inside the church
Task: Collect 5 Badges from 5 different enemies in different locations
Reward: Swordcraft in Summary and Gigagash Ability
Side Quest #066 (Operation Multithrust)
Pre-req: Spear Skill 100 and Side Quest #065 Complete
Location: Swinedimples Academy; Man in western hallway
Task: Defeat 3 Metal Medley enemies with Pressure Pointer
Reward: Clear Spear Theory and Lightning Storm Ability
Side Quest #068 (Spice Up Your Knife)
Pre-req: Knife Skill 100 and Side Quest #067 Complete
Location: Swinedimples Academy; Woman on 1F of Dorm
Task: Defeat 10 Bad Karmour (Oubliette) enemies with Victimiser
Reward: Knifing Know-How and Persecutter ability
Side Quest #070 (Look, Back in Anger)
Pre-req: Wand Skill 100 and Side Quest #069 Complete (Side Quest #077 and #078 Not in progress)
Location: Swinedimples Academy; Man in western part of campus
Task: Talk to man at Item Shop in Slurry Quay; Defeat Salamarauder (Tywll Cave) for Backscratcher
Reward: Wands and Beyond as well as Zing Stick Ability
Side Quest #072 (Jump for Joy)
Pre-req: Staff Skill 100 and Side Quest #071 Complete
Location: Swinedimples Academy; Western Hallway Blond Man
Task: Defeat Nemean (Grotto Boss) with a normal attack while equipped with a Laundry Pole
Reward: Staff Studies and Counter Wait Ability
Side Quest #074 (Mr Whippy Wish)
Pre-req: Whip Skill 100 and Side Quest #073 Complete
Location: Swinedimples Academy; Man on 1F of Dorm
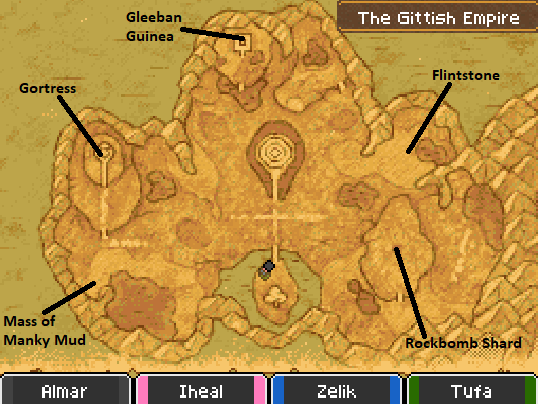
Task: Talk to Bunny Girl at Lighthouse near Bloomingdale and then defeat Dreadful Drackals (The Gittish Empire) and Drastic Drackal (Wyrmtail) with Leather Whips
Reward: Working with Whips and Serpent's Bite Ability
Side Quest #076 (The Talonted Trio)
Pre-req: Claw Skill 100 and Side Quest #075 Complete
Location: Swinedimples Academy; Man in eastern room of 1F
Task: Defeat Tearwolf (South of Swinedimples); Claws (Oubliette B3); King Crab (Four Corners of Ocean)
Reward: The Core of the Claw and Hand of God Ability
Side Quest #078 (Oh The Indignity)
Pre-req: Fan Skill 100 and Side Quest #077 Complete
Location: Swinedimples Academy; Woman in the eastern hallway on 2F
Task: Defeat Liquid Metal Slime (Slime Hill; Bowhole) with Fandango while wearing Bunny Ears and Bunny Tail
Reward: Further Fanmanship and Hustle Dance Ability
Side Quest #080 ('Atchet Job)
Pre-req: Axe Skill 100 and Side Quest #079 Complete
Location: Swinedimples Academy; Man near Fountain
Task: Defeat 3 Magmalices (The Magmaroo); 3 Stone Guardians (Oubliette) and 3 Bad Karmours (Oubliette) with Hatchet Man
Reward: Advanced Axecraft and Whopper Chop Ability
Side Quest #082 (To Shell and Back)
Pre-req: Hammer Skill 100 and Side Quest #081 Complete
Location: Swinedimples Academy; 1F Woman in western room near school entrance
Task: Defeat a Liquid Metal Slime with Bagsy Last while having a Tortoise Shell equipped
Reward: Hardcore Hammering and Big Banga Ability
Side Quest #084 (Beauty and Beyond)
Pre-req: Bow Skill 100 and Side Quest #083 Complete
Location: Swinedimples Academy; Thug inside the large western room
Task: Defeat 10 Boss Trolls (Outside Tower of Nod) with Rain of Pain and give Archie a pair of Wonder Pants (Made with Alchemy)
Reward: Archery for the Adept and Shining Shot Ability
Side Quest #086 (Brave the Caves)
Pre-req: Boomerang Skill 100 and Side Quest #085 Complete
Location: Swinedimples Academy; Girl outside the Dormitory
Task: Check Art Room on 2F. Defeat a Mortoad (Tywll Cave); Hunter Mech (Bad Cave); Living Statue (Bowhole)
Reward: The Boomerang Bible and Gigathrow Ability
Side Quest #088 (Buckler's Buckler)
Pre-req: Shield Skill 100 and Side Quest #087 Complete
Location: Swinedimples Academy; Man in the west room near school entrance
Task: Defeat 10 Killing Machines with Blockenspiel
Reward: Secrets of the Shield and Passive Ability: Prevent all critical attacks
Side Quest #090 (One Latht Tehth)
Pre-req: Fisticuff Skill 100 and Side Quest #089 Complete
Location: Swinedimples Academy; Man in the large western room of Swinedimples Academy L1
Task: Defeat 50 enemies on the 10F (or lower) of any grotto while not wearing any equipment
Reward: Fearsome Fisticuffing and Miracle Moon Ability
Side Quest #092 (Warriors Three)
Pre-req: Level 40+ Warrior and Side Quest #091 Complete
Location: Wormwood Creek; Farmer at southern fence
Task: Defeat 10 enraged Mandrake Marauders after enraging them with Whistle
Reward: Warrior's Workbook, Counterattack Ability and 5000G
Side Quest #094 (Nurtural Selection)
Pre-req: Level 40+ Priest and Side Quest #093 Complete
Location:Wormwood Creek; Old Man in well
Task: Heal a character with red HP using Moreheal 20 times (Must be done in battle)
Reward: Priest's Primer and Wave of Relief Ability
Side Quest #096 (Faerie Nearly There)
Pre-req: Level 40+ Mage and Side Quest #095 Complete
Location: Alltrades Abbey; Sleep at Inn with a qualified Mage in your group
Task: Defeat 10 Wight Priests (Old School - Swinedimples) with regular attacks while equipped with Faerie Staff
Reward: Fizzle-Retardant Suit and Fizzle-Retardant Blouse
Side Quest #098 (Slowly, Slowly, Critty Golem)
Pre-req: Level 40+ Martial Artist and Side Quest #097 Complete
Location: Alltrades Abbey; Old Man at Entrance
Task: Defeat 3 Golems (Around Upover) with regular critical hits
Reward: Martial Artist's Manual and Tension Saver Ability
Side Quest #099 (B-Coming one of the B-Team)
Pre-req: Level 15+ Thief
Location: Dourbridge; Thief inside bar
Task: Steal a Tycoon's Trove from Hunter Mechs (Bad Cave)
Reward: Rogue Robe, Roguess Robe and 1000G
Side Quest #100 (Busted)
Pre-req: Level 40+ Thief and Side Quest #099 Complete
Location: Dourbridge; Thief inside bar
Task: Steal a Lunar Diamond from a Sorcerer in Gerzuun B1
Reward: Thief's Theory, able to steal after battle and 10k G
Side Quest #102 (Prat's the way to do it!)
Pre-req: Level 40+ Minstrel and Side Quest #101 Complete
Location: Alltrades Abbey; Ghost on B1 in the bar
Task: Use the Minstrel Pratfall ability until you get a critical strike in battle two times
Reward: Minstrel's Manual and Gritty Ditty Ability
Side Quest #105 (Challengus Maximus)
Pre-req: Level 40+ Gladiator and Side Quest #104 Complete
Location: Island East of Hermany; man standing on southern end
Task: Defeat 10 Drackals while under the effects of Double Up
Reward: Gladiator's Guide and Passive Ability: Occasionally Attack Twice
Side Quest #108 (Top-Flight Knight Fight)
Pre-req: Level 40+ Paladin and Side Quest #107 Complete
Location: Gleeba; the Paladin on roof
Task: Use H-Pathy on a character with only 1 Hp five times in battle
Reward: Paladin's Primer and Solar Flair
Side Quest #111 (The Fource... Forever)
Pre-req: Level 40+ Armamentalist and Side Quest #110 Complete
Location: Alltrades Abbey; Man in red inside Alltrades Abbey
Task: Defeat 5 different enemies under the effects of 5 different Fources
Reward: Armamentalist Album and Passive Ability: Fource abilities effect the whole party
Side Quest #114 (One-turn Wonder)
Pre-req: Level 40+ Ranger and Side Quest #113 Complete
Location: Heights of Loneliness at Entrance
Task: Defeat Drakularge enemies in a single turn 5 times
Reward: Ranger's Revelations and Passive Ability: Chance for critical increases when HP is low
Return to Chapter 6 (Wormwood Creek, The Bowhole, Upover, The Magmaroo & Gortress)
Continue to Chapter 8 (Realm of the Mighty Final Dungeon & Corvus Final Boss)