
Dragon Quest IX: Walkthrough Chapter 5

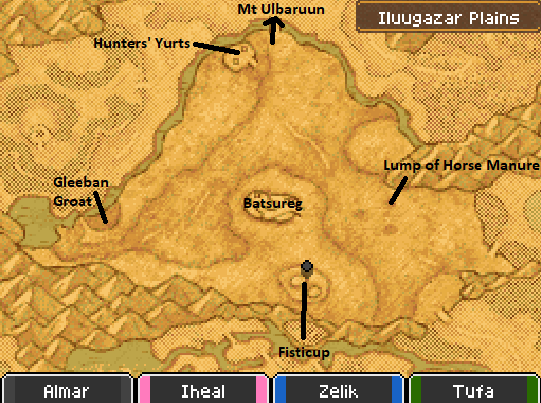
After you've finished with Gleeba the next destination for us is the town of Batsureg, located on the island just north of the island with Gleeba. Use my map above if you're having trouble finding it or figuring out where to disembark. You can see the town of Batsureg from the shore (and in my screenshot) so it shouldn't be too difficult to find.
Batsureg has a weapon and armor vendor stocked with tons of upgrades so be ready for a massive shopping spree once you land here. In this town, much like the previous ones, you're going to have to do some tedious running around to advance the story forward.
Side Quest #037 (Funghi for a Fun Guy)
Location: Pluvi Island; southwest of Gleeba the man is inside of a well
Task: Bring him 3 Belle Caps
Reward: Finessence; Magic Beast Horn when repeated
To advance the story forward in the town of Batsureg you'll want to complete the following tasks in the order I have given below. If you're having trouble finding any of the locations in the list use the screenshots both above and below for extra guidance.
1. Speak with chief Batkhaan in the northwestern Yurt
2. Go to the Hunters Yurts north of Batsureg (use map above)
3. Examine the northern Yurt
4. Speak with Batzorig in the southern Yurt
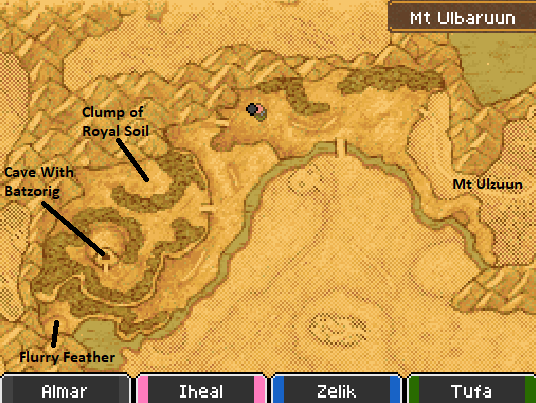
5. Go north to Mt Ulbaruun to meet Batzorig in a cave
You'll find the cave with Batzorig in it due west in the Mt Ulbaruun region. Use my map below if you're having trouble locating the cave.
Side Quest #034 (A Simple Task)
Location: Batsureg; Girl in the center of village
Task: Acquire Simple Simon or Simple Simone Accolade then assign that as your title
Reward: 1000G; 500G when repeated
Side Quest #035 (All Dolled Up)
Location: Batsureg; Man in southwestern tent
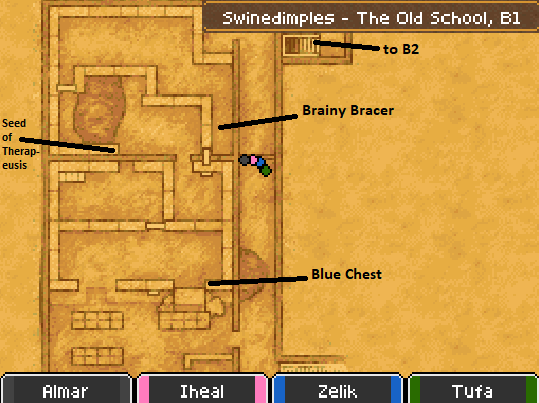
Task: Put Brainy Badboons to sleep then use Half-Inch to steal from them
Reward: Einhander
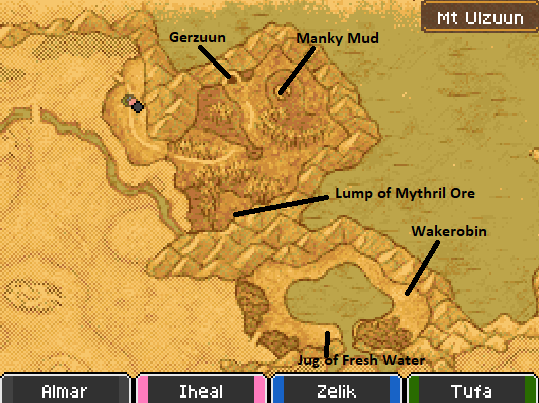
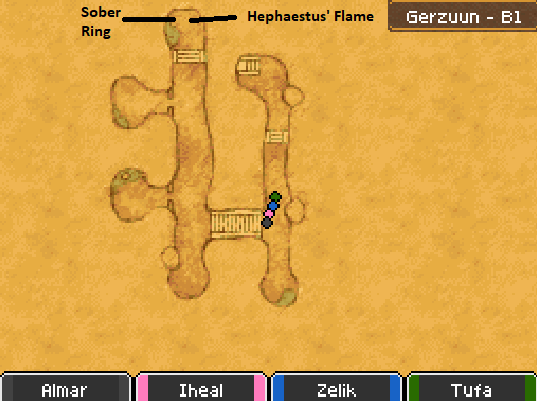
After speaking with the ghost inside of the cave you'll need to head directly east to the Mt Ulzuun region. In the northern part of this area you'll find a cave entrance which leads us to our next dungeon, Gerzuun. The ghost will open the door for you and allow you to pass, to advance the story and find the Bodura Grass you'll want to go to the Underground Spring area.
There is actually no boss in this dungeon, once you pick up the Bodura Grass you're safe to Evac out then you'll want to Zoom over to Batsureg. I'd recommend sleeping at the Inn now then heading north to the Hunters' Yurts where you'll want to speak with Batzorig in the southern one.

Return to Batsureg after speaking with Batzorig and prepare yourself for a boss fight, when you step onto the elevated piece of land in the center of town you'll start the encounter. If you need to heal up do it now it's your last chance and this boss could be a tough one for you.
Larstastnaras is the bosses name and she is a caster that has a staff that drains your MP when you're hit - which is the least of your worries. Her two main abilities that are a real pain in the butt to deal with are Dazzle and Boom. Dazzle makes it hard for your melee attacks to connect with her and Boom hits your whole group for about 40 points of damage. She also has a Magic Barrier ability which makes spells deal a lot less damage to her which could be a big problem to some groups too.
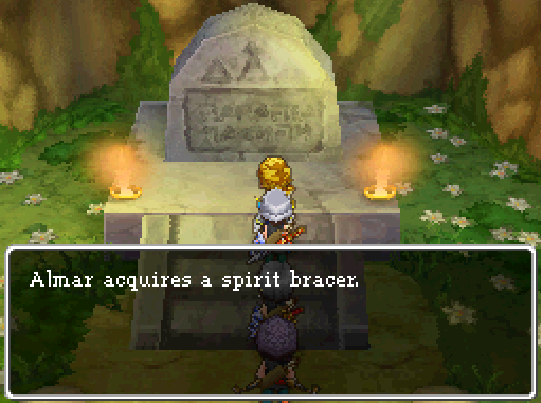
After you've defeated the boss and spend the night at the Inn - return to the grave where you met Batzorig and his ape companion earlier. You'll have another scene to watch and you'll receive a Spirit Bracer for coming here.

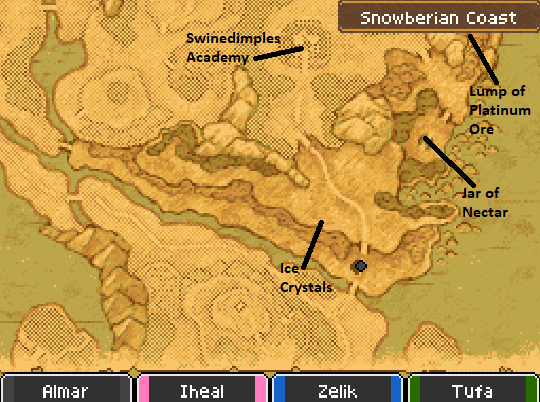
Our next stop is a place called Swinedimples Academy which is located almost directly east of Batsureg - however you have to take a some what convoluted way here. Return to Urdus Marshlands and travel east until you reach Hermany (map above). In Hermany you'll want to go north twice to reach Swinedimples Academy.
There will be someone to greet you at the gate talking about waiting for a detective - as you could probably already guess this is gonna be another town with a long list of crap to do in order to advance the story. Here's the list for you:
1. Speak with the man at the gate
2. Enter the Dormitory on the east side of the compound
3. Eavesdrop on the conversation the students are having on L2 then enter their room
4. Talk to Fred behind the house on the western side of the compound
5. Return to your room in the dormitory (the same one the three boys were in) and rest
6. At night go to the balcony on L3 of the main building
7. Examine the statue on this balcony for a scene
8. Go to the underground school in the northeast of the compound
Note: On L2 of the Swinedimples Academy you'll find the Alchemy Recipes for Goddess Ring, Meteorite Bracer, Life Bracer and many other of the end game rare Dragon Quest staple items.
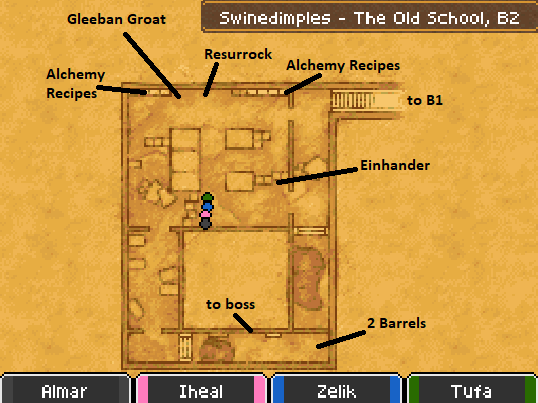
Inside the room on B2 you'll find the boss of this dungeon, Dreadmaster. He's a ghost teaching a room full of students and when you're ready to engage him all you have to do is speak to him. The last boss we fought was much harder than this guy in all honesty.
Dreadmaster has two abilities which could pose a problem to a weaker group; Double Trouble (which is basically two back to back melee attacks) and Crackle which is an ice based attack that hits the whole group for about 30 damage. He has another ability called Zammle which hits a single target for about 40 damage but that's hardly anything to worry about.
After the battle you'll get your seventh and final Fygg - now it's time to return to the Celestrian Observatory! Zoom back to Alltrades Abbey and approach the glimmering tree in the west to board the Starflight Express and zip back up to the Observatory. On your way up to the place where this all started there will be a scene involving Aquila - when everything is said and done you'll find yourself in a new town called Wormwood Creek.
Note: At this point in time a TON of Side Quests become available for you in Swinedimples Academy. Swinedimples offers you two quests for every weapon skill in the game, the first quest you can accept when your skill is 30 and the second when it is 100. Below you'll find the first set of these quests, for people who have raised that weapon skill to at least 30.
Side Quest #036 (Little Miss Bossy Boots)
Location: Swinedimples Academy; Girl inside the school on L1
Task: Bring her Holy Water and 2 Royal Soils
Reward: Swinedimples Salute Party Trick; Thunderball when repeated
Side Quest #065 (Operation Mercury)
Pre-req: Spear Skill 30
Location: Swinedimples Academy; Man in western hallway
Task: Defeat 3 Metal Medley enemies with Pressure Pointer
Reward: Halberd
Side Quest #067 (Nab the Knife-Nicker)
Pre-req: Knife Skill 30
Location: Swinedimples Academy; Woman on 1F of Dorm
Task: Fight Shivery Shrubbery enemies near Swinedimples and put them to sleep before defeating with Toxic Dagger
Reward: Icicle Dirk
Side Quest #069 (You Scratch My Back...)
Pre-req: Wand Skill 30
Location: Swinedimples Academy; Man in western part of campus
Task: Talk to man at Item Shop in Slurry Quay; Defeat Salamarauder (Tywll Cave) for Backscratcher
Reward: Knifing Know-How and Persecutter ability
Side Quest #071 (Staunch the Stench)
Pre-req: Staff Skill 30
Location: Swinedimples Academy; Western Hallway Blond Man
Task: Defeat Stenchurion enemies in the sea north of Gleeba with Deliverance Staff Ability
Reward: Killer Pillar
Side Quest #073 (Whipping Boy's Wish)
Pre-req: Whip Skill 30
Location: Swinedimples Academy; Boy on 2F of School
Task: Talk to Bunny Girl at Lighthouse near Bloomingdale and bring her a Hammer Fang from Power Hammer (Djust Desert)
Reward: Spiked Steel Whip
Side Quest #075 (Rake a Tail Feather)
Pre-req: Claw Skill 30
Location: Swinedimples Academy; 1F of School in Eastern Room
Task: Defeat Robo-robins with Can Opener to collect 10 Tinny Tail Feathers
Reward: Kestrel Claws
Side Quest #077 (Cool-Fanned Kick)
Pre-req: Fan Skill 30
Location: Swinedimples Academy; Woman in the eastern hallway on 2F
Task: Defeat Apeckalypse (Around Swinedimples) until they drop a Freezing Feather
Reward: The Core of the Claw and Hand of God Ability
Side Quest #079 (Bring Oi Back Me Axe)
Pre-req: Axe Skill 30
Location: Swinedimples Academy; Man near Fountain
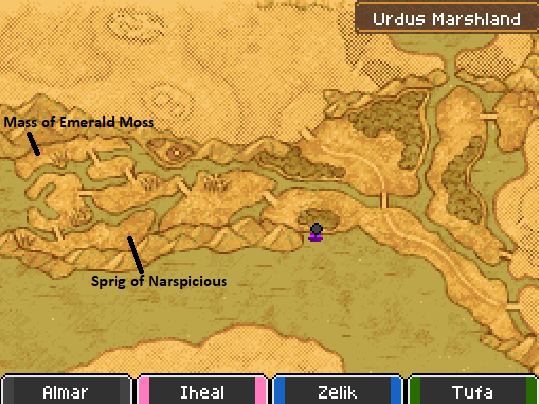
Task: Defeat Treevils (South of Batsureg; Urdus Marshland) until they drop Max's Axe
Reward: Pro's Axe
Side Quest #081 (Mallet's Mallet)
Pre-req: Hammer Skill 30
Location: Swinedimples Academy; 2F female student in central classroom
Task: Read Mallet Monthly in Library on 1F then defeat Admirers (Plumbed Depths) for Wobbly Jelly
Reward: Terra Firmer
Side Quest #083 (Beautiful Bowginnings)
Pre-req: Bow Skill 30
Location: Swinedimples Academy; Thug inside the large western room
Task: Defeat 10 Peckerels with Flutter Disaster
Reward: Billowing Bow
Side Quest #085 (Comeback Kid)
Pre-req: Boomerang Skill 30
Location: Swinedimples Academy; Boy southwestern part of compound
Task: Defeat a Metal Slime with Power Throw
Reward: Eaglewing
Side Quest #087 (Sucking Up to Buckler)
Pre-req: Shield Skill 30
Location: Swinedimples Academy; Man in the west room near school entrance
Task: Block 10 attacks with your shield
Reward: White Shield
Side Quest #089 (Way of the Fitht)
Pre-req: Fisticuff Skill 30
Location: Swinedimples Academy; Man in the large western room of Swinedimples Academy L1
Task: Defeat 10 Wyrtles (Urdus Marshland/Hermany) with Knuckle Sandwich
Reward: Tough Guy Tattoo
Return to Walkthrough Chapter 4 (The Bad Cave, Djust Desert/Gleeba, The Plumbed Depths & Sidequests)
Continue to Walkthrough Chapter 6 (Wormwood Creek, The Bowhole, Upover, The Magmaroo & Gortress)