
Level 5 (Low Rank) Guild Quests - MHFU
This page is a list and walkthrough of all the 5 Star Guild Quests in Monster Hunter Freedom Unite & Monster Hunter Freedom 2. Both of these games have mostly the same set of quests which is why this information works for both of them. There are a few quests that are unique to Unite and I will mention them when they come up.
I've included all of the relevant information for each quest on this list such as which zone it takes place in, what type of quest it is, whether or not you're required to complete it to advance and (of course) how to complete the quest. Below is an example that will serve as your Key for this page. If you're confused as to what any of the categories on this page mean take a look at the Key below.
Key:
Name of the Mission
Advance Req: If you are required to beat the mission to progress
Type: The type of mission this is, Gathering, Combat or Hunting
Video: My Youtube Video Walkthrough of this mission
Location: Where this mission takes place
Goal: The objective of this mission
#1 Absolute Power
#1 Absolute Power
Advance Req: No
Type: Hunting Quest
Video: Absolute Power Quest Walkthrough (Light Bowgun)
Location: Snowy Mountains (Day)
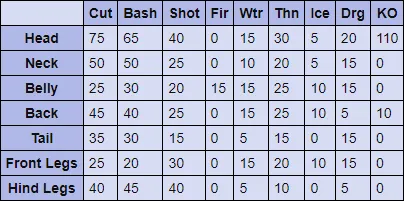
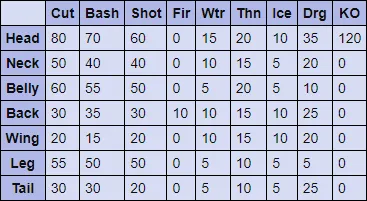
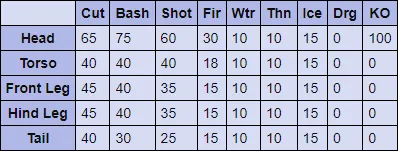
Goal: Hunt the Tigrex (4600 HP). You can find Tigrex in area #8 at the start of this mission. He'll hang out here for about a minute before switching to areas 1, 3, 6 or 7.
Tigrex Hitzones & Weaknesses:
#2 The Tigrex's Roar!
#2 The Tigrex's Roar!
Advance Req: No
Type: Hunting Quest
Video: The Tigrex's Roar Quest Walkthrough (Light Bowgun)
Location: Desert (Day)
Goal: Hunt the Tigrex (4600 HP). When the mission starts you can find Tigrex in area 5, he'll hang out here for a few minutes before eventually moving to one of the following areas 2, 3, 7 or 9. From watching him I think which area he moves to is totally random, he spends about a minute or two in each area before moving to the next one.
Tigrex Hitzones & Weaknesses:
#3 The Runaway Diablos!
#3 The Runaway Diablos!
Advance Req: Yes
Type: Hunting Quest
Video: The Runaway Diablos Quest Walkthrough (Light Bowgun)
Location: Desert (Day)
Goal: Hunt the Diablos (4600 HP). At the start of this mission you can find the Diablos in area #7, he hangs out here long enough for you to buff up and run over. Eventually though he will move to areas 3, 5, 2, 1 and 9 - he picks an area at random from what I have seen.
Diablos Hitzones & Weaknesses:
#5 The Fierce Black Horn!
#4 The Fierce Black Horn!
Advance Req: No
Unlock: Complete The Runaway Diablos to unlock this quest
Type: Hunting Quest
Video: The Fierce Black Horn Quest Walkthrough (Light Bowgun)
Location: Desert (Night)
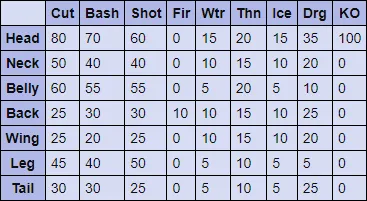
Goal: Hunt the Black Diablos (5060 HP). Much like the Diablos, you can find the Black Diablos in area 7 at the start of the mission. She hangs out here for awhile before eventually moving to one of the following areas at random, 5, 9, 2 and area 3. Like the Diablos she spends about a minute in each area before switching. In my opinion the best location to fight this boss is area 3 thanks to the ledge that lets you avoid almost all of her attacks (best for Bows/Bowguns).
Black Diablos Hitzones & Weaknesses:

#5 Valor in the Swamp Zone
#5 Valor in the Swamp Zone
Advance Req: Yes
Type: Hunting Quest
Video: Valor in the Swamp Zone Quest Walkthrough (Light Bowgun)
Location: Swamp (Day)
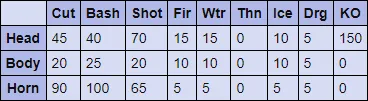
Goal: Hunt the Gravios (4600 HP). When the mission starts you can find the Gravios in area #8 on the map. He will eventually leave this area and travel to areas 6, 5, 4 and finally back to 8. From what I have seen he follows this same patrol route on every mission spending about a minute in each area before moving to the next.
Gravios Hitzones & Weaknesses:
#6 Terror of the Gravios
#6 Terror of the Gravios
Advance Req: No
Unlock: Complete the Valor in the Swamp Zone mission
Type: Hunting Quest
Video: Terror of the Gravios Quest Walkthrough (Light Bowgun)
Location: Volcano (Night)
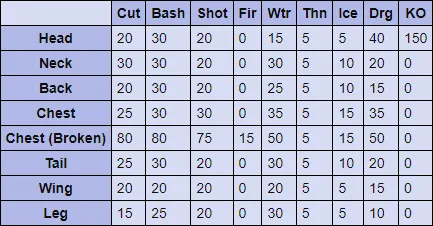
Goal: Hunt the Black Gravios (5280 HP). At the start of the mission you can find the Black Gravios in area #4. He will spend about a minute here before eventually starting his patrol route which goes through areas 3, 7 and 5 before returning to area 4.
Black Gravios Hitzones & Weaknesses:

#7 The King's Domain
#7 The King's Domain
Advance Req: Yes
Type: Hunting Quest
Video: The King's Domain Quest Walkthrough (Light Bowgun)
Location: Forest & Hills (Day)
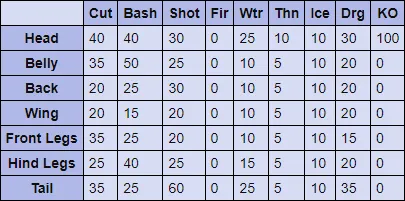
Goal: Hunt the Rathalos (4000 HP). You can find Rathalos in area #5 at the start of this mission. Rathalos spends about a minute in this location before moving to one of the following areas at random 2, 3, 4, 6, 9 or 10. There is no pattern to his movements from what I have been able to see.
Rathalos Hitzones & Weaknesses:

#8 Attack of the Rathalos
#8 Attack of the Rathalos
Advance Req: No
Unlock: Complete The King's Domain mission to unlock this one
Type: Hunting Quest
Video: Attack of the Rathalos Quest Walkthrough (Light Bowgun)
Location: Forest & Hills (Day)
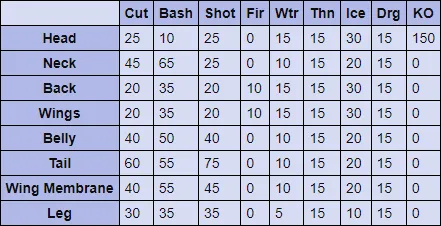
Goal: Hunt the Azure Rathalos (4140 HP). At the start of the mission you can find the Azure Rathalos in area #5. He doesn't stay here long before moving to one of the following areas at random 6, 9, 3, 4 or 2.
Azure Rathalos Hitzones & Weaknesses:

#9 The Queen's Descent
#9 The Queen's Descent
Advance Req: Yes
Type: Hunting Quest
Video: The Queen's Descent Quest Walkthrough (Light Bowgun)
Location: Jungle (Day)
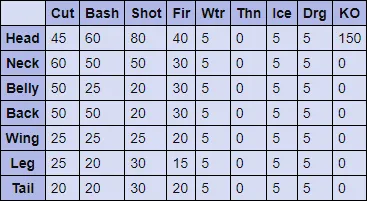
Goal: Hunt the Rathian (4600 HP). When the mission begins you can find the Rathian in area 3; after about a minute she will leave and pick one of the following areas at random 2, 1, 6, 8 or 9. From what I have seen she stays in each area for about a minute before flying to another one.
Rathian Hitzones & Weaknesses:
#10 The Cherry Blossom Rathian
#10 The Cherry Blossom Rathian
Advance Req: No
Unlock: Complete The Queen's Descent to unlock this quest
Type: Hunting Quest
Video: The Cherry Blossom Rathian Quest Walkthrough (Light Bowgun)
Location: Jungle (Night)
Goal: Hunt the Pink Rathian (5060 HP). Much like the normal Rathian this boss monster starts out in area 3. She will leave this location after about a minute and travel to one of the following areas at random 2, 1, 6, 8, 7, 4 or 9. Basically, she can go pretty much every where on this map... I recommend you bring a Psychoserum to make finding her a little bit easier.
Pink Rathian Hitzones & Weaknesses:
#11 The Legendary Kirin
#11 The Legendary Kirin
Advance Req: No
Unlock: This quest appears & disappears randomly
Type: Hunting Quest
Video: The Legendary Kirin Quest Walkthrough (Light Bowgun)
Location: Snowy Mountains (Night)
Goal: Hunt the Kirin (4000 HP). At the start of this mission you can find Kirin in area 6, he stays here for about a minute before starting his patrol route that takes him through areas 7 and 8 before returning to area 6. In other words, you can find the Kirin in the mountain areas of this map and nowhere else.
Kirin Hitzones & Weaknesses:
#12 The Red and Green Wyverns
#12 The Red and Green Wyverns
Advance Req: No
Unlock: Complete The Queen's Descent to unlock this quest
Type: Hunting Quest
Video: The Red and Green Wyverns Quest Walkthrough (Light Bowgun)
Location: Forest & Hills (Day)
Goal: Hunt the Rathalos (2240 HP) and Rathian (2800 HP). When the mission first starts you can find Rathalos (black/darker coloring) in area #4 and Rathian (light green in color) in area #5. Both of these enemies will hang out in each area for about a minute before moving to the next one. Normally what I like to do at the start of this mission is to either head for area #9 and fight the dragon that comes here first or to areas 2 or 3 to fight the dragon there. Normally Rathalos goes to the outside areas (4, 2, 3) and Rathian sticks to the areas with more tight corridors like 5 and 9.
Rathalos Hitzones & Weaknesses:
Rathian Hitzones & Weaknesses:
#13 Attack of the Wind Dragon
#13 Attack of the Wind Dragon
Advance Req: No
Unlock: Complete A Giant Dragon Invades 4* Guild Quest
Type: Slaying Quest
Video: Attack of the Wind Dragon Quest Walkthrough (Light Bowgun)
Location: Town
Goal: Defeat Kushala Daora (9000 HP). There are only two locations on this map where you can fight Kushala Daora, areas 2 and 3. In area 3 you can find the Dragonator which will deal massive damage to Kushala if you pull him close enough. Aside from that it's a standard fight against an Elder Dragon. For help with this boss check out my Hunt Preparation Guide as well as my Elder Dragon Weaknesses Guide.
Kushala Daora Hitzones & Weaknesses:

#14 Emperor of Flame
#14 Emperor of Flame
Advance Req: No
Unlock: Complete A Giant Dragon Invades 4* Guild Quest
Type: Slaying Quest
Video: Emperor of Flame Quest Walkthrough (Light Bowgun)
Location: Volcano (Night)
Goal: Defeat Teostra (9000 HP). At the start of this mission you can find the Teostra in area 8, it stays here for about a minute before going to areas 6, 4, 2, 7 and back to 6. I strongly recommend you wait in area 4 for Teostra and start your fight there. This will give you enough time to prepare before the fight (eat your food, drink your drugs, do a little dance). Check out my Hunt Preparation Guide for more information about how to properly prepare for this fight and my Elder Dragon Weaknesses Page if you'd like information about Teostra's weaknesses.
Teostra Hitzones & Weaknesses:
#14 The Sun With Fangs
Advance Req: No
Unlock: Complete A Giant Dragon Invades 4* Guild Quest
Type: Slaying Quest
Video: A Sun With Fangs Quest Walkthrough (Light Bowgun)
Location: Desert (Day)
Goal: Defeat Teostra (9000 HP). When the mission first begins you can find Teostra in area 9. It will hang out here for about a minute before traveling to areas 5, 2, 1, 4, 6, 3, 7 and of course 9. From what I have seen his movements are random but he definitely seems to prefer some locations over others. If you need help with this quest I recommend you check out my Hunt Preparation Guide or my Elder Dragon Weaknesses Guide for more information.
Teostra Hitzones & Weaknesses:
#15 Towards the Silence
#15 Towards the Silence
Advance Req: No
Unlock: Complete A Giant Dragon Invades 4* Guild Quest
Type: Slaying Quest
Video: Towards the Silence Quest Walkthrough (Light Bowgun)
Location: Swamp (Day)
Goal: Defeat Chameleos (9600 HP). When the mission begins you can find Chameleos in area 8. It will hang out here for about a minute before going to areas 6, 4, 2 and 5. From my observations it picks one of these areas at random but it seems to favor areas 6, 4 and 8. One thing to keep in mind is that Chameleos is often invisible so you may not see him right away when visiting one of these areas. My advice is to bring a lot of Paintballs and throw them in random directions until you find him when you know he's in your area. You can tell if he's in your area by using sound and by keeping your eyes open for when his invisibility flickers on and off. If you need additional help fighting Chameleos check out my Hunt Preparation Guide or my Elder Dragon Weaknesses Guide.
Chameleos Hitzones & Weaknesses:

#15 The Elder Dragon of Mist
Advance Req: No
Unlock: Complete A Giant Dragon Invades 4* Guild Quest
Type: Slaying Quest
Video: The Elder Dragon of Mist Quest Walkthrough (Light Bowgun)
Location: Forest & Hills (Day)
Goal: Defeat Chameleos (9600 HP). Bring a lot of Paintballs for this quest because Chameleos can be a bit more annoying than the other Elder Dragons since he often goes invisible. When this mission first starts you can find Chameleos in area 9; you have enough time to get here before he leaves and I strongly recommend you do because you want to mark this boss ASAP so you can easily track him. My advice is to go to area 9 (enter from area 3) and start chucking Paintballs in the big room until you hit him. If he gets away from you then you can check areas 3, 2, 5, 4 and 10 until you find him. Normally I check areas 2 and 3 looking for him since he likes to go there a lot if he isn't in #9. If you need additional help fighting Chameleos check out my Hunt Preparation Guide or my Elder Dragon Weaknesses Guide.
Chameleos Hitzones & Weaknesses:
#16 Two Little Shadows
#16 Two Little Shadows
Advance Req: No
Type: Hunting Quest
Video: Two Little Shadows Quest Walkthrough (Light Bowgun)
Location: Swamp (Night)
Goal: Hunt 2 Khezu (2240 HP). At the start of this mission you can find one Khezu in area 9 and the other in area 3. Both of these monsters will stay in these locations for a couple of minutes before eventually moving to one of the following areas at random: 4, 6, 7, 9 and of course 3. One thing you may notice about these Khezu is they're much smaller than a normal Khezu. They still hit just as hard and have as much HP so don't take them lightly.
Khezu Hitzones & Weaknesses:
#17 A Horde of Congalalas
#17 A Horde of Congalalas
Advance Req: No
Type: Hunting Quest
Video: A Horde of Congalalas Quest Walkthrough (Light Bowgun)
Location: Swamp (Day)
Goal: Hunt at least two Congalalas (2380 HP) before the time is over. For this quest you need to defeat two Congalala and then turn in the Paw Pass Ticket to complete the quest or wait until time runs out. If you fail to defeat at least two Congalala you'll fail the mission. When the mission first begins you can find the Congalala in area 8. It'll hang out here for about a minute before visiting areas 6, 5, 4, 2 and 7. From what I have observed it always visits areas 6, 5, 4 and 2 at the start of the mission in that order.. So I recommend you intercept it in either area 6 or 5. Once the first Congalala is defeated the second one will spawn in Area 8 where you can easily intercept and eliminate it.
Congalala Hitzones & Weaknesses:
#18 The Approaching Gaoren
(Urgent) #18 The Approaching Gaoren
Advance Req: Yes
Type: Slaying Quest
Video: The Approaching Gaoren Quest Walkthrough (Light Bowgun) - Shen Gaoren Attacks & Strats (Hammer)
Location: Fortress
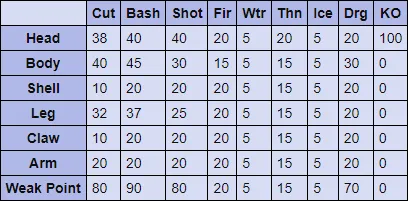
Goal: Defend the Fortress from Shen Gaoren; defeat Shen Gaoren (18000 HP). For this quest defeating Shen Gaoren is optional - all you really need to do is prevent him from destroying the Fortress which can easily be done by attacking him non-stop the entire time and causing him to stumble/fall and be stunned. Until you get better armor and weapons the chance of you actually killing Shen Gaoren is zero - so focus on repelling him at first. For more information about how to properly prepare for this mission I recommend you check out my Hunt Preparation Guide and my Carapaceon Weaknesses Page for more information about Shen's vulnerabilities.
Shen Gaoren Hitzones & Weaknesses:
Guild Quests
- (Low Rank) Level 1
- (Low Rank) Level 2
- (Low Rank) Level 3
- (Low Rank) Level 4
- (Low Rank) Level 5
- (High Rank) Level 6
- (High Rank) Level 7
- (High Rank) Level 8