
Level 7 (High Rank) Guild Quests - MHFU
This page is a list and walkthrough of all the 7 Star Guild Quests in Monster Hunter Freedom Unite & Monster Hunter Freedom 2. Both of these games have mostly the same set of quests which is why this information works for both of them. There are a few quests that are unique to Unite and I will mention them when they come up.
I've included all of the relevant information for each quest on this list such as which zone it takes place in, what type of quest it is, whether or not you're required to complete it to advance and (of course) how to complete the quest. Below is an example that will serve as your Key for this page. If you're confused as to what any of the categories on this page mean take a look at the Key below.
Key:
Name of the Mission
Advance Req: If you are required to beat the mission to progress
Type: The type of mission this is, Gathering, Combat or Hunting
Video: My Youtube Video Walkthrough of this mission
Location: Where this mission takes place
Goal: The objective of this mission
#1 Gathering - Swamp Zone
#1 Gathering - Swamp Zone
Advance Req: No
Type: Gathering Quest
Video: N/A
Location: Swamp (Night)
Goal: Turn in the Paw Pass
#2 Gathering - Forest & Hills
#2 Gathering - Forest and Hills
Advance Req: No
Type: Gathering Quest
Video: N/A
Location: Forest & Hills (Day)
Goal: Turn in the Paw Pass
#3 Gathering - Volcanic Zone
#3 Gathering - Volcanic Zone
Advance Req: No
Type: Gathering Quest
Video: N/A
Location: Volcano (Night)
Goal: Turn in the Paw Pass
#4 Two Roars in the Snow
#4 Two Roars in the Snow
Advance Req: Yes
Type: Hunting Quest
Video: Two Roars in the Snow Quest Walkthrough (Light Bowgun)
Location: Snowy Mountains (Night)
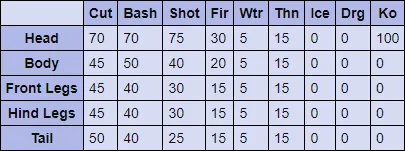
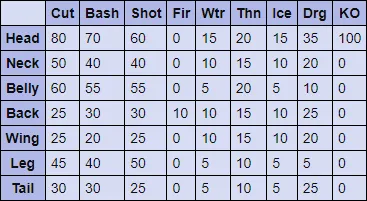
Goal: Hunt two Blangongas (1960 HP). When the mission first begins you can find one Blangonga in area 1 and the other in area 7 on the map. You'll obviously want to engage the one in the first area until it flees to another location. From what I have observed the two Blangongas will go between areas 1, 6, 7, 8 with the occasional 2 and 3 as well. They will always go to area 3 when sufficiently injured, but (in my experience) rarely prior to that. Area 2 you can find them up top in the small location that connects to area 7. My advice is to fight them in area 1, 6, 7 or 8 since you'll have a solid amount of room in each of these areas. Also, you don't want to fight two Blangongas on the same map. If you get two in the same area refresh your Paintballs on them and then wait it out until they split up.
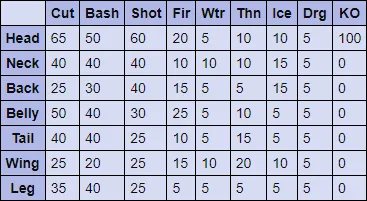
Blangongas Hitzones & Weaknesses:
#5 The King of the Mountains
#5 The King of the Mountains
Advance Req: No
Type: Hunting Quest
Video: The King of the Mountains Quest Walkthrough (Light Bowgun)
Location: Snowy Mountains (Day)
Goal: Hunt the Blangonga (3780 HP). At the start of the mission you can find the Blangonga in area 8 - it will stay here for a minute or two before moving to one of the following areas 1, 2, 3, 6 or 7. Basically, this Blangonga can visit all of the same areas as the 2 Blangonga's from the previous mission.
Blangongas Hitzones & Weaknesses:
#6 The Electrified Wyvern
#6 The Electrified Wyvern
Advance Req: No
Type: Hunting Quest
Video: The Electrified Wyvern Quest Walkthrough (Light Bowgun)
Location: Snowy Mountains (Night)
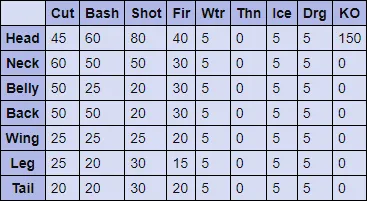
Goal: Hunt the Khezu (4320 HP). You can find the Khezu in area 6 at the start of the mission; it will hang out here for a little bit before switching to one of the following areas 1, 3, 7 or area 8.
Khezu Hitzones & Weaknesses:
#7 Red Shadow in the Swampland
#7 Red Shadow in the Swampland
Advance Req: Yes
Type: Hunting Quest
Video: Red Shadow in the Swampland Quest Walkthrough (Light Bowgun)
Location: Swamp (Day)
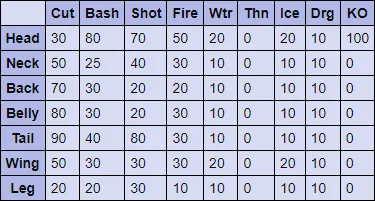
Goal: Hunt the Red Khezu (5220 HP). The Red Khezu is found in area 9 at the start of the mission. It will hang out here for a little bit before moving to one of the following areas 3, 4, 6 and 7.
Red Khezu Hitzones & Weaknesses:

#8 The Poison Gas
#8 The Poison Gas
Advance Req: No
Type: Hunting Quest
Video: The Poison Gas Quest Walkthrough (Light Bowgun)
Location: Jungle (Night)
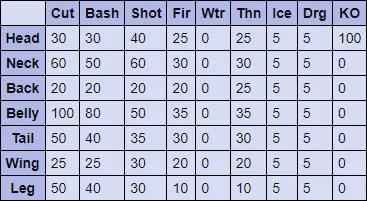
Goal: Hunt the Gypceros (1800 HP) and Purple Gypceros (2100 HP). When the mission begins you can find the Gypceros in area 5 and the Purple Gypceros in area 2. After a few minutes each monster will leave their respective areas and start traveling around the map. My advice is to go to an area you like fighting in and wait for one of them to land. These monsters will visit areas 1, 2, 3, 4, 5, 6, and 9.
Gypceros Hitzones & Weaknesses:

Purple Gypceros Hitzones & Weaknesses:
#9 Dual Plesioth
#9 Dual Plesioth
Advance Req: No
Type: Hunting Quest
Video: Dual Plesioth Quest Walkthrough (Light Bowgun)
Location: Jungle (Day)
Goal: Hunt the Plesioth (3000 HP) and Green Plesioth (3300 HP). The only two locations you can find Plesioths on this map are areas 3 and 4; things can get a bit dicey for this reason because you'll often be fighting two Plesioths at one time during the first part of this quest. Your #1 goal should be to kill 1 Plesioth as fast as possible so that you only have to deal with one.
Green Plesioth Hitzones & Weaknesses:
Plesioth Hitzones & Weaknesses:

#10 Attack of the Rathian
#10 Attack of the Rathian
Advance Req: No
Type: Hunting Quest
Video: Attack of the Rathian Quest Walkthrough (Light Bowgun)
Location: Jungle (Night)
Goal: Hunt the Rathian (5400 HP). When the mission first begins you can find the Rathian in area #3 on the map. It will stay in this area for quite some time before eventually moving to areas 2, 1, 6, 8 and 9.
Rathian Hitzones & Weaknesses:
#11 Water Wyvern in the Desert
#11 Water Wyvern in the Desert
Advance Req: No
Type: Hunting Quest
Video: Water Wyvern in the Desert Quest Walkthrough (Light Bowgun)
Location: Desert (Day)
Goal: Hunt the Plesioth (5400 HP). The only two locations that you can find this Plesioth are in areas 7 and 6 since those are the only locations with big pools of water. Out of these two locations I recommend you fight the Plesioth in area 6 since that is the easier battle arena and it seems like he spends the most time in that area.
Plesioth Hitzones & Weaknesses:
#12 The Underwater Terror
#12 The Underwater Terror
Advance Req: Yes
Type: Hunting Quest
Video: The Underwater Terror Quest Walkthrough (Light Bowgun)
Location: Desert (Day)
Goal: Hunt the Green Plesioth (5940 HP). Much like the previous quest, there are only two locations where you can encounter this monster - areas 6 and 7. I recommend you fight this boss in area 6 since that battle arena is a good size and the Green Plesioth seems to spend more time in that area than in area 7.
Green Plesioth Hitzones & Weaknesses:
#13 An Evening Soaked in Poison
#13 An Evening Soaked in Poison
Advance Req: No
Type: Hunting Quest
Video: An Evening Soaked in Poison Quest Walkthrough (Light Bowgun)
Location: Swamp (Night)
Goal: Hunt the Iodrome (2160 HP). The Idrome is a raptor boss which means it will follow a set path through a couple of areas - all you need to do is intercept it. You can find the Iodrome in area 6 when the mission begins; from area 6 it will travel through areas 6, 8, 4, 5 and finally back to 6.
Iodrome Hitzones & Weaknesses:

#14 Supreme Ruler of the Swamp
#14 Supreme Ruler of the Swamp
Advance Req: No
Type: Hunting Quest
Video: Supreme Ruler of the Swamp Quest Walkthrough (Light Bowgun)
Location: Swamp (Day)
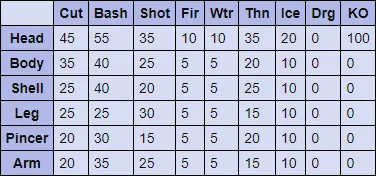
Goal: Hunt the Shogun Ceanataur (4320 HP). You can find the Shogun Ceanataur in area 9 at the start of the mission. It will stay in this location for less than a minute before switching to areas 7, 6, 5, 4, 3 and finally it will return to area 9. From what I have seen it will always follow this same rotation around the map which will make it easier to find. One thing to note is while you're fighting the crab - like all monsters it will run from you at times and when it run froms you it won't follow the same rotation around the map.
Shogun Ceanataur Hitzones & Weaknesses:
#15 The Purple Poison Menace
#15 The Purple Poison Menace
Advance Req: No
Type: Hunting Quest
Video: The Purple Poison Menace Quest Walkthrough (Light Bowgun)
Location: Swamp (Day)
Goal: Hunt the Purple Gypceros (3639 HP). At the start of the mission you will find the Purple Gypceros in area 8 - it will hang out here for about a minute before eventually going to one of the following areas 1, 2, 4, 5, 6 and of course 8.
Purple Gypceros Hitzones & Weaknesses:
#16 Eliminate the Rathalos!
#16 Eliminate the Rathalos!
Advance Req: Yes
Type: Hunting Quest
Video: Eliminate the Rathalos Quest Walkthrough (Light Bowgun)
Location: Forest & Hills (Day)
Goal: Hunt the Rathalos (4320 HP). When the mission begins you can find the Rathalos in area 6, this is the 'den' of the map and also the location the Rathalos will go when it's injured enough. After a few minutes it will move to one of the following areas 2, 3, 4, 6, 9 or area 10. From what I have seen it will pick a location at random and go there - I did not see any pattern to its movements.
Rathalos Hitzones & Weaknesses:

#17 The Shogun's Encampment
#17 The Shogun's Encampment
Advance Req: No
Type: Hunting Quest
Video: The Shogun's Encampment Quest Walkthrough (Light Bowgun)
Location: Volcano (Day)
Goal: Hunt the 2 Shogun Ceanataurs (2400 HP). At the start of this mission you can find one Shogun Ceanataur in area 6 and the other in area 3 - after about a minute they will start moving around to different areas on the map. Each of these crabs can visit the following locations, area 3, 4, 5, 6 and area 7.
Shogun Ceanataur Hitzones & Weaknesses:
#18 Basarios: Unseen Peril
#18 Basarios: Unseen Peril
Advance Req: Yes
Type: Hunting Quest
Video: Basarios: Unseen Peril Quest Walkthrough (Light Bowgun)
Location: Volcano (Day)
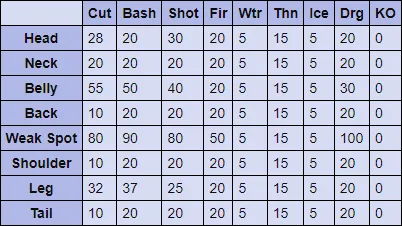
Goal: Hunt the Basarios (3240 HP). You can find the Basarios in area 7 when the mission first begins; it will be hiding underground with only the rock portion protruding from the ground. After some time the Basarios will switch areas to 6, 4, 2 and of course back to 7. His rotation seems to be completely random and he can go to any of the following areas at any time.
Basarios Hitzones & Weaknesses:

#19 Envoy to Disaster
#19 Envoy to Disaster
Advance Req: No
Type: Hunting Quest
Video: Envoy to Disaster Quest Walkthrough (Light Bowgun)
Location: Volcano (Night)
Goal: Slay 20 Remobras. For this mission you can find Remobras in areas 2, 7 and 5 at the start. Once you've eliminated about 12 Remobras they will start spawning in area 6 and 1 as well.
#20 Lao-Shan Lung Draws Near!
#20 Lao-Shan Lung Draws Near!
Advance Req: No
Type: Slaying Quest
Video: Lao-Shan Lung Draws Near Quest Walkthrough (Light Bowgun)
Location: Fortress
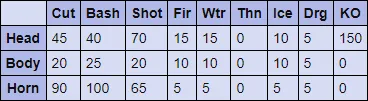
Goal: Defend the Fortress from Lao-Shan Lung (26666 HP); you don't actually have to defeat him to complete this mission. As long as you do not let the Fortress Integrity reach 0% before the 35min timer runs out - you'll achieve victory. As far as defeating Lao-Shan Lung goes, you'll typically need a very good set of gear that synergizes with your weapon and various items depending on what type of character you are playing. I recommend you check out my Hunt Preparation Guide as well as the Elder Dragon Weaknesses pages for more information that can make this fight easier. My advice is to bring no healing items (you can use the ones in the Storage if you need them) and instead fill your inventory with explosives and damage boosting items. Don't forget to do some gathering in the town if you need more bombs or healing items too.
Lao-Shan Lung Hitzones & Weaknesses:
#21 Meeting of the Blangongas
#21 Meeting of the Blangongas
Advance Req: No
Type: Hunting Quest
Video: Meeting of the Blangongas Quest Walkthrough (Light Bowgun)
Location: Snowy Mountains (Night)
Goal: Hunt more than two Blangongas (2520 HP). This quest requires you to kill at least two Blangongas, once they're dead you can either wait til the time runs out or turn in the Paw Pass Ticket to complete the quest. As for the Blangongas, you can find it in area 8 when the mission begins, it will stay here for about a minute before moving to areas 6, 3 and 7. Once it does this rotation it seems to go to a random area after that. After defeating the first Blangonga another will spawn in area 8 and then follow the same rotation.
Blangonga Hitzones & Weaknesses:
#22 The White Brute
#22 The White Brute
Advance Req: No
Type: Slaying Quest
Video: The White Brute Quest Walkthrough (Hammer)
Location: Snowy Mountains (Day)
Goal: Slay the Kirin (4320 HP). When the mission first begins you can find the Kirin in area 6 on the map, it stays in this area for about a minute before going to areas 7, 8 and back to 6. Kirin will follow this same route no matter what.
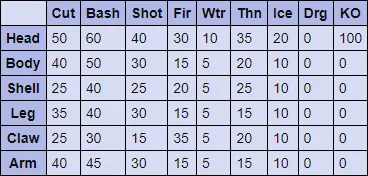
Kirin Hitzones & Weaknesses:
#23 Pricy Mushrooms, Shaka!
#23 Pricy Mushrooms, Shaka!
Advance Req: No
Type: Gathering Quest
Video: Pricy Mushrooms, Shaka Quest Walkthrough (Light Bowgun)
Location: Great Forest (Night)
Goal: Deliver 3 Select Mushrooms. All you need to do for this mission is run around the map and gather in all of the locations that have Mushrooms. Eventually you'll find the 3 Select Mushrooms that you need - once you have them deliver them to complete the mission. You can find Mushroom gathering locations in areas 1, 4, 5, 6 and 7 on this map. Check all of them until you get what you need.
#24 The Big Dirt Nap
#24 The Big Dirt Nap
Advance Req: No
Type: Hunting Quest
Video: The Big Dirt Nap Quest Walkthrough (Light Bowgun)
Location: Great Forest (Night)
Goal: Hunt the Hypnocatrice (3510 HP). The Hypnocatrice starts out in area 4, it will stay here for about a minute before moving to areas 5, 6, 1, 2 and back to 4. Once it is done this initial rotation it will typically go to area 7 and/or pick an area at random.
Hypnocatrice Hitzones & Weaknesses:
#25 Twin Walls of the Jungle
#25 Twin Walls of the Jungle
Advance Req: No
Type: Epic Hunting Quest
Video: Twin Walls of the Jungle Quest Walkthrough (Light Bowgun)
Location: Jungle (Night)
Goal: Hunt all of the Large monsters. For this quest that includes a Blue Yian Kut-ku (2100 HP) and a Rathian (2200 HP). The first monster you have to eliminate is the Blue Yian Kut-ku who can be found in area 6 when the mission first begins. If left undisturbed it will leave this location in about a minute and travel to one of the following areas 4, 5, 3, 2, 1 or 9. His route seems to be random based on my observations. Once defeated the Rathian will spawn next in area 3. It hangs out here for about a minute before going to areas 2, 1, 6, 8 and finally back to 3. Based on everything I have seen the Rathian follows this route every time.
Blue Yian Kut-ku Hitzones & Weaknesses:

Rathian Hitzones & Weaknesses:
#26 The Meeting of Sea and Air
#26 The Meeting of Sea and Air
Advance Req: No
Type: Epic Hunting Quest
Video: The Meeting of Sea and Air Quest Walkthrough (Light Bowgun)
Location: Desert (Day)
Goal: Hunt all of the Large monsters. For this quest that includes a Daimyo Hermitaur (1800 HP) and a Green Plesioth (2640 HP). When the mission begins you can find the Daimyo Hermitaur in area 9, it will hang out here for about one minute before moving to areas 5, 1, 2, 3, 7, 10 and back to 5. Once the Hermitaur completes this route it seems to choose areas at random to go to next. Once you defeat the crab the Plesioth will spawn in area 7, as per usual it will travel back and forth between areas 7 and 6.
Daimyo Hermitaur Hitzones & Weaknesses:
Green Plesioth Hitzones & Weaknesses:
#27 Red Lightning, Violet Blade
#27 Red Lightning, Violet Blade
Advance Req: No
Type: Epic Hunting Quest
Video: Red Lightning, Violet Blade Quest Walkthrough (Light Bowgun)
Location: Swamp (Night)
Goal: Hunt all of the Large monsters. For this quest that includes a Red Khezu (2700 HP) and a Shogun Ceanataur (2240 HP). At the start of this mission you can find the Red Khezu in area 9. It hangs out here for about a minute before going to areas 3, 4, 6, 7 and back to 9. Once the Red Khezu has been defeated the Shogun Ceanataur will spawn in area 9 and start its patrol route through 7, 6, 5, 4 and 3. After reaching area 3 it will turn around and go back through each area until it gets to 9 again. After it's finished that patrol route it seems as if it goes to random locations.
Red Khezu Hitzones & Weaknesses:
Shogun Ceanataur Hitzones & Weaknesses:
Guild Quests
- (Low Rank) Level 1
- (Low Rank) Level 2
- (Low Rank) Level 3
- (Low Rank) Level 4
- (Low Rank) Level 5
- (High Rank) Level 6
- (High Rank) Level 7
- (High Rank) Level 8