
Level 2 (Low Rank) Guild Quests - MHFU
This page is a list and walkthrough of all the 2 Star Guild Quests in Monster Hunter Freedom Unite & Monster Hunter Freedom 2. Both of these games have mostly the same set of quests which is why this information works for both of them. There are a few quests that are unique to Unite and I will mention them when they come up.
I've included all of the relevant information for each quest on this list such as which zone it takes place in, what type of quest it is, whether or not you're required to complete it to advance and (of course) how to complete the quest. Below is an example that will serve as your Key for this page. If you're confused as to what any of the categories on this page mean take a look at the Key below.
Key:
Name of the Mission
Advance Req: If you are required to beat the mission to progress
Type: The type of mission this is, Gathering, Combat or Hunting
Video: My Youtube Video Walkthrough of this mission
Location: Where this mission takes place
Goal: The objective of this mission
#1 The Shadow in the Mountains!
#1 The Shadow in the Mountains!
Advance Req: No
Type: Hunting Quest
Video: The Shadow in the Mountains Quest Walkthrough (Light Bowgun)
Location: Snowy Mountains (Night)
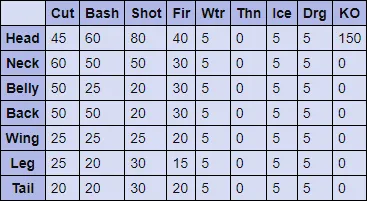
Goal: Hunt the Khezu (1920 HP). The Khezu travels between areas 3, 6, 7 and 8. More often than not I find the Khezu in area #6 at the start of the mission. This also seems to be where he spends most of his time, once you fight him a little bit he commonly retreats to his lair (area #3).
Khezu Hitzones & Weaknesses:
#2 The King of the Mountains!
#2 The King of the Mountains!
Advance Req: No
Type: Hunting Quest
Video: The King of the Mountains Quest Walkthrough (Light Bowgun)
Location: Snowy Mountains (Day)
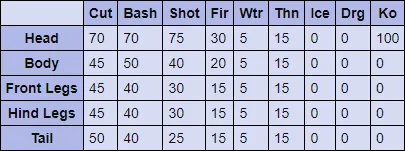
Goal: Hunt Blangonga (1680 HP). Normally at the start of this mission you can find the Blangonga in area #8, he will leave here after a few minutes and travel between areas 3, 6 and 7. From what I have seen he spends a few minutes in each area before moving to the next.
Blangonga Hitzones & Weaknesses:
#3 A Swarm of Hermitaurs!
#3 A Swarm of Hermitaurs!
Advance Req: No
Type: Slaying Quest
Video: A Swarm of Hermitaurs Quest Walkthrough (Light Bowgun)
Location: Jungle (Day)
Goal: Slay 10 Hermitaurs. All you need to do for this quest is to defeat 10 Hermitaurs on the Jungle map. You can find Hermitaurs in areas 4, 3 and 10; sometimes the Hermitaurs will be buried under the ground in these areas too so keep an eye out for any dust clouds above the ground. They can be hard to see, simply run overtop of them and you'll trigger a Hermitaur to unburrow itself. In order to get all 10 Hermitaurs for this quest you will need to visit each area multiple times for respawns.
#4 Water Wyvern in the Desert!
#4 Water Wyvern in the Desert!
Advance Req: No
Type: Hunting Quest
Video: Water Wyvern in the Desert Quest Walkthrough (Light Bowgun)
Location: Desert (Day)
Goal: Hunt the Plesioth (2400 HP). You can only flind the Plesioth in areas #6 and 7 on this map, he swims around in the deep body of water in both of these locations. In order to bring him out of the water you'll need to throw an object at him or hit him with some sort of ranged weapon. The best time to do this is when the dorsel fin is sticking out of the water and he is near the surface.
Plesioth Hitzones & Weaknesses:
#5 Gypceros: Venomous Terror!
#5 Gypceros: Venomous Terror!
Advance Req: No
Type: Hunting Quest
Video: Gypceros: Venomous Terror Quest Walkthrough (Light Bowgun)
Location: Swamp (Day)
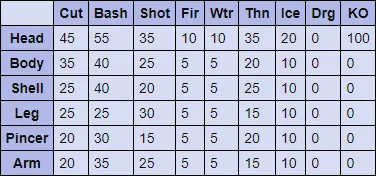
Goal: Hunt Gypceros (1440 HP). You can find the Gypceros in area #8 at the start of this mission, he will hang out here for a minute or two before starting his patrol route which takes him through every outside area on this map. For clarification those areas are 1, 2, 4, 5, 6 and of course area #8.
Gypceros Hitzones & Weaknesses:

#6 Supreme Ruler of the Swamp!
#6 Supreme Ruler of the Swamp!
Advance Req: No
Type: Hunting Quest
Video: Supreme Ruler of the Swamp Quest Walkthrough (Light Bowgun)
Location: Swamp (Night)
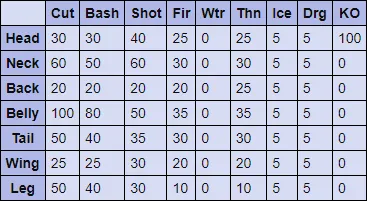
Goal: Hunt the Shogun Ceanataur (1920 HP). The Shogun Ceanataur normally starts in area #9 and then travels between areas 3, 4, 5, 6 and 7 in what seems to be a random order.
Shogun Ceanataur Hitzones & Weaknesses:
#7 Slay the Great Kut-ku!
#7 Slay the Great Kut-ku!
Advance Req: No
Type: Hunting Quest
Video: Slay the Great Kut-ku Quest Walkthrough (Light Bowgun)
Location: Forest & Hills (Day)
Goal: Hunt the Yian Kut-ku (960 HP). The Yian Kut-ku stays in area #9 at the start for a long time, he'll eventually leave and start his patrol which takes him through areas 2, 3, 4 and 5.
Yian Kut-ku Hitzones & Weaknesses:
#8 Eliminate the Rathalos!
#8 Eliminate the Rathalos!
Advance Req: No
Type: Hunting Quest
Video: Eliminate the Rathalos Quest Walkthrough (Light Bowgun)
Location: Forest & Hills (Day)
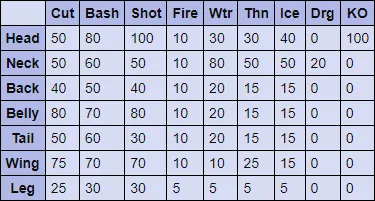
Goal: Hunt the Rathalos (2240 HP). The Rathalos starts out in area #5 and he'll stay here for a little bit of time. Eventually he'll move to areas 6, 9, 3, and 2 before going back to 5. I've seen him do this rotation a few times so I feel confident in saying that this is his normal rotation for the first 10 minutes or so of the mission.
Rathalos Hitzones & Weaknesses:

#9 Attack of the Rathian!
#9 Attack of the Rathian!
Advance Req: No
Type: Hunting Quest
Video: Attack of the Rathian Quest Walkthrough (Light Bowgun)
Location: Jungle (Day)
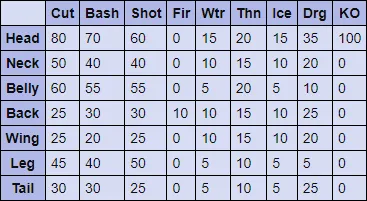
Goal: Hunt the Rathian (2400 HP). At the start in area #3 and then goes to 7, 4, 5, 1, 2 and finally back to 3. The Rathian stays in each area for a long time, several minutes would be my guess.
Rathian Hitzones & Weaknesses:
Guild Quests
- (Low Rank) Level 1
- (Low Rank) Level 2
- (Low Rank) Level 3
- (Low Rank) Level 4
- (Low Rank) Level 5
- (High Rank) Level 6
- (High Rank) Level 7
- (High Rank) Level 8