
Level 1 (Low Rank) Guild Quests - MHFU
This page is a list and walkthrough of all the 1 Star Guild Quests in Monster Hunter Freedom Unite & Monster Hunter Freedom 2. Both of these games have mostly the same set of quests which is why this information works for both of them. There are a few quests that are unique to Unite and I will mention them when they come up.
I've included all of the relevant information for each quest on this list such as which zone it takes place in, what type of quest it is, whether or not you're required to complete it to advance and (of course) how to complete the quest. Below is an example that will serve as your Key for this page. If you're confused as to what any of the categories on this page mean take a look at the Key below.
Key:
Name of the Mission
Advance Req: If you are required to beat the mission to progress
Type: The type of mission this is, Gathering, Combat or Hunting
Video: My Youtube Video Walkthrough of this mission
Location: Where this mission takes place
Goal: The objective of this mission
#1 A True Foe - The Giadrome!
#1 A True Foe - The Giadrome!
Advance Req: No
Type: Hunting Quest
Video: A True Foe - The Giadrome Quest Walkthrough (Bow)
Location: Snowy Mountains (Day)
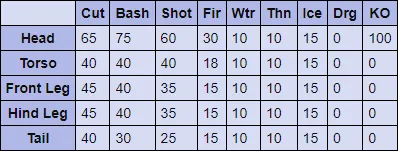
Goal: Hunt the Giadrome (640 HP). The Giadrome runs a circuit between areas 6, 7 and 8. He runs through each of these areas pretty quickly and unless you interrupt him with a trap or combat he won't stop.
Giadrome Hitzones & Weaknesses:

#2 Reckless Bulldrome Hunter!
#2 Reckless Bulldrome Hunter!
Advance Req: No
Type: Hunting Quest
Video: Reckless Bulldrome Hunter Quest Walkthrough (Light Bowgun)
Location: Snowy Mountains (Night)
Goal: Hunt the Bulldrome (600 HP). The Bulldrome can be found in areas 6, 7 and 8 on this map. From what I have watched he will move through each of these areas very slowly and he seems to start the mission in area #7.
Bulldrome Hitzones & Weaknesses:

#3 A Pack of Blangos!
#3 A Pack of Blangos!
Advance Req: No
Type: Slaying Quest
Video: A Pack of Blangos Quest Walkthrough (Light Bowgun)
Location: Snowy Mountains (Day)
Goal: Defeat 15 Blangos. When doing this quest you can find Blangos in the mountain areas (6, 7 and 8). Clear out each area then return to check for respawns, once they're all dead proceed inside to areas 5 and 3 where you can find the remaining Blangos.
#4 Mountain Herb Picking!
#4 Mountain Herb Picking!
Advance Req: No
Type: Gathering Quest
Video: Mountain Herb Picking Quest Walkthrough
Location: Snowy Mountains (Day)
Goal: Deliver 20 Mountain Herbs. This quest is pretty straight forward, just run around the entire Snowy Mountains and collect 20 Mountain Herbs from the Herb gathering locations. Watch my video walkthrough if you need to see where all of these locations are.
#5 Rarest of the Rare Beasts!
#5 Rarest of the Rare Beasts!
Advance Req: No
Type: Hunting Quest
Video: Rarest of the Rare Beasts Quest Walkthrough (Light Bowgun)
Location: Jungle (Night)
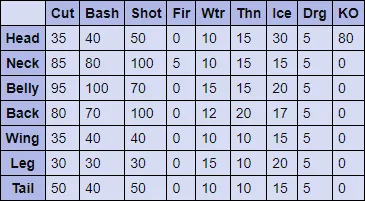
Goal: Hunt the Congalala (1400 HP). The Congalala is typically found in area #3 at the start of the mission, he does however roam between areas 3, 9, 6 and 1. From what I have seen the Congalala stays in each area for a long time (couple of minutes) before switching.
Congalala Hitzones & Weaknesses:
#6 Hunt the Rare Forest Congas!
#6 Hunt the Rare Forest Congas!
Advance Req: No
Type: Slaying Quest
Video: Hunt the Rare Forest Congas Quest Walkthrough (Light Bowgun)
Location: Jungle (Day)
Goal: Defeat 15 Congas. You can find Congas in areas 2, 5 and 10 at the start of this mission. After you kill enough Congas (or enough time passes) they will start spawning in area #3. Don't forget to check each of these 4 areas for respawns too as once you clear all of the Congas in some of the areas they will respawn.
#7 A Mushroom Goldrush!
#7 A Mushroom Goldrush!
Advance Req: No
Type: Gathering Quest
Video: A Mushroom Goldrush Quest Walkthrough
Location: Jungle (Day)
Goal: Deliver 20 Special Mushrooms. All you need to do for this mission is run around the map gathering in the various mushroom areas until you get 20 Special Mushrooms. If for some reason you don't get all 20 from the gathering locations you can also kill the boars on this map and skin them for Special Mushrooms.
#8 The Land Shark!
#8 The Land Shark!
Advance Req: No
Type: Hunting Quest
Video: The Land Shark Quest Walkthrough (Light Bowgun)
Location: Desert (Night)
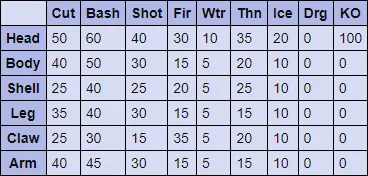
Goal: Hunt the Cephadrome (1679 HP). The Cephadrome is an underground monster that travels back and forth between areas 2, 1 and 5. He spends most of his time in areas 2 and 5; area 1 he travels through very breifly - but it is possible to catch him here (although I would say it's not a good spot to fight him). In order to bring the Cephadrome out of the ground you can use a Sonic Bomb or an attack like Crag S that will hit his dorsel fin when that is above ground.
Cephadrome Hitzones & Weaknesses:
#9 The Giant Enemy Crab!
#9 The Giant Enemy Crab!
Advance Req: No
Type: Hunting Quest
Video: The Giant Enemy Crab Quest Walkthrough (Light Bowgun)
Location: Desert (Day)
Goal: Hunt the Daimyo Hermitaur (1200 HP). At the very start of the mission you can find the Daimyo Hermitaur in area #9, he moves to area #5 quickly after which is normally where I go at the start of the mission. Daimyo hangs out in area #5 for a bit before making a circuit through this map. He travels from area 5 to 1, 2, 3, 7, 10 and then back to area #5. From what I have seen this order is always followed by the boss.
Daimyo Hermitaur Hitzones & Weaknesses:
#9 The Lady Gourmet!
#9 The Lady Gourmet!
Advance Req: No
Type: Gathering Quest
Video: The Lady Gourmet Quest Walkthrough (Light Bowgun)
Location: Desert (Day)
Goal: Deliver 8 Piscine Livers. This quest requires us to defeat Cephalos enemies which are the underground wyverns you can find in 'desert' areas (2, 1 and 5) of the Desert map. In order to reliably pull the Cephalos enemies out of the ground you need to hit them with a Sonic Bomb. You can also hit them with some regular attacks and that will pull them out of the ground too, bombs and Crag S/Pellet S being some of the normal attacks that work well.
Guild Quests
- (Low Rank) Level 1
- (Low Rank) Level 2
- (Low Rank) Level 3
- (Low Rank) Level 4
- (Low Rank) Level 5
- (High Rank) Level 6
- (High Rank) Level 7
- (High Rank) Level 8