
Level 4 (Low Rank) Guild Quests - MHFU
This page is a list and walkthrough of all the 4 Star Guild Quests in Monster Hunter Freedom Unite & Monster Hunter Freedom 2. Both of these games have mostly the same set of quests which is why this information works for both of them. There are a few quests that are unique to Unite and I will mention them when they come up.
I've included all of the relevant information for each quest on this list such as which zone it takes place in, what type of quest it is, whether or not you're required to complete it to advance and (of course) how to complete the quest. Below is an example that will serve as your Key for this page. If you're confused as to what any of the categories on this page mean take a look at the Key below.
Key:
Name of the Mission
Advance Req: If you are required to beat the mission to progress
Type: The type of mission this is, Gathering, Combat or Hunting
Video: My Youtube Video Walkthrough of this mission
Location: Where this mission takes place
Goal: The objective of this mission
#1 Gathering - Swamp Zone
#1 Gathering - Swamp Zone
Advance Req: No
Type: Gathering Quest
Video: N/A
Location: Swamp (Day)
Goal: Return the Paw Pass.
#2 Gathering - Forest and Hills
#2 Gathering - Forest and Hills
Advance Req: No
Type: Gathering Quest
Video: N/A
Location: Forest & Hills (Day)
Goal: Return the Paw Pass.
#3 Gathering - Volcanic Zone
#3 Gathering - Volcanic Zone
Advance Req: No
Type: Gathering Quest
Video: N/A
Location: Volcano (Day)
Goal: Return the Paw Pass.
#4 The Ruler of the Snow
#4 The Ruler of the Snow
Advance Req: No
Type: Hunting Quest
Video: The Ruler of the Snow Quest Walkthrough (Light Bowgun)
Location: Snowy Mountains (Night)
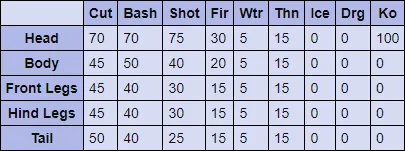
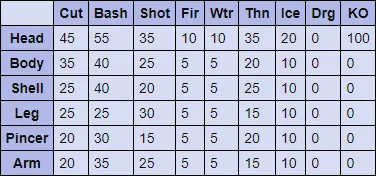
Goal: Hunt the Blangonga (1960 HP). At the start of this mission you can find the Blangonga in area #8 in the mountains. He'll stay here for about a minute before switching randomly to one of the following areas, 1, 2, 3, 6 and/or 7. When wounded he'll retreat to area #3 to sleep which is the monster den on this map.
Blangonga Hitzones & Weaknesses:
#5 The Shadow in the Cave
#5 The Shadow in the Cave
Advance Req: No
Type: Hunting Quest
Video: The Shadow in the Cave Quest Walkthrough (Light Bowgun)
Location: Swamp (Night)
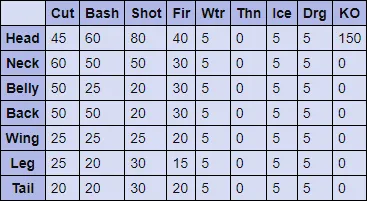
Goal: Hunt the Khezu (3980 HP). When the mission begins you can find the Khezu in area 9 on the map. After a minute or so he will move to one of the following areas at random, 3, 4, 6 or 7. From what I have seen he normally goes to area 3 or 7 first, I typically find him at the start of the mission in one of these two locations crawling on the ceiling.
Khezu Hitzones & Weaknesses:
#6 Red Shadow in the Snow
#6 Red Shadow in the Snow
Advance Req: No
Unlock: Complete The Shadow in the Cave to unlock this mission.
Type: Hunting Quest
Video: Red Shadow in the Snow Quest Walkthrough (Light Bowgun)
Location: Snowy Mountains (Day)
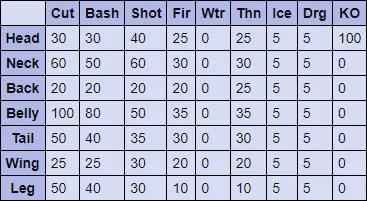
Goal: Hunt the Red Khezu (3960 HP). At the start of this mission you can find the Red Khezu in area #6 on the map. It will hang out here for a few minutes before moving to one of the follow areas at random 3, 1, 7 or 8.
Red Khezu Hitzones & Weaknesses:

#7 Blango Slaying Tactics
#7 Blango Slaying Tactics
Advance Req: No
Type: Slaying Quest
Video: Blango Slaying Tactics Quest Walkthrough (Light Bowgun)
Location: Snowy Mountains (Day)
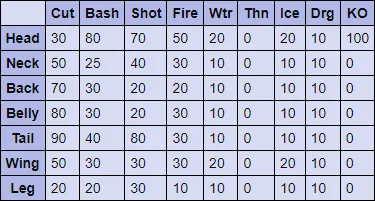
Goal: Slay 20 Blangos. At the start of the mission you can find Blangos in areas 3, 6, 7 and 8 - once you clear out each of these locations Blangos will spawn in area 5; clear this location twice to finish the mission.
#8 The Subterranean Glutton
#8 The Subterranean Glutton
Advance Req: No
Type: Gathering Quest
Video: The Subterranean Glutton Quest Walkthrough (Light Bowgun)
Location: Snowy Mountains (Night)
Goal: Deliver 5 Khezu Whelps. You can find Khezu Whelps in area #8 on this map, there will be a small hole you can crawl through which will let you climb up to the peak which has a single mining location. You can only carry a single Khezu Whelp at a time so it's recommended you bring a Farcaster item to save some time.
#9 Master of the Giant Lake
#9 Master of the Giant Lake
Advance Req: Yes
Type: Hunting Quest
Video: Master of the Giant Lake Quest Walkthrough (Light Bowgun)
Location: Jungle (Night)
Goal: Hunt the Plesioth (4400 HP). The only two locations that you can find this boss are in areas 3 and 4, he will swim around in the deep ocean water. You will have to wait until his dorsel fin is sticking out of the water to hit him which will begin the fight. Alternatively, you can wait until he gets close enough to show and he'll usually agro you due to proximity.
Plesioth Hitzones & Weaknesses:

#10 The Pink Fur Party
#10 The Pink Fur Party
Advance Req: No
Type: Slaying Quest
Video: The Pink Fur Party Quest Walkthrough (Light Bowgun)
Location: Jungle (Day)
Goal: Slay 20 Congas. When this mission first begins you can find Congas in areas 2, 3, 5 and 9. Once you've defeated most of the Congas that you need they will start spawning in area 10 too, this is where you can get the final few that you will need.
#11 The Hidden Jungle Clouds
#11 The Hidden Jungle Clouds
Advance Req: No
Type: Slaying Quest
Video: The Hidden Jungle Clouds Quest Walkthrough (Light Bowgun)
Location: Jungle (Night)
Goal: Slay 50 Hornetaurs. Hornetaurs are the small insects that look like grasshoppers and crawl on the ground. You can find these enemies in areas 1, 2, 3, 5, 6, 7 and area 9. I recommend you spend a bit of time in each area because you'll have to clear out all of the Hornetaurs plus any respawns - there are exactly 50 Hornetaurs in this mission so getting every last one is important!
#12 The Underwater Terror
#12 The Underwater Terror
Advance Req: No
Unlock: To unlock this quest you need to complete the Master of the Giant Lake mission
Type: Hunting Quest
Video: The Underwater Terror Quest Walkthrough (Light Bowgun)
Location: Desert (Day)
Goal: Hunt the Green Plesioth (5060 HP). You can find the Green Plesioth in one of two locations on this map, area 7 or area 6. Both of these locations have deep bodies of water that the Plesioth swims around in. In order to start the fight with the Plesioth you'll need to hit his dorsel fin that sticks out of the water with an item or weapon. Alternatively, you can wait until he gets close enough to land to agro you from range... that could take awhile though and isn't recommended.
Green Plesioth Hitzones & Weaknesses:
#13 Evening Hermitaur Sonata
#13 Evening Hermitaur Sonata
Advance Req: Yes
Type: Slaying Quest
Video: Evening Hermitaur Sonata Quest Walkthrough (Light Bowgun)
Location: Desert (Night)
Goal: Slay 20 Hermitaurs. There are Hermitaur enemies in areas 1, 2, 5, and 9 at the start of the mission. Normally I find most of the Hermitaurs that I need in area #5, keep exiting and entering the area to spawn more. Also, pay attention to the dust clouds above the ground because that will let you know that a crab is buried there. At the end of this mission Hermitaurs will start to spawn in area #10, this is where you will find the last few that you need.
#14 The Purple Poison Menace
#14 The Purple Poison Menace
Advance Req: No
Unlock: To unlock this quest you must complete Chase the Poison Gypceros
Type: Hunting Quest
Video: The Purple Poison Menace Quest Walkthrough (Light Bowgun)
Location: Swamp (Night)
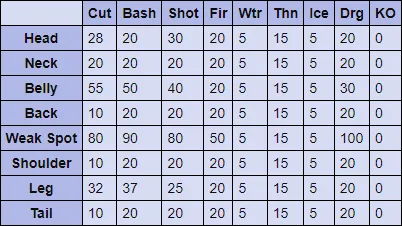
Goal: Hunt the Purple Gypceros (3080 HP). When the mission starts you can find this boss in area #8 on the map. After about a minute he will move at random to one of the following areas 1, 2, 4, 5 or 6.
Purple Gypceros Hitzones & Weaknesses:
#15 Pincer through the Sky
#15 Pincer through the Sky
Advance Req: Yes
Type: Hunting Quest
Video: Pincer through the Sky Quest Walkthrough (Light Bowgun)
Location: Swamp (Day)
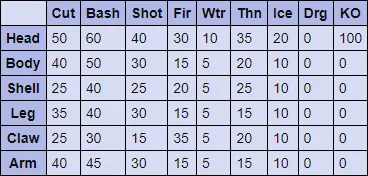
Goal: Hunt the Shogun Ceanataur (3520 HP). You can find the Shogun Ceanataur in area #9 at the start of this mission. It only stays in this area for about a minute before starting its patrol route which goes through areas 7, 6, 5, 4, 3 and back to 9.
Shogun Ceanataur Hitzones & Weaknesses:
#16 Chase the Poison Gypceros!
#16 Chase the Poison Gypceros!
Advance Req: No
Type: Hunting Quest
Video: Chase the Poison Gypceros Quest Walkthrough (Light Bowgun)
Location: Swamp (Day)
Goal: Hunt the Gypceros (2880 HP). The first spot you can find the Gypceros in is area #8 at the start of the mission. After about a minute it will leave here and randomly pick one of the following areas to visit next; 4, 2, 1, 5, or area 6. It spends about one minute in each area before choosing another and flying there.
Gypceros Hitzones & Weaknesses:

#17 Trouble in the Forest
#17 Trouble in the Forest
Advance Req: Yes
Type: Slaying Quest
Video: Trouble in the Forest Quest Walkthrough (Light Bowgun)
Location: Forest & Hills (Day)
Goal: Slay 20 Bullfangos. You can find Bullfangos in areas 6, 8, 9, 10 and 11. After you clear out each of these areas make sure to visit them again for respawns.
#18 Seeking the Strange Mask
#18 Seeking the Strange Mask
Advance Req: No
Type: Hunting Quest
Video: Seeking the Strange Mask Quest Walkthrough (Light Bowgun)
Location: Forest & Hills (Day)
Goal: Slay 10 Shakalakas. The Shakalaka enemies are commonly found hiding under bright red mushrooms throughout this map. When you approach a mushroom the Shakalaka will jump out of the ground and attack you, defeat it and it'll burrow its entire body except the head. I found that for this quest to be weirdly random. Sometimes you have to visit each area in a specific order and there seems to be only one or two Shakalakas active on the map at any given time. For example, Area 10 has two mushrooms next to each other and I have had both activate at the same time before and both activate at different times. I normally go to areas 1, 8, 10, 11, 3, 9 and then to 4. Return to area 10 for another Shakala and then area 9 for another too. You should be 9/10 Shalakaka at this point, the final one that's remaining is found in area #5.
#19 The Ioprey Leader
#19 The Ioprey Leader
Advance Req: Yes
Type: Hunting Quest
Video: The Ioprey Leader Quest Walkthrough (Light Bowgun)
Location: Volcano (Night)
Goal: Hunt the Iodrome (1840 HP). Iodrome is a raptor boss which means it has a static start position and a predictable patrol route. You can find this Iodrome in area 7 at the start of the mission and it goes through areas 3, 5 and 6 before returning to area #7 and starting the circuit all over again.
Iodrome Hitzones & Weaknesses:

#20 Commander in the Flames
#20 Commander in the Flames
Advance Req: No
Type: Hunting Quest
Video: Commander in the Flames Quest Walkthrough (Light Bowgun)
Location: Volcano (Night)
Goal: Hunt the Shogun Ceanataur (3520 HP). You can find the Shogun Ceanataur in area #6 at the start of the mission, he hangs out here for about a minute before starting his patrol route. From what I have seen his patrol route is always the same, he will go to areas 7, 3, 4, 5 and then back to 6.
Shogun Ceanataur Hitzones & Weaknesses:
#21 Basarios: Unseen Peril
#21 Basarios: Unseen Peril
Advance Req: No
Type: Hunting Quest
Video: Basarios Unseen Peril Quest Walkthrough (Light Bowgun)
Location: Volcano (Night)
Goal: Hunt the Basarios (2640 HP). At the start of this mission you can always find the Basarios in area #7; he will stay here for a few minutes so you have plenty of time to get here. Eventually Basarios will leave and travel to areas 6, 4 or 2 - which area he chooses is random from what I have seen.
Basarios Hitzones & Weaknesses:

#22 A Band of Ceanataurs
#22 A Band of Ceanataurs
Advance Req: No
Type: Slaying Quest
Video: A Band of Ceanataurs Quest Walkthrough (Light Bowgun)
Location: Volcano (Day)
Goal: Slay 20 Ceanataurs. When this mission first starts you can find Ceanataurs in areas 2, 7, 3 and 4. After clearing out all of the crabs from each of these areas other enemies will start to spawn here. When this happens you'll want to visit area #6 which will now have Ceantaurs spawning there.
#23 Great Ore Discovery
#23 Great Ore Discovery
Advance Req: No
Type: Gathering Quest
Video: Great Ore Discovery Quest Walkthrough (Light Bowgun)
Location: Volcano (Day)
Goal: Deliver 20 pieces of Coal. You can mine Coal from almost every mining location on this map. I recommend you visit areas 4, 5, 6, and 8 during this quest primarily; you'll find Coal in areas 4, 5 and 6. Area #8 you'll find Ruststones as well as other valuable mid level ores - this area is always worth going out of your way for.
#24 A Giant Dragon Invades!
#24 A Giant Dragon Invades!
Advance Req: No
Unlock: Complete all 3 Star and 4 Star Hunting Quests to unlock this one
Type: Slaying Quest
Video: A Giant Dragon Invades Quest Walkthrough (Light Bowgun)
Location: Fortress
Goal: Defend the Fortress from Lao-Shan Lung (18666 HP); to complete this mission all you need to do is make sure the Fortress integrity does not reach 0. For right now I recommend you don't worry about actually killing Lao-Shan Lung, wait until you get better weapons later in the game then come back to kill him. If you need more help preparing for this quest check out my Hunt Preparation Guide, that will tell you what items you should bring for quests like this. For more information about Lao-Shan Lung and his weaknesses check out my Elder Dragon Weaknesses Guide.
Lao-Shan Lung Hitzones & Weaknesses:
#25 The Meeting of Daimyo
#25 The Meeting of Daimyo
Advance Req: No
Type: Hunting Quest
Video: The Meeting of Daimyo Quest Walkthrough (Light Bowgun)
Location: Jungle (Day)
Goal: Hunt more than 2 Daimyo Hermitaurs (2040 HP), once you've killed two wait until the time is up or deliver the Paw Pass Ticket. From what I have seen all of the Daimyo Hermitaurs spawn in area #10 (the area at the northern most point on the map). They spend about a minute in area 10 before moving down to area #3 which is where I typically fight them all.
Daimyo Hermitaur Hitzones & Weaknesses:
#26 Go Fish Goldenfish!
#26 Go Fish Goldenfish!
Advance Req: No
Type: Hunting Quest
Video: Where to catch Goldenfish In Desert
Location: Desert (Day)
Goal: Deliver 8 Goldenfish. You can catch Goldenfish in area 6 of the Desert map. Since this mission requires us to catch a total of 8 Goldenfish I recommend you do the Goldenfish Bait method which involves making bait that will exclusively catch Goldenfish. You can make this bait by combining Snakebee Larva and a Firefly; I recommend you bring a full stack of this bait as well as a full stack of Worms and Fireflies with you when doing this quest. As I always say for the Goldenfish mission, you can do it one of two ways. You can keep leaving and entering the area to check if a Goldenfish has spawned in the pool of water or you can fish non-stop until one spawns and catch it that way. Fishing non-stop for 8 Goldenfish with limited bait may not work though, which is why I recommend both baits for this quest.
(Urgent) #27 Absolute Power
(Urgent) #27 Absolute Power
Advance Req: Yes
Type: Hunting Quest
Video: Absolute Power Quest Walkthrough (Light Bowgun)
Location: Snowy Mountains (Day)
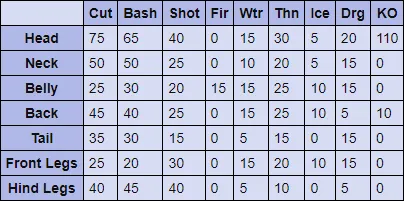
Goal: Hunt the Tigrex (4600 HP). You can find Tigrex in area #8 at the start of this mission. He'll hang out here for about a minute before switching to areas 1, 3, 6 or 7.
Tigrex Hitzones & Weaknesses:
Guild Quests
- (Low Rank) Level 1
- (Low Rank) Level 2
- (Low Rank) Level 3
- (Low Rank) Level 4
- (Low Rank) Level 5
- (High Rank) Level 6
- (High Rank) Level 7
- (High Rank) Level 8