
Level 3 (Low Rank) Guild Quests - MHFU
This page is a list and walkthrough of all the 3 Star Guild Quests in Monster Hunter Freedom Unite & Monster Hunter Freedom 2. Both of these games have mostly the same set of quests which is why this information works for both of them. There are a few quests that are unique to Unite and I will mention them when they come up.
I've included all of the relevant information for each quest on this list such as which zone it takes place in, what type of quest it is, whether or not you're required to complete it to advance and (of course) how to complete the quest. Below is an example that will serve as your Key for this page. If you're confused as to what any of the categories on this page mean take a look at the Key below.
Key:
Name of the Mission
Advance Req: If you are required to beat the mission to progress
Type: The type of mission this is, Gathering, Combat or Hunting
Video: My Youtube Video Walkthrough of this mission
Location: Where this mission takes place
Goal: The objective of this mission
#1 Gathering - Snowy Mountains
#1 Gathering - Snowy Mountains
Advance Req: No
Type: Gathering Quest
Video: N/A
Location: Snowy Mountains (Day)
Goal: Deliver the Paw Pass Ticket
#2 Gathering - Jungle Zone
#2 Gathering - Jungle Zone
Advance Req: No
Type: Gathering Quest
Video: N/A
Location: Jungle (Day)
Goal: Deliver the Paw Pass Ticket
#3 Gathering - Desert Zone
#3 Gathering - Desert Zone
Advance Req: No
Type: Gathering Quest
Video: N/A
Location: Desert (Day)
Goal: Deliver the Paw Pass Ticket
#4 Giadrome Assault
#4 Giadrome Assault
Advance Req: Yes
Type: Hunting Quest
Video: Giadrome Assault Quest Walkthrough (Light Bowgun)
Location: Snowy Mountains (Night)
Goal: Hunt the Giadrome (839 HP). The Giadrome is a raptor boss and like all raptor bosses it will always start in one location on the map and then run a circuit through a few areas before returning to its start location. Giadrome's start location is area #8 and from there it goes through 7, 6 and back to area 8.
Giadrome Hitzones & Weaknesses:

#5 The Mountain Roughrider
#5 The Mountain Roughrider
Advance Req: No
Type: Hunting Quest
Video: The Mountain Roughrider Quest Walkthrough (Light Bowgun)
Location: Snowy Mountains (Day)
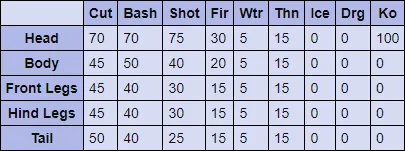
Goal: Hunt the Bulldrome (1260 HP). When the quest starts you can find the Bulldrome in area #7 on the map. He will stay in this location for about a minute or so before moving to either area #6 or #8.
Bulldrome Hitzones & Weaknesses:

#6 Slay the Giaprey
#6 Slay the Giaprey!
Advance Req: No
Type: Slaying Quest
Video: Slay the Giaprey Quest Walkthrough (Light Bowgun)
Location: Snowy Mountains (Day)
Goal: Slay 20 Giaprey. At the start of the mission you can find raptors in areas 3, 5, 6, 7 and 8. Clear each area out then circle back for respawns; when you kill all of the raptors in one area Blangos will spawn instead. After you clear all of the raptors in each of these areas visit area #2 and you'll find the last few you need for the quest.
#7 Find the Mountain Herbs!
#7 Find the Mountain Herbs!
Advance Req: No
Type: Gathering Quest
Video: Find the Mountain Herbs Quest Walkthrough (Light Bowgun)
Location: Snowy Mountains (Night)
Goal: Deliver 20 Mountain Herbs
#8 Hunt Down the Velocidrome!
#8 Hunt Down the Velocidrome!
Advance Req: No
Type: Hunting Quest
Video: Hunt Down the Velocidrome Quest Walkthrough (Light Bowgun)
Location: Jungle (Night)
Goal: Hunt the Velocidrome (839 HP). The Velocidrome is a raptor which means it has a static spawn location and will run a circuit through certain areas on the map. At the start of the mission the Velocidrome is found in area #8, he'll leave here shortly and go to areas 6, 5, 7, 3 and back to area 8. My recommendation is to intercept him in area #5 at the start of the mission.
Velocidrome Hitzones & Weaknesses:

#9 Blue Menace of the Jungle
#9 Blue Menace of the Jungle
Advance Req: No
Type: Hunting Quest
Video: Blue Menace of the Jungle Quest Walkthrough (Light Bowgun)
Location: Jungle (Day)
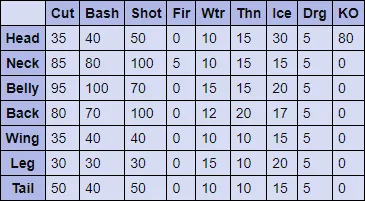
Goal: Hunt the Blue Yian Kut-ku (2800 HP). You can find the Blue Yian Kut-ku in area #6 at the start of the mission. He'll leave here shortly and travel to areas 1, 2, 3, 4, 5, 6 and 9 in no specific order. I didn't time him but I would say he spends about one minute in each location before moving to the next.
Blue Yian Kut-ku Hitzones & Weaknesses:

#10 Cunning Raiders
#10 Cunning Raiders
Advance Req: No
Type: Slaying Quest
Video: Cunning Raiders Quest Walkthrough (Light Bowgun)
Location: Jungle (Night)
Goal: Slay 20 Velociprey. You can find raptors in areas 2, 5, 8 and 4 on this map. Visit each area multiple times to catch all of the respawns.
#11 Attack of the Giant Bugs!
#11 Attack of the Giant Bugs!
Advance Req: No
Type: Slaying Quest
Video: Attack of the Giant Bugs Quest Walkthrough (Light Bowgun)
Location: Jungle (Night)
Goal: Slay 50 Vespoids. You can find Vespoids in areas 1, 2, 3, 5, 7 and 8. There are many Vespoids in each of these areas and there will be respawns in each area too once you start clearing out the Vespoids. You'll end up completing this quest with many Vespoids still left alive - you don't have to visit every location or kill every Vespoid in each area to complete this quest. As far as making this mission easier, I strongly recommend a Light Bowgun with Pellet ammo. It works kind of like a shotgun in real life in the sense that it fires in a frontal cone which will hit all enemies in front of you & off to the side, above and below where you're firing.
#12 The Mushroom Hunt!
#12 The Mushroom Hunt!
Advance Req: No
Type: Gathering Quest
Video: The Mushroom Hunt Quest Walkthrough (Light Bowgun)
Location: Jungle (Night)
Goal: Deliver 20 Special Mushrooms. All you need to do for this quest is run aroud the Jungle and collect 20 Special Mushrooms from the various mushroom gathering locations. This quest is extremely easy and shouldn't pose an issue for you.
#13 Panning for Goldenfish
#13 Panning for Goldenfish
Advance Req: No
Type: Gathering Quest
Video: Panning for Goldenfish Quest Walkthrough
Location: Jungle (Day)
Goal: Deliver 3 Goldenfish. You can catch Goldenfish at area 9 on this map (I don't think the fishing location at the home base spawns them). My advice is to either bring a lot of bait and fish over a dozen times until you catch all 3 or bring Goldenfish Bait which will exclusively hook a Goldenfish. Combine a Snakebee Larva and a Firefly to make the Goldenfish Bait that I am talking about and bring a full stack with you when doing this quest. If you're doing the Goldenfish Bait method you'll want to exit and enter an area over and over until you see a Goldenfish swimming around in the water. Until you know what a Goldenfish looks like you'll probably confuse them for other fish but that's ok, only one type of fish will bite this bait.
#14 Hunt the Gendrome!
#14 Hunt the Gendrome!
Advance Req: No
Type: Hunting Quest
Video: Hunt the Gendrome Quest Walkthrough (Light Bowgun)
Location: Desert (Day)
Goal: Hunt the Gendrome (1320 HP). This boss is a raptor and like I always say, raptors start in a static location and run a predictable circle around the map. At the beginning of the mission you can find the Gendrome in area #6, from here he'll go through areas 4, 2, 1, 5 and back to area 6.
Gendrome Hitzones & Weaknesses:

#15 The Land Shark
#15 The Land Shark
Advance Req: Yes
Type: Hunting Quest
Video: The Land Shark Quest Walkthrough (Light Bowgun)
Location: Desert (Night)
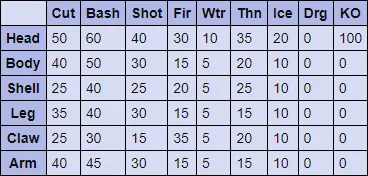
Goal: Hunt the Cephadrome (1679 HP). The Cephadrome spends the majority of his time in areas 2 and 5; he'll use area 1 to travel back and forth between these two. After enough damage is dealt to the Cephadrome he'll go to area #7 to sleep and recover. Use a Sonic Bomb to bring the Cephadrome out of the sand.
Cephadrome Hitzones & Weaknesses:
#16 The Lurking Desert Giant
#16 The Lurking Desert Giant
Advance Req: Yes
Type: Hunting Quest
Video: The Lurking Desert Giant Quest Walkthrough (Light Bowgun)
Location: Snowy Mountains (Day)
Goal: Hunt the Daimyo Hermitaur (2520 HP). Mr. crab will start out in area 9, he doesn't spend much time here before moving to areas 1, 2, 3, 7 and 10. From what I have seen he spends very little time in each area before moving to the next.
Daimyo Hermitaur Hitzones & Weaknesses:
#17 Slay the Genprey!
#17 Slay the Genprey!
Advance Req: No
Type: Slaying Quest
Video: Slay the Genprey Quest Walkthrough (Light Bowgun)
Location: Desert (Day)
Goal: Slay 20 Genprey. You can find raptors in area 4, 3, 10 and at the end of the quest you can find them in area 6.
#18 Liver of Legend!
#18 Liver of Legend!
Advance Req: No
Type: Gathering Quest
Video: Liver of Legend Quest Walkthrough (Light Bowgun)
Location: Desert (Day)
Goal: Deliver 10 Piscine Livers. This quest requires you to defeat the Cephalos enemies that bury under the sand and skin them for Piscine Livers. If you're having trouble getting these enemies out of the sand I recommend using a Sonic Bomb or aim for the dorsel fin that's above the ground level. Sometimes a hit to the dorsel will bring them out of the sand, I find this to be easiest with a Bowgun loaded with Pellets or Crag ammo.
#19 Gone Fishin'
#19 Gone Fishin'
Advance Req: No
Type: Gathering Quest
Video: Gone Fishin Quest Walkthrough (Light Bowgun)
Location: Desert (Day)
Goal: Deliver 3 Goldenfish. You can catch Goldenfish in the underground cave fishing spot which is located in area 6. There are two ways to do this mission, the first is to bring with you a ton of excess Worms and Fireflies for bait and then fish non-stop until you get 3 Goldenfish. Alternatively, you can combine Snakebee Larva and Firefly to make Goldenfish Bait and then fish exclusively for them. When doing the Goldenfish Bait method you'll have to repeatedly leave this area and come back until you see a Goldenfish in the water, fish it out, then leave and come back again until you see another. It's up to you to choose the method.
#20 Attack of the Yian Kut-ku
#20 Attack of the Yian Kut-ku
Advance Req: No
Type: Hunting Quest
Video: Attack of the Yian Kut-ku Quest Walkthrough (Light Bowgun)
Location: Swamp (Day)
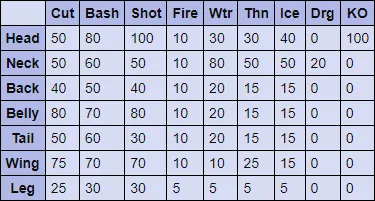
Goal: Hunt the Yian Kut-ku (1679 HP). At the start of this mission you can find the Yian Kut-ku in area #8. He'll spend about a minute before leaving here and going to one of the following areas, 6, 4, 5, or 2. I have seen him follow this same rotation two or three times so I am going to guess this is his standard patrol route.
Yian Kut-ku Hitzones & Weaknesses:
#21 Charge... Charge... Charge!
#21 Charge... Charge... Charge!
Advance Req: No
Type: Hunting Quest
Video: Charge... Charge... Charge... Quest Walkthrough (Light Bowgun)
Location: Swamp (Day)
Goal: Hunt the Bulldrome (1320 HP). You can find the Bulldrome in area #8 at the start of this mission. After a few minutes he will move to areas 6, 5, 4 and finally back to area #8. From what I have seen this is his set in stone patrol route.
Bulldrome Hitzones & Weaknesses:
#22 The Mischief-maker
#22 The Mischief-maker
Advance Req: Yes
Type: Hunting Quest
Video: The Mischief-maker Quest Walkthrough (Light Bowgun)
Location: Swamp (Night)
Goal: Hunt the Congalala (2939 HP). At the start of the mission you can find the Congalala in area #8. He will leave here after about a minute and go to areas 6, 5, 4, 2 and 7. From what I have seen his patrol route is random and he can go to any area at any time.
Congalala Hitzones & Weaknesses:
#23 The Ruler of the Snow!
(Urgent) #23 The Ruler of the Snow!
Advance Req: Yes
Type: Hunting Quest
Video: The Ruler of the Snow Quest Walkthrough (Light Bowgun)
Location: Snowy Mountains (Night)
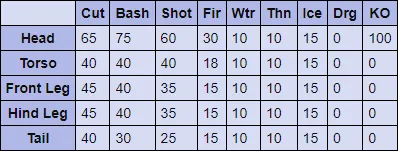
Goal: Hunt the Blangonga (1960 HP). When the mission begins you can find the Blangonga in area #8, he'll leave here shortly after and move to areas 6, 3, 7, 2 and even area 1. After watching him for a few missions I am fairly confident that his patrol route is completely random, I was unable to see any pattern for how he chooses where to go next.
Blangonga Hitzones & Weaknesses:
Guild Quests
- (Low Rank) Level 1
- (Low Rank) Level 2
- (Low Rank) Level 3
- (Low Rank) Level 4
- (Low Rank) Level 5
- (High Rank) Level 6
- (High Rank) Level 7
- (High Rank) Level 8