
Level 6 (High Rank) Guild Quests - MHFU
This page is a list and walkthrough of all the 6 Star Guild Quests in Monster Hunter Freedom Unite & Monster Hunter Freedom 2. Both of these games have mostly the same set of quests which is why this information works for both of them. There are a few quests that are unique to Unite and I will mention them when they come up.
I've included all of the relevant information for each quest on this list such as which zone it takes place in, what type of quest it is, whether or not you're required to complete it to advance and (of course) how to complete the quest. Below is an example that will serve as your Key for this page. If you're confused as to what any of the categories on this page mean take a look at the Key below.
Key:
Name of the Mission
Advance Req: If you are required to beat the mission to progress
Type: The type of mission this is, Gathering, Combat or Hunting
Video: My Youtube Video Walkthrough of this mission
Location: Where this mission takes place
Goal: The objective of this mission
#1 Gathering - Snowy Mountains
#1 Gathering - Snowy Mountains
Advance Req: No
Type: Gathering Quest
Video: N/A
Location: Snowy Mountains (Night)
Goal: Deliver the Paw Pass Ticket or wait for time to run out.
#2 Gathering - Jungle Zone
#2 Gathering - Jungle Zone
Advance Req: No
Type: Gathering Quest
Video: N/A
Location: Jungle (Night)
Goal: Deliver the Paw Pass Ticket or wait for time to run out.
#3 Gathering - Desert Zone
#3 Gathering - Desert Zone
Advance Req: No
Type: Gathering Quest
Video: N/A
Location: Desert (Night)
Goal: Deliver the Paw Pass Ticket or wait for time to run out.
#4 A True Foe - The Giadrome!
#4 A True Foe - The Giadrome!
Advance Req: No
Type: Hunting Quest
Video: A True Foe - The Giadrome Quest Walkthrough (Light Bowgun)
Location: Snowy Mountains (Night)
Goal: Hunt the Giadrome (1040 HP). The Giadrome is a raptor enemy which means it has a very predictable patrol route. It begins the mission in area 8 and goes through 7, 6 and back to 8.
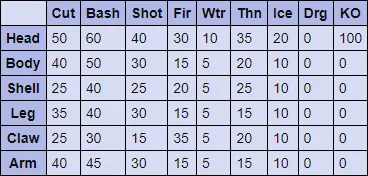
Giadrome Hitzones & Weaknesses:

#5 Reckless Bulldrome Hunter
#5 Reckless Bulldrome Hunter
Advance Req: No
Type: Hunting Quest
Video: Reckless Bulldrome Hunter Quest Walkthrough (Light Bowgun)
Location: Snowy Mountains (Night)
Goal: Hunt the Bulldrome (1680 HP). At the start of this mission you can find the Bulldrome in area 7 on the map. It will stay here for about a minute before starting its patrol route which goes through areas 8 and 6 then returns to area 7.
Bulldrome Hitzones & Weaknesses:

#6 Flanked by Velocidrome
#6 Flanked by Velocidrome
Advance Req: No
Type: Hunting Quest
Video: Flanked by Velocidrome Quest Walkthrough (Light Bowgun)
Location: Jungle (Day)
Goal: Hunt two Velocidrome (1080 HP). At the start of the mission one Velocidrome is found in area 8 and the other is in area 7. Both will follow the same patrol route which goes through area 8, 6, 7 and 3 before returning to area 8.
Velocidrome Hitzones & Weaknesses:

#7 Aim for the Jungle Crab
#7 Aim for the Jungle Crab
Advance Req: No
Type: Hunting Quest
Video: Aim for the Jungle Crab Quest Walkthrough (Light Bowgun)
Location: Jungle (Night)
Goal: Hunt the Daimyo Hermitaur (3360 HP). The Daimyo Hermitaur starts out in area 3, it spends about a minute here before starting its patrol route through areas 9, 1, 2 and finally back to area 3.
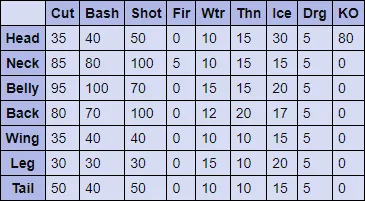
Daimyo Hermitaur Hitzones & Weaknesses:
#8 The Poison Fanged Duo
#8 The Poison Fanged Duo
Advance Req: Yes
Type: Hunting Quest
Video: The Poison Fanged Duo Quest Walkthrough (Light Bowgun)
Location: Desert (Day)
Goal: Hunt two Gendrome (900 HP). When this quest begins you can find one Gendrome in area 6 and the other in area 1. Both of these enemies follow the same patrol route which will take them through areas 6, 4, 2, 1, 5 and finally back to area 6.
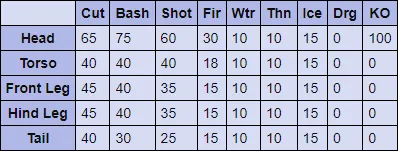
Gendrome Hitzones & Weaknesses:

#9 Pursuit of the Sand Wyvern
#9 Pursuit of the Sand Wyvern
Advance Req: No
Type: Hunting Quest
Video: Pursuit of the Sand Wyvern Quest Walkthrough (Light Bowgun)
Location: Desert (Day)
Goal: Hunt the Cephadrome (2080 HP). You can find the Cephadrome in area 2 at the start of the mission. It will stay in this area for awhile before switching to areas 1 and 5. The Cephadrome will spend most of its time in areas 2 and 5 - using area 1 to travel between them.
Cephadrome Hitzones & Weaknesses:
#10 Ultimate Crab Dinner
#10 Ultimate Crab Dinner
Advance Req: Yes
Type: Hunting Quest
Video: Ultimate Crab Dinner Quest Walkthrough (Light Bowgun)
Location: Desert (Day)
Goal: Hunt two Daimyo Hermitaurs (1800 HP). When the mission begins one Daimyo Hermitaur is found in area 3 and the other in area 9. Each crab will spend about a minute in their start locations before switching to one of the following areas 3, 9, 7, 5, 10, 1 and 2. As you can see they can basically go to every area so my advice is to bring a Psychoserum to make finding them easier.
Daimyo Hermitaur Hitzones & Weaknesses:
#11 Trapped by Yian Kut-ku
#11 Trapped by Yian Kut-ku
Advance Req: Yes
Type: Hunting Quest
Video: Trapped by Yian Kut-ku Quest Walkthrough (Light Bowgun)
Location: Swamp (Night)
Goal: Hunt the Yian Kut-ku (1200 HP) and the Blue Yian Kut-ku (2100 HP). When the mission begins you can find the Blue Yian Kut-ku in area 2 and the Yian Kut-ku in area 8. Each wyvern spends about a minute in their location(s) before switching to one of the following areas: 2, 8, 6, 4 and area 5.
Yian Kut-ku Hitzones & Weaknesses:
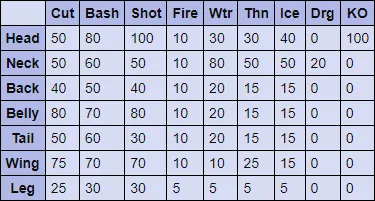
Blue Yian Kut-ku Hitzones & Weaknesses:

#12 Conga Counterattack!
#12 Conga Counterattack!
Advance Req: Yes
Type: Hunting Quest
Video: Conga Counterattack Quest Walkthrough (Light Bowgun)
Location: Swamp (Night)
Goal: Hunt the Congalala (3639 HP). At the start of this mission you can find the Congalala in area 8. It will stay here for a few minutes before moving to areas 6, 5, 4, 7 or 2. From what I have seen it normally always goes to area 6 first and usually 5 right after that. Once he has visited these two areas he seems to randomize where he goes.
Congalala Hitzones & Weaknesses:
#13 The Beating of Royal Wings
#13 The Beating of Royal Wings
Advance Req: No
Type: Slaying Quest
Video: The Beating of Royal Wings Quest Walkthrough (Light Bowgun)
Location: Jungle (Day)
Goal: Slay the Vespoid Queen (2160 HP). Unlike most of the other missions in this game you need to summon the Vespoid Queen in order to fight her. To summon the Vespoid Queen you'll need to run around the Jungle killing regular Vespoid enemies until you spawn the queen. From my experience it will take about 20 or so Vespoid kills - once the queen spawns you can find her in area #6 in the middle of the map.
Vespoid Queen Hitzones & Weaknesses:

Guild Quests
- (Low Rank) Level 1
- (Low Rank) Level 2
- (Low Rank) Level 3
- (Low Rank) Level 4
- (Low Rank) Level 5
- (High Rank) Level 6
- (High Rank) Level 7
- (High Rank) Level 8