
Level 8 (High Rank) Guild Quests - MHFU
This page is a list and walkthrough of all the 8 Star Guild Quests in Monster Hunter Freedom Unite & Monster Hunter Freedom 2. Both of these games have mostly the same set of quests which is why this information works for both of them. There are a few quests that are unique to Unite and I will mention them when they come up.
I've included all of the relevant information for each quest on this list such as which zone it takes place in, what type of quest it is, whether or not you're required to complete it to advance and (of course) how to complete the quest. Below is an example that will serve as your Key for this page. If you're confused as to what any of the categories on this page mean take a look at the Key below.
Key:
Name of the Mission
Advance Req: If you are required to beat the mission to progress
Type: The type of mission this is, Gathering, Combat or Hunting
Video: My Youtube Video Walkthrough of this mission
Location: Where this mission takes place
Goal: The objective of this mission
Note: There are quite a few missions in this bracket that appear and disappear randomly from the list. Keep this in mind when viewing the list. Also, Elder Dragon quests that share the same dragon are listed together to make things easier on both of us.
#1 Land of the Tremors
#1 Land of the Tremors
Advance Req: No
Type: Hunting Quest
Video: Land of Tremors Quest Walkthrough (Light Bowgun)
Location: Snowy Mountains (Night)
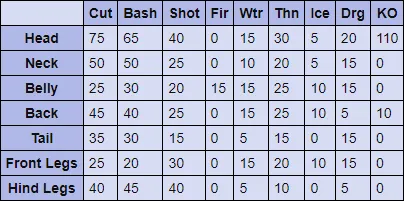
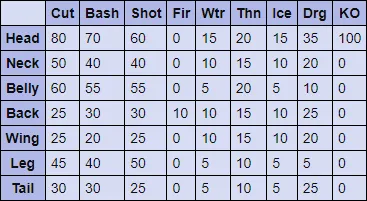
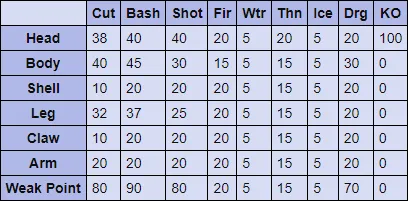
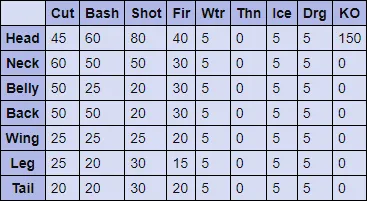
Goal: Hunt 2 Tigrex (3000 HP). When the mission begins you can find one Tigrex in area 8 and the other in area 1. These monsters will move around the map every few minutes visiting areas 8, 1, 7, 6 and 3. My favorite locations to fight these guys is area 1 or 6 because both of these areas have small ledges that you can stand ontop of. If you are using a Bowgun or a Bow you'll be able to hit the Tigrex without them being able to hit you (for the most part). Aside from that my biggest piece of advice is to never fight both at the same time. If you find both Tigrex in the same area on the map refresh your Paintballs on them and let them split up.
Tigrex Hitzones & Weaknesses:
#2 The Rajang in the Snow
#2 The Rajang in the Snow
Advance Req: No
Type: Hunting Quest
Video: The Rajang in the Snow Quest Walkthrough (Light Bowgun)
Location: Snowy Mountains (Day)
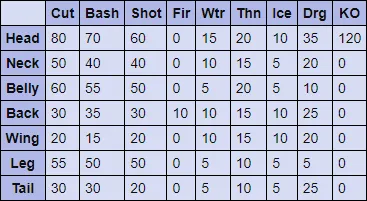
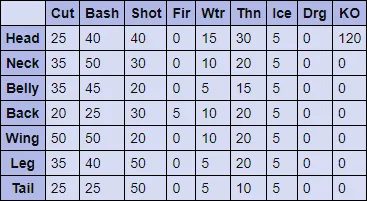
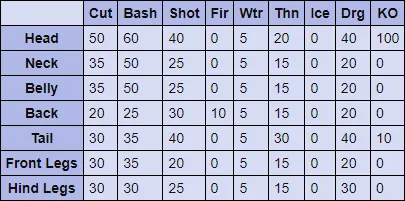
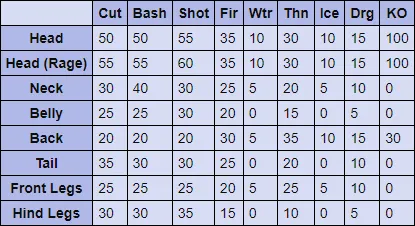
Goal: Slay Rajang (5040 HP). You can find the Rajang in area 8 when the mission first begins, it will stay here for about a minute before going to one of the following areas 7, 3 or 6. I've also seen it very rarely go to area 2 - but most of the time it's found in one of the other locations.
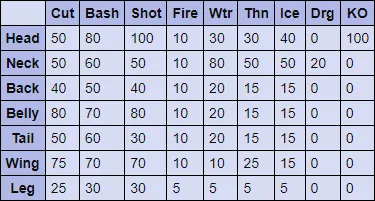
Rajang Hitzones & Weaknesses:

#3 The Tigrex's Roar
#3 The Tigrex's Roar
Advance Req: No
Type: Hunting Quest
Video: Tigrex Attacks & Strats Guide (Greatsword)
Location: Desert (Day)
Goal: Hunt the Tigrex (5800 HP). The Tigrex starts out in area 5, it'll hang out here for about a minute before going to areas 1, 2, 3, 7 and back to 5. Once it completes this rotation it seems to pick areas at random. Depending on your weapon the best location to fight Tigrex will be different. I'm someone who uses ranged weapons so I prefer area 3 since it has a small ledge that allows you to avoid all melee hits from Tigrex.
Tigrex Hitzones & Weaknesses:
#4 Pink Dance in the Jungle
#4 Pink Dance in the Jungle
Advance Req: No
Type: Hunting Quest
Video: Pink Dance in the Jungle Quest Walkthrough (Light Bowgun)
Location: Jungle (Day)
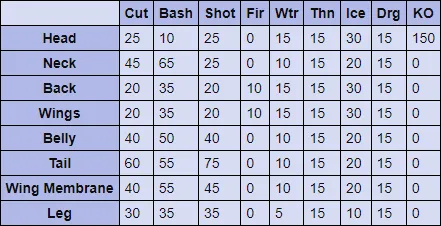
Goal: Hunt the Pink Rathian (5940 HP). At the start of this mission you can find the Pink Rathian in area #3, after a minute it'll move to areas 7, 4, 5, 1, 2 and finally back to 3. It seems to follow this same route every time, once it returns to area 3 though it will start picking locations at random instead of following a specific path.
Pink Rathian Hitzones & Weaknesses:
#5 The Runaway Diablos
#5 The Runaway Diablos
Advance Req: No
Type: Hunting Quest
Video: The Runaway Diablos Quest Walkthrough (Light Bowgun)
Location: Desert (Day)
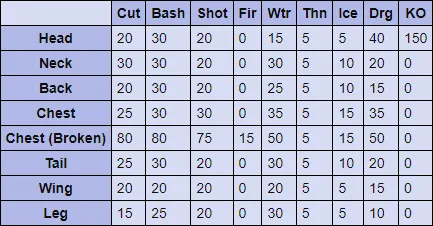
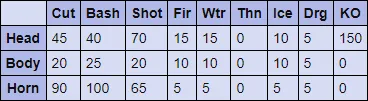
Goal: Hunt down the Diablos (5600 HP). You can find the Diablos in area 7 when the mission first begins - it will hang out here for a little bit before moving to areas 9, 5 or 3. From what I have seen it picks one of these areas at random and it seems to prefer areas 7, 9 and 5 the most. It rarely goes to 3.
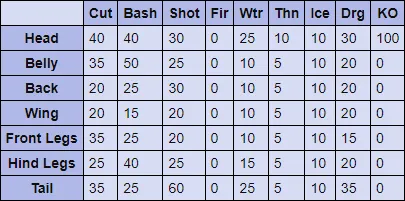
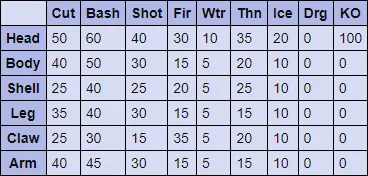
Diablos Hitzones & Weaknesses:
#6 The Fierce Black Horn
#6 The Fierce Black Horn
Advance Req: Yes
Type: Hunting Quest
Video: The Fierce Black Horn Quest Walkthrough (Light Bowgun)
Location: Desert (Day)
Goal: Hunt the Black Diablos (5940 HP). The Black Diablos starts out in area 7 - it will stay here for a minute or two then switch to areas 9, 5, 2, 3 and 1 in random order.
Black Diablos Hitzones & Weaknesses:

#7 Four Horns!
#7 Four Horns!
Advance Req: No
Type: Hunting Quest
Video: Four Horns Quest Walkthrough (Light Bowgun)
Location: Desert (Night)
Goal: Hunt the Diablos (3200 HP) and the Black Diablos (3520 HP). When you begin this mission you can find the Black Diablos in area 5 and the Diablos in area 7. As usual they will stay in their respective areas for a minute or so before moving to another. Both monsters can visit areas 5, 7, 9, 1, 2 and 3. Of course you'll want to try and keep these monsters split up so you aren't fighting two of them at the same time. If you're ranged I recommend fighting them in areas 9 or 3 since both locations have small ledges you can climb ontop of that will allow you to avoid almost all attacks from both Diablos.
Diablos Hitzones & Weaknesses:
Black Diablos Hitzones & Weaknesses:
#8 Rajang of Mountain Flames
#8 Rajang of Mountain Flames
Advance Req: No
Type: Hunting Quest
Video: Rajang of Mountain Flames Quest Walkthrough (Light Bowgun)
Location: Volcano (Night)
Goal: Hunt the Rajang (5040 HP). You can find the Rajang in area 4 at the start of the mission, it'll spend about a minute here before going to areas 3, 7 or 6. From what I have observed it picks one of these areas at random and there is no pattern to its movements.
Rajang Hitzones & Weaknesses:
#9 Terror of the Gravios
#9 Terror of the Gravios
Advance Req: No
Type: Hunting Quest
Video: Terror of the Gravios Quest Walkthrough (Light Bowgun)
Location: Volcano (Day)
Goal: Hunt the Gravios (5600 HP). The Gravios starts in area 7 before eventually moving to areas 5, 4, 3 and back to 7. From my observations it follows this same route each time which makes it pretty easy to find this monster when you want to!
Gravios Hitzones & Weaknesses:
#10 Black Rock in the Swamp
#10 Black Rock in the Swamp
Advance Req: Yes
Type: Hunting Quest
Video: Black Rock in the Swamp Quest Walkthrough (Light Bowgun)
Location: Swamp (Night)
Goal: Hunt the Black Gravios (5720 HP). At the start of this mission you can find the Black Gravios in area #8. This monster has a set patrol route, it will go from area 8 through 6, 5, 4 and right back to 8. Sometimes it will turn around and go backwards through this same patrol route - I have seen it do that during my observations.
Black Gravios Hitzones & Weakness:

#11 A Troublesome Pair
#11 A Troublesome Pair
Advance Req: No
Type: Hunting Quest
Video: A Troublesome Pair Quest Walkthrough (Light Bowgun)
Location: Forest & Hills (Day)
Goal: Hunt the Rathalos (2560 HP) and the Rathian (3200 HP). The Rathian spawns in area 5 (the den) and the Rathalos spawns in area 4. Both of these enemies can visit the same locations at the same time so you'll want to be careful when you're fighting them and keep a Paintball on both of them. You can find these enemies in areas 5, 4, 6, 9, 2, 3 and 10.
Rathalos Hitzones & Weaknesses:

Rathian Hitzones & Weaknesses:
#12 Blue Sky, Pink Earth
#12 Blue Sky, Pink Earth
Advance Req: Yes
Type: Hunting Quest
Video: Blue Sky, Pink Earth Quest Walkthrough (Light Bowgun)
Location: Forest & Hills (Day)
Goal: Hunt the Azure Rathalos (2700 HP) and the Pink Rathian (3300 HP). You can find the Pink Rathian in area #5 at the start (The den) and the Azure Rathalos is in area 4. Much like the previous mission these two monsters will visit the same locations - sometimes at the same time. You can find these enemies in areas 5, 4, 6, 9, 2, 3 and 10.
Azure Rathalos Hitzones & Weaknesses:

Pink Rathian Hitzones & Weaknesses:
#13 Attack of the Rathalos
#13 Attack of the Rathalos
Advance Req: No
Type: Hunting Quest
Video: Attack of the Rathalos Quest Walkthrough (Light Bowgun)
Location: Forest & Hills (Day)
Goal: Hunt the Azure Rathalos (5040 HP). At the start of the mission you can find the Azure Rathalos in area #5 (The den); it will spend a little bit of time here before moving to one of the following areas at random. Areas 5, 4, 6, 9, 2, 3 and 10.
Azure Rathalos Hitzones & Weaknesses:
#14 Deny the Silver Rathalos
#14 Deny the Silver Rathalos
Advance Req: Yes
Type: Hunting Quest
Video: Deny the Silver Rathalos Quest Walkthrough (Light Bowgun)
Location: Tower
Goal: Hunt the Silver Rathalos (5800 HP). The Silver Rathalos is found at the very top of the tower in area #10. It never moves from this location which makes it quite easy to find!
Silver Rathalos Hitzones & Weaknesses:

#15 Find the Golden Phantom
#15 Find the Golden Phantom
Advance Req: Yes
Type: Hunting Quest
Video: Find the Golden Phantom Quest Walkthrough (Light Bowgun)
Location: Tower
Goal: Hunt the Gold Rathian (6160 HP). Much like the previous mission the Gold Rathian is found in area #10 and it will never leave this location.
Gold Rathian Hitzones & Weaknesses:
#16 The Frozen Dictator
#16 The Frozen Dictator
Advance Req: No
Unlock Req: Complete all 6* and 7* quests except for the Epic quests & Meeting of the Blangongas to unlock
Type: Slaying Quest
Video: The Frozen Dictator Quest Walkthrough (Light Bowgun) - Kushala Daora Attacks & Strats (Greatsword)
Location: Snowy Mountains (Night)
Goal: Defeat Kushala Daora (10500 HP). At the start of this mission you can find Kushala Daora in area 8. He will spend about a minute here before moving to areas 6, 3, 2, 7 and of course 8. If you need extra help defeating this boss I recommend you check out my Hunt Preparation Guide and/or my Elder Dragon Weaknesses Guide. Both of those pages will have more information for defeating this boss.
Kushala Daora Hitzones & Weaknesses:

#16 The Elder Dragon of Wind
Advance Req: No
Unlock Req: Complete all 6* and 7* quests except for the Epic quests & Meeting of the Blangongas to unlock
Type: Slaying Quest
Video: The Elder Dragon of Wind Quest Walkthrough (Light Bowgun) - Kushala Daora Attacks & Strats (Greatsword)
Location: Jungle (Night)
Goal: Defeat Kushala Daora (10500 HP). Kushala Daora can be found in area 3 when the mission first begins, it will hang out here for about one minute before switching to areas 2, 7, 4 or 8. From what I have seen the rotation it does through these areas is random so bring a Psychoserum if you're having trouble finding him. If you need extra help defeating this boss I recommend you check out my Hunt Preparation Guide and/or my Elder Dragon Weaknesses Guide. Both of those pages will have more information for defeating this boss.
Kushala Daora Hitzones & Weaknesses:
#17 The War of Immolation
#17 The War of Immolation
Advance Req: No
Unlock Req: Complete all 6* and 7* quests except for the Epic quests & Meeting of the Blangongas to unlock
Type: Slaying Quest
Video: The War of Immolation Quest Walkthrough (Light Bowgun) - Teostra Attacks & Strats (Hammer)
Location: Town
Goal: Defeat Teostra (11250 HP). When the mission begins you can find the Teostra in area 2 on the map. It will stay here for less than a minute before moving to area 3 which is where you should engage it. Keep in mind that this map has the Dragonator device which you can lure the Teostra to and deploy for massive damage (it's the switch at the top of the high wall). If you need extra help defeating this boss I recommend you check out my Hunt Preparation Guide and/or my Elder Dragon Weaknesses Guide. Both of those pages will have more information for defeating this boss.
Teostra Hitzones & Weaknesses:
#17 Emperor of Flame
Advance Req: No
Unlock Req: Complete all 6* and 7* quests except for the Epic quests & Meeting of the Blangongas to unlock
Type: Slaying Quest
Video: Emperor of Flame Quest Walkthrough (Light Bowgun) - Teostra Attacks & Strats (Hammer)
Location: Volcano (Night)
Goal: Defeat Teostra (11250 HP). At the start of this mission you can find the Teostra in area 8, it stays here for about a minute before going to areas 6, 4, 2, 7 and back to 6. I strongly recommend you wait in area 4 for Teostra and start your fight there. This will give you enough time to prepare before the fight (eat your food, drink your drugs, do a little dance). Check out my Hunt Preparation Guide for more information about how to properly prepare for this fight and my Elder Dragon Weaknesses Page if you'd like information about Teostra's weaknesses.
Teostra Hitzones & Weaknesses:
#18 The Elder Dragon of Mist
#18 The Elder Dragon of Mist
Advance Req: No
Unlock Req: Complete all 6* and 7* quests except for the Epic quests & Meeting of the Blangongas to unlock
Type: Slaying Quest
Video: The Elder Dragon of Mist Quest Walkthrough (Light Bowgun) - Chameleos Attacks & Strats (Longsword)
Location: Forest & Hills (Day)
Goal: Defeat Chameleos (12000 HP) This quest as well as Towards the Silence are rotated in and out depending on which you have completed last. Both quests require you to defeat Chameleos, the only thing that changes is the area you're fighting. For all of the Elder Dragon quests in this game you don't need to kill the dragon to achieve victory. If you deal enough damage it will flee and that will result in your victory as well earning you loot and the rewards. Additionally, any damage and breaks you deal to Chameleos are carried over between quests until you defeat him. When the mission starts you can find Chameleos in area #9, after a little bit of time he will move to areas 3, 2, 5 and then it always seems to be random. I've watched him follow the 9, 3, 2, 5 order a few times but then he sometimes goes back to 9, goes to 4 or just picks a random area. If you need help defeating Chameleos check out my Hunt Preparation Guide as well as my Elder Dragon Weaknesses Guide - both of these pages will give you more information.
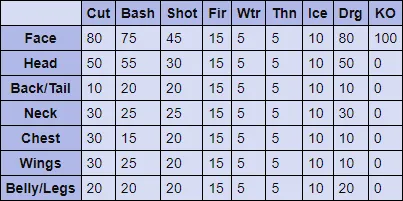
Chameleos Hitzones & Weaknesses:

#18 Towards the Silence
Advance Req: No
Unlock Req: Complete all 6* and 7* quests except for the Epic quests & Meeting of the Blangongas to unlock
Type: Slaying Quest
Video: Towards the Silence Quest Walkthrough (Light Bowgun) - Chameleos Attacks & Strats (Longsword)
Location: Swamp (Day)
Goal: Defeat Chameleos (12000 HP). Towards the Silence and The Elder Dragon of Mist are rotated in and out depending on which you completed last. Each quest requires you to defeat Chameleos, the only thing that changes is the arena you're fighting in. For all of the Elder Dragon quests in this game you don't need to kill the dragon to achieve victory. If you deal enough damage it will flee and that will result in your victory as well earning you loot and the rewards. Additionally, any damage and breaks you deal to Chameleos are carried over between quests until you defeat him. You can find Chameleos in area 8 at the start of the mission, after a little bit of time he will move to areas 6, 4, 2, 9 and then back to area 8. I have seen him follow this route twice so I am guessing this is his normal patrol route. If you need help defeating Chameleos check out my Hunt Preparation Guide as well as my Elder Dragon Weaknesses Guide - both of these pages will give you more information.
Chameleos Hitzones & Weaknesses:
#19 Legendary Black Dragon
#19 Legendary Black Dragon
Advance Req: No
Type: Special Quest
Video: Legendary Black Dragon Quest Walkthrough (Light Bowgun) - Fatalis Attacks and Strats Guide (Lance)
Location: Castle Schrade
Goal: Defeat Fatalis (20,000 HP). There is no 'finding' Fatalis on this map since there is only one location he can be. I can give you two tips when fighting on this map, the gate in the middle will stun Fatalis and damage him when you pull him through it (it'll fall down ontop of Fatalis). There is also a Dragonator that you can find on this map that will inflict massive damage to Fatalis when deployed. If you'd like additional help on how to prepare for this fight check out my Hunt Preparation Guide or my Elder Dragon Weaknesses Guide for more information.
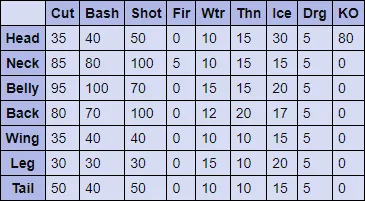
Fatalis Hitzones & Weaknesses:
#20 The End Times
#20 The End Times
Advance Req: No
Type: Special Quest
Video: The End Times Quest Walkthrough (Light Bowgun) - Crimson Fatalis Attacks & Strats (Longsword)
Location: Battleground
Goal: Defeat Crimson Fatalis (20,000 HP). This map is the same one that you fight Akantor on, the Crimson Fatalis is found in the large open area and you will have to fight him without the ability to run away and heal safely in a different area. As usual, if you need additional help with this fight I recommend you check out my Hunt Preparation Guide or my Elder Dragon Weaknesses Guide.
Fatalis Hitzones & Weaknesses:
#21 The Approaching Gaoren
#21 The Approaching Gaoren
Advance Req: No
Type: Slaying Quest
Video: The Approaching Gaoren Quest Walkthrough (Light Bowgun) - Shen Gaoren Attacks & Strats (Hammer)
Location: Town
Goal: Defend the town from Shen Gaoren (20,000 HP). You don't have to defeat Shen Gaoren to complete this quest, only prevent him from destroying the town. This mission is ultimately a DPS race, the more you stun Shen Gaoren the less damage he will do to the town overall. Don't forget to use the ballistas and the Dragonator to deal extra damage. As usual if you need extra advice to be successful on this mission I recommend you check out my Hunt Preparation Guide or the Carapaceon Weaknesses Guide. Both of these pages have information that will help you be victorious.
Shen Gaoren Hitzones & Weaknesses:
#22 Rise to the Summit
#22 Rise to the Summit
Advance Req: No
Type: Slaying Quest
Video: Rise to the Summit Quest Walkthrough (Light Bowgun) - Akantor Attacks & Strats (Longsword)
Location: Battleground
Goal: Defeat Akantor (9600 HP). There is no "finding" Akantor on this map since there is only one location he can even be. You begin this quest in the arena and the only way to get to the safe zone is through fainting. Much like the Crimson Fatalis quest that takes place on this map - you get no reprieve while fighting Akantor. You can't run away and heal up in a different area then come back - you're stuck here fighting. If you need help preparing for this hunt check out my Hunt Preparation Guide and if you want information about Elder Dragon Weaknesses check out that page too.
Akantor Hitzones & Weaknesses:
#23 Wyvern of the Wind
#23 Wyvern of the Wind
Advance Req: No
Type: Hunting Quest
Video: Wyvern of the Wind Quest Walkthrough (Light Bowgun)
Location: Great Forest (Day)
Goal: Hunt the Nargacuga (5040 HP). When the mission begins you can find the Nargacuga in area 5. It will hang out in this location for about one minute before switching to areas 7, 2, 4 and back to 5. From my observations it always follows this same patrol route through the map.
Nargacuga Hitzones & Weaknesses:
#24 Born of Darkness
#24 Born of Darkness
Advance Req: No
Type: Hunting Quest
Video: Born of Darkness Quest Walkthrough (Light Bowgun)
Location: Jungle (Night)
Goal: Hunt the Nargacuga (5220 HP). You can find the Nargacuga in area 9 at the start of this mission. It'll spend a little bit here before moving to areas 3, 2, 5, 7 and back to 9. From my observations this is a set in stone route and the Nargacuga will always follow this same path.
Nargacuga Hitzones & Weaknesses:
#25 Two Queens
#25 Two Queens
Advance Req: No
Type: Hunting Quest
Video: Two Queens Quest Walkthrough (Hammer) -- Two Queens Quest Walkthrough (Longsword)
Location: Great Arena
Goal: Hunt the Rathian (3000 HP) Pink Rathian (3300 HP). For this quest you will have to fight a Rathian and a Pink Rathian in a very small arena. My advice is to bring Flashbombs and use them to deal as much damage as possible to the Rathians while it is safe. Aside from that - pick one Rathian and focus on it while keeping your eye on the other one.
Pink Rathian Hitzones & Weaknesses:
#26 One-Horned Demon King
#26 One-Horned Demon King
Advance Req: No
Type: Hunting Quest
Video: One-Horned Demon King Quest Walkthrough (Light Bowgun)
Location: Desert (Day)
Goal: Hunt the Diablos (8000 HP); this Diablos only has one horn and is significantly stronger than a regular Diablos with almost 2x the HP. From my experience it also seems to enrage more often than a normal Diablos too. When the mission begins you can find this Diablos in area 7 on the map. It hangs out here for a little bit before moving to one of the following areas at random 7, 9, 5, 3 or 2. If you are having trouble finding the monster remember that it burrows underground often too.
Diablos Hitzones & Weaknesses:
#27 Phantasmic Battle
#27 Phantasmic Battle
Advance Req: No
Type: Slaying Quest
Video: Kirin Attacks and Strats (Greatsword)
Location: Battleground
Goal: Defeat the Kirin (4320 HP). Much like every other mission that takes place on the Battleground Map, you will be stuck in the arena with the Kirin until you manage to defeat it.
Kirin Hitzones & Weaknesses:
#28 Furious Beauties
#28 Furious Beauties
Advance Req: No
Type: Epic Hunting Quest
Video: Furious Beauties Quest Walkthrough (Light Bowgun)
Location: Snowy Mountains (Day)
Goal: Hunt the Khezu (2240 HP), the Giadrome (720 HP) and the Tigrex (2000 HP). You can find the Khezu in area 6 when the mission first begins, the Khezu and Tigrex are both found in the same areas on this map (6, 7, 8, 3 and 1). The Giadrome can only be found in areas 6, 7 and 8. It will run a predictable and easy to follow route through these three locations.
Khezu Hitzones & Weaknesses:
Giadrome Hitzones & Weaknesses:

Tigrex Hitzones & Weaknesses:
#29 Fight for the Throne
#29 Fight for the Throne
Advance Req: No
Type: Epic Hunting Quest
Video: Fight for the Throne Quest Walkthrough (Light Bowgun)
Location: Forest & Hills (Night)
Goal: Hunt the Yian Kut-ku (1280 HP), the Velocidrome (720 HP) and the Rathalos (1920 HP). When the mission first begins you can find the Yian Kut-ku in area 9. Both the Yian Kut-ku and the Rathalos travel to the same locations on this map - areas 9, 3, 2, 4, 5 and 10. From what I have observed they pick an area to visit at random and there is no pattern to their movements. Once the Yian Kut-ku is dead the Velocidrome will spawn in area 10. The Velocidrome will follow a set in stone route through areas 10, 3 and 2. Once it reaches area 2 it will turn around and return to area 10, in area 10 it turns around and goes back to 2. Rinse and repeat. After being defeated the final enemy, the Rathalos, will spawn in area 5 (The Den). Like I said previously, this monster visits all the same areas as the Yian Kut-ku (Areas 9, 3, 2, 4, 5 and 10).
Yian Kut-ku Hitzones & Weaknesses:
Velocidrome Hitzones & Weaknesses:

Rathalos Hitzones & Weaknesses:
#30 Hotter than Hell Itself
#30 Hotter than Hell Itself
Advance Req: No
Type: Epic Hunting Quest
Video: Hotter than Hell Itself Quest Walkthrough (Light Bowgun)
Location: Volcano (Night)
Goal: Hunt the Basarios (1680 HP), the Iodrome (1280 HP) and the Gravios (2200 HP). At the start of this mission you can find the Basarios in area 7; as usual for Basarios monsters it will be buried under ground with only the rocky back portion of its body exposed. If left undisturbed for a couple of minutes the Basarios will eventually move to areas 6, 4, 2 and back to 7. Based on my observations he will always follow this route. Once dead the Iodrome will spawn in area 7 and begin its patrol route from area 7 through areas 3, 5, 6 and back to 7. After being defeated the final enemy, the Gravios, will spawn in area 7. If left undisturbed it will eventually travel to areas 3, 4, 5 and back to 7. From what I have seen it will follow this same patrol route each time.
Basarios Hitzones & Weaknesses:

Iodrome Hitzones & Weaknesses:

Gravios Hitzones & Weaknesses:
#31 Desert Unifier
#31 Desert Unifier
Advance Req: No
Type: Hunting Quest
Video: Desert Unifier Quest Walkthrough (Light Bowgun)
Location: Desert (Day)
Goal: Hunt the Daimyo Hermitaur (1920 HP), the Cephadrome (1280 HP) and the Diablos (2200 HP). When the mission begins you can find the Daimyo Hermitaur in area 9. It will stay here for about a minute before starting a patrol route through areas 5, 1, 2, 3, 7, 10 and finally back to 5. Once defeated the Cephadrome will spawn next in area 2. The Cephadrome will spend most of its time in areas 2 and 5; it can be found in area 1 too but only briefly as it uses that area to travel back and forth between 2 and 5. After being defeated the final monster, the Diablos, will spawn in area 7. The Diablos will hang out in area 7 for a minute or so before eventually traveling to areas 2, 1, 5, 9 and 3. From what I have seen it picks an area at random and it doesn't have a set route that it follows.
Daimyo Hermitaur Hitzones & Weaknesses:
Cephadrome Hitzones & Weaknesses:
Diablos Hitzones & Weaknesses:
Guild Quests
- (Low Rank) Level 1
- (Low Rank) Level 2
- (Low Rank) Level 3
- (Low Rank) Level 4
- (Low Rank) Level 5
- (High Rank) Level 6
- (High Rank) Level 7
- (High Rank) Level 8