
Level 6 Elder Quest Walkthroughs - MHFU
This page doubles as both a list and walkthrough of all the 5 Star Elder Quests in Monster Hunter Freedom Unite & Monster Hunter Freedom 2. Both of these games have mostly the same set of quests which is why this information works for both of them. There are a few quests that are unique to Unite and I will mention them when they come up.
I've included all of the relevant information for each quest on this list such as which zone it takes place in, what type of quest it is, whether or not you're required to complete it to advance and (of course) how to complete the quest. Below is an example that will serve as your Key for this page. If you're confused as to what any of the categories on this page mean take a look at the Key below.
Key:
Name of the Mission
Advance Req: If you are required to beat the mission to progress
Type: The type of mission this is, Gathering, Combat or Hunting
Video: My Youtube Video Walkthrough of this mission
Location: Where this mission takes place
Goal: The objective of this mission
#1 A Troublesome Pair!
#1 A Troublesome Pair!
Advance Req: No
Type: Hunting Quest
Video: A Troublesome Pair Quest Walkthrough (Light Bowgun)
Location: Forest & Hills (Day)
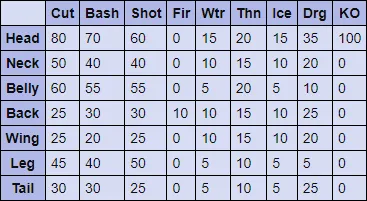
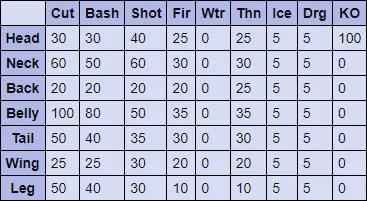
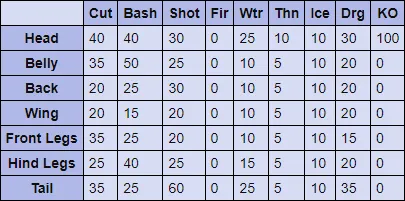
Goal: Hunt Rathalos (1120 HP - Black in color) and Rathian (1400 HP - Green in color). At the start of this mission Rathalos starts out in area #4 and Rathian starts out in area #5. At least I think so, both of these enemies leave their respective areas within 30 seconds of the mission starting. What I normally do when this mission starts is go to areas 2 or 3 to fight Rathalos or to area 9 where I can fight Rathian. More often than not I will catch these enemies in one of these areas. From what I have seen, Rathalos goes to the outside areas (4, 2, 3) and Rathian sticks to the areas with more tight corridors like 5 and 9.
Rathalos Hitzones & Weaknesses:

Rathian Hitzones & Weaknesses:
#2 Dual Plesioth!
#2 Dual Plesioth!
Advance Req: No
Type: Hunting Quest
Video: Dual Plesioth Quest Walkthrough (Light Bowgun)
Location: Jungle (Day)
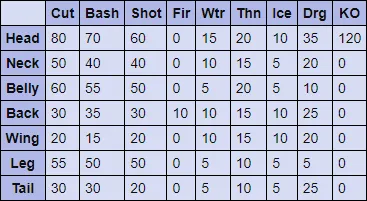
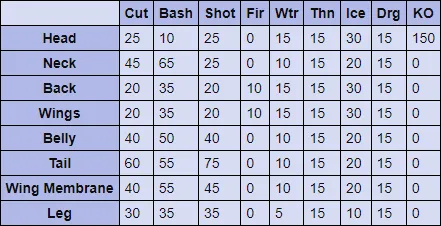
Goal: Hunt the Green Plesioth (1540 HP) and regular Plesioth (1400 HP). The Green Plesioth starts out in area 4 and the normal Plesioth starts out in area 3; these two locations are the only two areas where the Plesioth's can even go. You can find these creatures swimming around in the deep waters, you'll need to hit their dorsel fin with an attack to agro them and start the fight.
Green Plesioth Hitzones & Weaknesses:
Plesioth Hitzones & Weaknesses:

#3 Pink Dance in the Jungle!
#3 Pink Dance in the Jungle!
Advance Req: Yes
Type: Hunting Quest
Video: Pink Dance in the Jungle Quest Walkthrough (Light Bowgun)
Location: Jungle (Night)
Goal: Hunt Pink Rathian (2640 HP). You can find the Pink Rathian in area 3 on this map when the mission begins. It will stay here for about a minute before leaving and going to another one of the following areas at random 2, 1, 6 or area 8.
Pink Rathian Hitzones & Weaknesses:
#4 Four Horns!
#4 Four Horns!
Advance Req: Yes
Type: Hunting Quest
Video: Four Horns Quest Walkthrough (Light Bowgun)
Location: Desert (Night)
Goal: Hunt Black Diablos (2420 HP) and regular Diablos (2200 HP). At the start of this mission you can find the Diablos in area 7 and the Black Diablos in area 5. They will stay in these areas for a minute or two (which is long enough for you to buff up and run over) before switching to another part of the map. For this quest I try to fight these enemies in areas 7, 3 or 5 because there are obstacles or ledges in these areas that you can use to avoid attacks.
Black Diablos Hitzones & Weaknesses:

Diablos Hitzones & Weaknesses:
#5 Emperor of Flame!
#5 Emperor of Flame!
Advance Req: No
Type: Slaying Quest
Video: Emperor of Flame Quest Walkthrough (Light Bowgun)
Location: Volcano (Night)
Goal: Defeat Teostra (7500 HP). Teostra is an Elder Dragon and thus works similarly to all of the other Elder Dragons. All damage dealt to Teostra as well as any breaks that happen will be shared amongst the two quests that feature him in this rank. Those two quests are Emperor of Flames and A Sun With Fangs; one of these two will always be available to you and they will cycle depending on which you finished last. One other thing worth bringing up is that you don't need to defeat Teostra to achieve victory. If you deal enough damage to him he'll flee and that will earn you a victory as well. He'll also be damaged the next time you encounter him making the next fight easier.
Teostra Hitzones & Weaknesses:
#5 A Sun With Fangs
Advance Req: No
Unlock: Complete the Emperor of Flames quest
Type: Slaying Quest
Video: A Sun With Fangs Quest Walkthrough (Light Bowgun)
Location: Desert (Day)
Goal: Defeat Teostra (7500 HP). This quest is cycled with Emperor of Flames depending on which you completed last. Damage dealt to Teostra as well as any breaks are shared between these two quests.
Teostra Hitzones & Weaknesses:
#6 The Shogun's Encampment!
#6 The Shogun's Encampment!
Advance Req: No
Type: Hunting Quest
Video: The Shogun's Encampment Quest Walkthrough (Light Bowgun)
Location: Volcano (Day)
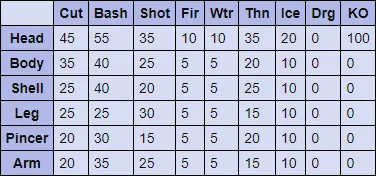
Goal: Hunt two Shogun Ceanataurs (1440 HP). At the start of this mission you can find one crab in area 6 and the other in area 3. Both of these monsters will hang out in this location for about a minute before moving to one of the following areas at random 6, 3, 4, 7 and 5.
Shogun Ceanataurs Hitzones & Weaknesses:
#7 Attack of the Rathalos!
#7 Attack of the Rathalos!
Advance Req: Yes
Type: Hunting Quest
Video: Attack of the Rathalos Quest Walkthrough (Light Bowgun)
Location: Forest & Hills (Day)
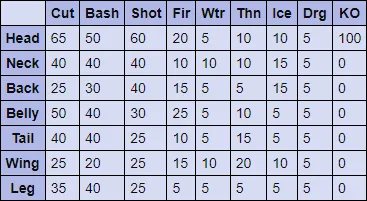
Goal: Hunt Azure Rathalos (2160 HP). When the mission first begins you can find the Azure Rathalos in area 5 on the map. After about a minute it will leave this location and visit areas 4, 3, 10, 9 and 2. I think it can visit area 6 as well but I have not seen it go there during this mission.
Azure Rathalos Hitzones & Weaknesses:

MHFU Rank 6 Quests
Once you complete the quests required to advance you'll unlock A State of Crisis which is the Rank 6 Urgent Quest. Completing this will unlock the next quest giver, Nekoht, if you're playing Monster Hunter Freedom Unite. Anyone who is playing Monster Hunter Freedom 2, your quest chain ends here with the exception of a few more Rank 6 quests and the Guild Quests.
For more information about Nekoht's quests follow the links provided or at the bottom of the page.
(Urgent) #8 A State of Crisis!
Advance Req: Yes
Type: Slaying Quest
Video: A State of Crisis Quest Walkthrough (Light Bowgun) - Shen Gaoren Attacks & Strats (Hammer)
Location: Town (Day)
Goal: Defend the town from Shen Gaoren (14000 HP). All you need to do for this quest is make sure that Shen Gaoren does not destroy the town before the timer runs out. You can do this by staggering him as much as possible to slow him down and prevent him from attacking. Killing Shen Gaoren will net you some extra loot but is not required to complete this mission. If you need help preparing for this quest check out my Hunt Preparation Guide for more information.
Shen Gaoren Hitzones & Weaknesses:
#9 The Final Invitation!
#9 The Final Invitation!
Advance Req: No
Unlock: To unlock this quest you need to finish ALL of the quests that the Elder gives you.
Type: Hunting Quest
Video: The Final Invitation Quest Walkthrough (Light Bowgun)
Location: Great Arena
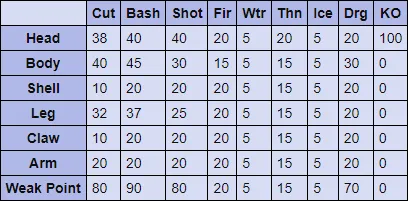
Goal: Defeat 2 Rajang (2520 HP). For this quest one Rajang will be in the arena at the start and once it's been defeated a second one will come out and attack. You need to defeat both of them to complete the quest. This quest is very likely to be too difficult for you when it first unlocks so I strongly recommend you come back to it later once you get better gear and weapons. If you need help preparing for this quest check out my Hunt Preparation Guide for more information.
Rajang Hitzones & Weaknesses:

#10 A Giant Dragon Invades!
#10 A Giant Dragon Invades!
Advance Req: No
Type: Slaying Quest
Video: A Giant Dragon Invades Quest Walkthrough (Light Bowgun)
Location: Fortress
Goal: Stop Lao-Shan Lung (18666 HP) from destroying the Fortress. Technically all you need to do to complete this mission is prevent Lao-Shan Lung from destroying the Fortress. You can do this by constantly breaking parts of its body so that it is stunned and slowed down. The more breaks you get on him the more you'll slow him down. If you need help preparing for this quest I strongly recommend you check out my Hunt Preparation Guide for more info. Alternatively, if you'd like to learn more about Lao-Shan's weaknesses check out my Elder Dragon Weaknesses Guide too.
Lao-Shan Lung Hitzones & Weaknesses:

(Urgent) Secret Request: Hypnocatrice!
(Urgent) Secret Request: Hypnocatrice!
Advance Req: No
Type: Hunting Quest
Video: Secret Request: Hypnocatrice Quest Walkthrough (Light Bowgun)
Location: Great Fortress (Day)
Goal: Hunt Hypnocatrice (2860 HP). At the start of the mission you can find the Hypnocatrice in area #4 at the northern point of the map. It stays in this location for about a minute before starting a patrol which takes it through areas 5, 6, 1, 2 and back to 4. From what I have seen it stays in each area for about a minute before flying to the next. Once it gets back to area 4 it seems like it starts flying to random areas instead of following a set route.
Hypnocatrice Hitzones & Weaknesses:
Elder Quests
- Level 1
- Level 2
- Level 3
- Level 4
- Level 5
- Level 6
Continue to Nekoht Quests (Level 7)