
Level 5 Elder Quest Walkthroughs - MHFU
This page doubles as both a list and walkthrough of all the 5 Star Elder Quests in Monster Hunter Freedom Unite & Monster Hunter Freedom 2. Both of these games have mostly the same set of quests which is why this information works for both of them. There are a few quests that are unique to Unite and I will mention them when they come up.
I've included all of the relevant information for each quest on this list such as which zone it takes place in, what type of quest it is, whether or not you're required to complete it to advance and (of course) how to complete the quest. Below is an example that will serve as your Key for this page. If you're confused as to what any of the categories on this page mean take a look at the Key below.
Key:
Name of the Mission
Advance Req: If you are required to beat the mission to progress
Type: The type of mission this is, Gathering, Combat or Hunting
Video: My Youtube Video Walkthrough of this mission
Location: Where this mission takes place
Goal: The objective of this mission
#1 Absolute Power!
#1 Absolute Power!
Advance Req: No
Type: Hunting Quest
Video: Absolute Power Quest Walkthrough (Light Bowgun)
Location: Snowy Mountains (Night)
Goal: Hunt Tigrex (2400 HP). This is going to be the hardest quest that you've had to do up until this point. In order to beat Tigrex you're going to need to be extremely prepared and be skilled enough to dodge at least 90% of his attacks. Follow the links provided and read up on this monster to make the fight easier, you're going to have to kill Tigrex again after this too.
Tigrex Hitzones & Weaknesses:
#2 The Legendary Kirin!
#2 The Legendary Kirin!
Advance Req: No
Type: Slaying Quest
Video: The Legendary Kirin Quest Walkthrough (Light Bowgun)
Location: Snowy Mountains (Night)
Goal: Slay Kirin (2560 HP). Despite looking like a deer Kirin is actually an Elder Dragon! At the start of the quest you can find Kirin in area #6, it will eventually move to areas 7 or 8 if you do not engage it. Finding this beast isn't the difficult part, the fight with it is.
Kirin Hitzones & Weaknesses:
#3 Two Roars in the Snow!
#3 Two Roars in the Snow!
Advance Req: No
Type: Hunting Quest
Video: Two Roars in the Snow Quest Walkthrough (Light Bowgun)
Location: Snowy Mountains (Night)
Goal: Hunt two Blangongas (1260 HP Each). At the start of the mission one Blangonga is in area #1 and the other is in area #7. When you deal enough damage to them they'll flee to different areas before eventually retreating to their den (area #3) when they are badly wounded. Finding these two enemies isn't the hard part, beating them is. One on one they can be managed but you'll want to avoid both of them ganging up on you in the same area.
Blangongas Hitzones & Weaknesses:
#4 The Poison Siege
#4 The Poison Siege
Advance Req: Yes
Type: Hunting Quest
Video: The Poison Siege Quest Walkthrough (Light Bowgun)
Location: Jungle (Night)
Goal: Hunt Gypceros (840 HP) and Purple Gypceros (980 HP). The Gypceros starts in area #5 and the Purple Gypceros starts out in area #2. Both of these monsters spend less than one minute in each area and travel around frequently. My advice is to pop a Psychoserum to quickly find them when you're ready to fight.
Gypceros Hitzones & Weaknesses:

#5 The Tigrex's Roar
#5 The Tigrex's Roar
Advance Req: No
Type: Hunting Quest
Video: The Tigrex's Roar Quest Walkthrough (Light Bowgun)
Location: Desert (Day)
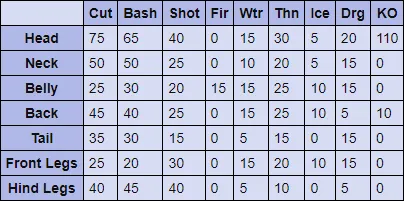
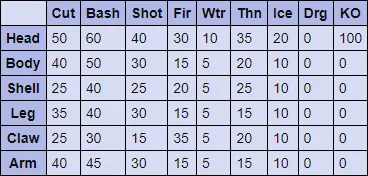
Goal: Hunt the Tigrex (2800 HP). At the start of the mission you can find him in area #5 on the map, he'll stay here for a few minutes before switching. He will randomly pick an area to visit next, I have seen him in areas 1, 2, 9, 7 and 3 - basically every part of the map that is out doors.
Tigrex Hitzones & Weaknesses:
#6 The Runaway Diablos
#6 The Runaway Diablos
Advance Req: Yes
Type: Hunting Quest
Video: The Runaway Diablos Quest Walkthrough (Light Bowgun)
Location: Desert (Day)
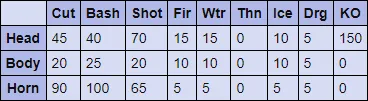
Goal: Hunt the Diablos (2800 HP). When the mission begins you can find the Diablos in area #7, he stays here for a long time in my experience before eventually switching. From what I have seen he randomly travels to areas 3, 5, 9, 7, 2 and 1.
Diablos Hitzones & Weaknesses:
#7 The Fierce Black Horn
#7 The Fierce Black Horn
Advance Req: No
Type: Hunting Quest
Video: The Fierce Black Horn Quest Walkthrough (Light Bowgun)
Location: Desert (Night)
Goal: Hunt the Black Diablos (2640 HP). At the start of this mission you can find the Black Diablos in area #7. She will eventually randomly move to areas 2, 1, 5, and 3, from what I have seen she doesn't spend much time in some of the areas but often spends a lot of time in areas 7 and 5.
Black Diablos Hitzones & Weaknesses:

#8 Ultimate Crab Dinner
#8 Ultimate Crab Dinner
Advance Req: Yes
Type: Hunting Quest
Video: Ultimate Crab Dinner Quest Walkthrough (Light Bowgun)
Location: Desert (Night)
Goal: Hunt two Daimyo Hermitaurs (1320 HP). You can find one crab in area #3 and the other in area #8 at the start of the mission. Each crab will move around very quickly, spending less than one minute in each area sometimes. My recommendation is to bring Psychoserum to find them as that'll make it way easier. As far as fighting these crabs, I recommend battle arenas 3 or 9 because each of these locations have ledges you can climb ontop of and hit the crabs safely while they are unable to hit you.
Daimyo Hermitaurs Hitzones & Weaknesses:
#9 Black Rock in the Swamp
#9 Black Rock in the Swamp
Advance Req: No
Type: Hunting Quest
Video: Black Rock in the Swamp Quest Walkthrough (Light Bowgun)
Location: Swamp (Night)
Goal: Hunt the Black Gravios (3520 HP). You can find the Black Gravios in area #8 at the start of this mission. It spends awhile in this area before eventually moving onto areas 6, 5, 4 and then returning to area #8. I have watched it repeat this rotation multiple times on two different missions so I am guessing this is the patrol route it follows.
Black Gravios Hitzones & Weaknesses:

#10 Seeking the Strange Mask
#10 Seeking the Strange Mask
Advance Req: No
Type: Slaying Quest
Video: Seeking the Strange Mask Quest Walkthrough (Light Bowgun)
Location: Forest & Hills (Day)
Goal: Defeat 5 Shakalakas. You can find the Shakalakas buried under the ground throughout this map, look for the bright red mushrooms that stand out like a sore thumb and run overtop of them. If there is a Shakalaka hiding under the mushroom it will pop out and attack you. Search the map for 5 of these to complete the quest. You can find the first Shakalaka in area 1, from here I normally go to areas 8, 10, 11 and finally 3. Sometimes the Shakalaka in these areas won't spawn for you out of the Mushroom and if that happens you have to visit a different area and try there. I also recommend returning to a previous area and checking the mushroom to see if it works after you eliminate a few more Shakalakas; sometimes a previously inactive mushroom will become active.
#11 Terror of the Gravios
#11 Terror of the Gravios
Advance Req: Yes
Type: Hunting Quest
Video: Terror of the Gravios Quest Walkthrough (Light Bowgun)
Location: Volcano (Day)
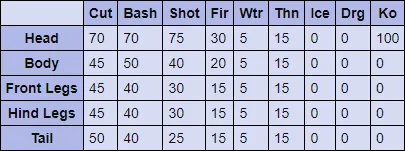
Goal: Hunt the Gravios (2800 HP). When the mission starts you can find Gravios in area #7, he'll hang out here for a little bit before moving to areas 5, 4, 3 and back to area 7. From what I have seen he seems to follow this same patrol route every mission.
Gravios Hitzones & Weaknesses:
#12 Check the Ancient Tower
#12 Check the Ancient Tower
Advance Req: No
Type: Slaying Quest
Video: Check the Ancient Tower Quest Walkthrough (Light Bowgun)
Location: Tower
Goal: Defeat 10 Remobra. Remobra are easy to kill flying wyvern enemies which are found in many locations throughout this entire tower. You can find the Remobra enemies in areas 2, 4, 6, 8 and 10.
#13 Overseer of the Ancients
#13 Overseer of the Ancients
Advance Req: No
Type: Slaying Quest
Video: Overseer of the Ancients Quest Walkthrough (Light Bowgun)
Location: Tower (Day)
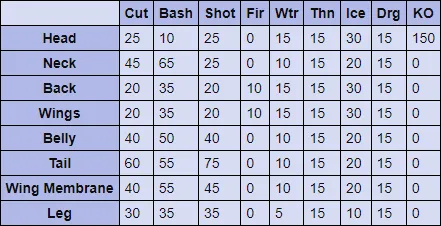
Goal: Defeat Lunastra (7000 HP). This quest and The Empress Blazing Throne are rotated in and out depending on which you have completed last. Both of them require you to defeat Lunastra - the only thing that changes is the location. Much like all of the Elder Dragon quests in this game you don't have to kill Lunastra to achieve victory - doing enough damage to him and causing him to flee will net you victory as well. Additionally, the damage and breaks you deal to Lunastra are carried over from quest to quest as long as you don't Abandon it. What this means is you can whittle Lunastra down over the course of multiple quests and secure the kill that way.
Lunastra Hitzones & Weaknesses:

#13 The Empress Blazing Throne
Advance Req: No
Type: Slaying Quest
Video: The Empress's Blazing Throne (Light Bowgun)
Location: Volcano (Day)
Goal: Defeat Lunastra (7000 HP). This quest and Overseer of the Ancients are rotated in and out depending on which you completed last. They both require you to defeat Lunastra, the only thing that will change is the location. Much like all of the Elder Dragon quests in this game you don't have to kill Lunastra to achieve victory - doing enough damage to him and causing him to flee will net you victory as well. Additionally, the damage and breaks you deal to Lunastra are carried over from quest to quest as long as you don't Abandon it. What this means is you can whittle Lunastra down over the course of multiple quests and secure the kill that way. If you need more help defeating Lunastra I recommend you check out my Hunt Preparation Guide as well as my Elder Dragon Weaknesses Guide.
Lunastra Hitzones & Weaknesses:
#14 The Elder Dragon of Mist
#14 The Elder Dragon of Mist
Advance Req: No
Type: Slaying Quest
Video: The Elder Dragon of Mist Quest Walkthrough (Light Bowgun)
Location: Forest & Hills (Day)
Goal: Defeat Chameleos (8000 HP). This quest as well as Towards the Silence are rotated in and out depending on which you have completed last. Both quests require you to defeat Chameleos, the only thing that changes is the area you're fighting. For all of the Elder Dragon quests in this game you don't need to kill the dragon to achieve victory. If you deal enough damage it will flee and that will result in your victory as well earning you loot and the rewards. Additionally, any damage and breaks you deal to Chameleos are carried over between quests until you defeat him. When the mission starts you can find Chameleos in area #9, after a little bit of time he will move to areas 3, 2, 5 and then it always seems to be random. I've watched him follow the 9, 3, 2, 5 order a few times but then he sometimes goes back to 9, goes to 4 or just picks a random area. If you need help defeating Chameleos check out my Hunt Preparation Guide as well as my Elder Dragon Weaknesses Guide - both of these pages will give you more information.
Chameleos Hitzones & Weaknesses:

#14 Towards the Silence
Advance Req: No
Type: Slaying Quest
Video: Towards the Silence Quest Walkthrough (Light Bowgun)
Location: Swamp (Day)
Goal: Defeat Chameleos (8000 HP). Towards the Silence and The Elder Dragon of Mist are rotated in and out depending on which you completed last. Each quest requires you to defeat Chameleos, the only thing that changes is the arena you're fighting in. For all of the Elder Dragon quests in this game you don't need to kill the dragon to achieve victory. If you deal enough damage it will flee and that will result in your victory as well earning you loot and the rewards. Additionally, any damage and breaks you deal to Chameleos are carried over between quests until you defeat him. You can find Chameleos in area 8 at the start of the mission, after a little bit of time he will move to areas 6, 4, 2, 9 and then back to area 8. I have seen him follow this route twice so I am guessing this is his normal patrol route. If you need help defeating Chameleos check out my Hunt Preparation Guide as well as my Elder Dragon Weaknesses Guide - both of these pages will give you more information.
Chameleos Hitzones & Weaknesses:
#15 Festival of Thunder
#15 Festival of Thunder
Advance Req: No
Unlock: I believe this is the Japanese version only? Because I tried and tried but could not get this quest to ever show up for me
Type: Hunting Quest
Video: N/A
Location: Swamp (Night)
Goal: Hunt the Mini Khezu
#16 The Pink Horde
#16 The Pink Horde
Advance Req: No
Unlock: I believe this is the Japanese version only? Because I tried and tried but could not get this quest to ever show up for me
Type: Hunting Quest
Video: N/A
Location: Swamp (Day)
Goal: Hunt two Congalala
(Urgent) A Troublesome Pair
(Urgent) A Troublesome Pair
Advance Req: Yes
Type: Hunting Quest
Video: A Troublesome Pair Quest Walkthrough (Light Bowgun)
Location: Forest & Hills (Day)
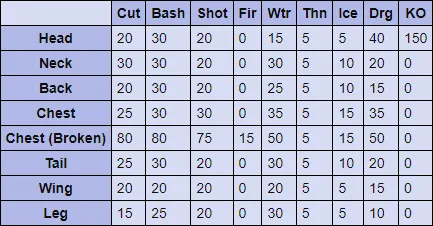
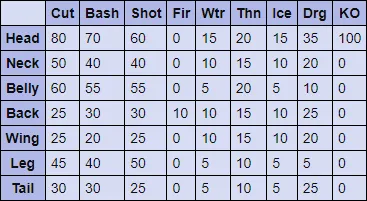
Goal: Hunt Rathalos (1120 HP - Black in color) and Rathian (1400 HP - Green in color). At the start of this mission Rathalos starts out in area #4 and Rathian starts out in area #5. At least I think so, both of these enemies leave their respective areas within 30 seconds of the mission starting. What I normally do when this mission starts is go to areas 2 or 3 to fight Rathalos or to area 9 where I can fight Rathian. More often than not I will catch these enemies in one of these areas. From what I have seen, Rathalos goes to the outside areas (4, 2, 3) and Rathian sticks to the areas with more tight corridors like 5 and 9.
Rathalos Hitzones & Weaknesses:

Rathian Hitzones & Weaknesses:
Elder Quests
- Level 1
- Level 2
- Level 3
- Level 4
- Level 5
- Level 6