
Level 4 Elder Quest Walkthroughs - MHFU
This page doubles as both a list and walkthrough of all the 4 Star Elder Quests in Monster Hunter Freedom Unite & Monster Hunter Freedom 2. Both of these games have mostly the same set of quests which is why this information works for both of them. There are a few quests that are unique to Unite and I will mention them when they come up.
I've included all of the relevant information for each quest on this list such as which zone it takes place in, what type of quest it is, whether or not you're required to complete it to advance and (of course) how to complete the quest. Below is an example that will serve as your Key for this page. If you're confused as to what any of the categories on this page mean take a look at the Key below.
Key:
Name of the Mission
Advance Req: If you are required to beat the mission to progress
Type: The type of mission this is, Gathering, Combat or Hunting
Video: My Youtube Video Walkthrough of this mission
Location: Where this mission takes place
Goal: The objective of this mission
#1 Gathering - Volcanic Zone!
#1 Gathering - Volcanic Zone
Advance Req: No
Type: Gathering Quest
Video: blah blah
Location: Volcano (Day)
Goal: Deliver the Paw Pass. In my opinion the only item(s) worth going out of your way for in the Volcano map is Ruststones. You can gather Ruststones from the mining locations at areas 8 and 6 on this map.
#2 The Ruler of the Snow
#2 The Ruler of the Snow
Advance Req: No
Type: Hunting Quest
Video: The Ruler of the Snow Quest Walkthrough (Bow)
Location: Snowy Mountains (Day)
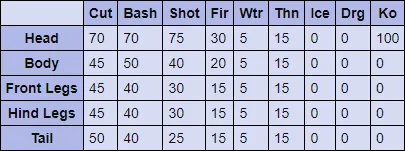
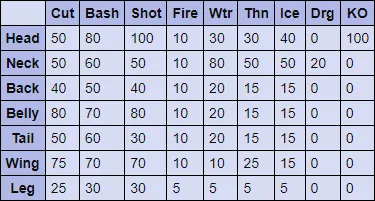
Goal: Hunt Blangonga (1960 HP). The first area that I normally see the Blangonga in is area #8. After a few minutes he'll leave this area and start his patrol which goes through areas 6, 3, 2 and 7. I think the route he goes is random because I have seen him jump around between areas 2, 3 and 7 then to somewhere else in a random order.
Blangonga Hitzones & Weaknesses:
#3 Red Shadow in the Swampland
#3 Red Shadow in the Swampland
Advance Req: No
Type: Hunting Quest
Video: Red Shadow in the Swampland Quest Walkthrough (Light Bowgun)
Location: Swamp (Night)
Goal: Hunt Red Khezu (2160 HP). For the first bit of this mission you can find the Red Khezu in areas 9, 3 and 7 on the map (every location that is an indoor cave). If you're having a hard time finding him look up because he'll be found crawling on the ceiling of these caves when he is inside of them. Eventually he will leave the caves and start flying around to visit other locations. While outside he will visit areas 4 and 6.
Red Khezu Hitzones & Weaknesses:

#4 The Lone Black Garuga!
#4 The Lone Black Garuga!
Advance Req: No
Type: Hunting Quest
Video: The Lone Black Garuga Quest Walkthrough (Light Bowgun)
Location: Jungle (Night)
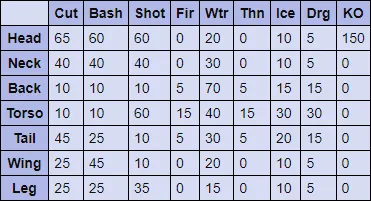
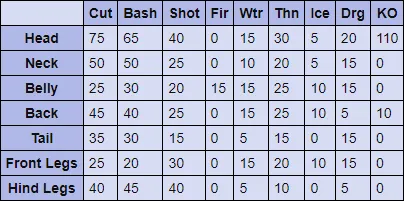
Goal: Hunt Yian Garuga (2400 HP). The very first time you hunt this boss you'll find it in the monster den on this map (area #6) it will stay in here until you encounter it since there is a cinematic associated with it. After beating it the first time you can find it during future runs in areas 3, 2, 1 and 8. It normally patrols through all of these areas from what I have seen.
Yian Garuga Hitzones & Weaknesses:
#5 Twin Velocidrome!
#5 Twin Velocidrome!
Advance Req: No
Type: Hunting Quest
Video: Twin Velocidrome Quest Walkthrough (Light Bowgun)
Location: Jungle (Night)
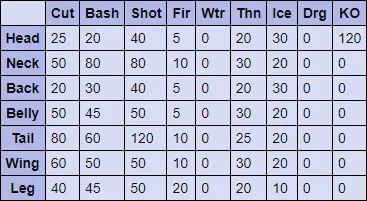
Goal: Hunt two Velocidrome (560HP Each). As the quest tells you, we have two bosses this time. Both of these raptors will run the same circuit on the map - they just start in different areas and are designed to never cross paths unless you stop one of them intentionally. The raptors run through areas 5 - 7 - 3 - 8 and finally 6 before returning to area 5 and starting again.
Velocidrome Hitzones & Weaknesses:

#6 Attack of the Giant Bugs!
#6 Attack of the Giant Bugs!
Advance Req: No
Type: Slaying Quest
Video: Attack of the Giant Bugs Quest Walkthrough (Bow)
Location: Jungle (Night)
Goal: Slay 20 Hornetaurs. Hornetaurs are the small bugs that look like crickets and crawl across the ground. These enemies are all over the place during this quest and you should have no trouble at all finding them and taking them out. Using a ranged weapon for these guys can be a little annoying though since you have to aim down to hit them!
#7 Battle of the Blos
#7 Battle of the Blos
Advance Req: Yes
Type: Hunting Quest
Video: Battle of the Blos Quest Walkthrough (Light Bowgun)
Location: Desert (Night)
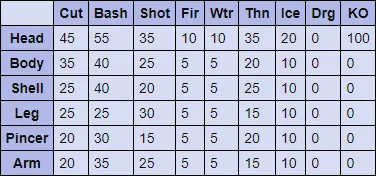
Goal: Hunt Monoblos (2400 HP). You can find this boss in area #7 at the start but eventually he'll leave and travel to areas 3, 5 and 9. Like all enemies that burrow under the sand the best way to get them out to start combat is with a Sonic Bomb.
Monoblos Hitzones & Weaknesses:

#8 The Silver Horn!
#8 The Silver Horn
Advance Req: No
Type: Hunting Quest
Video: The Silver Horn Quest Walkthrough (Light Bowgun)
Location: Desert (Day)
Goal: Hunt White Monoblos (3600 HP). At the start of the mission you can almost always find this boss in area #7. Eventually the boss will leave this area and travel to areas 5, 3, 1 and 2. He spends a long time in each area (a couple of minutes at least) before moving to another. From what I have seen there is no pattern or patrol route he follows, it seems mostly random.
White Monoblos Hitzones & Weaknesses:
#9 Supreme Ruler of the Swamp
#9 Supreme Ruler of the Swamp
Advance Req: No
Type: Hunting Quest
Video: Supreme Ruler of the Swamp Quest Walkthrough (Light Bowgun)
Location: Swamp (Day)
Goal: Hunt Shogun Ceanataur (1600 HP). When the mission starts you can almost always find the boss in area #9 on the map. It will eventually move to areas 3, 4, 5, 6 and 7 at random from what I have seen.
Shogun Ceanataur Hitzones & Weaknesses:
#10 Trapped by Yian Kut-ku
#10 Trapped by Yian Kut-ku
Advance Req: No
Type: Hunting Quest
Video: Trapped by Yian Kut-ku Quest Walkthrough (Light Bowgun)
Location: Swamp (Night)
Goal: Defeat the Blue Yian Kut-Ku (1120 HP) and Pink Yian Kut-ku (640 HP). The Pink Yian Kut-ku starts in area #8 and the Blue Yian Kut-ku starts in area #2. If left undisturbed they will move around the map to most of the outside areas.
Blue Yian Kut-ku Hitzones & Weaknesses:

Pink Yian Kut-ku Hitzones & Weaknesses:
#11 The Ioprey Leader
#11 The Ioprey Leader
Advance Req: No
Type: Hunting Quest
Video: The Ioprey Leader Quest Walkthrough (Light Bowgun)
Location: Volcano (Day)
Goal: Hunt Iodrome (800 HP). The Iodrome is a raptor and like most raptors they will run a circuit through the map in a very predictable rotation. He starts in area #7 and goes through 3, 5, 6 and the back to 7.
Iodrome Hitzones & Weaknesses:

#12 Basarios: Unseen Peril
#12 Basarios: Unseen Peril
Advance Req: Yes
Type: Hunting Quest
Video: Basarios: Unseen Peril Quest Walkthrough (Light Bowgun)
Location: Volcano (Day)
Goal: Hunt Basarios (1440 HP). You can find Basarios in area #7 at the start of the mission, he's the giant rock that sticks out like a sore thumb in this area. Basarios stays in area #7 for a couple of minutes before moving on to areas 6, 4, 2 and then back to area 7. I've seen him follow this same patrol route over the course of three missions so I am guessing that's his set in stone (get the pun?) route.
Basarios Hitzones & Weaknesses:

#13 Commander in the Flames
#13 Commander in the Flames
Advance Req: Yes
Type: Hunting Quest
Video: Commander in the Flames Quest Walkthrough (Light Bowgun)
Location: Volcano (Night)
Goal: Hunt Shogun Ceanataur (1600 HP). At the start of the mission you can find the Shogun Ceanataur in area #6. He stays in area #6 for about a minute or two before moving through the map from area to area spending about a minute in each spot. I've watched him follow the same patrol route twice which is 7, 3, 4, 5 and back to 6.
Shogun Ceanataur Hitzones & Weaknesses:
#14 Ioprey Hunting
#14 Ioprey Hunting
Advance Req: No
Type: Slaying Quest
Video: Ioprey Hunting Quest Walkthrough (Light Bowgun)
Location: Volcano (Night)
Goal: Slay 20 Ioprey. Visit area #1 at the start of this mission since you can get 6 of the Ioprey we need from here. Then you'll want to visit areas 5 and 6 since both of them will have Ioprey and no other area will (for now). Once enough time passes Ioprey will spawn in area #7 too. Re-visit each of these areas to kill any respawns and you'll have more than enough Ioprey to complete the mission.
#15 A Band of Ceanataurs
#15 A Band of Ceanataurs
Advance Req: No
Type: Slaying Quest
Video: A Band of Ceanataurs Quest Walkthrough (Light Bowgun)
Location: Volcano (Day)
Goal: Slay 10 Ceanataurs. For this mission what I like to do is visit areas 2, 7 and 6 for all of the crabs in each area. Sometimes the crabs will be burrowed under the ground so keep an eye out for the small dust clouds above the ground. Once you've cleared out all of those areas (or enough time passes) Ceanataurs will start spawning in area #3, normally I finish the mission off in this area.
#16 More Coal Please
#16 More Coal Please
Advance Req: Yes
Type: Gathering Quest
Video: More Coal Please Quest Walkthrough (Light Bowgun)
Location: Volcano (Day)
Goal: Gather Coal. All you need to do for this quest is to mine various locations on this map and collect Coal. I strongly recommend you do locations 5, 6 and 8 first when you do this quest. Areas 5 and 6 will have the most Coal on the map and area 8 is the mountain peak where you have a chance of mining Ruststones. A Ruststone is a very valuable item that I will explain in another place, for now all you need to know is you should collect them and keep them in your storage.
#17 The Frozen Dictator
#17 The Frozen Dictator
Advance Req: No
Type: Slaying Quest
Video: The Frozen Dictator Quest Walkthrough (Light Bowgun)
Location: Snowy Mountains (Night)
Goal: Defeat Kushala Daora (7000 HP). Your target for this quest is an Elder Dragon, this is a very difficult enemy which will require a high amount of preparation. In order to complete this quest you do not need to defeat Kushala, if you deal enough damage to this dragon it will flee and that will result in victory as well. One thing to note is this quest is very closely intertwined with The Elder Dragon of Wind; you will be fighting the same Kushala in both of these quests and any damage you deal to him or any breaks will be carried over from quest to quest. What this means is you can defeat Kushala Daora just by running these quests over and over and slowly wittling down its HP. As long as you do not Abandon the quest, the damage and breaks you apply to Kushala will carry over. If you need extra help defeating this boss I recommend you check out my Hunt Preparation Guide and/or my Elder Dragon Weaknesses Guide.
Kushala Daora Hitzones & Weaknesses:

#17 The Elder Dragon of Wind
Advance Req: No
Unlock: Complete #17 The Frozen Dictator to unlock this quest
Type: Slaying Quest
Video: The Elder Dragon of Wind Quest Walkthrough (Light Bowgun)
Location: Jungle (Night)
Goal: Defeat Kushala Daora (7000 HP). As I said for The Frozen Dictator, both of these quests are very closely intertwined. Damage or breaks dealt to Kushala in one of these quests will carry over to the next one until you eventually defeat him.
Kushala Daora Hitzones & Weaknesses:
#18 (MHFU Only) Hermitaur Buffet
#18 (MHFU Only) Hermitaur Buffet
Advance Req: No
Type: Slaying Quest
Video: Hermitaur Buffet Quest Walkthrough (Light Bowgun)
Location: Arena (Day)
Goal: Defeat 20 Hermitaurs. This is a very easy quest, there are only two areas to this map - the area you start in and the "battle arena". Grab the Farcaster from the chest in the main area and exit into the battle arena to start fighting crabs. In this area crabs will spawn endlessly until you're done the quest, if you need a break use the Farcaster to return to safety.
(Urgent) Absolute Power
(Urgent) Absolute Power
Advance Req: No
Type: Hunting Quest
Video: Absolute Power Quest Walkthrough (Light Bowgun)
Location: Snowy Mountains (Night)
Goal: Hunt Tigrex (2400 HP). This is going to be the hardest quest that you've had to do up until this point. In order to beat Tigrex you're going to need to be extremely prepared and be skilled enough to dodge at least 90% of his attacks. Follow the links provided and read up on this monster to make the fight easier, you're going to have to kill Tigrex again after this too.
Tigrex Hitzones & Weaknesses:
Elder Quests
- Level 1
- Level 2
- Level 3
- Level 4
- Level 5
- Level 6