
Level 3 Elder Quest Walkthroughs - MHFU
This page doubles as both a list and walkthrough of all the 3 Star Elder Quests in Monster Hunter Freedom Unite & Monster Hunter Freedom 2. Both of these games have mostly the same set of quests which is why this information works for both of them. There are a few quests that are unique to Unite and I will mention them when they come up.
I've included all of the relevant information for each quest on this list such as which zone it takes place in, what type of quest it is, whether or not you're required to complete it to advance and (of course) how to complete the quest. Below is an example that will serve as your Key for this page. If you're confused as to what any of the categories on this page mean take a look at the Key below.
Key:
Name of the Mission
Advance Req: If you are required to beat the mission to progress
Type: The type of mission this is, Gathering, Combat or Hunting
Video: My Youtube Video Walkthrough of this mission
Location: Where this mission takes place
Goal: The objective of this mission
#1 Gathering - Swamp Zone!
#1 Gathering - Swamp Zone!
Advance Req: No
Type: Gathering Quest
Video: N/A
Location: Swamp (Day)
Goal: Turn in Paw Pass. Each time you reach a new rank there will be a set of Gathering Quests made specifically for each of the new biomes you get access to. You can do whatever you want during this quest, gather what you want, kill what you want and complete the quest when you want. Look at these quests as a means for learning the new map and gathering some of the new resources.
#2 Gathering - Forest and Hills!
#2 Gathering - Forest and Hills!
Advance Req: No
Type: Gathering Quest
Video: N/A
Location: Forest & Hills (Day)
Goal: Turn in Paw Pass. Each time you reach a new rank there will be a set of Gathering Quests made specifically for each of the new biomes you get access to. You can do whatever you want during this quest, gather what you want, kill what you want and complete the quest when you want. Look at these quests as a means for learning the new map and gathering some of the new resources.
#3 Shadow in the Snow!
#3 Shadow in the Snow!
Advance Req: No
Type: Hunting Quest
Video: Shadow in the Snow Quest Walkthrough (Bow)
Location: Snowy Mountains (Day)
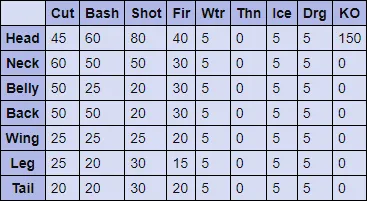
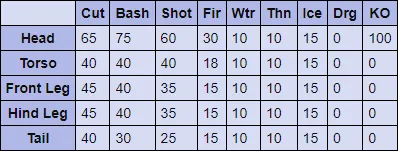
Goal: Hunt down Khezu (1440HP). At the start of this mission you'll want to check area #6 and area #3 for this boss. Normally he starts in area #6 and flies back and forth between 6, 7 and 8. When he is wounded he'll fly back to his cave den which is area #3.
Khezu Hitzones & Weaknesses:
#4 The Subterranean Glutton!
#4 The Subterranean Glutton!
Advance Req: No
Type: Gathering Quest
Video: The Subterranean Glutton Quest Walkthrough
Location: Snowy Mountains (Night)
Goal: Gather 3 Khezu Whelps. You can mine Khezu Whelps from the dragon corpse on the mountain top in area #8.
#5 Blango Slaying Tactics!
#5 Blango Slaying Tactics!
Advance Req: Yes
Type: Slaying Quest
Video: Blango Slaying Tactics Quest Walkthrough
Location: Snowy Mountains (Night)
Goal: Slay 10 Blango. The Blango enemies are apes that you can find roaming around in the icy portions of this map.
#6 Aim for the Jungle Crab!
#6 Aim for the Jungle Crab!
Advance Req: No
Type: Hunting Quest
Video: Aim for the Jungle Crab Quest Walkthrough
Location: Jungle (Night)
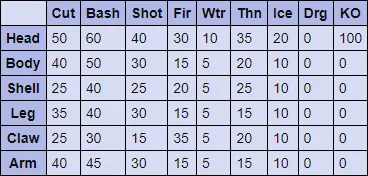
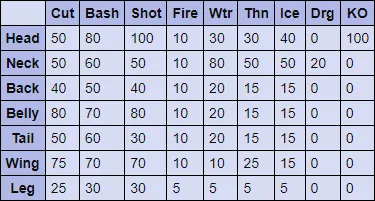
Goal: Hunt the Daimyo Hermitaur (1680 HP). You can find the Daimyo Hermitaur in area #3 at the start of this mission; he'll typically be here for the first few minutes then he'll start patrolling around the map. From my research he'll first go to area 9 then to 1, 2 before going back to 3. He doesn't seem to spend much time in each area before moving to the next.
Daimyo Hermitaur Hitzones & Weaknesses:
#7 Master of the Giant Lake!
#7 Master of the Giant Lake!
Advance Req: No
Type: Hunting Quest
Video: Master of the Giant Lake Quest Walkthrough (Light Bowgun)
Location: Jungle (Night)
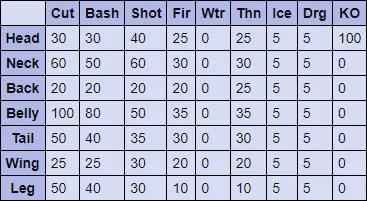
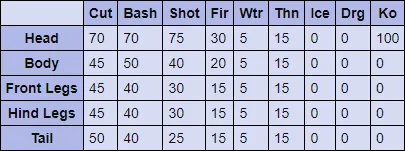
Goal: Hunt Green Plesioth (2640 HP). The Green Plesioth travels back and forth between areas #3 and 4 on this map - he's found in the ocean portion of these areas and it can be difficult to get his attention without a ranged weapon. My advice is to wait until he is near the surface and some of his body is exposed then hit with him a projectile of some kind.
Green Plesioth Hitzones & Weaknesses:
#8 A Swarm of Hermitaurs!
#8 A Swarm of Hermitaurs!
Advance Req: No
Type: Slaying Quest
Video: A Swarm of Hermitaurs Quest Walkthrough
Location: Jungle (Day)
Goal: Slay 10 Hermitaurs. You can find Hermitaurs in the beach areas of this map (4, 3, 9 and 10). Sometimes the crabs are buried in the sand, look for some dust clouds above the ground to locate underground crabs. To get an underground crab out of the ground simply run overtop of it. Don't forget to check the same area twice for respawns too.
#9 The Purple Poison Menace!
#9 The Purple Poison Menace!
Advance Req: No
Type: Hunting Quest
Video: The Purple Poison Menace Quest Walkthrough (Bow)
Location: Jungle (Night)
Goal: Hunt Purple Gypceros (1680 HP). In my experience the Purple Gypceros starts out in area #6 which is the monster den on this map. After a few minutes he will start traveling from area to area typically visiting areas 5, 4, 3, 2 and 9. Maybe it's just my luck but I have seen him go through each of these areas in the order provided many times.
Purple Gypceros Hitzones & Weaknesses:
#10 The Lurking Desert Giant!
#10 The Lurking Desert Giant!
Advance Req: Yes
Type: Hunting Quest
Video: The Lurking Desert Giant Quest Walkthrough (Bow)
Location: Desert (Day)
Goal: Hunt Daimyo Hermitaur (1200 HP). At the start of this quest you can find Daimyo Hermitaur in area #9 but he doesn't stay here very long at all. Within a minute after the quest starts he will switch to area #5 where he'll hang out for a little bit. Typically in this area is where you'll find and fight the crab at the start of the quest. If left undisturbed then Daimyo Hermitaur will roam between areas 5, 1, 2, 3, 7 and 10 before finally returning to area 5.
Daimyo Hermitaur Hitzones & Weaknesses:
#11 Water Wyvern in the Desert!
#11 Water Wyvern in the Desert!
Advance Req: No
Type: Hunting Quest
Video: Water Wyvern in the Desert Quest Walkthrough (Bow)
Location: Desert (Day)
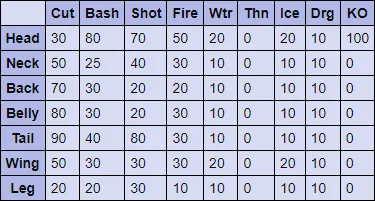
Goal: Hunt Plesioth (2000 HP). For this quest we're hunting another Plesioth - just like in the previous mission you'll find this Plesioth in the deep water areas. In particular the two areas you can find him at on this map area areas #7 and #6. Wait until the Plesioth comes up to the top of the water and exposes its fins - hit it while it's exposed to begin the fight and bring it out of the water.
Plesioth Hitzones & Weaknesses:

#12 Slay the Genprey!
#12 Slay the Genprey!
Advance Req: No
Type: Slaying Quest
Video: Slay the Genprey Quest Walkthrough (Bow)
Location: Desert (Day)
Goal: Slay 20 Genprey. These are the raptor enemies and you can find them in many different locations around the Desert. You can find Genprey in areas 1, 5, 10, 3, 7, 6 and 4. It seems like in some of the areas (like area #7) the Genprey only spawn there after the quest has been active for a bit of time. Maybe they only spawn here during the evening or something like that or maybe it's all random! I am honestly not sure - either way though you shouldn't have any issue finding all of the Genprey you need for this quest.
#13 Gypceros: Venomous Terror!
#13 Gypceros: Venomous Terror!
Advance Req: Yes
Type: Hunting Quest
Video: Gypceros: Venomous Terror Quest Walkthrough
Location: Swamp (Night)
Goal: Hunt Gypceros (1200 HP). At the start of this mission you can find Gypceros in area #2 on the map. Once a bit of time passes he will start roaming through different areas in a random order. I've seen him travel to areas 4, 5, 6 and 8.
Gypceros Hitzones & Weaknesses:

#14 Attack of the Blue Kut-ku!
#14 Attack of the Blue Kut-ku!
Advance Req: No
Type: Hunting Quest
Video: Attack of the Blue Kut-ku Quest Walkthrough
Location: Swamp (Day)
Goal: Hunt the Blue Yian Kut-ku (1400 HP). You can find the Blue Yian Kut-ku in area #8 at the start of the mission, after a few minutes he'll leave and start his patrol route. From what I have seen he patrols to areas 2, 4, 5 and 6 as well as occasionally back to area 8 as well.
Blue Yian Kut-ku Hitzones & Weaknesses:

#15 The Mischief-Maker!
#15 The Mischief-Maker!
Advance Req: No
Type: Hunting Quest
Video: The Mischief-maker Quest Walkthrough (Bow)
Location: Swamp (Day)
Goal: Hunt Congalala (1400 HP). I typically always see Congalala at area #8 when the mission starts. Once he leaves this area he normally travels back and forth between areas 6, 5, 4, 2 and 7. He spends a lot of time in some of the areas so it shouldn't be hard to find him.
Congalala Hitzones & Weaknesses:
#16 Fang of the Iodrome!
#16 Fang of the Iodrome!
Advance Req: No
Type: Hunting Quest
Video: Fang of the Iodrome Quest Walkthrough (Bow)
Location: Swamp (Day)
Goal: Hunt Iodrome (800 HP). The Iodrome runs a pretty routine path through this map starting in area 6 at the start and going through 8, 4, 5 and back to 6. I have spent some time watching this monster's route and it seems like each time it does a lap it will turn around and retrace its steps until it gets back to the same position. It's a somewhat confusing and unique route for a monster.
Iodrome Hitzones & Weaknesses:

#17 Slay the Great Kut-ku!
#17 Slay the Great Kut-ku!
Advance Req: No
Type: Hunting Quest
Video: Slay the Great Kut-ku Quest Walkthrough (Bow)
Location: Forest & Hills (Day)
Goal: Hunt the Yian Kut-ku (800 HP). At the start of this mission you can find the Yian Kut-ku in area #9 on the map. Eventually it will leave this area and start a patrol route which goes through areas 3, 2, 4, and 5.
Yian Kut-ku Hitzones & Weaknesses:
#18 A Killing from Mushrooms!
#18 A Killing from Mushrooms!
Advance Req: Yes
Type: Gathering Quest
Video: A Killing from Mushrooms Quest Walkthrough
Location: Forest & Hills (Day)
Goal: Gather 10 Special Mushrooms.
(Urgent) The Ruler of the Snow!
(Urgent) The Ruler of the Snow!
Advance Req: Yes
Type: Hunting Quest
Video: The Ruler of the Snow Quest Walkthrough (Bow)
Location: Snowy Mountains (Day)
Goal: Hunt Blangonga (1960 HP). The first area that I normally see the Blangonga in is area #8. After a few minutes he'll leave this area and start his patrol which goes through areas 6, 3, 2 and 7. I think the route he goes is random because I have seen him jump around between areas 2, 3 and 7 then to somewhere else in a random order.
Blangonga Hitzones & Weaknesses:
Elder Quests
- Level 1
- Level 2
- Level 3
- Level 4
- Level 5
- Level 6