
Level 2 Elder Quest Walkthroughs - MHFU
This page doubles as both a list and walkthrough of all the 2 Star Elder Quests in Monster Hunter Freedom Unite & Monster Hunter Freedom 2. Both of these games have mostly the same set of quests which is why this information works for both of them. There are a few quests that are unique to Unite and I will mention them when they come up.
I've included all of the relevant information for each quest on this list such as which zone it takes place in, what type of quest it is, whether or not you're required to complete it to advance and (of course) how to complete the quest. Below is an example that will serve as your Key for this page. If you're confused as to what any of the categories on this page mean take a look at the Key below.
Key:
Name of the Mission
Advance Req: If you are required to beat the mission to progress
Type: The type of mission this is, Gathering, Combat or Hunting
Video: My Youtube Video Walkthrough of this mission
Location: Where this mission takes place
Goal: The objective of this mission
#1 Gathering - Snowy Mountains!
#1 Gathering - Snowy Mountains!
Advance Req: No
Type: Gathering Quest
Video: Snowy Mountains Resource Locations
Location: Snowy Mountains (Day)
Goal: Turn in Paw Pass. Each time you reach a new rank there will be a set of Gathering Quests made specifically for each of the new biomes you get access to. You can do whatever you want during this quest, gather what you want, kill what you want and complete the quest when you want. Look at these quests as a means for learning the new map and gathering some of the new resources.
#2 Gathering - Jungle Zone!
#2 Gathering - Jungle Zone!
Advance Req: No
Type: Gathering Quest
Video: Jungle Zone Resource Locations
Location: Jungle (Day)
Goal: Turn in Paw Pass. Each time you reach a new rank there will be a set of Gathering Quests made specifically for each of the new biomes you get access to. You can do whatever you want during this quest, gather what you want, kill what you want and complete the quest when you want. Look at these quests as a means for learning the new map and gathering some of the new resources.
#3 Gathering - Desert Zone!
#3 Gathering - Desert Zone!
Advance Req: No
Type: Gathering Quest
Video: Desert Zone Resource Locations
Location: Desert (Day)
Goal: Turn in Paw Pass. Each time you reach a new rank there will be a set of Gathering Quests made specifically for each of the new biomes you get access to. You can do whatever you want during this quest, gather what you want, kill what you want and complete the quest when you want. Look at these quests as a means for learning the new map and gathering some of the new resources.
#4 The Carnivorous Leader!
#4 The Carnivorous Leader!
Advance Req: No
Type: Slaying Quest
Video: The Carnivorous Leader Quest Walkthrough (Sword & Shield)
Location: Snowy Mountains (Day)
Goal: Hunt the Giadrome (360 HP). This quest is a repeat of the Rank 1 Urgent quest; it will be automatically completed when you start Rank 2.
Giadrome Hitzones & Weaknesses:

#5 Reckless Bulldrome Hunter!
#5 Reckless Bulldrome Hunter!
Advance Req: Yes
Type: Slaying Quest
Video: Reckless Bulldrome Hunter Quest Walkthrough (Bow)
Location: Snowy Mountains (Day)
Goal: Hunt the Bulldrome (600 HP). This guy roams around the mountain portion of the map - I recommend you clear out an area of enemies then wait for him to come to you. Alternatively, go from area to area until you find him and flush him out yourself!
Bulldrome Hitzones & Weaknesses:

#6 Slay the Giaprey!
#6 Slay the Giaprey!
Advance Req: No
Type: Slaying Quest
Video: Slay the Giaprey Quest Walkthrough (Bow)
Location: Snowy Mountains (Day)
Goal: Slay 20 Giaprey. You can find them in areas #3, #5, #6 and #8. I sometimes find them in #7 too but I don't think they respawn here once killed.
#7 The Pack of Blangos!
#7 The Pack of Blangos!
Advance Req: No
Type: Slaying Quest
Video: The Pack of Blangos Quest Walkthrough (Bow)
Location: Snowy Mountains (Night)
Goal: Slay 5 Blangos. Blangos can be found in areas #8 and #7 on the map. You will have to run back and forth between these two locations to make the Blangos respawn during this quest. Also, the Bulldrome big baddie can be found patrolling through this area as well.
#8 The Taboo Negligence!
#8 The Taboo Negligence!
Advance Req: No
Type: Gathering Quest
Video: The Taboo of Negligence Quest Walkthrough
Location: Snowy Mountains (Night)
Goal: Gather 15 Mountain Herbs.
#9 Hunt Down the Velocidrome!
#9 Hunt Down the Velocidrome!
Advance Req: No
Type: Hunting Quest
Video: Hunt Down the Velocidrome Quest Walkthrough (Bow)
Location: Jungle (Day)
Goal: Hunt the Velocidrome (360 HP). The Velocidrome is a raptor enemy which typically means he spends a lot of time running from area to area. He goes from area #8 to 6 - 5 - 7 - 3 and then back to area #8; this will be his rotation until you engage him. Once he is wounded enough typically he'll retreat to the den on this map which is area #6.
Velocidrome Hitzones & Weaknesses:

#10 Jungle Menace!
#10 Jungle Menace!
Advance Req: Yes
Type: Gathering Quest
Video: Jungle Menace Quest Walkthrough (Bow)
Location: Jungle (Night)
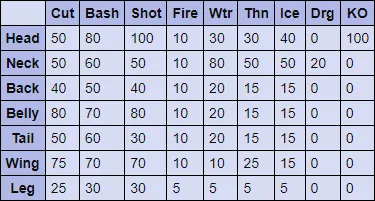
Goal: Hunt Yian Kut-ku (960 HP). In my experience he normally starts out in areas 5 or 6 and he travels back and forth between almost every area on the map. I've seen him in areas 2, 3, 4, 5, 6 and 9 while writing this guide. One thing to note is he can fly through area #7 but I personally have never seen him land here.
Yian Kut-ku Hitzones & Weaknesses:
#11 Rarest of the Rare Beasts!
#11 Rarest of the Rare Beasts!
Advance Req: Yes
Type: Hunting Quest
Video: Rarest of the Rare Beasts Quest Walkthrough (Bow)
Location: Jungle (Night)
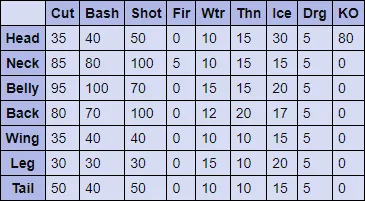
Goal: Hunt Congalala (1400 HP). At the start of the mission you can almost always find him in area #3. Once a bit of time passes though he normally starts roaming around between areas 9, 6, 1 and 3. From my experience the order he chooses to go from area to area is random, I have watched many bosses using the speed up feature on the PSP emulator and there is no predictable path they seem to take.
Congalala Weaknesses & Hitzones:
#12 Hunt the Rare Forest Congas!
#12 Hunt the Rare Forest Congas!
Advance Req: No
Type: Slaying Quest
Video: Hunt the Rare Forest Congas Quest Walkthrough (Bow)
Location: Jungle (Day)
Goal: Slay 10 Congas. This quest is pretty easy, you can find Congas throughout the entire map just go from area to area killing any apes you find.
#13 Attack of the Giant Bugs!
#13 Attack of the Giant Bugs!
Advance Req: No
Type: Slaying Quest
Video: Attack of the Giant Bugs Quest Walkthrough (Bow)
Location: Jungle (Day)
Goal: Defeat 20 Vespoids. More Vespoids will spawn on this quest than usual since we need to kill them. Vespoids are the flying bugs that you can find throughout this area; when killing them there is a high chance that the body will explode. If you want to skin a Vespoid for loot you'll need to defeat it with something like a Smoke Bomb, this will leave the body intact and allow you to skin it.
#14 Collect to Combine!
#14 Collect to Combine!
Advance Req: No
Type: Gathering Quest
Video: Collect to Combine Quest Walkthrough
Location: Jungle (Day)
Goal: Gather 10 Special Mushrooms.
#15 Hunt the Gendrome!
#15 Hunt the Gendrome!
Advance Req: No
Type: Hunting Quest
Video: Hunt the Gendrome Quest Walkthrough (Bow)
Location: Desert (Day)
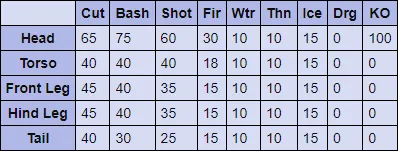
Goal: Hunt the Gendrome (540 HP). The Gendrome runs a circuit around the map along the same route every time. Where he starts when the mission begins is typically random but the circuit he runs is always the same in my experience. His circuit is area 6, 4, 2, 1, 5 and then back to 6.
Gendrome Hitzones & Weaknesses:

#16 The Land Shark!
#16 The Land Shark!
Advance Req: No
Type: Hunting Quest
Video: The Land Shark Quest Walkthrough (Bow)
Location: Desert (Day)
Goal: Hunt the Cephadrome (720 HP). He roams between area #2 and #5 at the start of the level in my experience. Once he is wounded he can go to many different places, thankfully he is pretty easy to find considering he's big and swims in the sand. My advice is bring a few Sonic Bombs with you to get him out of the sand when he is being annoying. Sometimes he will jump out and attack you and stay out of the sand... Other times he'll swim around in circles forever and force you to bring him out of the sand or wait (like in my video).
Cephadrome Hitzones & Weaknesses:
#17 Liver of Legend!
#17 Liver of Legend!
Advance Req: No
Type: Gathering Quest
Video: Liver of Legend Quest Walkthrough (Bow)
Location: Desert (Day)
Goal: Gather 3 Piscine Livers. You can obtain a Piscine Liver by killing a Cephalos monster and skinning it. Cephalos' are those annoying monsters that swim through the sand and are hard to bring above ground. The easiest way to bring them out of the ground is by using a Sonic Bomb but even then you only have a limited amount of time to do damage before they flee. If you'd like to see how I do it watch the quest walkthrough above or my video about How to get Piscine Livers.
#18 Gone Fishin'!
#18 Gone Fishin'!
Advance Req: No
Type: Gathering Quest
Video: Gone Fishin' Quest Walkthrough
Location: Desert (Day)
Goal: Gather 2 Golden Fish. The only area on the map that you can catch a Golden Fish is the underground cave in area #6. You're going to need a lot more bait than this quest allows so bring some with you and keep fishing at this location until Golden Fish spawn. Once they spawn catch them and you're all done.
Elder Quests
- Level 1
- Level 2
- Level 3
- Level 4
- Level 5
- Level 6