
Persona 2: Eternal Punishment Walkthrough - Chapter 3
We ended the previous Chapter just before starting the Nichirinmaru dungeon. When you enter the Yacht Harbor on the Narumi Ward Map you'll get a scene, talk with your entire party afterwards then board the boat to continue. Talk with everyone once you're on the boat and then head inside the door to start the dungeon.
Nichirinmaru Demon Dialogue Choices
It's up to you if you'd like to map these next two dungeons or not... The rewards are very good if you do decide to map them. As far as advancing this dungeon goes, our first real goal is going to be to get down to B2F and enter the Conference Room (it's in the north). When you arrive at B2F you'll start to encounter some new demons, one of them is a Leviathan.
Leviathan is important for our next dungeon since he will open up a puzzle room for us with some really good items. We need to make a Contract with him and we also need to be Level 42 in order to command him, so you'll want to make sure both of these criteria are met. You still have time to grind out the levels before we reach that point in the Undersea Ruins, but you may want to start now.
After visiting the conference room on B2 you'll want to go west to the stairs, this leads down to B3. In the southern portion of B3 you'll find some stairs that go to a small section on B2. There will be stairs that go up to an even smaller section on B1 then again on 1F. The boss is found on the Heliport, go through the door on 2F to reach it.
Our boss this time is three X-1 robots. You can make this fight a lot easier for yourself by using the Sif Persona on someone. She has the Vile Lightning spell which is the only element that these robots are weak to. Mediarama to heal your party every round helps too. If you ever struggle with a boss remember to check out my Fusion Spells Guide for information about which spells you should combine together and my Best Personas Guide for information about which Personas are worth using and why.
When the fight is over talk to everyone then return to the previous room. The guard that was previously blocking the stairs down to the 1F in the north is gone now, so go down. You now have access to the final portion of Nichirinmaru, if you want to finish mapping the dungeon now is the time to do it. Once you're done with this dungeon head over to the "new" B1 area, there will be doors in the south which lead to a Dock (pictured below). This is our ticket off the boat.
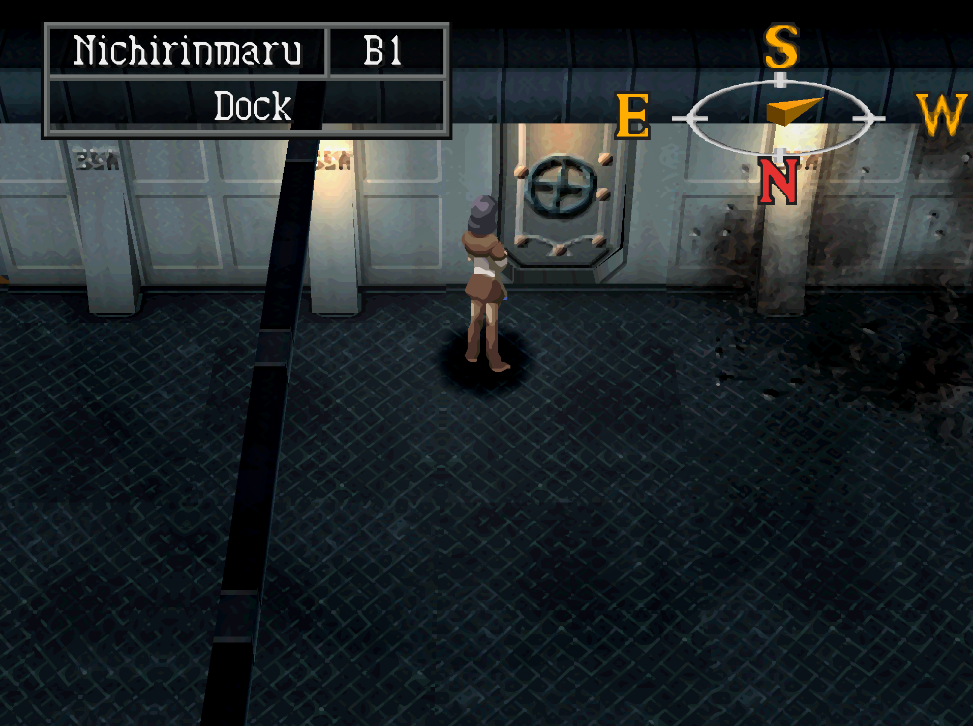
To exit the Nichirinmaru look for the Dock door on B1
Undersea Ruins Demon Dialogue Choices
Entering the Dock will trigger a scene, after which you'll regain control of your party in the Undersea Ruins. Our main task for this dungeon is an optional one, we need to form a Contract with Aeshma (found on B2F and B3F) and ask her for info until we get two pieces of info... The first will be about a secret treasure room in the ruins and the second info will be about Leviathan being able to access that treasure room.
After obtaining both pieces of info from Aeshma you'll need to form a Contract with a Leviathan (if you haven't already) and then choose the "break down a wall" option when you ask it for a favor. The hidden treasure room is located on B3F; it's to the north of where you find the Velvet Room and Trish's Spring.
Note: You can get the info from more than just Aeshma... but not all demons will give you info. Sometimes when you talk to a demon they'll straight up tell you something like "I'm an idiot, I don't know these things" - in my experience it's normally demons with the Fool personality trait that say this.
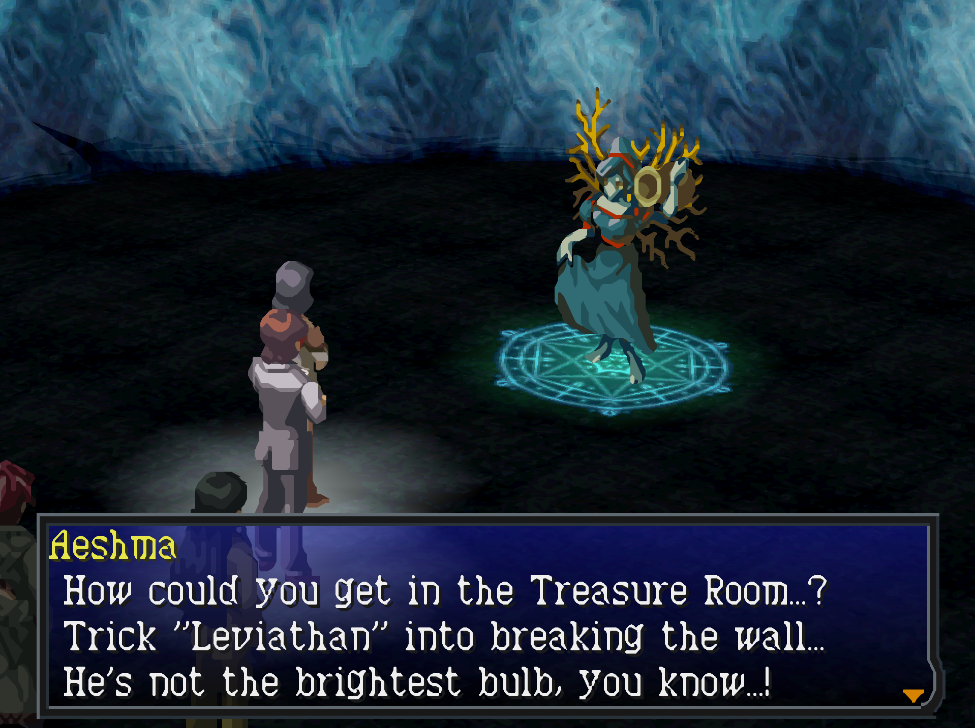
While the whole Leviathan thing is optional, it will get you some really good items; 1 Meteorite S and 1 Hihi-Irokane, 1 Torment Card (Freidyne), 1 Lightning Card (Ziodyne), 1 Ice Card (Bufudyne), 1 Earthquake Card (Maha Magdyne), 1 Hurricane Card (Maha Garudyne), 1 Torrent Card (Maha Aquadyne) and 1 Flame Card (Maha Agidyne). From the Cards you get here and then the ones from Salam, you'll be able to experiment to your heart's content with Personas and Fusion Spells.
You may be thinking that's the only hidden treasure room in this dungeon... but wait, there's more! The final treasure room is right at the end of the dungeon, so I will navigate you there first.
In order to complete the Undersea Ruin you'll first need to advance to/past B2 (pictured below). The path to the boss is blocked by two pitfalls, so you'll need to take the stairs south of that room instead. From there you'll follow the linear path until you come back out in the northern portion of B2. You will need to dodge the pitfalls as you go north then back south to each the stairs (marked go here on the map below). It sounds confusing but this dungeon is actually very straight forward. The biggest issue(s) are the annoying pitfall traps.
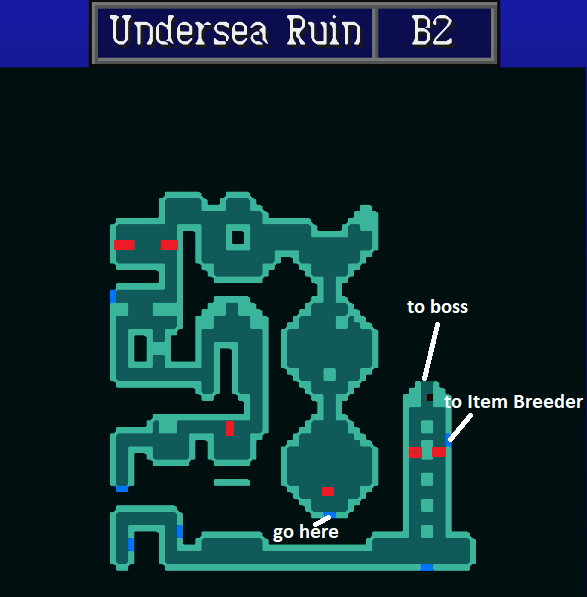
Pitfall traps are marked in red
Undersea Ruins Demon Dialogue Choices
Once you reach the stairs marked "go here" it's a pretty linear route to the bosses room. Keep following the linear route up and down various staircases until you reach the northern portion of the 1F (pictured below). The second treasure room is up here, it's connected to a room with about a dozen pitfalls.. You need to navigate through this maze to reach 3 treasures.
Inside the 1F treasure room you'll find an Orichalch, Mediarama Card and a Holy Light Card. Use my two screenshots below if you need help finding this room or navigating it.
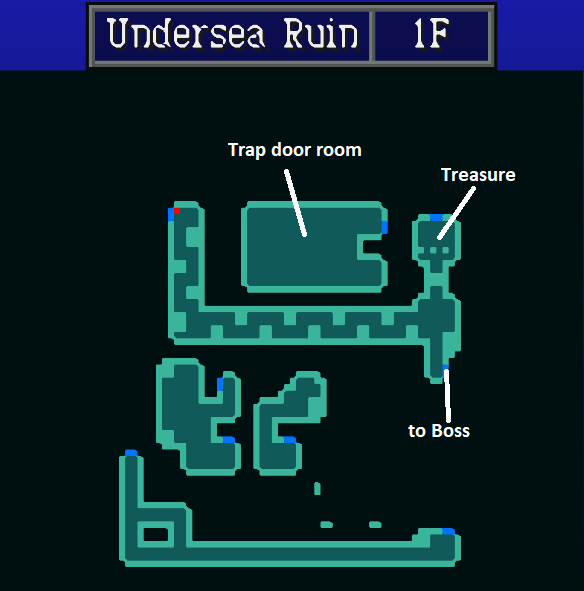
The Trap door/pitfall room has tons of pitfall traps, how to navigate it is shown below.
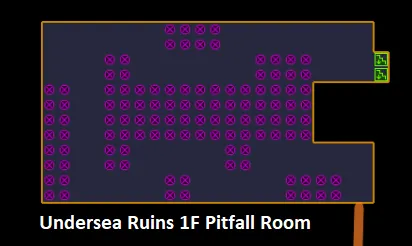
Follow the route shown to get through the Pitfall Room
After you've collected the treasures on the 1F it's time to head back to B2 where the boss is waiting... but wait! There's more! Look at my map above to find the door to the boss, I have it marked in the picture above. Before you run into the Room of Seal where the boss is it's strongly advised that you turn around and go up the stairs.
This will take you to a small room where you can find a secret passage that will take you to a chest with an Item Breeder inside. I strongly recommend you get this item because it will allow us to duplicate an eligible item in the future. Normally this is used to duplicate the materials required to make the Legendary Weapons; or to duplicate a powerful card that you want more of.
With that item, we're done with all of the hidden loot here... Now it's time to return to where we fell through the pit and head north into the Room of Seal. Something neat about this dungeon is that depending on which character you picked (Elly or Nate) the boss will change. Those of you who chose Elly will have a much easier time in this dungeon...
Nate Boss Fight
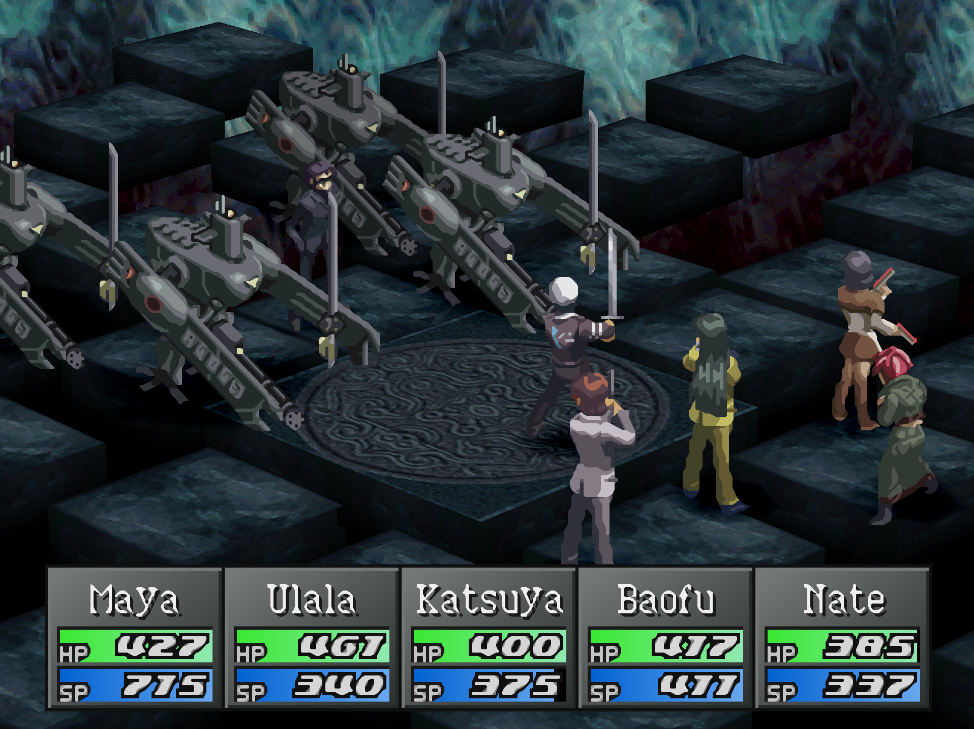
Nate's route will be facing Kandori and four X-2 Robots
Nate will be fighting Kandori along with 4 X-2 Robots. You'll want to focus on the Robots first, if you have Sif or any Persona that is capable of dealing AoE Lightning damage, that will help out a lot. Another tip I can give you for this fight is to get a Persona with Mediarama and use it every single turn. With enough SP your character can keep the party alive for 15+ turns by spamming this skill.
Kandori doesn't do anything for the first half of this fight, he will only start attacking you after the robots start to die. If you use enough attacks that hit all enemies then you'll have him low on health before he even becomes a threat... Which is probably the best strategy for this fight.
This is the hardest fight in the game up to this point, you need a good Persona line up to succeed or you need to grind until your characters dramatically over level the bosses. Obviously I am going to recommend you go with a good Persona line up. Check out my Best Personas Guide for more information about who is good during this level range and why.
I'd recommend two approaches for this fight centered around two different Fusion Spells:
Meltdown Fusion Spell: Most guides recommend this spell throughout this era of the game but it requires you to use a Flame Card when Summoning a Persona. To perform Meltdown you'll need to use to use a Fire Spell, Earth Spell then Maha Agidyne. Check out my Fusion Spells for more information.
Lightning Blast: This is the easier of the two strategies because Lightning Blast requires "Lightning Spell + Lightning Spell" to cast; the X-2 Robots are also weak to Lightning so this is the lazier strategy if you plan to switch your party around for just this battle.
Aside from these two Fusion Spell combos you'll also want to make sure you have at least one or two people who are able to use Mediarama. I normally use a Mediarama Card on someone's Persona so I have two with it for this fight... Otherwise it comes down to a lot of RNG. If they disable the Persona on your healer, you're kinda just screwed. You can spam items until the Persona is back up... but you have no control over how many times during the fight your healer gets hit.
Elly Boss Fight
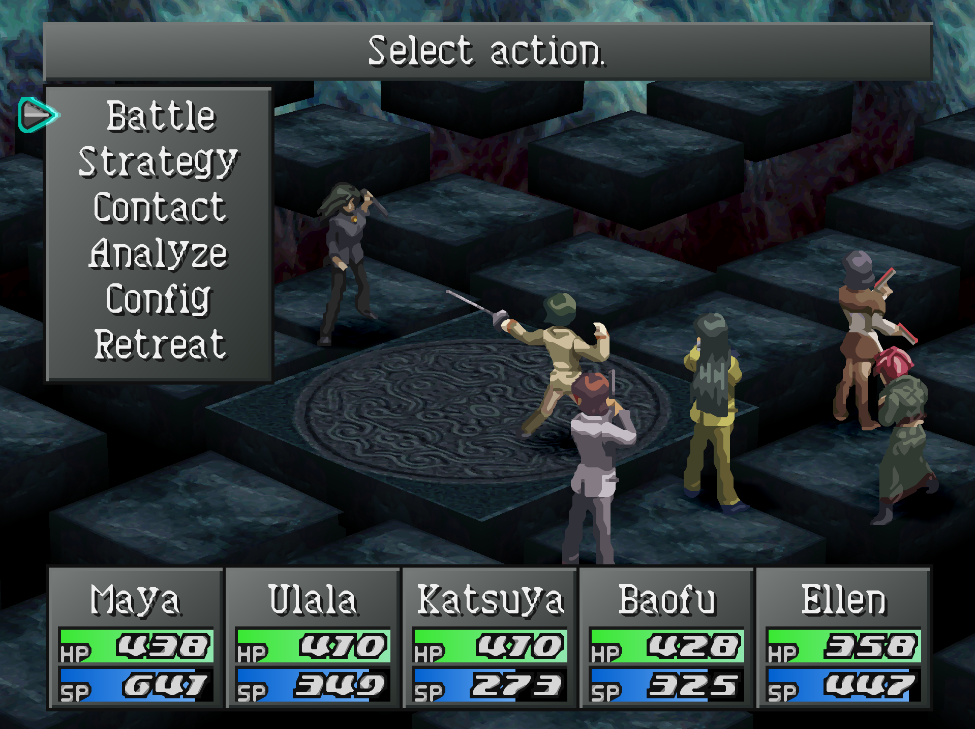
Ok so, are you ready for the strategy for this fight? Auto Attack. Chizuru is strong against all magical attacks but she is weak to physical so the best way to beat her is to literally just auto attack her to death. Despite her simplistic strategy, she can still put up a struggle for you. She spawns illusions during the fight which will reflect physical attacks used on them as well as use Card of Binding on you which will silence you.
Even though she has a super easy strategy, you can't just turn on auto battle and walk away... When Chizuru summons her illusions the only way to get rid of them again is to attack the real one. This means constantly changing and picking new targets on everyone each time it happens.
Back in Town
After finishing the Undersea Ruins you'll find yourself back on the Narumi Ward map. Make sure you turn in your Red/Blue Cape rumor to the Tourist in Narumi and if you mapped Nichirinmaru head over to Salam and turn that in. From this point onward Salam's rewards aren't as good. We also have so many different cards now that we just don't really need to keep getting more. The next dungeon is also a gigantic pita with pit fall traps etc, so you probably don't want to map it anyway...
Before the next dungeon you should head over the Seedy CD so that we can complete the second half of the dungeon. You'll get a Legenbright for doing so which is used to make Legendary Weapons. If you skipped the Mu Continent Side Quest previously, now would be a good time to do that too. Last but not least, there's a new area open in the Kasugayama High Bomb Shelter for us to visit too.
If you haven't upgraded your gear in awhile you have a few options available... For weapons, Parabellum has cheaper but worse equipment, the best weapons are sold in Clair-De-Lune in Narumi... Each piece is going to be quite expensive though. For armor the best place is still Rosa Candida, which is also in Aoba.
New Rumor:
1. 200km/h Fogey at Seedy CD - talk to Ixquic inside the Seedy CD
When you're done all of the side activities, it's time to head over to Araya Shrine in Rengedai for some story scenes. Once you're done there our next stop is Mt. Iwato (just north of Araya Shrine), this is our next dungeon.
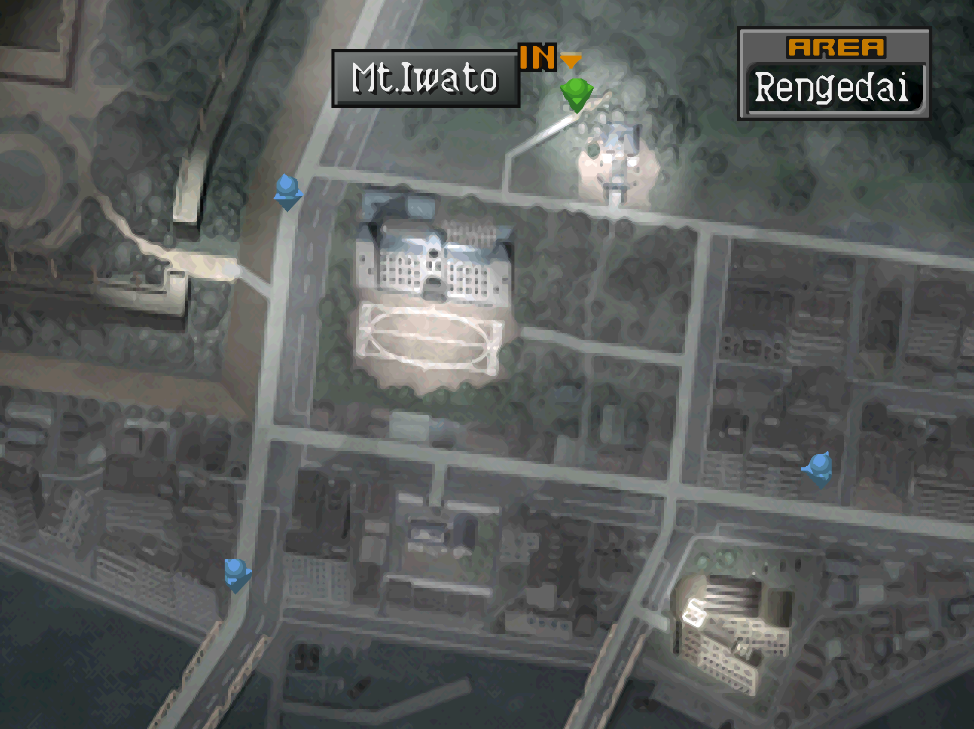
Mt. Iwato Demon Dialogue Choices
The Mt. Iwato dungeon is incredibly linear and it's more or less here as a story exposition. You'll go from room to room in the dungeon and watch a scene with your party members in each. Talk to them when the scene is done then exit and go to the next room. Just like in Innocent Sin you'll find items in this dungeon which can be used to Summon 'Ultimate Personas' for each character. I will point those items out on the maps below.
One important thing to note, the Ultimate Persona for each character isn't always the best Persona for them to use. In my first playthrough I used them and Returned them all for items at the Velvet Room. On my second playthrough I didn't even bother making them. I collected the Material Cards and just let them rot.
Tip: A good way to level up Personas is by having them auto battle against enemies who nullify or resist their damage. I will let my chars dump all of their SP until they start using regular attacks which will eventually kill the demon.
In total there are 4 Material Cards we can find in this dungeon, Ancient Sun and Bronze Ring are both found on B1F. You'll find the Silver Bow on B2F and the Ortyx on B4F. Each of these are used in making a Persona, you may notice we have 5 party members but only 4 Material Cards... There's a reason for that which you'll see at the end of this dungeon.
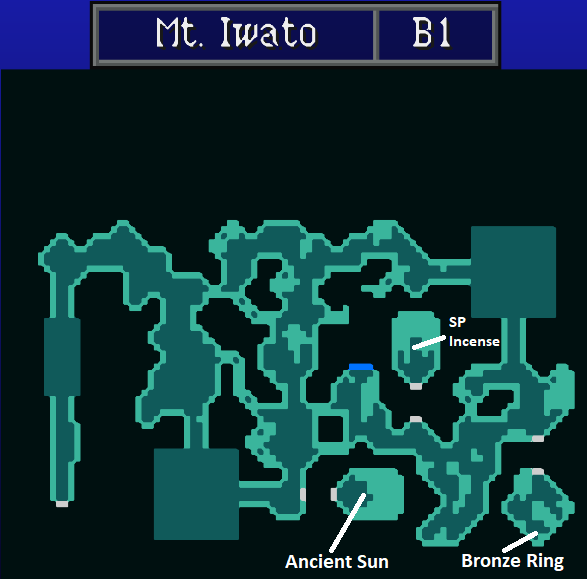
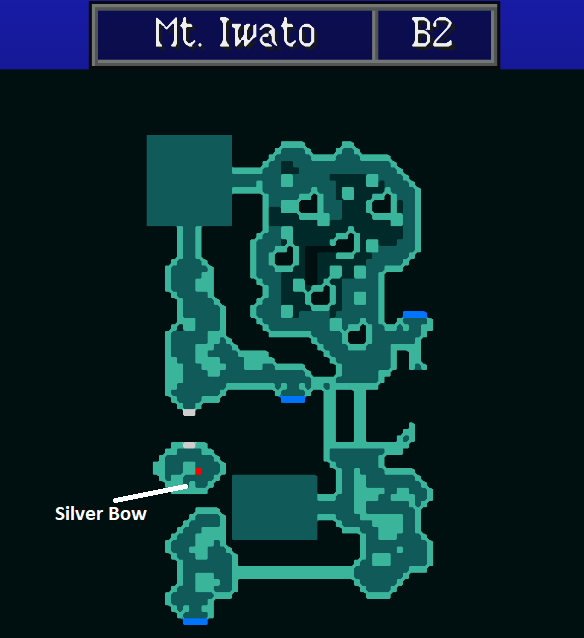
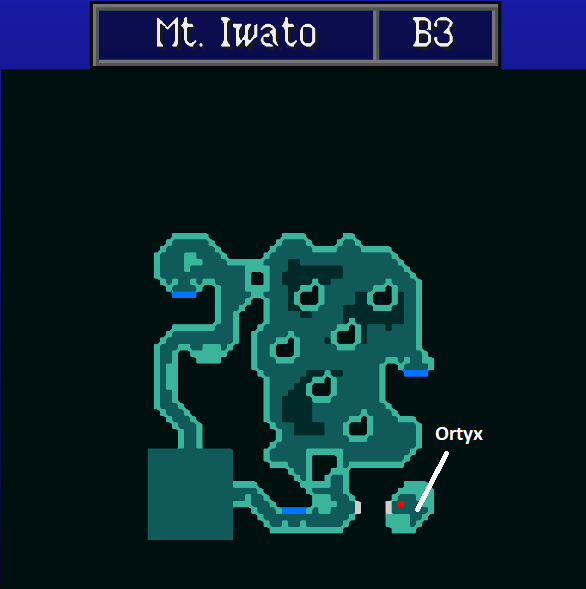
The final scene in Mt. Iwato covers the ending of Innocent Sin and will also result in your fifth party member leaving. Whether it's Ellen or Nate, they leave and Tatsuya will join you. For those who played Innocent Sin, it's a nice moment - having both of our main characters back and in the same party again.
We have a lot to do in the city now that we have Tatsuya with us... Before we do anything though, we should hit up the Velvet Room. For once in this guide, I am going to give you some direct Persona advice. Since we are getting close to the end of the game things are starting to get harder and you really need the proper setup to be successful.
Like I have been telling you up until now, it's important that you learn Fusion Spells. They will do more damage than normal and also give your Personas a chance to Mutate which can increase their stats, learn a new spell or (if you want) change into something new.
Below are the Personas I think you should get and use right now. All of the information below can also be found on my Best Personas Guide.
(Level 47) Succubus (Moon): Goes best with Maya. It does Lightning and Ice damage by default but you can put a powerful card on it to make it do more. An extra bonus is this Persona is highly resistant to all magic, but weak to physical.
(Level 46) Hunab Ku (World): I put this on Katsuya since it raises his Tec on level up. The Persona comes with Earth spells and a strong single target heal. When Summoning him you may want to use a Card to give it a different elemental attack, depending on your current setup.
(Level 48) Armati (Judgment): Goes best on Baofu, Katsuya or Tatsuya. +1 Tec on level up and he has Mediarama (group heal), Megidola (large Almighty damage to all enemies), Bufudyne (large ice damage; single target), Fire, Tackle (physical) and Lightning. Basically he has tons of different attack types that can be used in Fusion Spells along with the strong Megidola attack for groups.
(Level 51) Tsukuyomi (Moon): Works best on Baofu or Tatsuya. This Persona comes with Maka Kaja and Sama Kaja; if you use a Raku Kaja Card on it when you Summon it, you'll make it into an amazing support Persona. It also comes with Zandyne as the primary damaging attack. Ultimately it's your choice if you want to put another Offensive or Defensive Card onto the Persona. In my opinion, in order to properly use this Persona you'll need to have another Persona with Affectionate Prayer and also learn the Support Fusion Spells. If you don't plan to do that and just want a powerful Persona, put a strong Offensive card on it instead.
(Level 55) Hathor (Priestess): Put this on Ulala. Probably one of my favorite late game Personas because it comes with Mediarama, Estoma and Gryva/High Pressure. It's not going to work in many Fusion Spells but that's ok because we'll probably be using Mediarama every round on harder fights anyway. Another bonus to this Persona is it will raise your Vit with each level.
Maya: Succubus (188 Moon Cards)
Ulala: Hathor (165 Priestess Cards)
Katsuya: Hunab Ku (184 World Cards)
Baofu (Support): Tsukuyomi (204 Moon Cards)
Baofu (Offense): Armati (192 Judgment Cards)
You can Return every Persona you were previously using at Igor for some extra Cards/Items. I strongly recommend you keep Maia Custom if you have her though, she is a low SP cost Mediarama which is very useful incase you hit a difficult fight. Keep Nata too if you got him earlier from Aoba Park. Ulala is going to take over as our new group healer, Hathor comes with both Mediarama and Estoma which is why I keep him until the end of the game. Both of these spells are so important for different reasons, having both on the same Persona is amazing.
Maya, Katsuya and Tatsuya will be damage dealers with Baofu being an optional support character if you'd like. Tsukuyomi is a great support Persona but a rather weak offensive one. Also, you'll need Affectionate Prayer to perform group buffs which means swapping out another Persona from the list above... That said though, group buffs in this game make a huge difference, they're very worth it... I just normally never put in the extra effort to use them in any game (unless I must) so I am giving you two options.
When you're done with the Velvet Room, it's time to go shopping and do some of the other stuff that's available to us. Toa Armory (Hirasaka) has some new equipment for sale and so does Rosa Candida in Aoba, if you need money do the newly available Man Searches at Shiraishi. If you didn't already finish the Seedy CD Side Quest, go do that now. Also you should finish Mu Continent since the part 2 is available right now too. Did you make a Legendary Weapon yet? If not, you should make the Legendary Handgun, you'll want one for Katsuya and Maya.
Last but not least you have the Kasugayama High Bomb Shelter Dungeon which has a new area you can unlock by entering the Subway Tunnel (our next dungeon).
Optional Dialogue Flag: If you already have Flamenco de la Passion unlocked (Ulala + Katsuya Contact) visit Sumaru Prison in Hirasaka and talk with Tatsuya inside. You'll unlock a new variant of this Contact.
Tip: You can spread a demon rumor to make your Legendary Weapons stronger. Keep talking with demons and asking for info until they give you information about your weapon, then spread the rumor through demons just like we always do. The rumor you're looking to spread is "It's powerful" ... One note about this though, once you spread a rumor like this if you ever make a demon scared and have them flee from battle... they'll spread a rumor that makes your weapon worse. This will require you to spread the "It's powerful" rumor again to make your weapon stronger.
New Rumors:
1. (potentially old) The Sumaru Genie is doing Affinity Readings - Rumormonger Barkeep (Johnny Rogers in Konan)
2. Trish has reformed - Nekomata (Kuzunoha Detective Agency in Aoba)
3. There is a Haunted Taxi at Mu Continent (Mu Continent in Yumezaki)
4. Kudan appears in the Bomb Shelter Area 6 (Yasuo in Kasugayama High)
Once you're done with all of the stuff mentioned above head over to Narumi and enter the Subway.
Continue to Walkthrough Chapter 4
Return to Walkthrough Chapter 2