
Dragon Quest VIII: Journey of the Cursed King Walkthrough Chapter 7
This guide is designed to point you in the right direction but not hold your hand throughout the entire game. Dungeons and Towns you'll be exploring mostly on your own, with my maps pointing out any treasures that are hidden in a dungeon as well as how to solve any puzzles you'll encounter that could possibly get you stuck.
Additionally depending on your own personal preference, my maps/pictures are designed to work as a guide of their own. If you'd like to skip reading text entirely while you play, you can just look at the maps for the treasure chest locations and where you need to go to advance the story forward.
Skill Point Tips: Jessica Staff (Kazing 100 Points); Whip (Attack Power Bonuses); Yangus Humanity (Golden Oldies 100 Points); Scythe (Attack Power Bonuses); Hero Courage (Omniheal 82 Points); Sword (Falcon Slash 52 Points) and Angelo Bow (Shining Shot 88 Points); Charisma (Divine Intervention 27 Points) and Staff (Oomph 65 Points)
Alchemy Tips: Agility Ring, Assassin's Dagger, Dark Robe, Demon Spear, Dragon Shield, Fallen Angel Rapier, Full Moon Ring, Gigant Armour, Imp Knife, Life Bracer, Mercury's Rapier, Mighty Armlet, Power Shield, Prayer Ring, Recovery Ring, Ring of Clarity, Ring of Truth, Ruby of Protection, Spiked Armour, Strength Ring, Uber War Hammer, Zombie Mail, Zombie Slayer; Cheeses & Other Consumables
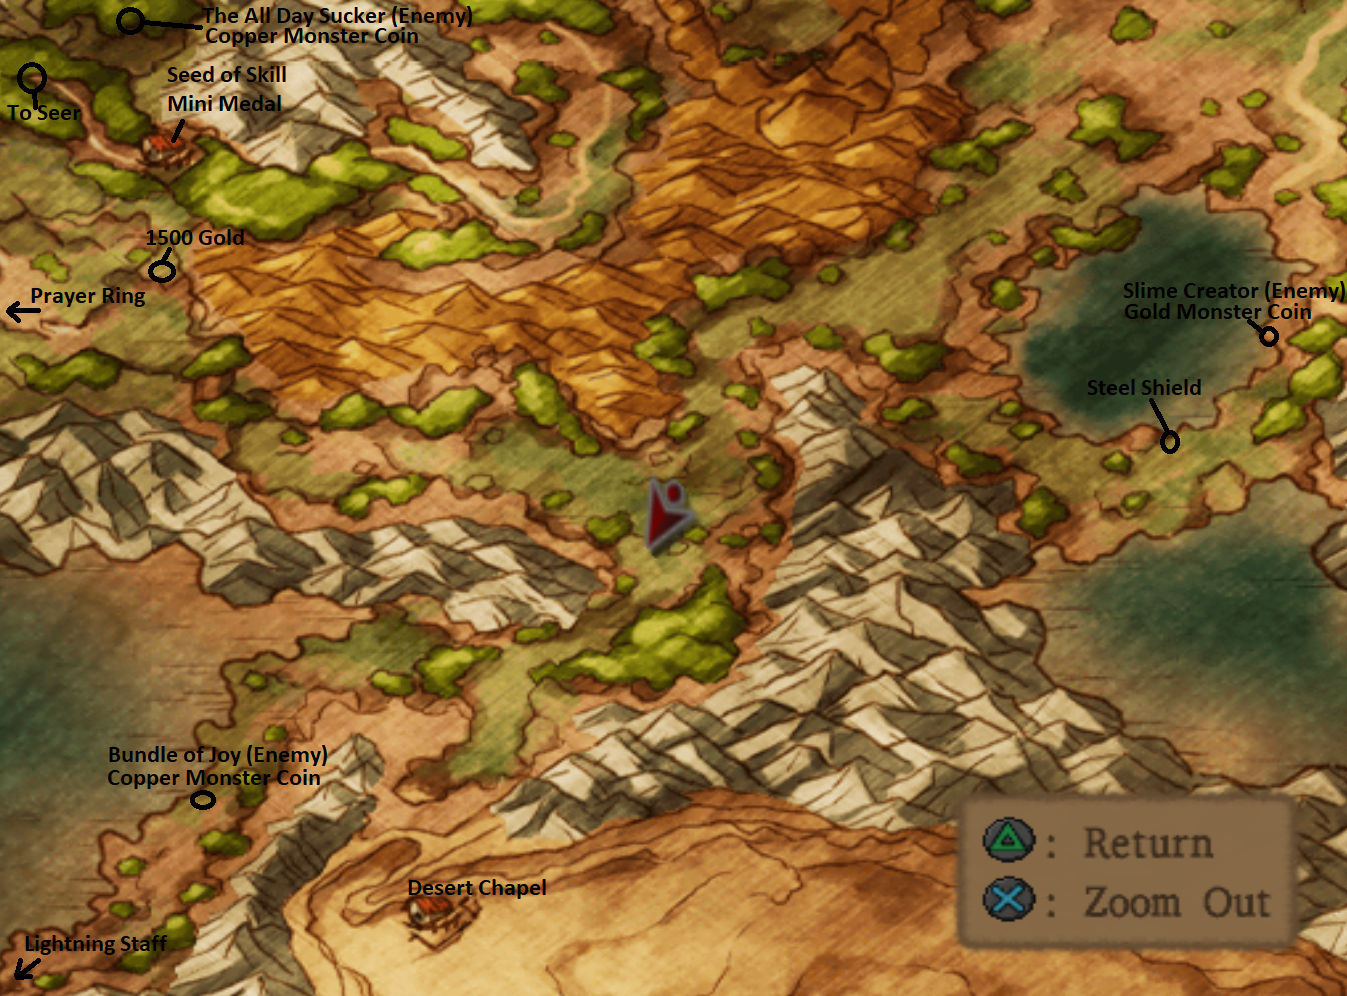
On your way to the hut west of Argonia I recommend you explore the world and collect the treasure chests that are left. You'll have to go out of your way for a few of them but it'll also allow you to grab the Desert Chapel Zoom location to save time running down there later.
At the hut you'll want to collect the Seed of Skill, Mini Medal and search all of the bookshelves for new Alchemy recipes. You should also speak with the monsters living in the Seer's house before heading out. The area we're going to next is reached by following the path west into the forest. This is where you'll find The Seer hanging out.
Watch the cutscene here and then talk to Medea before you leave. She asks you to bring her back here every so often so she can turn back into a human and speak with the Hero. Sounds like she is in love with him! Once you're finished, return to the house that we just came from and talk to The Seer again there.
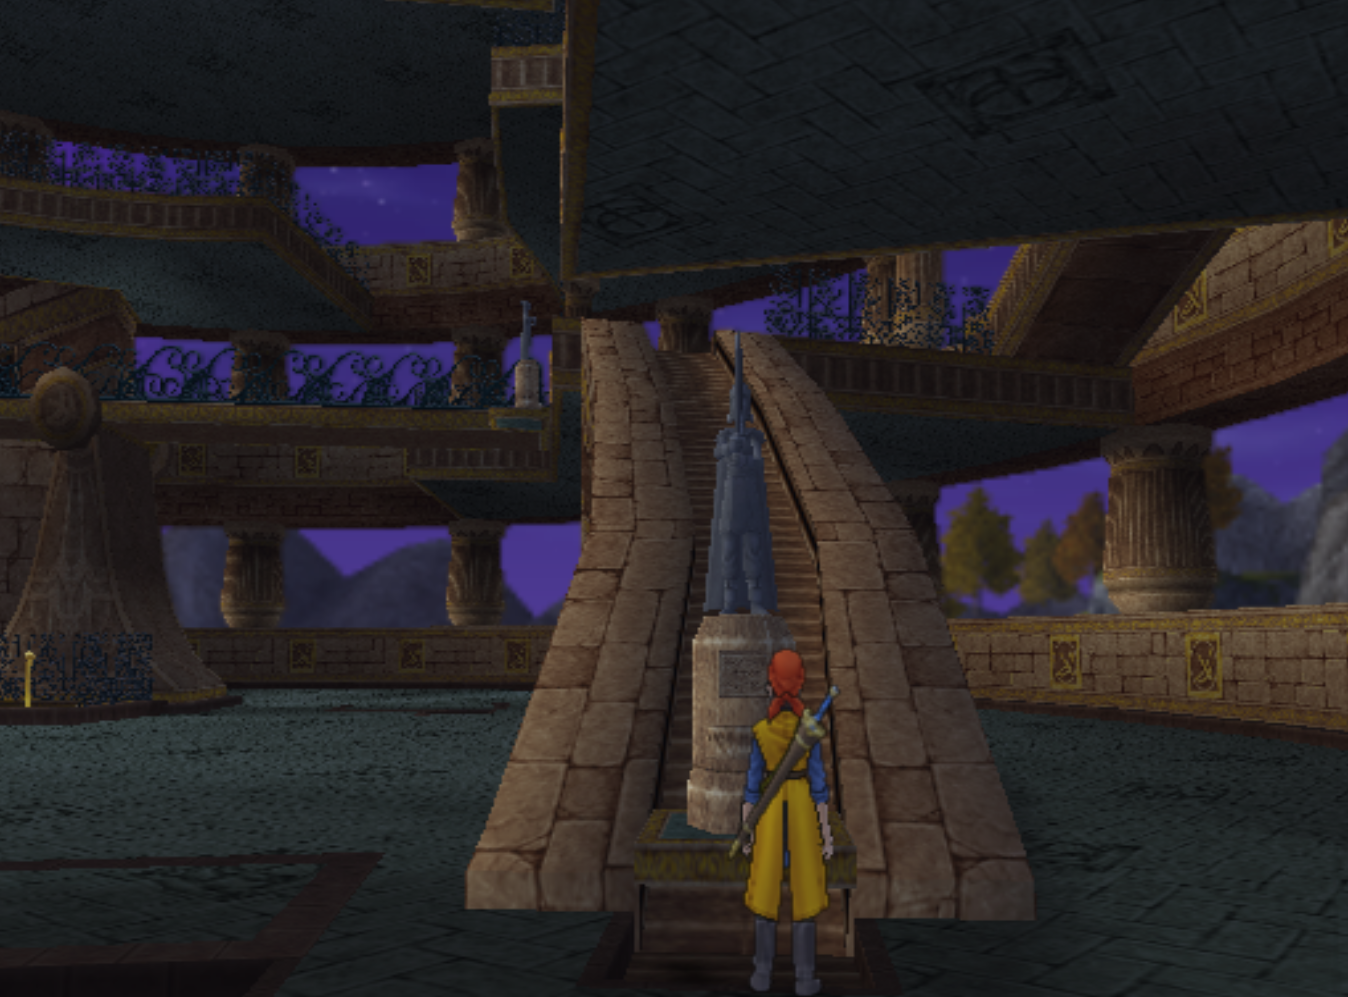
He tells you that to recharge the Sun Mirror (Magic Mirror) you'll want to sail your boat through the stone arch connecting the two landmasses to the north. It's the same stone arch that has a town going across it, you've probably seen it on the map already if you explored the area north of Argonia.
Zoom to Princess Minnie's Castle and head inside to exchange the Mini Medals you have right now for Fishnet Stockings, Posh Waistcoat and Staff of Divine Wrath. With that out of the way sail northwest until you get to the arch that I was talking about, shown in the screen shot below. Use Holy Protection on the Hero or drink Holy Water to avoid random encounters if you'd like.
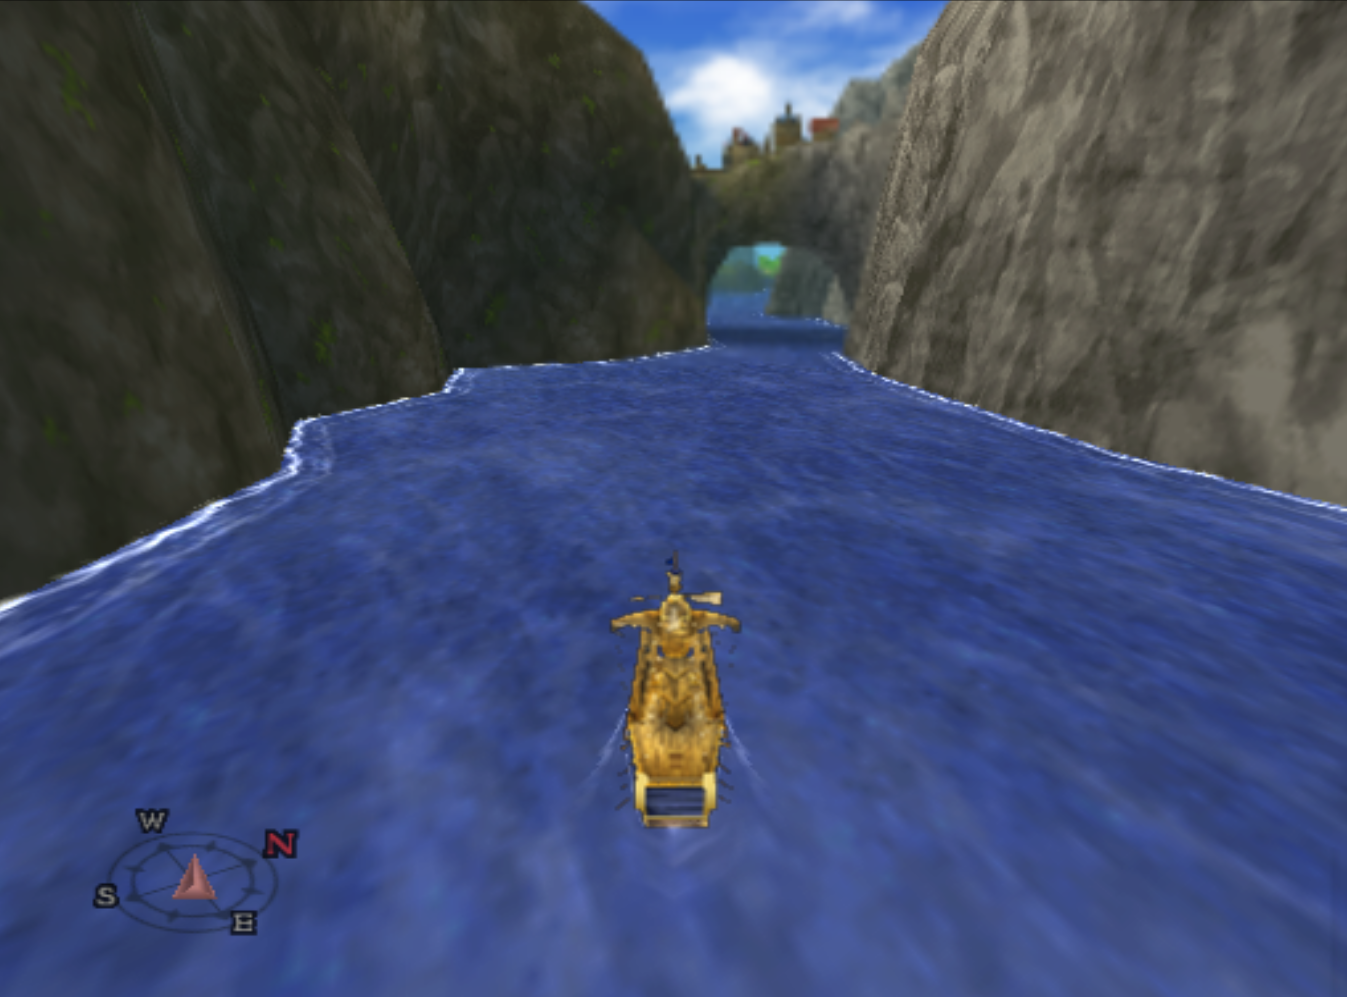
Sail under the bridge and you'll encounter a sea dragon - even while under the effects of Holy Protection or Holy Water. The very first move the sea dragon does is called Gigaflash. It's a large flash of bright light which damages your whole team. For the very first turn of the battle you're going to want to use the Magic Mirror as an item on the Hero - you can attack on everyone else or do whatever it doesn't matter.
After you absorb the power of the Gigaflash the Magic Mirror transforms into the Sun Mirror. Now we can finally go back to the Dark Ruins. Jeeze louise what a side track this all was. Return to the Dark Ruins and place the Sun Mirror onto the pedestal outside the dungeon. This will clear the black haze from the area and let you pass.
Before you enter you should know this is the hardest dungeon + boss you've faced yet. Make sure your Hero is at least level 30 before you challenge Dhoulmagus at the end of this dungeon.
Dark Ruins Dungeon
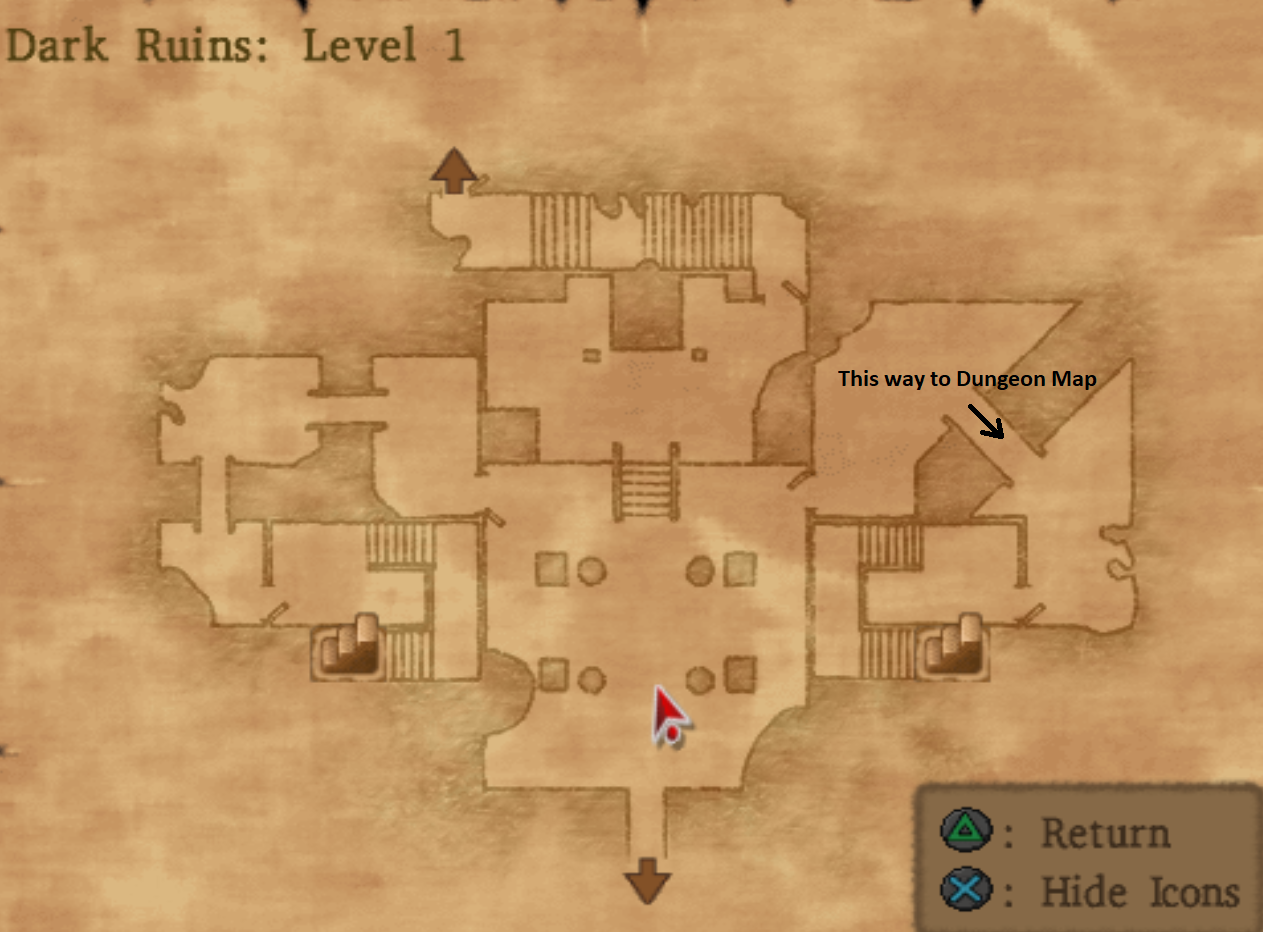
When you enter the dungeon go through the door to the right first and up the stairs to find the treasure chest with the dungeon map. After you get the dungeon map head back down the stairs and up the ones on the other side of the room. This will take you to a lever to pull which raises the staircase in the center of the room and allows you to proceed deeper into the dungeon.
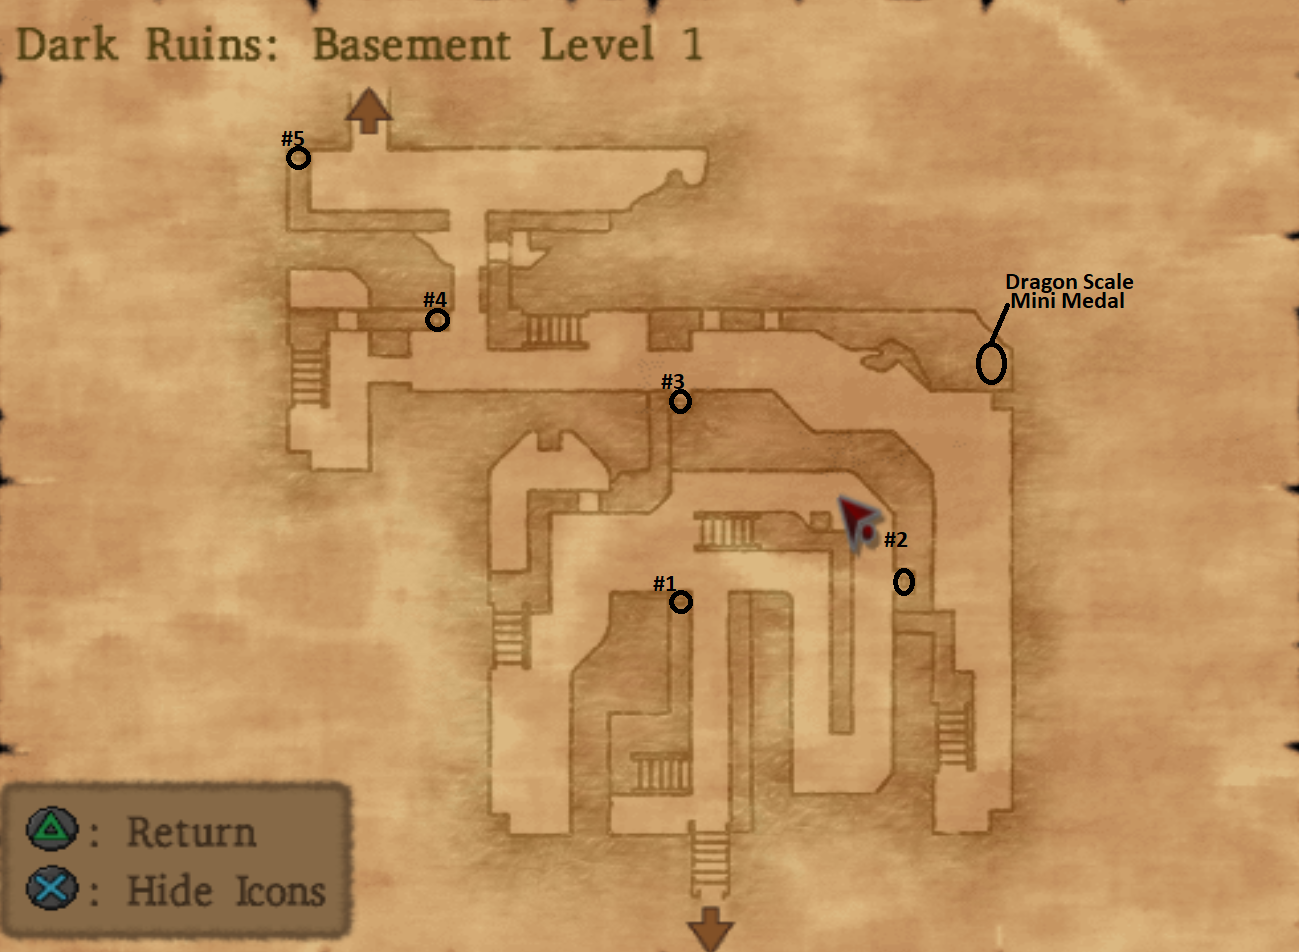
The next room is a huge room with many different levers in it. Use my map below for instructions on which levers to pull in order to gain access to the chests in the northern portion of the room as well as which levers to pull to advance to the next floor.
Here is a quick key for you to use that'll help you navigate through this floor with ease:
Levers to Chests: #1, #2, #3 then backtrack across the upper walkways to reach the chests.
Levers to Next Floor (after chests): #3, #4, #5, #4
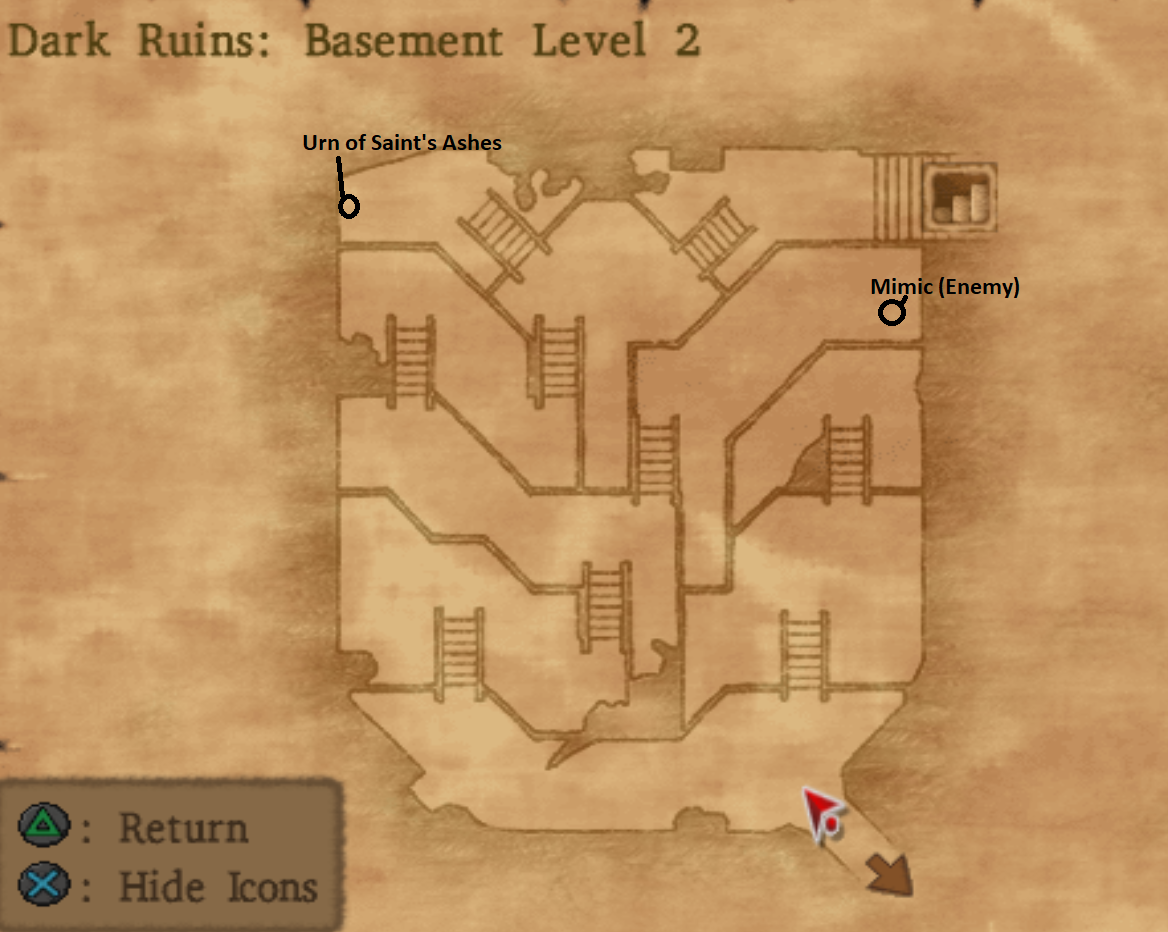
Dark Ruins Basement Level 2 is easy to navigate - there's just a bunch of stairwells here which you'll need to run down to progress to the next floor. There's also two treasure chests in this room, one is a mimic and the other is an urn of saint's ashes. Grab both before proceeding.
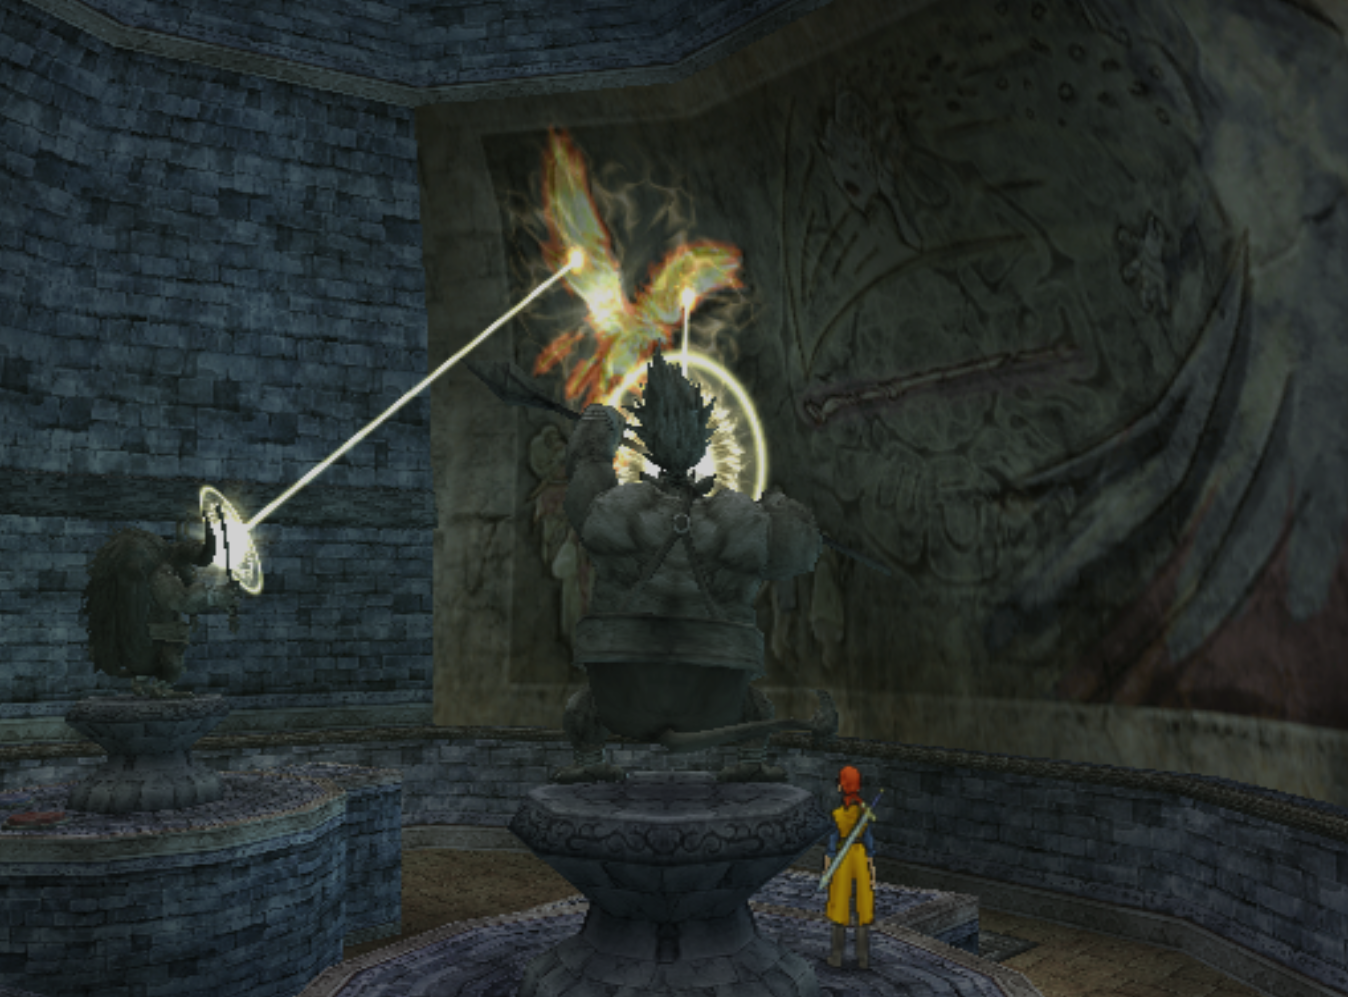
The next room we come across is a piece of cake - all you need to do is stand on one of the two buttons next to each statue and have both laser beams pointed at the bird drawing on the wall. Just like my screen shot below shows; afterwards proceed down to the next floor.
On your way down the stairs you'll find an opening to your right, it leads you to a spring which will fully restore your teams MP/HP... Which I highly recommend you do since the boss is coming up in the next room. Also this is my last warning to you - if you're not at least level 30 with your Hero I'd recommend grinding for a little bit around this spring and then proceeding (might want to Evac out and save if you grind a lot so you don't waste all that time if you lose).
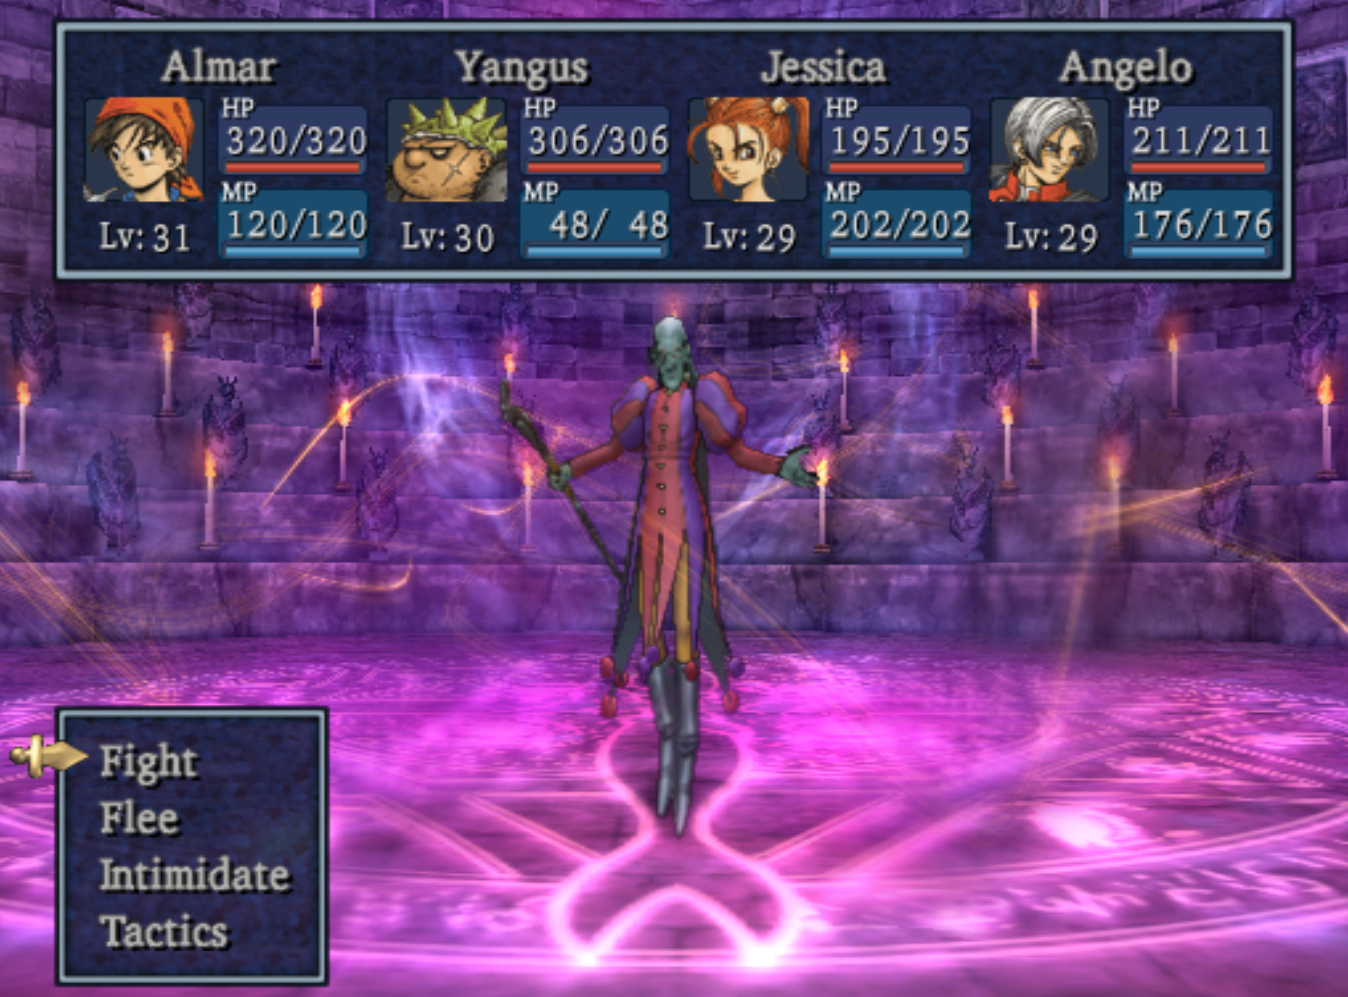
When you're ready to proceed continue down the stairs and through the door in the next room. A cutscene will trigger and next up is the boss fight with Dhoulmagus. If you feel that you're a bit under leveled for this upcoming fight I would recommend also stocking your inventory full of healing items on Yangus/Hero. There'll be some turns where you have to heal on every member of your party and items will come in handy.
(First Fight) Dhoulmagus Strategy: Use Kabuff and Acceleratle when the battle starts. Also refresh Acceleratle at minimum each time Dhoulmagus dispels your group. Use AoE attacks when Dhoulmagus splits himself into 3 to take out the illusions he creates. The illusions he makes have 1/4 the amount of HP he does but hit for about the same amount so they're basically glass cannons. I'd also recommend healing Angelo/Jessica each time they take any sort of damage. Since these two are your weakest team members it's important you keep them high health so that Dhoulmagus doesn't take a party member out in a single turn.
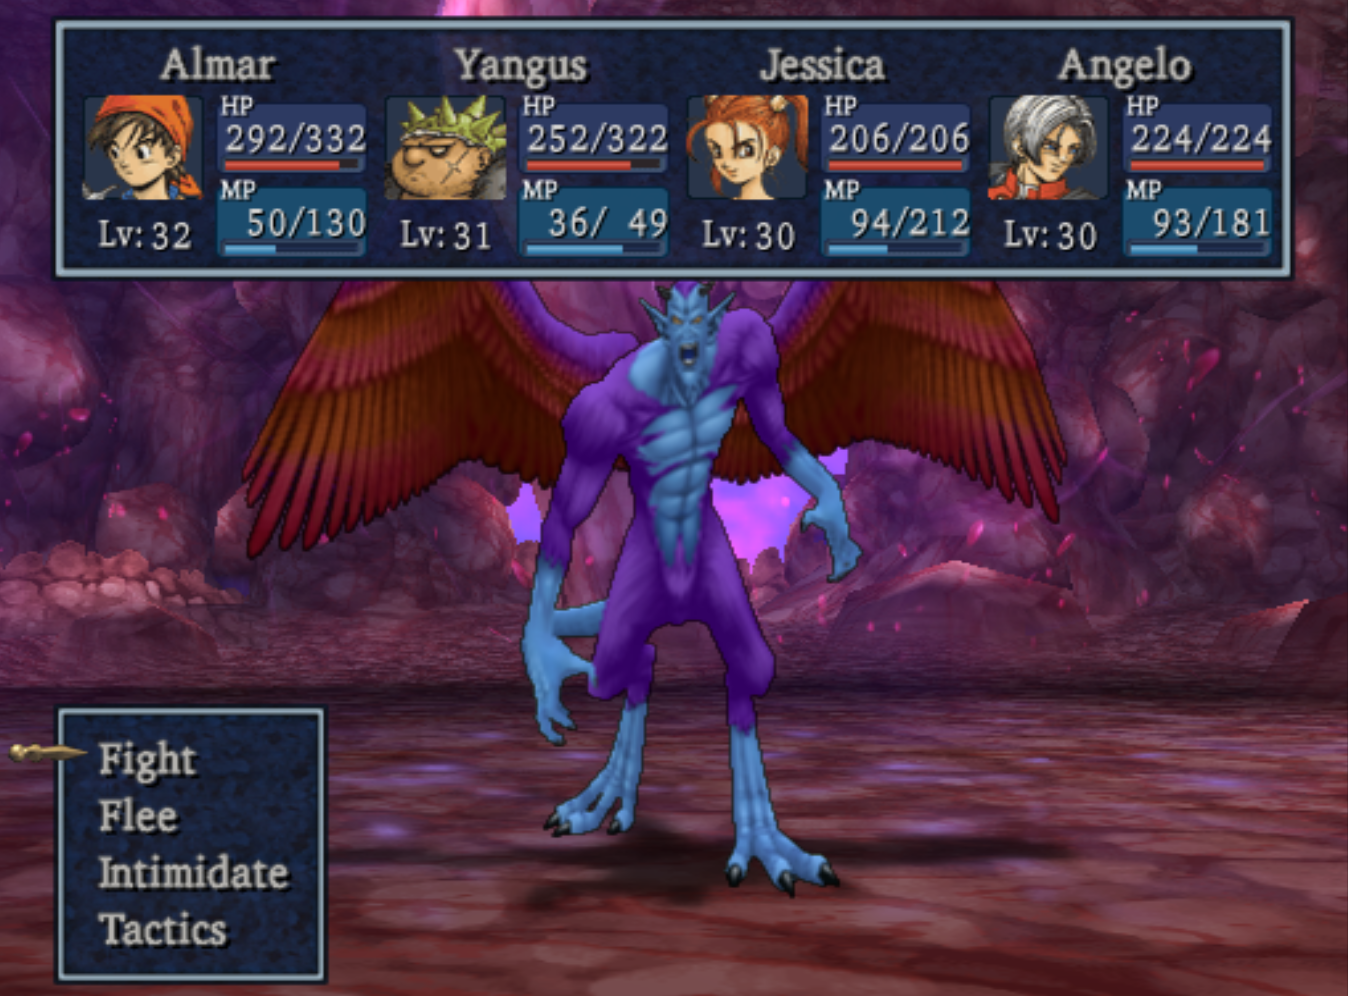
After you beat Dhoulmagus you'll get tossed into another battle with Dhoulmagus yet again. Fun! For both of these battles there's really only 1 thing you have to worry about more than anything else and that's Dhoulmagus getting lucky and taking out one of your team members in a single turn. If you can prevent that from happening you should be able to win no problem.
(Second Fight) Dhoulmagus Strategy: For this fight Dhoulmagus attacks twice each and every turn. Much like the fight before use Kabuff and Acceleratle to buff your party and rebuff them each time Dhoulmagus dispells them. Especially Acceleratle, we wan't to attack before Dhoulmagus every turn. I'd also recommend using "Call Team" the ability we get from the Monster Arena Side Quest at the start of this round.
With Dhoulmagus dead you find yourself back in Argonia after an interesting cutscene. Travel to the north in search of Jessica, the door that was once blocking your way to the town in the north is blown apart allowing you passage. Up here you will find the town of Arcadia.
Town of Arcadia
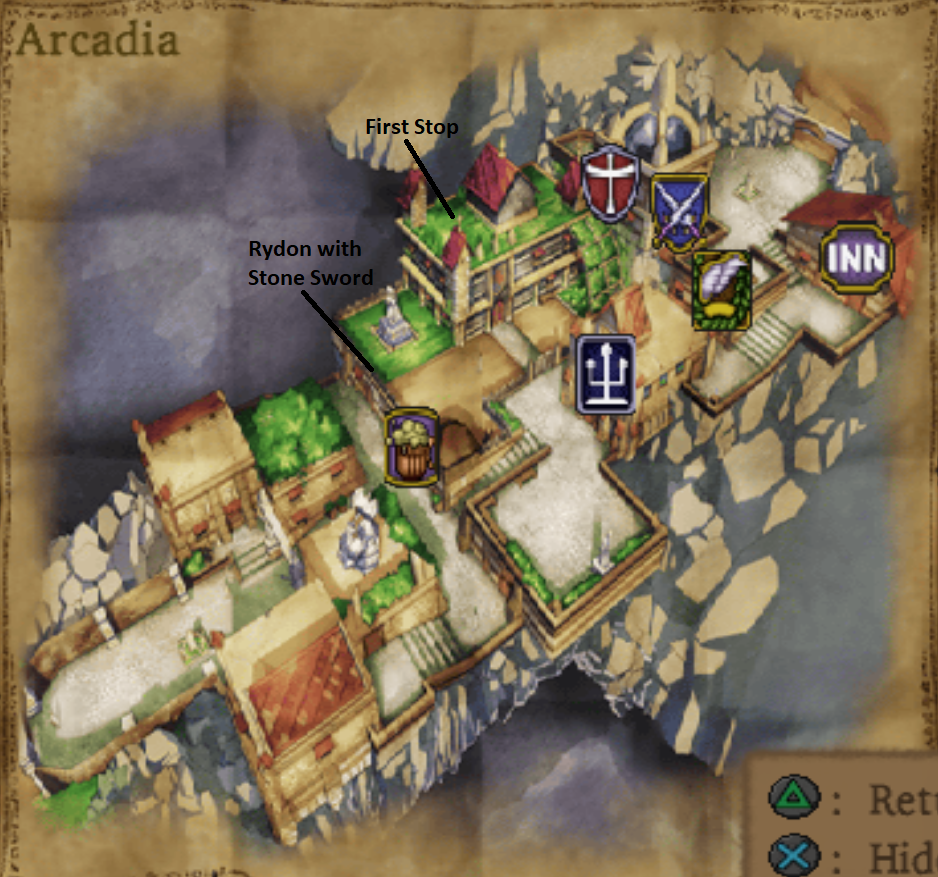
The first thing you need to do once you arrive in town is go to Master Dominico's residence. Most of the town folk block every other route so it's pretty hard to miss his residence. Here Jessica is about to kill the guy, you busting in just in time saves his life. Watch the cutscene and accept this arseholes task. Then you can explore the town and collect all of the goodies.
Prior to leaving town you need to do two things; both of them are listed below:
1. Speak with David outside the mansion
2. Get the Stone Sword from the Kranbartles
To advance the story forward yet again our next stop will be Rydon's Tower; take the northern exit out of Arcadia and travel northeast to the tower. I'd recommend collecting all the treasure chests in this area first though - use my world map below to learn their locations!
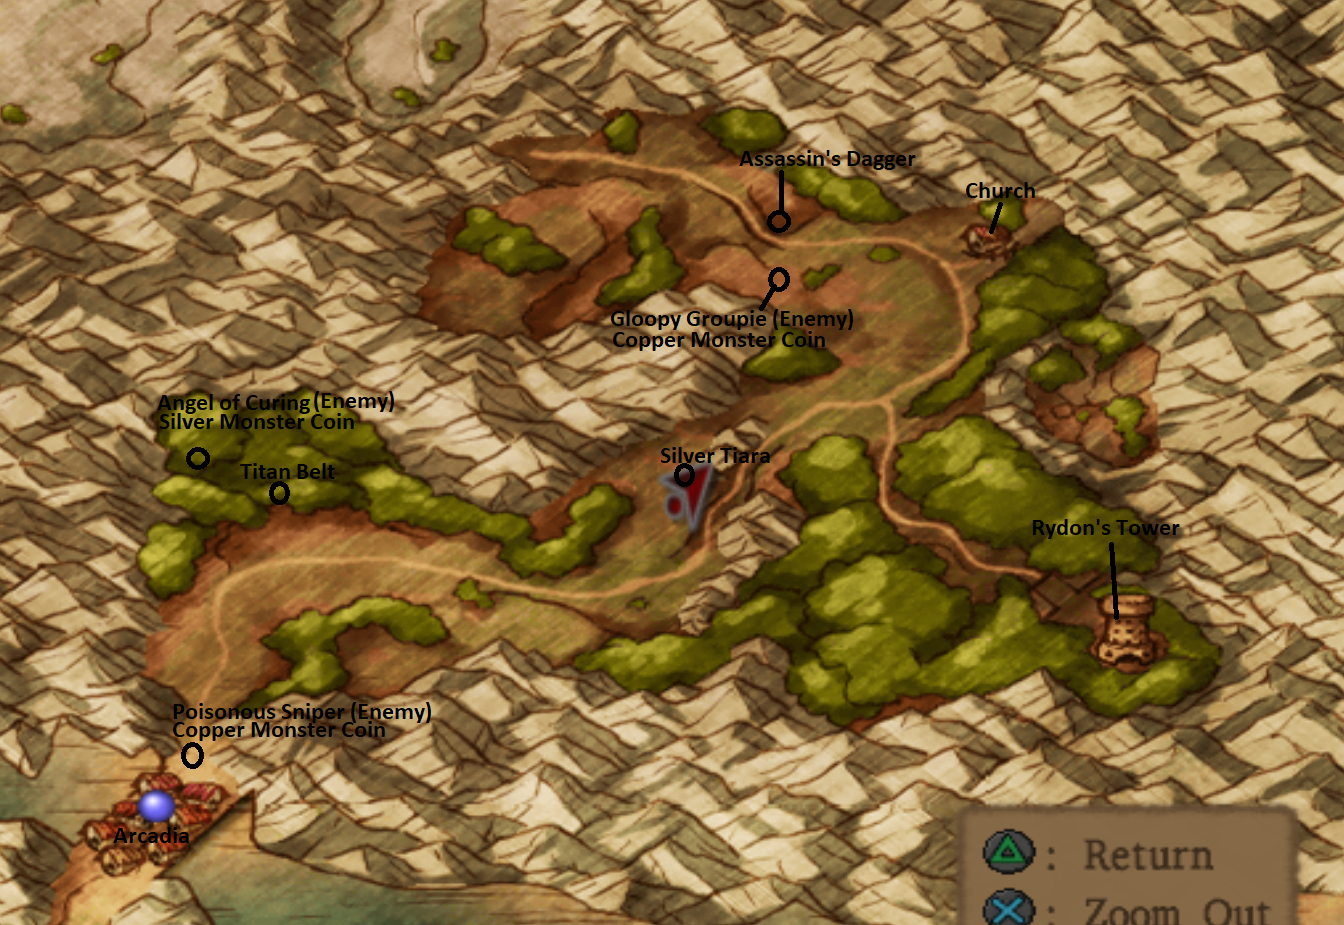
When you're ready to advance the story head to Rydon's Tower in the eastern portion of the area and use the Stone Sword from your inventory to gain entry.
Rydon's Tower Dungeon
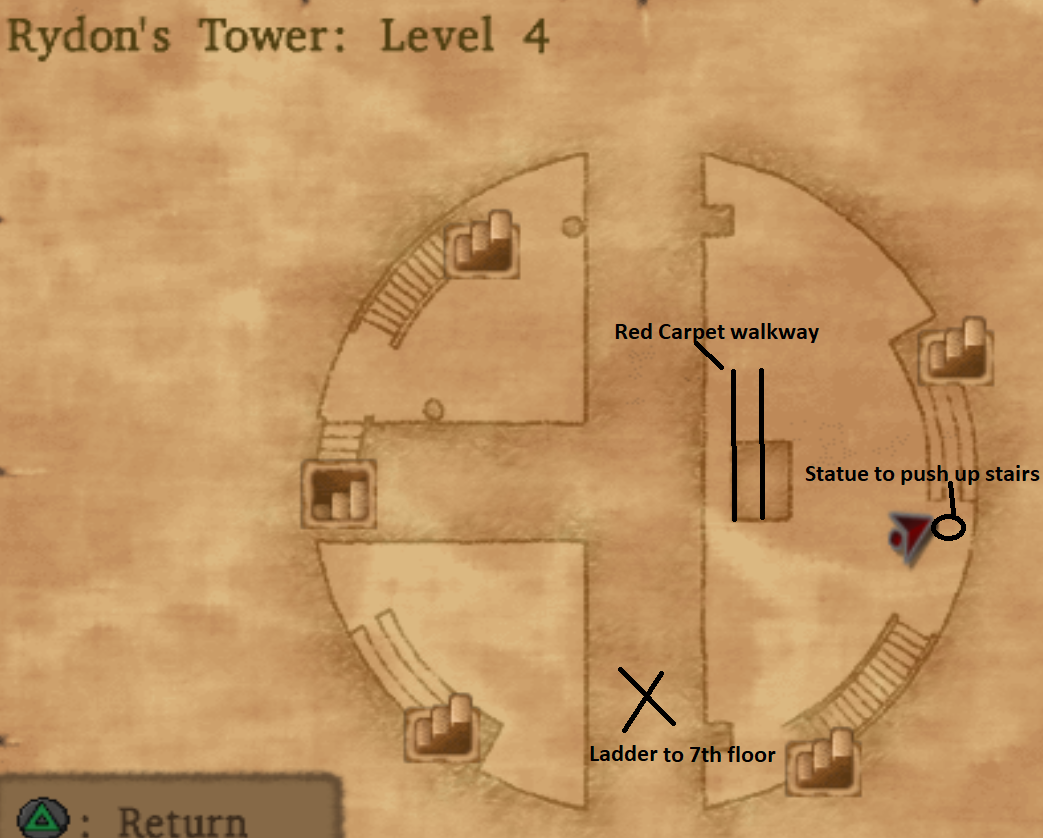
This dungeon is one giant puzzle and it's a royal pain in the butt. Basically how it works is you to move the statues onto the little platforms next to the teeter-totter walkways and then go down the stairs nearby and run up the walkway with the weight holding it down. This will move you up one floor at a time.
When you reach the 4th floor of the tower you'll need to change your strategy a bit. There'll be a statue in front of the stairwell which doubles as an escalator in the east wing. Some of the stairs in this dungeon can be used as an escalator for the statues, moving them up one floor. All you need to do is push the statue onto the block area in front of the stairs and a scene will commence with it being moved up a floor.
Push the statue up the stairs to the 5th floor then drag it over to the seesaw walkway, putting it on the open space next to the walkway. Go up the walkway and then up the ladder on the 6th floor to find yourself in a different section of the tower, a brief scene will play when you first arrive.
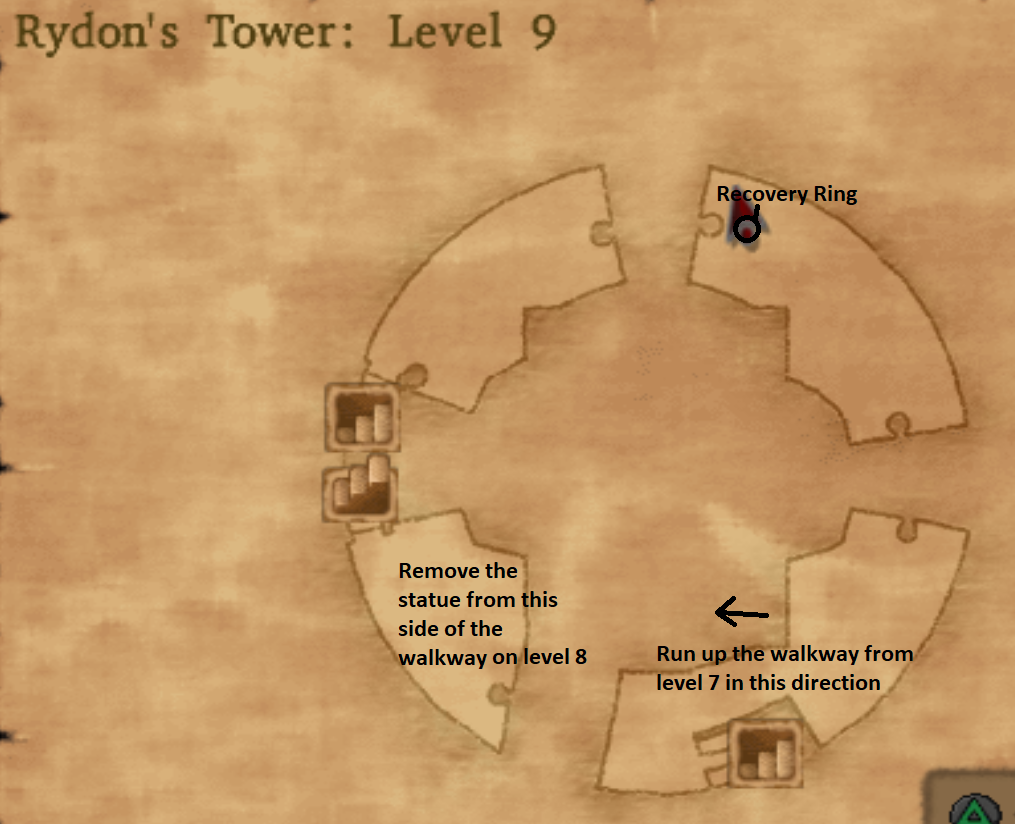
On the 7th floor the first thing you will want to do is raise the platform in the northern portion of the tower allowing you to reach a treasure chest on the 9th floor with a Recovery Ring in it. Return to the 7th floor and go up the southeastern staircase to the 8th floor. Here you will want to move the statue off the block next to the seesaw in the center of the room. This will raise your side up one floor and drop the other side since it has a weight on it.
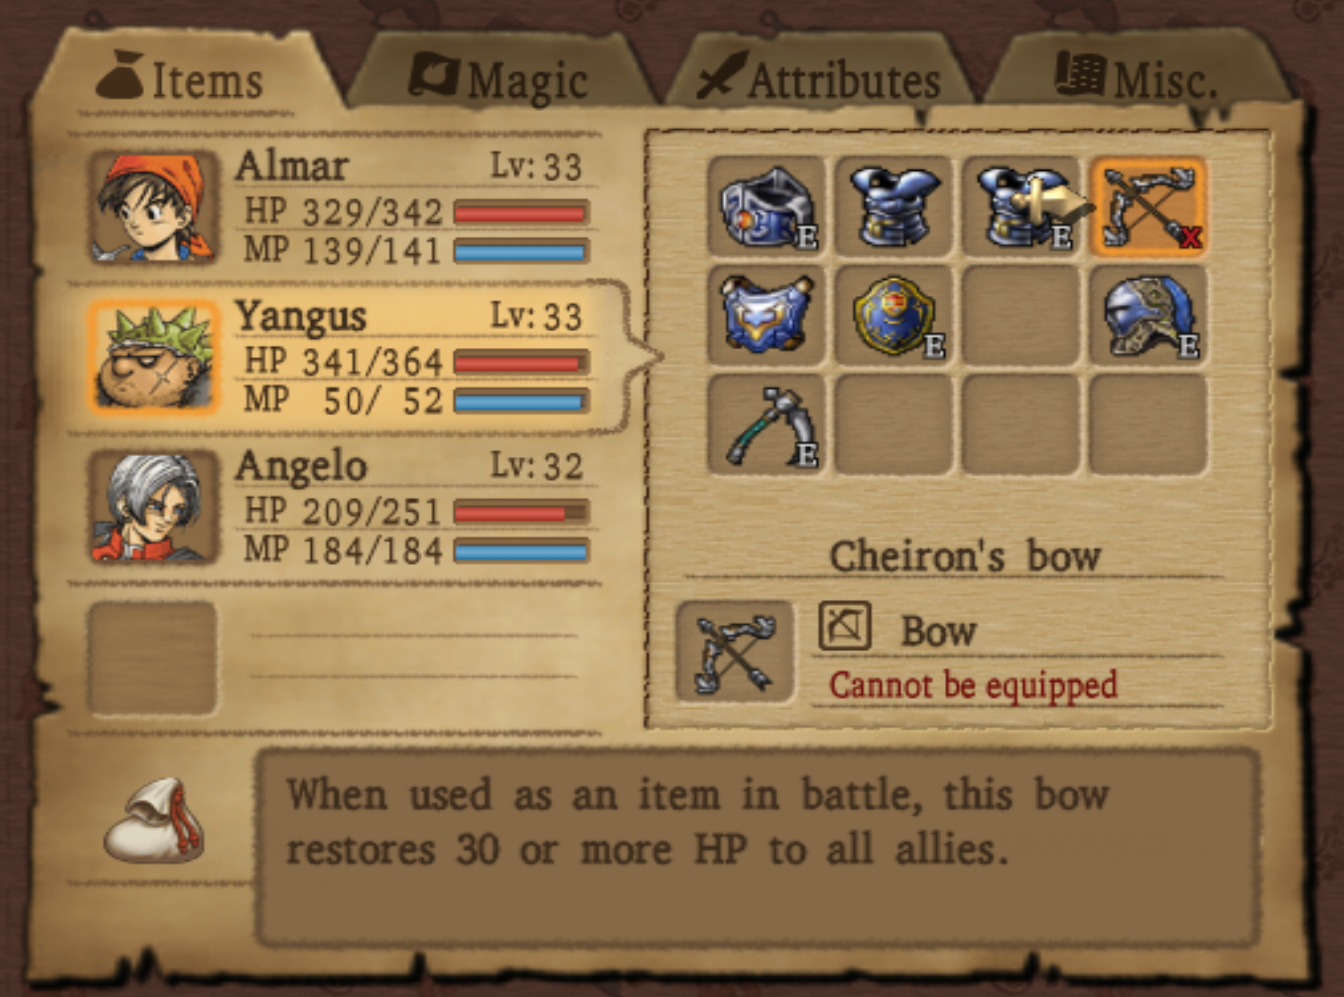
Run up the stairwell to the 9th floor then go up the stairs to the tower's peak. Up here you'll find a treasure chest which has Cheiron's Bow in it - an extremely powerful item which used in battle restores 30 HP to everyone in your party. I recommend you put this in Yangus' inventory since that will give him the ability to heal your entire group.
When you're done speak to Rydon at the top of the tower and ask him about the Kran Spinels. He tells you that all he can remember is a name, Alexandra. So, Zoom over to Alexandria and travel down the road to the Tower - the dungeon where we met Jessica really early on in the game. Use Holy Protection on the Hero or Holy Water for this whole part if you'd like to avoid annoying random encounters.
Go to the top of this tower, the same place her brother was killed and over to the statue here. Inspect it then try to leave the area and the statue will communicate with you. After the scene collect the gemstones that fall from the statue then use Evac to leave. Zoom back to Arcadia and return to Master Dominico.
Continue to walkthrough Chapter 9 (Side Quests, Savella Cathedral, Pirate's Cove, Empycchu)