
Level 9 Nekoht Quests - Monster Hunter Freedom Unite
This page is a list and walkthrough of all the Level 9 Quests give by Nekoht in Monster Hunter Freedom Unite. Nekoht is a unique NPC to Unite and is only available in this game; once you finish all of the Elder Quests she'll start giving you additional quests.
I've included all of the relevant information for each quest on this list such as which zone it takes place in, what type of quest it is, whether or not you're required to complete it to advance and (of course) how to complete the quest. Below is an example that will serve as your Key for this page. If you're confused as to what any of the categories on this page mean take a look at the Key below.
Key:
Name of the Mission
Advance Req: If you are required to beat the mission to progress
Type: The type of mission this is, Gathering, Combat or Hunting
Video: My Youtube Video Walkthrough of this mission
Location: Where this mission takes place
Goal: The objective of this mission
#1 Secret Request: Nargacuga!
#1 Secret Request: Nargacuga!
Advance Req: No
Type: Hunting Quest
Video: Secret Request: Nargacuga Quest Walkthrough (Light Bowgun)
Location: Great Fortress (Day)
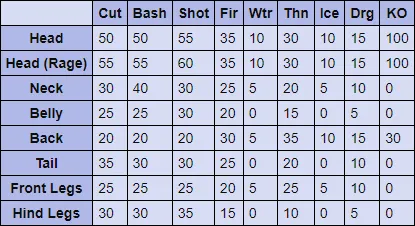
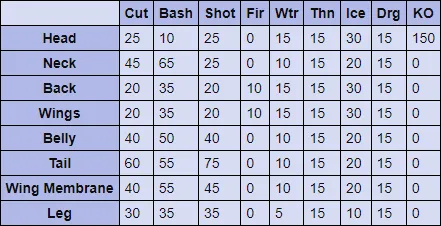
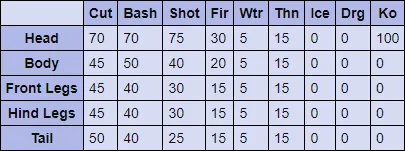
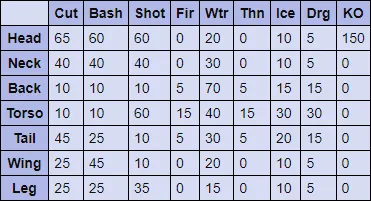
Goal: Hunt the Nargacuga (3600 HP). When the mission first begins you can find the Nargacuga in area 5, it will hang out here for a bit before moving to areas 7, 2, 4 and then back to 5. Once he arrives back in area 5 it seems like his route becomes random and he has a chance of visiting any of the locations that he can visit.
Nargacuga Hitzones & Weaknesses:
#2 Assassin of the Jungle
#2 Assassin of the Jungle
Advance Req: No
Type: Hunting Quest
Video: Assassin of the Jungle Quest Walkthrough (Light Bowgun)
Location: Old Jungle
Goal: Hunt the Nargacuga (3960 HP). At the start of this mission you can find the Nargacuga in area 2, it'll stay here for about a minute before switching to areas 3, 7, 6, 1 and finally back to 2. From what I have observed he will follow this same rotation through the map over and over.
Nargacuga Hitzones & Weaknesses:
#3 Land of the Tremors
#3 Land of the Tremors
Advance Req: Yes
Type: Hunting Quest
Video: Land of the Tremors Quest Walkthrough (Light Bowgun)
Location: Snowy Mountains (Night)
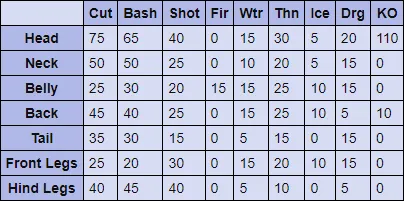
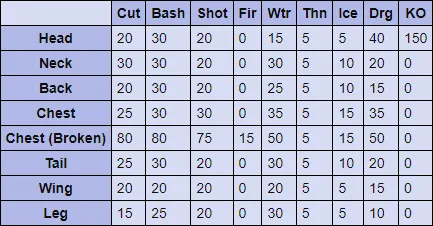
Goal: Hunt 2 Tigrex (2200 HP). You can find one Tigrex in area 1 and the other in area 8 at the start of this mission; they will spend about one minute in each location if left undisturbed. From what I have seen the Tigrex follow no pattern when they switch areas, it seems as if they always pick an area at random and go there (sometimes they both go to the same area). The areas I have seen the Tigrex visit are areas 1, 3, 6, 7 and 8. As you can imagine this mission is going to be a challenging one since Tigrex are pretty tough enemies. My advice is to never fight two Tigrex at the same time and if you're ranged use the platforms in areas 1 and 6 to your advantage. You can easily stand on the platform and shoot the Tigrex without them being able to hit you back.
Tigrex Hitzones & Weaknesses:
#4 A King, Robed in Smoke
#4 A King, Robed in Smoke
Advance Req: No
Type: Hunting Quest
Video: A King, Robed in Smoke Quest Walkthrough (Light Bowgun)
Location: Old Volcano
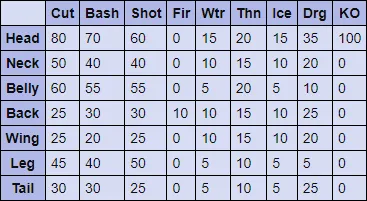
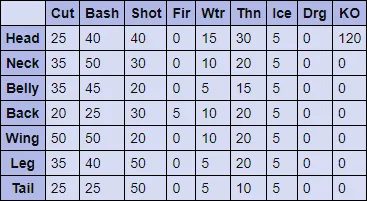
Goal: Hunt the Rathalos (3200 HP). The first place you can find the Rathalos is in area 7 in the northern portion of this map. He'll hang out here for about a minute before going to areas 6, 2, 3 and back to 7.
Rathalos Hitzones & Weaknesses:

#5 Dancing Desert Queen
#5 Dancing Desert Queen
Advance Req: No
Type: Hunting Quest
Video: Dancing Desert Queen Quest Walkthrough (Light Bowgun)
Location: Old Desert
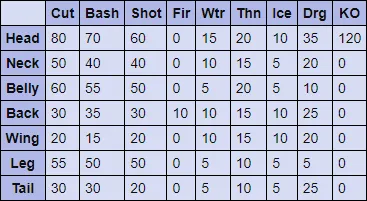
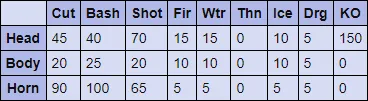
Goal: Hunt the Rathian (4000 HP). When the mission first begins you can find the Rathian in area 4 on the map. It will hang out here for about a minute before switching to one of the following areas 1, 3, 10 or 7. From what I have seen the area it picks is random, but it seems to prefer 1 and 3.
Rathian Hitzones & Weaknesses:
#6 Descendants of the King
#6 Descendants of the King
Advance Req: No
Type: Hunting Quest
Video: Descendants of the King Quest Walkthrough (Light Bowgun)
Location: Forest & Hills (Night)
Goal: Hunt the Azure Rathalos (1980 HP) and the Pink Rathian (2420 HP). When the mission begins you can find the Azure Rathalos in area 4 and the Pink Rathian in area 5 (The Den). Both of these enemies will stay in the area they start in for about a minute and if left undisturbed they'll switch to another location. Each of these monsters can visit the following Areas 4, 5, 9, 3, 2, 10 and 6. There seems to be no pattern or order that they visit these areas in, it appears to be random. My best advice to you is mark both of them with a Paintball and definitely avoid fighting them both at the same time.
Azure Rathalos Hitzones & Weaknesses:

Pink Rathian Hitzones & Weaknesses:
#7 Diablos, the Demon King
#7 Diablos, the Demon King
Advance Req: No
Type: Hunting Quest
Video: Diablos, the Demon King Quest Walkthrough (Light Bowgun)
Location: Desert (Night)
Goal: Hunt the Diablos (6000 HP). When the mission first begins you can find the Diablos in area 7, it'll hang out here for about a minute before going to areas 2, 1, 5, 9 and 3. From what I have observed it picks one of these areas at random and goes there and it follows no set pattern. If you're having trouble finding the Diablos it may be buried underground, wait for it to surface or try waving at a Felyne Ballooner in the sky to mark its location on the map.
Diablos Hitzones & Weaknesses:
#8 The Four Spires
#8 The Four Spires
Advance Req: No
Type: Hunting Quest
Video: The Four Spires Quest Walkthrough (Light Bowgun)
Location: Old Desert
Goal: Hunt 2 Black Diablos (2420 HP). When the mission begins you can find one Black Diablos in area 7 and the other in area 10. If left undisturbed both of these monsters will switch to one of the following locations after about one minute: Areas 4, 2, 1, 3 and of course 7 and 10. From my observations they pick an area at random and they both can visit the same areas. One piece of advice - don't fight them both at the same time otherwise you'll end up dead. Another bit of advice, if you're using a ranged weapon area 10 has a ledge that you can stand on to avoid most attacks while still being able to deal damage to the monsters.
Black Diablos Hitzones & Weaknesses:

#9 Armored Supremacy
#9 Armored Supremacy
Advance Req: No
Type: Hunting Quest
Video: Armored Supremacy Quest Walkthrough (Light Bowgun)
Location: Old Volcano
Goal: Hunt the Gravios (4000 HP). At the start of this mission you will find the Gravios in area 4, it'll hang out here for about a minute before starting a rotation that goes through areas 6, 7, 5 and back to 4. From what I have seen it will follow this same exact rotation each and every time.
Gravios Hitzones & Weaknesses:
#10 Two Black Suits of Armor
#10 Two Black Suits of Armor
Advance Req: No
Type: Hunting Quest
Video: Two Black Suits of Armor Quest Walkthrough (Light Bowgun)
Location: Old Volcano
Goal: Hunt two Black Gravios (2420 HP). One Black Gravios is found in area 7 and the other is in area 4 at the start of the mission. Just like in the previous mission the Gravios will follow a simple rotation going through areas 7, 5, 4 and 6.
Black Gravios Hitzones & Weaknesses:

#11 Explore the Unexplored
#11 Explore the Unexplored
Advance Req: Yes
Type: Hunting Quest
Video: Explore the Unexplored Quest Walkthrough (Light Bowgun)
Location: Tower
Goal: Hunt the Silver Rathalos (4000 HP). This map is a battle arena of sorts, you start in base camp and need to drop down into a large area with the Silver Rathalos. My advice is to bring Flashbombs if you need them and materials to make more. You can stun the Silver Rathalos with them to make the fight easier. Aside from that, I recommend you check out my Hunt Preparation Guide for more information about how to prepare for difficult quests like this one.
Silver Rathalos Hitzones & Weaknesses:

#12 A Single Beam of Moonlight
#12 A Single Beam of Moonlight
Advance Req: Yes
Type: Hunting Quest
Video: A Single Beam of Moonlight Quest Walkthrough (Light Bowgun)
Location: Tower
Goal: Hunt the Gold Rathian (4840 HP). Just like the previous mission you start in the base camp and need to jump down into the arena with the Gold Rathian. Once you're down here you're stuck with him until you either faint or it's dead. I recommend you check out my Hunt Preparation Guide for more information about how to prepare for difficult quests like this one. Flashbombs are one of the consumables that Gold Rathians are susceptible to.
Gold Rathian Hitzones & Weaknesses:
#13 Fire Ring, Lunar Ring
#13 Fire Ring, Lunar Ring
Advance Req: Yes
Unlock: You need to complete Explore the Unexplored and A Single Beam of Moonlight to unlock this mission
Type: Hunting Quest
Video: Fire Ring, Lunar Ring Quest Walkthrough (Light Bowgun)
Location: Old Swamp
Goal: Hunt the Gold Rathian (2420 HP) and Silver Rathalos (2200 HP). At the start of this mission you will find the Gold Rathian in area 9 and the Silver Rathalos in area 5. If left undisturbed they will leave these locations in about a minute and travel to areas 4, 3, 2, 6, 10, 2, 5 and of course 9. Basically, it seems that they go everywhere except 1, 8, 11 and 7. Bring Psychoserum or wave to the Felyne Ballooner in the sky if you're having trouble locating them at any point.
Gold Rathian Hitzones & Weaknesses:
Silver Rathalos Hitzones & Weaknesses:
#14 Attack of the Rajang
#14 Attack of the Rajang
Advance Req: No
Type: Hunting Quest
Video: Attack of the Rajang Quest Walkthrough (Light Bowgun)
Location: Volcano (Night)
Goal: Hunt the Rajang (3600 HP). The Rajang starts out in area 4, he will eventually move to areas 3, 6, 7 and 2. It seems like he picks which area to visit at random but (at least in my experience) he definitely seems to favor areas 4, 3 and 6.
Rajang Hitzones & Weaknesses:

#15 It's Electric
#15 It's Electric
Advance Req: No
Type: Slaying Quest
Video: It's Electric Quest Walkthrough (Light Bowgun)
Location: Old Jungle
Goal: Slay the Kirin (3200 HP). You can find the Kirin in area 6 when the mission first begins. It will spend about a minute here before going through areas 4, 1, 3 and 7 before turning around and returning to 6. This is the patrol route that Kirin follows, you can intercept him anywhere along it that you like.
Kirin Hitzones & Weaknesses:
#16 Diamond Dust
#16 Diamond Dust
Advance Req: No
Type: Epic Hunting Quest
Video: Diamond Dust Quest Walkthrough (Light Bowgun)
Location: Snowy Mountains (Day)
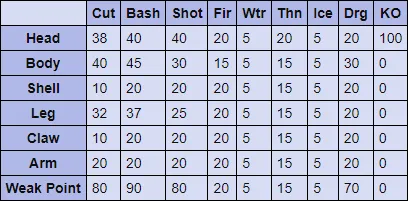
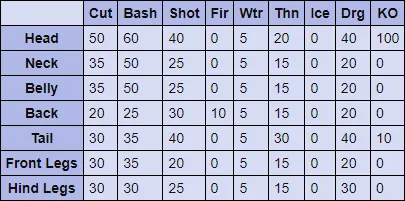
Goal: Hunt all of the Large Monsters on this quest; the large monsters include a Blangonga (1540 HP) and a Tigrex (2200 HP). At the start of this mission you can find the Blangonga in area 8. It will hang out here for about a minute before moving to areas 6, 2, 7 or 3. The Tigrex will spawn once the Blangonga has been defeated and it'll visit the same locations on this map.
Blangonga Hitzones & Weaknesses:
Tigrex Hitzones & Weaknesses:
#17 Hard-Shelled Terrors
#17 Hard-Shelled Terrors
Advance Req: No
Type: Epic Hunting Quest
Video: Hard-Shelled Terrors Quest Walkthrough (Light Bowgun)
Location: Volcano (Day)
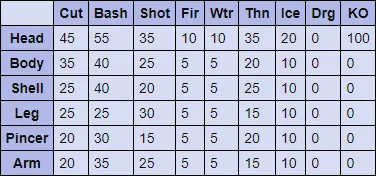
Goal: Hunt all of the Large Monsters. For this quest that includes a Gravios (2200 HP) and a Shogun Ceanataur (1920 HP). When the mission first begins you can find the Gravios in area 7, it'll hang out here for about a minute before starting its patrol route which takes it through areas 5, 4, 3 and back to 7. Once you defeat the Gravios the Shogun Ceanataur will spawn in area 6. After a few minutes the Shogun Ceanataur will begin its patrol route through areas 7, 3, 4, 5 and back to 6. From what I have seen it will always follow this same route through each area.
Gravios Hitzones & Weaknesses:
Shogun Ceanataur Hitzones & Weaknesses:
#18 Bird Wyvern All-Stars
#18 Bird Wyvern All-Stars
Advance Req: No
Type: Epic Hunting Quest
Video: Bird Wyvern All Stars Quest Walkthrough (Light Bowgun)
Location: Forest & Hills (Night)
Goal: Hunt all of the Large Monsters; that includes a Yian Kut-ku (960 HP), a Hypnocatrice (1430 HP) and a Yian Garuga (2200 HP) for this quest. The first monster you'll be dealing with at the start of this mission is the Yian Kut-ku which spawns in area 9. From what I have seen all 3 of the monsters that you hunt on this map visit the same locations - which are areas 9, 4, 3, 2, 5, 10 and 6. Based on my observations they seem to prefer areas 9, 3, 4 and 2 the most; other than that it seems they pick areas at random.
Yian Kut-ku Hitzones & Weaknesses:
Hypnocatrice Hitzones & Weaknesses:
Yian Garuga Hitzones & Weaknesses:
#19 Sand Dune's Might
#19 Sand Dune's Might
Advance Req: No
Type: Epic Hunting Quest
Video: Sand Dune's Might Quest Walkthrough (Light Bowgun)
Location: Old Desert
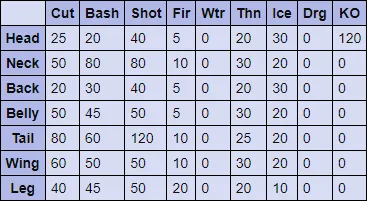
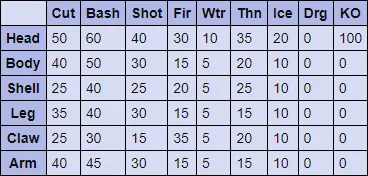
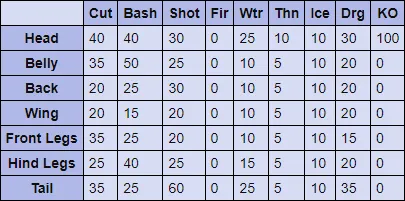
Goal: Hunt all of the Large Monsters; that includes a Monoblos (2200 HP), a Daimyo Hermitaur (1320 HP) and a Rathian (2200 HP). You can find the Monoblos in area 10 when the mission first begins, if left undisturbed it will visit areas 7, 4, 1 and of course 10. Once dead the Daimyo Hermitaur will spawn in area 7. Much like the Monoblos it'll hang out here for a minute before going to areas 7, 2, 1 and 3. Last but not least the Rathian will spawn in area 4 once the crab is dead. The Rathian will visit areas 10, 7, 1, 3 and of course area 4.
Monoblos Hitzones & Weaknesses:
Daimyo Hermitaur Hitzones & Weaknesses:
Rathian Hitzones & Weaknesses:
#20 Evaporate into the Night
#20 Evaporate into the Night
Advance Req: No
Unlock: Clear all 7*, 8* and 9* single monster quests
Type: Slaying Quest
Video: Evaporate into the Night Quest Walkthrough (Light Bowgun)
Location: Jungle (Night)
Goal: Slay the Chameleos (12,000 HP). When the mission begins you can find Chameleos in area 6 on the map. From my experience he typically moves out of here quick and over to 9. After that he seems to pick a random location from the various places he can visit. I've seen him in areas 6, 9, 1, 5, 4 and 3. For better luck finding him I recommend waving to a Felyne Ballooner as they'll mark his location on the map temporarily. My best advice though is to use your ears - he makes noise when you are in the same area as he is, his invisiblity also flickers on and off. Once you know he's around start chucking Paintballs. If you need additional help fighting Chameleos check out my Hunt Preparation Guide or my Elder Dragon Weaknesses Guide.
Chameleos Hitzones & Weaknesses:

#20 The Elder Dragon of Mist
Advance Req: No
Unlock: Clear all 7*, 8* and 9* single monster quests
Type: Slaying Quest
Video: The Elder Dragon of Mist Quest Walkthrough (Light Bowgun)
Location: Forest & Hills (Day)
Goal: Slay the Chameleos (12,000 HP). Bring a lot of Paintballs for this quest because Chameleos can be a bit more annoying than the other Elder Dragons since he often goes invisible. When this mission first starts you can find Chameleos in area 9; you have enough time to get here before he leaves and I strongly recommend you do because you want to mark this boss ASAP so you can easily track him. My advice is to go to area 9 (enter from area 3) and start chucking Paintballs in the big room until you hit him. If he gets away from you then you can check areas 3, 2, 5, 4 and 10 until you find him. Normally I check areas 2 and 3 looking for him since he likes to go there a lot if he isn't in #9. If you need additional help fighting Chameleos check out my Hunt Preparation Guide or my Elder Dragon Weaknesses Guide.
Chameleos Hitzones & Weaknesses:
#21 A Midnight Audience
#21 A Midnight Audience
Advance Req: No
Unlock: Clear all 7*, 8* and 9* single monster quests
Type: Slaying Quest
Video: A Midnight Audience Quest Walkthrough (Light Bowgun)
Location: Swamp (Night)
Goal: Slay the Teostra (11,250 HP) . At the start of this mission you can find the Teostra in area 8, after about a minute it'll leave and go to areas 6, 5, 2, 4 and 8. It seems to pick one of these areas at random and goes there but it does seem to prefer areas 8, 6, 5 and 4. If you need help preparing for this hunt I recommend you check out my Hunt Preparation Guide. Alternatively, if you'd like to learn more about this monster's weaknesses check out my Elder Dragon Weaknesses Guide.
Teostra Hitzones & Weaknesses:
#21 Fight for Your Life
Advance Req: No
Unlock: Clear all 7*, 8* and 9* single monster quests
Type: Slaying Quest
Video: Fight for Your Life Quest Walkthrough (Light Bowgun)
Location: Town
Goal: Slay the Teostra (11,250 HP). On this map you can only encounter the Teostra in areas 2 and 3. In area 3 you'll find the Dragonator device which will deal heavy damage to the monster when used - other than this device the fight against this boss is pretty straight forward. If you need help preparing for this hunt I recommend you check out my Hunt Preparation Guide. Alternatively, if you'd like to learn more about this monster's weaknesses check out my Elder Dragon Weaknesses Guide.
Teostra Hitzones & Weaknesses:
#22 The Approaching Gaoren
#22 The Approaching Gaoren
Advance Req: No
Type: Slaying Quest
Video: The Approaching Gaoren Quest Walkthrough (Light Bowgun) - Shen Gaoren Attacks & Strats (Hammer)
Location: Fortress
Goal: Defend the Fortress from Shen Gaoren (20000 HP). As is typical for this quest you're not required to kill Shen Gaoren - only stop him from destroying the Fortress. You can stop him from destroying the Fortress by attacking him constantly and refusing to let up. You've probably already figured this out but each time you inflict enough damage to a body part in this game it will 'break' which stuns the monster. Do this to Shen repeatedly and you'll successfully prevent him from destroying the Fortress. Don't worry about killing him until you've gotten better gear and weapons. If you want some advice on how to prepare for this mission check out my Hunt Preparation Guide - if you'd like to learn more about Shen Gaoren's weaknesses then check out my Carapaceon Weaknesses Guide too.
Shen Gaoren Hitzones & Weaknesses:
(Urgent) Rise to the Summit
(URGENT) Rise to the Summit
Advance Req: No
Unlock: This is the penultimate Urgent quest that Nekoht gives you
Type: Slaying Quest
Video: Rise to the Summit Quest Walkthrough (Light Bowgun)
Location: Battleground
Goal: Defeat Akantor (8400 HP). As the name of this map suggests, it's basically a giant battleground. You can find Akantor in the large area that you start in and you won't be able to leave this area unless you get defeated or you defeat Akantor. If you need help preparing for this difficult quest I recommend you check out my Hunt Preparation Guide. Alternatively, if you'd like to learn more about Akantor's weaknesses check out my Elder Dragon Weaknesses Guide.
Akantor Hitzones & Weaknesses:
(Urgent) Monster Hunter
(URGENT) Monster Hunter
Advance Req: No
Unlock: Complete all of the Elder Quests & All of Nekoht's Quests to unlock this
Type: Epic Hunting Quest
Video: Monster Hunter Quest Walkthrough (Longsword)
Location: Great Arena
Goal: Hunt all four of the Large Monsters, you need to defeat a Rathalos (3840 HP), Tigrex (4800 HP), Nargacuga (4320 HP) and a Rajang (4320 HP). All of these monsters are G3 ranked so you should expect a very difficult fight with all of them. Basically of them have 400 attack and as much HP as they would if it were a solo quest. What I am trying to say is, don't get hit.
Rathalos Hitzones & Weaknesses:
Tigrex Hitzones & Weaknesses:
Nargacuga Hitzones & Weaknesses:
Rajang Hitzones & Weaknesses:
Nekoht Quests
- Level 7
- Level 8
- Level 9