
Level 8 Nekoht Quests - Monster Hunter Freedom Unite
This page is a list and walkthrough of all the Level 8 Quests give by Nekoht in Monster Hunter Freedom Unite. Nekoht is a unique NPC to Unite and is only available in this game; once you finish all of the Elder Quests she'll start giving you additional quests.
I've included all of the relevant information for each quest on this list such as which zone it takes place in, what type of quest it is, whether or not you're required to complete it to advance and (of course) how to complete the quest. Below is an example that will serve as your Key for this page. If you're confused as to what any of the categories on this page mean take a look at the Key below.
Key:
Name of the Mission
Advance Req: If you are required to beat the mission to progress
Type: The type of mission this is, Gathering, Combat or Hunting
Video: My Youtube Video Walkthrough of this mission
Location: Where this mission takes place
Goal: The objective of this mission
#1 The Remobra Den
#1 The Remobra Den
Advance Req: No
Type: Slaying Quest
Video: The Remobra Den Quest Walkthrough (Light Bowgun)
Location: Great Arena
Goal: Slay 15 Remobras. This is as straight forward a mission as you can get, you go into the arena and you defeat 15 Remobras.
#2 The Sleepy Great Forest
#2 The Sleepy Great Forest
Advance Req: No
Type: Hunting Quest
Video: The Sleepy Great Forest Quest Walkthrough (Light Bowgun)
Location: Great Forest (Night)
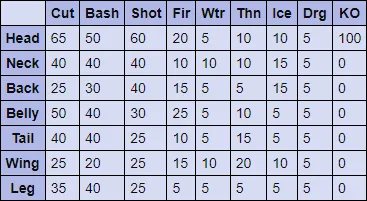
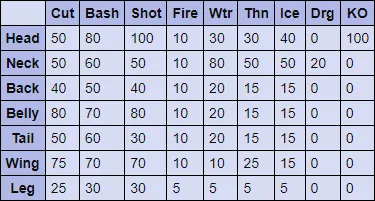
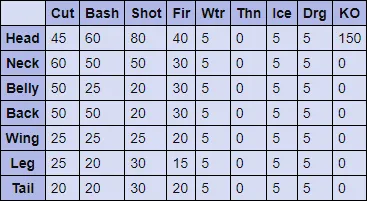
Goal: Hunt 2 Hypnocatrices (1430 HP). When the mission begins you can find one Hypnocatrice in area 4 and the other in area 5. They spend about a minute in each location before moving to the next. From what I have observed they will visit areas 1, 2, 4, 5, 6 and 7; I do not think there is a set in stone patrol route for these guys as they seem to pick areas at random. My advice is to visit area 4 at the start of the mission and fight them there until you need to switch.
Hypnocatrice Hitzones & Weaknesses:
#3 Eyes in the Underground Lake
#3 Eyes in the Underground Lake
Advance Req: No
Type: Hunting Quest
Video: Eyes in the Underground Lake Quest Walkthrough (Light Bowgun)
Location: Old Desert
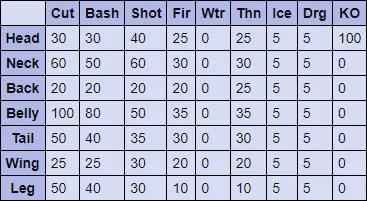
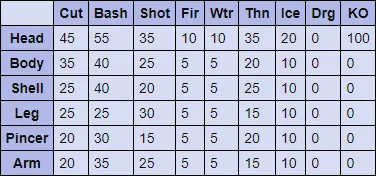
Goal: Hunt the Plesioth (4000 HP). You can find the Plesioth in area #5 which is at the northern most point of this map. He doesn't leave this area at all the entire time since it's the only spot on the map with a lake to house him.
Plesioth Hitzones & Weaknesses:

#4 Green Waves of Verdure
#4 Green Waves of Verdure
Advance Req: No
Type: Hunting Quest
Video: Green Waves of Verdure Quest Walkthrough (Light Bowgun)
Location: Old Jungle
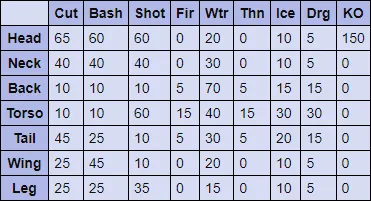
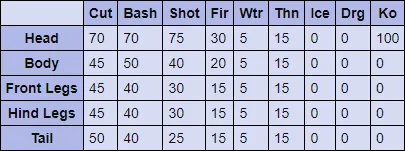
Goal: Hunt two Green Plesioth (2420 HP). When the mission first begins you can find one Green Plesioth in area 7 and the other in area 3. These are the only two locations that the monsters will travel back and forth between since they're the only areas with a river large enough to hold them. If you're a ranged character I strongly recommend you fight them in area 7 since there is a ledge in the back that you can stand on. Standing on this ledge will allow you to dodge all but one or two of their attacks making the fight significantly easier.
Green Plesioth Hitzones & Weaknesses:
#5 Elegy for a Lone Wolf
#5 Elegy for a Lone Wolf
Advance Req: No
Type: Hunting Quest
Video: Elegy for a Lone Wolf Quest Walkthrough (Light Bowgun)
Location: Forest & Hills (Night)
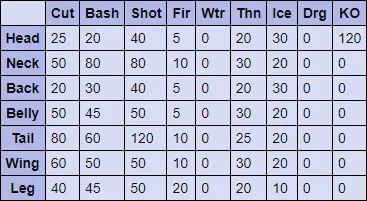
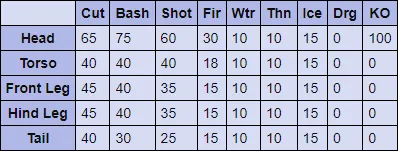
Goal: Hunt the Yian Garuga (4000 HP?). At the start you can find the Yian Garuga in area 9, it will hang out here for about a minute before moving to one of the following areas at random 10, 3, 2, 4, or area 5.
Yian Garuga Hitzones & Weaknesses:
#6 Battle with the Monoblos
#6 Battle with the Monoblos
Advance Req: No
Type: Hunting Quest
Video: Battle with the Monoblos Quest Walkthrough (Light Bowgun)
Location: Desert (Day)
Goal: Hunt the Monoblos (4000 HP). You can find the Monoblos in area 7 at the start of the mission - it hangs out here for about a minute before moving to one of the following areas at random 9, 5, 2 or 1. Keep in mind that the Monoblos hides underground a lot of the time so it may take a little bit of running around to force it to the surface.
Monoblos Hitzones & Weaknesses:

#7 Secret Request: 2 Monoblos!
#7 Secret Request: 2 Monoblos!
Advance Req: No
Type: Hunting Quest
Video: Secret Request: 2 Monoblos Quest Walkthrough (Light Bowgun)
Location: Old Desert
Goal: Hunt the Monoblos (2200 HP) and White Monoblos (3000 HP). The White Monoblos starts out in area 7 and the regular Monoblos starts in area 10. Both of these monsters will stay in their start locations for a few minutes before eventually moving. I have witnessed these Monoblos visit areas 1, 2, 3, 4, 7 and 10. There doesn't seem to be a pattern to their movements so you'll have to explore to find them.
Monoblos Hitzones & Weaknesses:
White Monoblos Hitzones & Weaknesses:
#8 Kut-ku Calamity!
#8 Kut-ku Calamity!
Advance Req: No
Type: Hunting Quest
Video: Kut-ku Calamity Quest Walkthrough (Light Bowgun)
Location: Forest & Hills (Day)
Goal: Hunt at least 1 Yian Kut-ku (1280 HP) and 1 Blue Yian Kut-ku (2240 HP). You can find the Blue Yian Kut-ku in area #5 at the start of the mission and the regular Yian Kut-ku in area #9. They will stay in their start areas for about a minute before moving to another area at random. I've seen these wyverns visit areas 2, 3, 4, 9 and of course area 10.
Yian Kut-ku Hitzones & Weaknesses:
Blue Yian Kut-ku Hitzones & Weaknesses:

#9 Basarios Season
#9 Basarios Season
Advance Req: No
Type: Hunting Quest
Video: Basarios Season Quest Walkthrough (Light Bowgun)
Location: Old Volcano
Goal: Hunt at least two Basarios (1920 HP). When the mission begins you can find one Basarios in area 2 and the other in area 3. They will stay in each of these areas for a few minutes before switching to one of the following areas at random: 2, 3, 4 and 5.
Basarios Hitzones & Weaknesses:

#10 A Shogun Tastes Like...?
#10 A Shogun Tastes Like...?
Advance Req: No
Type: Hunting Quest
Video: A Shogun Tastes Like Quest Walkthrough (Light Bowgun)
Location: Volcano (Day)
Goal: Hunt at least two Shogun Ceanataurs before the time is up (1760HP - 2880 HP). When the mission begins you can first find the Shogun Ceanataur in area 6; it will hang out here for a minute or so before starting a patrol route which takes it through areas 7, 3, 4, 5 and then finally back to area 6. Once defeated the second Shogun Ceanataur will spawn in area 6 and follow the same patrol route if you allow it to.
Shogun Ceanataurs Hitzones & Weaknesses:
#11 Bl-Bl-Blangongas!
#11 Bl-Bl-Blangongas!
Advance Req: No
Type: Hunting Quest
Video: Bl-Bl-Blangongas Quest Walkthrough (Light Bowgun)
Location: Snowy Mountains (Night)
Goal: Hunt at least two Blangongas (2030 HP) before the time is up. During this mission the Blangongas will spawn in area 8 which is the northern most point on the map. After about a minute in this location they will leave and visit one of the following areas at random 6, 3, 2 or area 7.
Blangonga Hitzones & Weaknesses:
#12 Operation Desert Winds
#12 Operation Desert Winds
Advance Req: No
Type: Epic Hunting Quest
Video: Operation Desert Winds Quest Walkthrough (Light Bowgun)
Location: Desert (Day)
Goal: Hunt all of the Large Monsters. For this quest that includes a Plesioth (2200 HP) and a White Monoblos (3000 HP). The first monster that's available during this quest is the Plesioth which you can find in areas 7 and 6, from what I have seen he spends the most time in area 6 where the underground lake is. Once you've dispatched the Plesioth the White Monoblos will spawn in area 7. He hangs out at this location for a little bit before moving to areas 2, 1, 5 or area 3. From what I have seen his choice of area is completely random.
Plesioth Hitzones & Weaknesses:
White Monoblos Hitzones & Weaknesses:
#13 Congalala in a Crab Shell
#13 Congalala in a Crab Shell
Advance Req: No
Type: Epic Hunting Quest
Video: Congalala in a Crab Shell Quest Walkthrough (Light Bowgun)
Location: Swamp (Night)
Goal: Hunt all of the Large Monsters. For this quest that includes a Congalala (1540 HP) and a Shogun Ceanataur (1760 HP). The first monster you need to kill is the Congalala who starts out in area 8. He will spend about a minute here before moving to areas 6, 5, 4, 2 and 7. Once you have defeated the Congalala the next enemy, a Shogun Ceanataur, will spawn in area 9. If left alone for longer than a minute it will move to areas 7, 6, 5, 4, 3 and back to 9.
Congalala Hitzones & Weaknesses:
Shogun Ceanataur Hitzones & Weaknesses:
#14 Sleepy Miasma, Poison Mist
#14 Sleepy Miasma, Poison Mist
Advance Req: No
Type: Epic Hunting Quest
Video: Sleepy Miasma, Poison Mist Quest Walkthrough (Light Bowgun)
Location: Jungle (Day)
Goal: Hunt all of the Large Monsters. For this quest that includes a Gypceros (1320 HP) and a Hypnocatrice (1430 HP). I strongly recommend you bring 3 Psychoserum's for this quest because each of the enemies travel to many areas. The first enemy you can find on this quest is the Gypceros who spawns in area #6 on the map. If left alone in this area for about a minute he will leave and travel to one of the following areas at random 4, 5, 3, 2, 9 or area 1. Once the Gypceros has been defeated the Hypnocatrice will spawn in area 2. It travels to areas 5, 4, 3, 9 and area 6 - many different areas and sometimes it doesn't spend very long in the area. Bring Psychoserum.
Gypceros Hitzones & Weaknesses:

Hypnocatrice Hitzones & Weaknesses:
#15 Carnivores of the Old Jungle
#15 Carnivores of the Old Jungle
Advance Req: No
Type: Epic Hunting Quest
Video: Carnivores of the Old Jungle Quest Walkthrough (Light Bowgun)
Location: Old Jungle
Goal: Hunt all of the Large Monsters. For this quest that includes a Khezu (1760 HP) and a Green Plesioth (2420 HP). When the mission begins you can find the Khezu in area 4 on the map. It will hang out here for a few minutes before moving to areas 8, 9 and 10. Once defeated you can find the Green Plesioth in areas 7 and 3. It will spawn in the river at area 7 and then patrol back and forth between here and 3.
Khezu Hitzones & Weaknesses:
Green Plesioth Hitzones & Weaknesses:
#16 Attack of the Wind Dragon
#16 Attack of the Wind Dragon
Advance Req: No
Type: Slaying Quest
Video: Attack of the Wind Dragon Quest Walkthrough (Light Bowgun)
Location: Town
Goal: Slay Kushala Daora (10500 HP). You can find Kushala Daora in area 2 at the start of the mission but he only stays here for about a minute. He'll leave here and visit area #3 which is where I recommend you start the fight because it will allow you to hit the button at the top of the wall and hit Kushala with the Dragonator device. I like to get the Dragonator out of the way early because trying to get up here quick enough when Kushala flies up to this area is pretty difficult. Check out my Hunt Preparation Guide if you need help preparing for this fight and of course my Elder Dragon Weaknesses Guide for information about Kushala's vulnerabilities.
Kushala Daora Hitzones & Weaknesses:

#17 The Empress's Blazing Throne
#17 The Empress's Blazing Throne
Advance Req: No
Unlock: Clear all 7* and 8* single monster hunting quests
Type: Slaying Quest
Video: The Empress's Blazing Throne Quest Walkthrough (Light Bowgun)
Location: Volcano (Day)
Goal: Slay Lunastra (10500 HP). The first place that Lunastra lands at the start of this mission is area 8. He stays here momentarily before eventually going to areas 6, 4, 2, 7 and back to 6. From what I have seen he will always follow that rotation through each area. If you need help preparing for this mission check out my Hunt Preparation Guide and if you'd like to learn more about Lunastra's weaknesses check out my Elder Dragon Weaknesses Guide too.
Lunastra Hitzones & Weaknesses:

#17 Indigo Meteor
Advance Req: No
Unlock: Clear all 7* and 8* single monster hunting quests
Type: Slaying Quest
Video: Indigo Meteor Quest Walkthrough (Light Bowgun)
Location: Desert (Night)
Goal: Slay Lunastra (10500 HP). When the mission begins you can find Lunastra in area 9 on the map. He hangs out here for a minute or so before moving to areas 5, 4, 3, 7 and back to 9. From what I have observed it follows this same route every time through the entire map. If you are having trouble preparing for this hunt and need some advice check out my Hunt Preparation Guide. Alternatively, check out my Elder Dragon Weaknesses Guide for more information about Lunastra's vulnerabilities.
Lunastra Hitzones & Weaknesses:
#18 Lao-Shan Lung Draws Near
#18 Lao-Shan Lung Draws Near!
Advance Req: No
Type: Slaying Quest
Video: Lao-Shan Lung Draws Near Quest Walkthrough (Light Bowgun)
Location: Fortress
Goal: Stop or defeat Ash Lao-Shan Lung (26666 HP). Your goal for this quest should not be to kill Ash Lao-Shan Lung, it should be to deal enough damage to him to stop him from destroying the fortress. Each time you break a part of his body you'll slow him down and/or prevent him from attacking the Fortress. Until you get better gear and weapons this should be your main focus because killing him with weak weapons and gear is impossible. If you'd like more information about how to properly prepare for this quest check out my Hunt Preparation Guide. Or if you'd like to learn more about this dragon's weaknesses check out my Elder Dragon Weaknesses Guide.
Ash Lao-Shan Lung Hitzones & Weaknesses:
Nekoht Quests
- Level 7
- Level 8
- Level 9