
World Overview for Wilderness Zones in Baldur's Gate (Bottom of the Map)
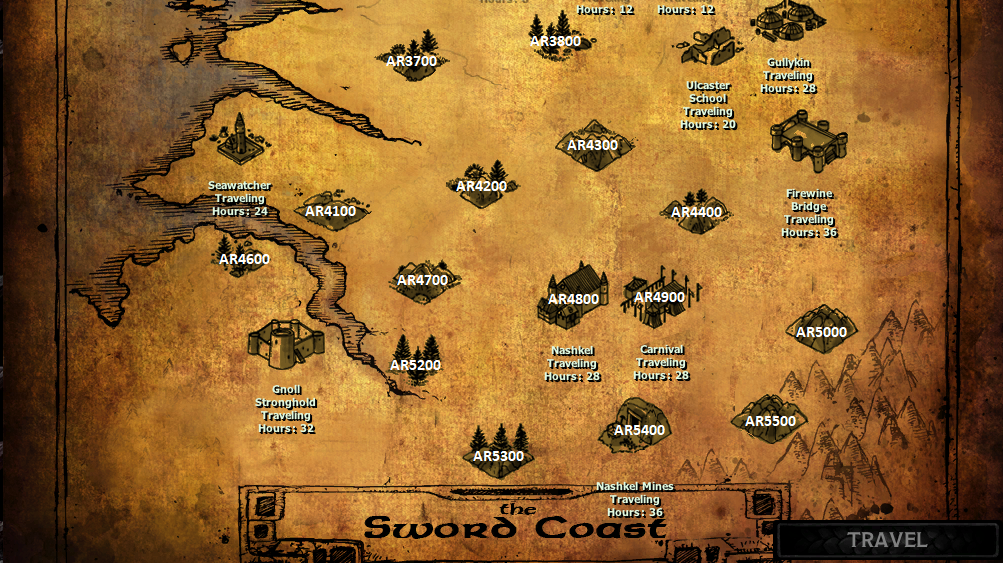
On this page you will find succinct information about what is in each Wilderness Zone of Baldur's Gate 1. This page contains information specifically about the Wilderness Zones on the bottom of the world map if you'd like to see information about other parts of the map check the links at the bottom of the page.
Essentially what I have done is gone through everything in each zone and I singled out the most important quests, items or events to complete and wrote them down. Very unique items, best in slot items, available companions, Steam Achievements and things of that nature are what made my lists below.
AR3700: Bassilus the Murderer is here whom is part of a few side quests; take the Holy Symbol he drops to Kelddath Ormlyr at the Temple east of Beregost. The most notable loot Bassilus carries is Ashideena +2 which is the BiS War Hammer in this game. North of Bassilus you'll find Melicamp the Chicken - take the chicken to High Hedge and give him to the mage here. More info about both these quests in my Walkthrough Chapter 2.
AR3800: You will find a couple of events on this map you can trigger but there's no notable loot or quests.
AR4100: This is the wilderness map where you will find Captain Brage which is part of a Chapter 2 Side Quest. You'll also find Charleston Nib who is in control of a digging site which is part of another Chapter 2 Side Quest.
AR4200: Drizzt Do'Urden can be found here; he is a popular character in the Baldur's Gate series. In this version you can kill him and loot his weapons, Icingdeath +3 and Twinkle +3 along with his armor Mithral Chain +4. Aside from Drizzt there is not much else notable in this zone.
AR4300: A few minor events happen here along with an easter egg for Neverwinter Nights (Lord Foreshadow).
AR4400: Arghain a half-ogre you find here will drop a Two-Handed Sword +1. There isn't much else of note outside of this item.
AR4600: Lots of goodies all over this map. Two Side Quests here, Jared in the south who asks you to kill a bear and may reward you with Boots of the North depending on your charisma and alignment. Laurel in the west who asks you to kill some Gibberlings with her for some easy EXP. You can also find Neville in the north who is a bandit that will drop a Long Sword +1 when killed.
AR4700: An Xvart Village is found on this map, there is some notable loot in the cave - Bracers of Defense AC 8 and Flail +1.
AR5000: On the northern portion of this map you will get attacked by 4 Iron Throne Assassins, Lamalha, Maneira, Telka and Zeela. They have some really good loot for the early portion of the game and the fight isn't too hard. In the southwestern portion of the map you will meet someone named Hentold who will give you Heart of the Golem +2 (Dagger) if you agree to help him. You can keep this dagger if you want or turn it in at the tomb for a measly 900 EXP.
AR5200: There are a few events on this map, most notable is a Dryad who will ask for help. Side with her and fight Caldo and Krumm to get Girdle of Bluntness and Club +1. Another is a gnoll by name of Ingot who drops The Chesley Crusher Halberd. You can find Ingot on the western end of the zone, he walks up to you and mentions that he was exiled for wanting to eat a prisoner. You'll have to provoke a fight with him in dialogue or attack him outright. If you don't attack him he'll leave the game forever.
AR5300: The 3 most notable things on this map is the Albert and His Dog Side Quest as well as Sendai, an NPC who drops Telbar's Studded Leather which is the best in slot Studded Leather chestpiece in BG1. The last item is Bracers of Archery which are dropped by Zal who is part of the ambush setup by Vax.
AR5500: If you have Dorn in your party then you'll find Kryll on this map. Ring of Fire Resistance can be found here as well hidden in a crevice to the south, this is the best item on the map and definitely worth getting. I usually do the side quest that you get here too from Lena, she asks you to carry Samuel back to the Temple at the Friendly Arm Inn.
Gnoll Stronghold: If you decide to recruit Minsc or Edwin to your party you'll have to visit this location for Dynaheir, another potential companion in the game. The best loot in this area is found right at the entrance, there are 2 ogrillons guarding the bridge that will ask you to pay a toll. When defeated they'll drop Gauntlets of Dexterity, one of the BiS bracer items. In a cave below the Gnoll Stronghold; Tome of Leadership and Influence gives you a permanent +1 Charisma boost.
Seawatcher: Manual of Bodily Health (+1 Constitution) is found here along with many Sirine enemies that give 2000 EXP each. There is also a few minor events and side quests to complete here.
Ulcaster School: This area is both a wilderness map as well as a dungeon. Ulcaster Dungeon is easy enough for a low level group to clear and has a handful of mediocre loot. For the most part the best items you'll find in here are magical arrows. If you talk to Ulcaster outside the dungeon enough times he'll give you a side quest to retrieve Ulcaster's Dusty History Book from inside the dungeon. This quest gives 1000 EXP and is worth doing.
Gullykin: In the north part of the Gullykin Map there will be a Halfling Village which connects to the Firewine Ruins dungeon. You can find a Sling +1 inside a locked cupboard in the southeastern most Halfling House. Firewine Ruins entrance is found in the western most building in the Halfling Village (marked Temple and Winery on map). The southern half of the zone will have a group of mercenaries hired by the Iron Throne to kill you which are carrying some nice items. Long Sword +1, Mail of the Dead (Chain Mail +2), Morning Star +1 are among them.
Firewine Ruins: The only piece of loot that I feel is notable inside this dungeon is the Mage Robe of Electrical Resistance which drops from Lendarn.
Firewine Bridge: Meilum in the northeastern portion of the zone will drop Gauntlets of Weapon Expertise and a Long Sword +1. The Gauntlets are an amazing item that you'll be using for the majority of the game.
Carnival: Each of the tents in this zone have a unique event or dialogue. Most notable in this area is the stone statue of Branwen, a potential companion in the game. You can use a Stone to Flesh scroll on the statue to dispel it and Branwen will ask to join you. The best tents to go inside are the Potion Merchant's Tent where you'll be able to buy a Red Potion and Violet Potion for 50gp each. Zordal's Tent will involve an easy fight with Zordal along with numerous items from him and Bentha (if she dies you get all the loot, if she lives you get 1 item). Most of the other tents have various items for sale or containers to rummage through.
World Overview for Baldur's Gate (Town) Zone Lists
World Overview for Top of the Map Wilderness Zones
World Overview for Bottom of the Map Wilderness Zones