
World Overview for Wilderness Zones in Baldur's Gate (Top of the Map)
On this page you will find succinct information about what is in each Wilderness Zone of Baldur's Gate 1. This page contains information specifically about the Wilderness Zones on the top of the world map if you'd like to see information about other parts of the map check the links at the bottom of the page.
Essentially what I have done is gone through everything in each zone and I singled out the most important quests, items or events to complete and wrote them down. Very unique items, best in slot items, available companions, Steam Achievements and things of that nature are what made my lists below.
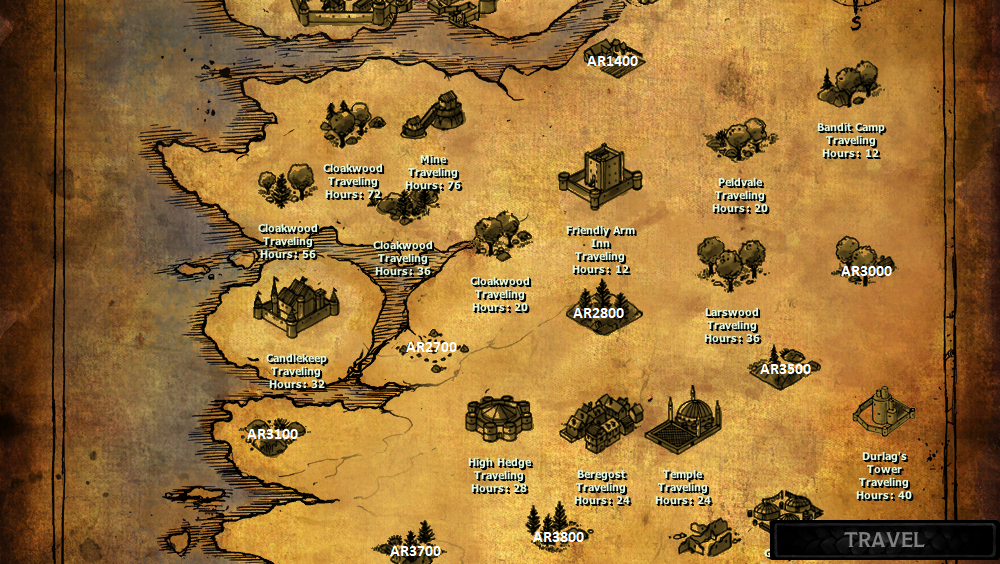
AR1400: This is a memorable map since it's infested with Ankhegs; do not come here until at least level 5. You will meet Ajantis here, a possible companion who will join you and will also find a total of 3 side quests here - we are doing 1. In the middle of the map you will meet Farmer Brun who asks you to retrieve his son's corpse (aka Nathan's Body) from the Ankheg nest. The big hole in the ground west of his house takes you to the Ankheg nest and inside you'll find a few enemies as well as a cache of treasure which will include Nathan's Body.
AR2700: You will begin Chapter 1 of the game in the southern portion of this zone. In this area there are 3 potential companions for you to recruit, Imoen who will approach you at the start of the game and Xzar and Montaron who you can find on the road northeast of Imoen. You'll also find the loot that Gorion left behind when he was slain in the middle of this map.
AR2800: A hidden Ring of Protection +1 can be found here; exact location is in my Walkthrough Chapter 1. In the eastern part of this zone you will also find an Ogre who drops Girdle of Piercing and Girdle of Masculinity/Feminity.
AR3000: There are 2 big fights here, the first is against a group of Red Wizards of Thay who will attack you no matter what unless Edwin is with you. They drop 2 Mage Robes of Cold Resistance, a Mage Robe of Electrical Resistance and a Mage Robe of Fire Resistance as well as a Ring of Energy. East of the Red Wizards group you will also find a group of powerful spiders. Players who are level 5 and lower will have difficulty with them but they are a good source of EXP.
AR3100: Helm of Defense aka Gift of Peace (BiS helm) is found on this map. In the north-central portion of this map you will encounter a Neried named Shoal who you can speak with. She will kiss whichever character you speak to her on and potentially kill them. After this she'll become hostile for one or 2 hits then start talking to your group again. Make her resurrect your dead party member and an ogre mage named Droth will be summoned whom will drop the Helm of Defense when defeated.
AR3500: Basilisks are on this map, a lot of them. Shar-Teel is a potential companion that you can recruit on this map as well. You can talk to and use Korax in the northwest portion of the map to "eat" all the Basilisk gazes by sending him in to attack them first but Korax may not last for the entire map before turning hostile. Potions of Mirrored Eyes or Stone to Flesh or Protection from Petrification Scrolls will help against Basilisks a lot. All in all this map has some of the best EXP in the game due to the number of Basilisks. In addition to the Basilisks you'll find a group of adventurers on this map that you can provoke into a fight, they'll drop Long Sword +1 (2), Golden Girdle of Urnst, Bracers of Defense AC 7 and Morning Star +1.
AR3700: On this map you will find Bassilus in the southeast whose part of the Bassilus the Murderer Side Quest. Bassilus also drops Ashideena which is the BiS Warhammer for BG1. In the northeast you will find Melicamp the Chicken who is part of the Melicamp's Transformation Side Quest. I believe both of these quests are worth doing since they're easy enough. You will also find goblins in the south-central portion of this area who drop The Whistling Sword +2.
AR3800: In the south-central portion of this map you will encounter a group of Hobgoblins that will drop Boots of Stealth: Worn Whispers. You can keep these boots or turn them into Zhurlong in Beregost for a small reward. Either way this is really the only item worth noting on this map.
Friendly Arm Inn: This is the first town you will come across other than Candlekeep. You have a few important things to do here, first of which is to collect the Ring of Wizardry in the southern portion of this map - check Chapter 1 of my Walkthrough for the exact location. Next, talk with Dorn inside the Inn if you want him to join your group later when visiting the Nashkel Mines.
Peldvale: Only 2 notable things happen here. The first is you'll meet Viconia, a potential companion on this map. Second is this map and Larswood are your only 2 methods of traveling to the Bandit Camp during Chapter 3 and it being friendly to you.
Larswood: In the northeastern portion of this area you will find a Druid Shrine with an event that will reward you with Backbiter +3. You can also find a Bandit named Teven who will have an event in the southwest portion of the map. This event is used in a story quest involving the Bandit Camp during Chapter 3. If you're playing the Enhanced Edition and your group is at least level 5 you can meet Baeloth here as well.
High Hedge: Kivan is a potential companion that you can recruit in this area, he's found north of the High Hedge building. The main attraction in High Hedge though is the Wizard's shop in the central portion of the map. Here you can buy various different magical items including lots of ammunition. The best items he sells are his Wizard spells, Potion Case, Robe of the Good Archmagi and Robe of the Neutral Archmagi.
Cloakwood: Cloakwood is a forest that you visit during Chapter 4 of the main story and it consists of 4 different maps. There are a couple of BiS weapons and armor that you'll find in these regions; I recommend you use Chapter 4 of my walkthrough for the most detailed explanation of all 4 maps.
Cloakwood Mine: Much like with the Cloakwood Forest you'll visit this location during Chapter 4. Also, much like with the Cloakwood Forest I recommed you use Chapter 4 of my walkthrough for the most detailed explanation of the mines and the loot inside.
Bandit Camp: You visit this area during Chapter 3 of the main story, until this time it's unavailable. To reach this zone you'll want to exit Peldvale to the north. For a list of the noteable loot that you can find here check out Chapter 3 of my Walkthrough.
Durlag's Tower: Durlag's Tower is part of the Tales of the Sword Coast expansion for BG1 and contains some of the best loot in the entire game. For more information about Durlag's Tower I strongly recommend you check out my Tales of the Sword Coast Walkthrough or the Durlag's Tower Walkthrough.
Candlekeep: The Prologue takes place in this zone as does all of Chapter 6. When you return to Candlekeep during Chapter 6 there is a significant amount of noteable loot, I recommend you check out my Chapter 6 Walkthrough for more information.
World Overview for Baldur's Gate (Town) Zone Lists
World Overview for Top of the Map Wilderness Zones
World Overview for Bottom of the Map Wilderness Zones