
Soothsayer Build Guide - Titan Quest
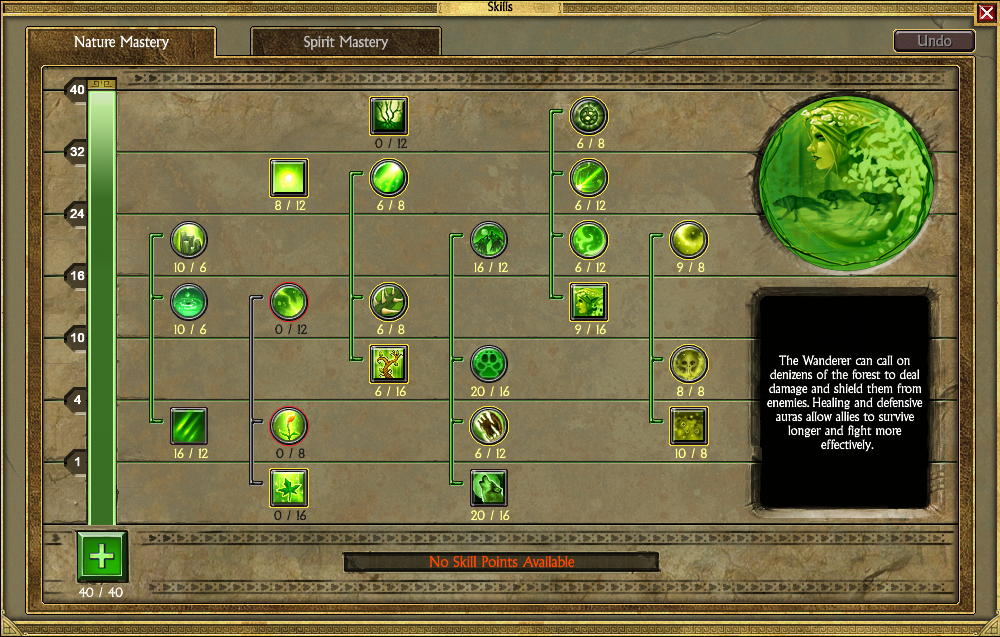
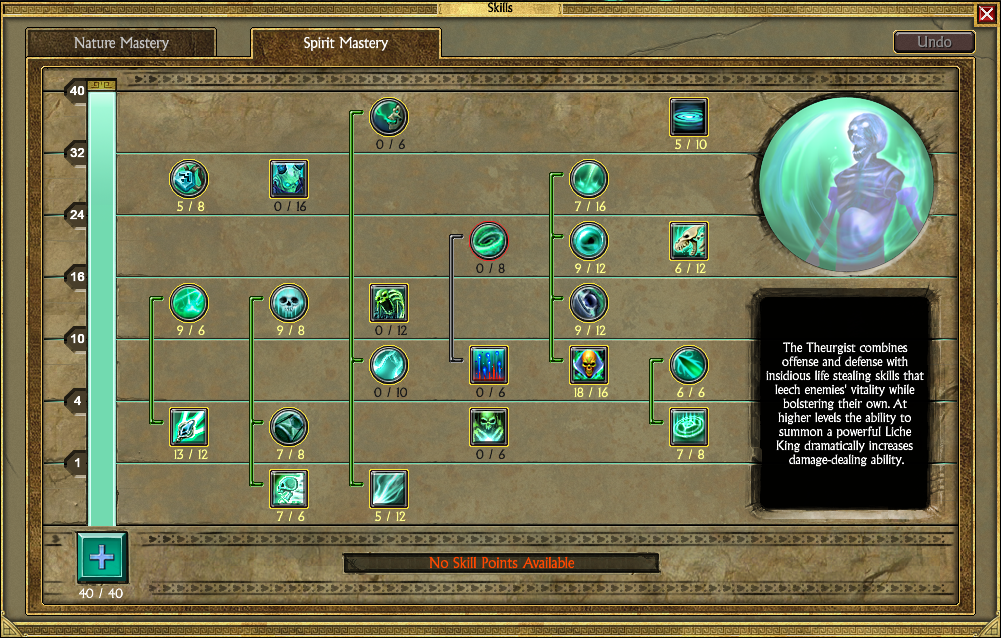
Skill Trees: Spirit and Nature
Primary Skills: Ternion Attack, Plague, Call of the Wild, Summon Liche King, Circle of Power, Briar Ward, Refresh, Soul Vortex
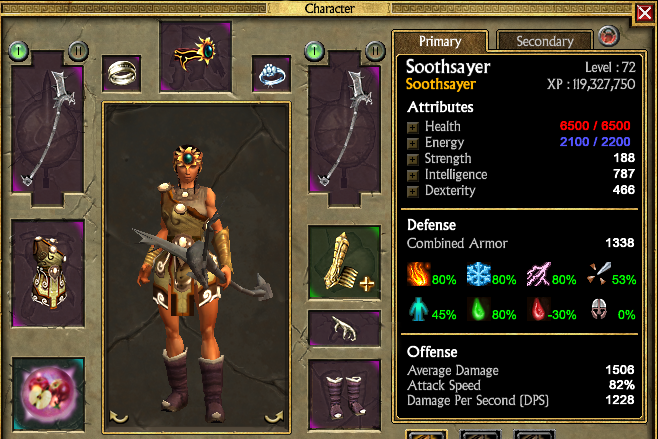
Important Stats: +4 Skills is very important; +% Vitality Damage will boost your DPS. Otherwise focus on resistances
Attributes: Enough Dexterity to wear gear and pretty much every single other point into Intelligence
Soothsayer is the combination of Nature and Spirit masteries and is typically best played as a caster pet class. If you want to also deal decent damage with this build instead of entirely relying on your pets I strongly recommend you get a staff that deals Vitality Damage. Deathchill Aura and Ternion Attack are a very powerful combination if you're using a Vitality Damage staff so we'll take advantage of that with this build.
As far as gear goes, you'll be using Intelligence based gear and you'll want to get at least +4 Skills that way we can use 3 wolves in total. You can easily achieve this with items such as Stonebinder's Cuffs and Demonskin Walkers. I strongly recommend you farm a pair of Stonebinder's Cuffs for this build as they give you +3 Skills and are one of the best bracer slot items in the game.
There are a few items you can get that will boost your DPS too such as Polydegmon, Rune of Najo-Ja, Marduk's Tablet of Destiny, Eurydice's Wedding Band but they aren't required and the DPS boost you'd see by using them is quite small. Polydegmon is nice and will boost all of your damage (but not your pets) and Eurydice's Wedding Band will only increase the damage of your staff (Ternion Attack) -- if you're using a Vitality Damage staff.
Vitality Damage Staves: Praxidikae, Fafnir's Heart, Moros Nyx, Strength of the Nile, Gem of the Serpent Priest, Necromancer's Staff
I have included a list of staves above that you'll want to use on this build for maximum damage. Again, this is not required but strongly recommended. I've tested the build out using a Cold Damage staff and it worked just fine, just noticeably less DPS with Ternion Attack. For those of you who don't know Titan Quest in and out, there's a merchant in Gadir a town in Atlantis that sells loot crates that you purchase with ingame Gold. He's called the Gadir Orb Merchant and I strongly recommend you use him since the orbs he sells will drop a lot of the gear mentioned on this page.
The chest armor I used for this build was Tunic of the Magi because I wanted more resists. Vestment of the Overlord and Cestus would both be good picks for the chest slot too. In the helm slot I use Plouton's Crown since it has a set bonus with Polydegmon and it has decent overall stats. Other helms that are good include Stheno's Wisdom, Tiara of the Emerald Seas, Crest of Hypnos.
For the rest of your gear you're going to want to be focusing primarily on boosting your resistances.
Soothsayer's are one of the builds in this game that can't function without their buffs. If you encounter enemies that dispell they'll often be the worst ones to deal with because they'll force you to rebuff after the fight every time. Deathchill Aura is required for our Ternion Attacks to deal good damage. Heart of the Oak and Spirit Ward are important to keep up at all times too.
Our main rotation of attacks will include Ternion Attack to deal damage and Plague to debuff enemies. Plague will increase the damage your pets deal to enemies as well as decrease how much damage they deal. The damage reduction Plague gives you and the damage reduction Deathchill Aura give do not stack. For this reason I typically recommend casting Plague on targets clumped together in the distance -- that way it'll reduce the damage of targets not in range of Deathchill Aura.
When you level up more and you start fighting more challenging enemies you'll want to incorporate Circle of Power, Briar Ward, Soul Vortex and Refresh into your rotation too. Circle of Power and Briar Ward are both powerful spells that provide many benefits if you stand in their auras on the ground. Soul Vortex is a pretty powerful PBAoE (Point Black AoE) spell which will drain life and energy of all enemies around you.
All 3 of these spells have moderately long cooldowns however with the Refresh ability in Nature you'll be able to use all 4 of these abilities every single fight. Refresh is a super powerful spell that will reduce the time for all spells on cooldown, making them refresh faster.
(Nature) Call of the Wild: This is one of your most important skills for the build and for leveling. Max it out as early as possible and get +3 Skills as early as possible too as it'll allow you to summon 3 wolves. Survival Instinct and Strength of the Pack passives need to be maxed as well.
(Nature) Heart of the Oak: At max rank gives you and your pets +85% Health, additionally the Permanence of Stone passive will give you and your pets 31% Elemental Resistances too.
(Nature) Plague: Spread the Plague everywhere you go. It's a fairly weak DoT but the debuff on it is extremely powerful and will increase the amount of damage you deal as well as the damage your pets deal. It also reduces the amount of damage enemies deal when attacking you.
(Nature) Sylvan Nymph: I dump my extra Skill Points into the Sylvan Nymph as well as the 3 passive abilities tied to it once I am done all of the other important skills for this build.
(Nature) Refresh: You'll be using Refresh constantly inbetween battles and sometimes during battles to drop a second Battle Standard or to use a second War Horn. What Refresh does is lower the cooldown of any abilities that are currently on cooldown. It helps most for Ancestral Horn, since it allows us to keep 100% up time on that ability but it'll also refresh War Horn, Battle Standard and other abilities you have too.
(Nature) Briar Ward: This skill creates a small aura on the ground which grants you a buff and provides you some protection from outside attacks. I use this skill on every difficult fight, run into the pack of enemies and drop this along with Circle of Power and you'll have 2 extremely powerful buffs to help you out. Use Refresh to lower the cooldown of this skill along with Circle of Power.
(Spirit) Ternion Attack: Your left click attack. Essentially this skill turns your primary staff attack into 3 projectiles that shoot out in front of you. It only works with staves and it uses whatever damage type your staff uses. For us it's important we always use a Vitality damage staff since we're a Vitality based build.
(Spirit) Soul Vortex: Drains the Health and Energy of all targets close to you for a short period of time. Usually I would not recommend getting this skill due to the very long cooldown however much like with Circle of Power and Briar Ward you'll be able to use this skill every single fight with Refresh. I typically use this skill at the start of each fight after running into a pack of enemies and dropping Briar Ward on the ground to keep myself alive.
(Spirit) Spirit Ward: This is a buff that you will want to keep active on your character at all times. It decreases the damage undead enemies deal to you and increases the damage that you deal to them. Undead have a naturally high resistance to Vitality Damage so this will help a lot with defeating them.
(Spirit) Deathchill Aura: One of the most over powered skills in all of Spirit. It significantly reduces Vitality Resistance of the enemies around you along with their health and also reduces all of the damage they deal. The main thing we're using this ability for is the Vitality Resistance reduction and damage reduction to enemies surrounding us. Deathchill Aura only works on enemies that get very close to you, those pesky archers that are firing at you from a distance probably won't be in range to suffer from the 45% less damage debuff.
(Spirit) Summon Liche King: The Liche King is one of the more powerful pets in the game along with being very costly in terms of Skill Points.
(Spirit) Circle of Power: Drops a totem on the ground with an aura surrounding it that significantly boosts your Vitality Damage when you stand inside of it. It also reduces Energy Cost, -Recharge time and increasing Casting Speed. Since we have Refresh with our build we'll be able to use this skill every single fight since we can clear the cooldown after each fight.
Other Tips:
Titan Quest Build Calculator/Planner
- If you're struggling in Titan Quest and need some help check out my Best Leveling Abilities Guide, my Titan Quest F.A.Q or my Titan Quest Tips & Tricks pages for a lot of helpful info about this game. Additionally if you're curious what I think the Best Builds Are in Titan Quest check out that guide too. Last but not least you should consider getting TQVaultAE which is a third party program that nearly everyone who plays TQ uses.
- Curious what other sorts of gear you should get for this build? I have put together a long list of Overpowered Gear Combos in Titan Quest that you may find useful. The guide contains information for all sorts of build combinations and specializations; both offensive and defensive gear choices are included as well as Monster Infrequents you can farm for Best In Slot items for your characters.
- You should have a second staff equipped on your character that you can easily swap to which deals a form of damage other than Vitality Damage. This will help a lot when you encounter Undead or other enemies that are immune to Vitality Damage or heavily resistant to it.