
Persona 2: Innocent Sin Walkthrough (Chapter 3)
With Smile Hirasaka complete you will now have access to two new Side Quest Rumors! The first of which is the Cursed Taxi Rumor and the second is the Cursed Escort Rumor. Both of these rumors are started by talking to the same person inside of Peace Diner in the Yumezaki prefecture. Each of these quests will have you visiting the Abandoned Factory, for more information about the quests follow the links provided.
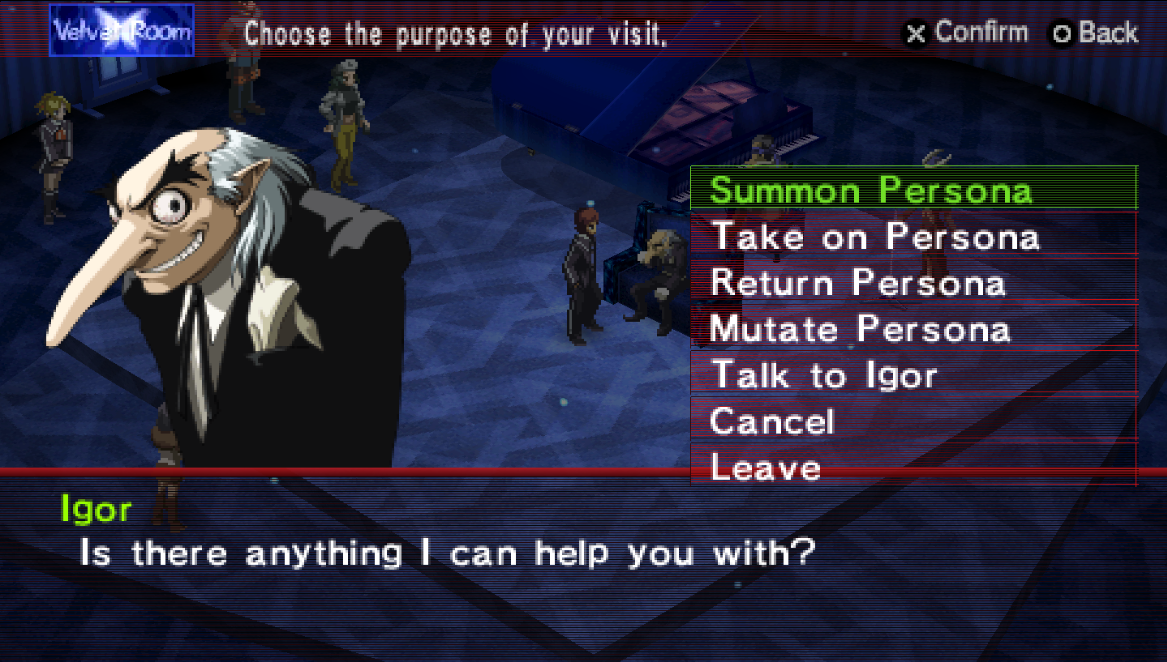
Now is also a good time for you to visit the Velvet Room and switch out/upgrade your Personas. As usual I recommend you check out my Persona 2: Best Personas Guide for more information about which Personas are good and why. If you need any Tarot Cards to summon a new Persona I recommend getting them from enemies inside of the Abandoned Factory.
Below are a few Personas that I talk about in my Persona 2: Best Personas Guide; I figured I would add the best ones here for anyone too lazy to follow the link. I strongly recommend you grab the Personas I mention below since they'll make your life a lot easier.
(Level 15) Xuanzang (Hierophant): This is mostly a healing Persona, he comes with Media and Diarama. Holy Light is the only offensive spell he has but with an SP cost of only 13 this Persona is worth keeping for most of the game as back up heals.
(Level 22) Hel (Death): Comes with Wind, Fire, Earth, Dark and Ice attacks. She can be used in nearly any elemental fusion there is.
(Level 22) Pairika (Moon): This Persona has a few Wind abilities which are useful - but what really makes her unique is her resistances. Pairika nullifies almost all physical attacks and is strong to various elements too. She's an exceptional defensive Persona, definitely one of the best in the game.
(Level 22) Marshal Tianpeng (Hermit): He comes with Earth attacks as well as Poisma and Straight Slash. All of these skills can be used in Fusion Spells making this Persona a really good choice for this level range.
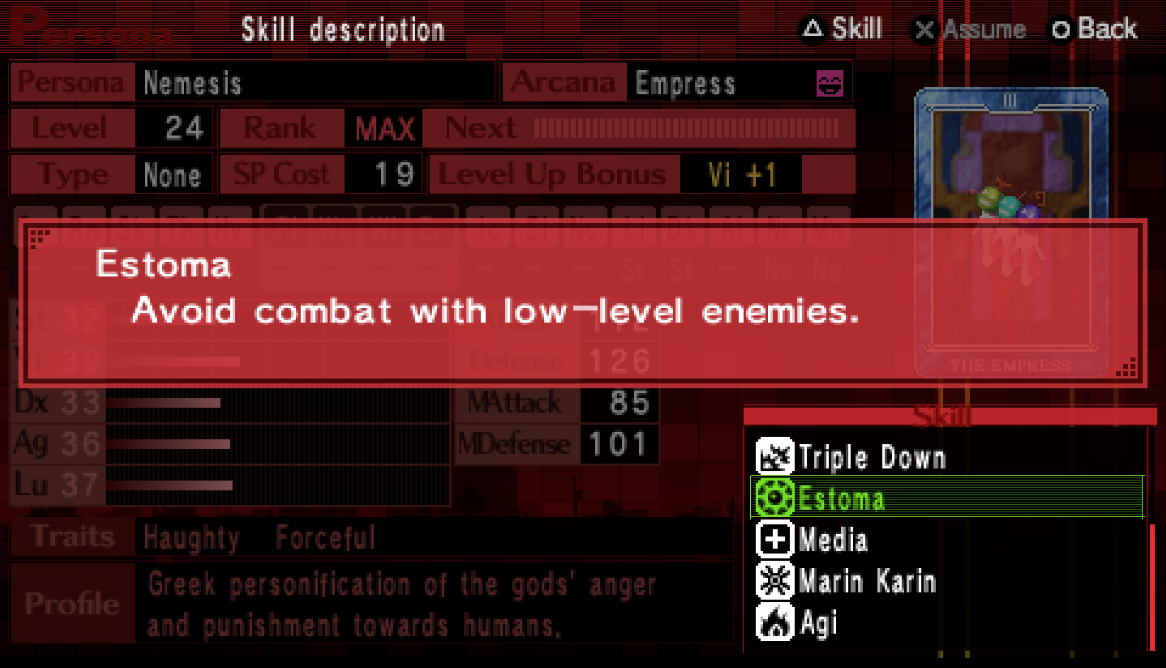
(Level 23) Umayadono-Ouji (Hierophant): She comes with Estoma which is an amazing ability that lets you avoid enemies lower level than you. You'll want to keep either this Persona or Nemesis with you at all times to help you avoid random encounters.
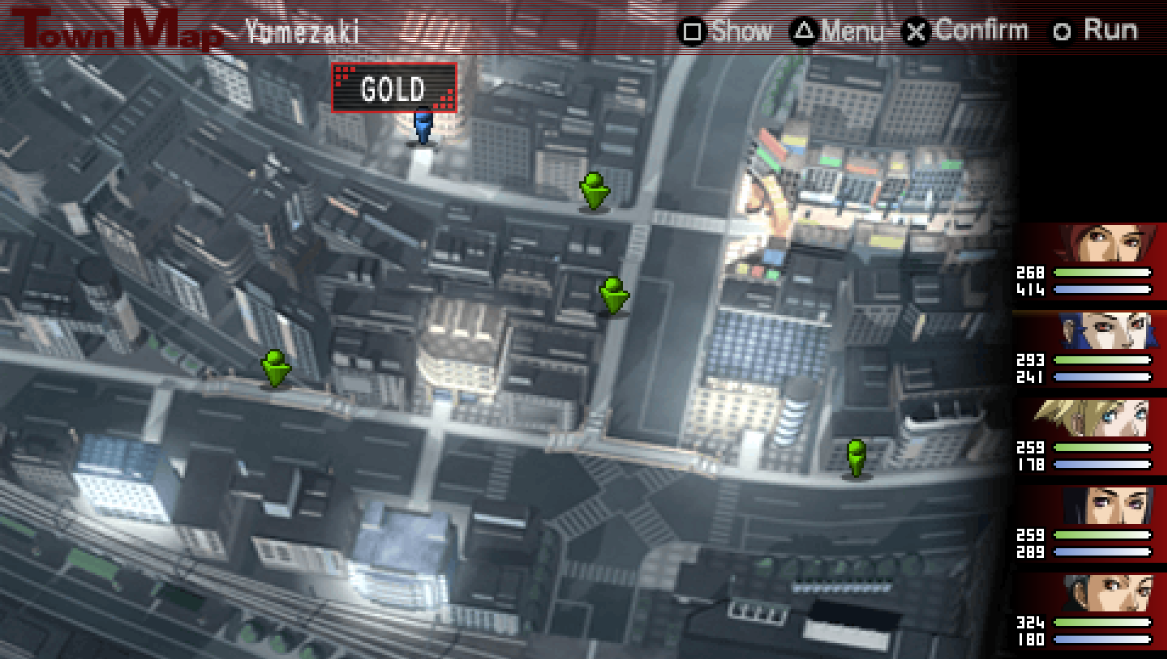
Once you're finished with all the side activities you'd like to do it's time to head over to the next dungeon - GOLD.
Demon Dialogue Choices for GOLD Dungeon
When you first arrive at GOLD you'll have a scene during which you'll meet Ulala, Maya's friend. Ulala is actually a Persona user in Persona 2: Eternal Punishment, she is one of the main cast members of that game. You'll regain control of your characters after the scene with Ulala inside of the Gold Boxing Gym.
GOLD is another dungeon that has a simple gimmick and is rather straight forward. What you need to do inside this dungeon is on every floor enter all of the available rooms that you can and speak with all of your party members inside of those rooms. I think only the final room (Men's Staff Room) is required to beat this dungeon though since that's where you find the transmitter and riddle.
Below is a list of all the rooms you'll get a scene inside of throughout this dungeon.
1F: Supply Closet
2F: Gold Trainer Room
3F: Women's Staff Room
3F: Men's Staff Room
As I mentioned before, the 3F Men's Staff Room is where you will find the transmitter and riddle. There will also be a scene inside this room where someone sees your group then takes off running. You'll have to chase him all the way back to the Gold Boxing Gym which is the room where we started this dungeon on the 1F. You'll get another scene in this room and then the dungeon will be complete.
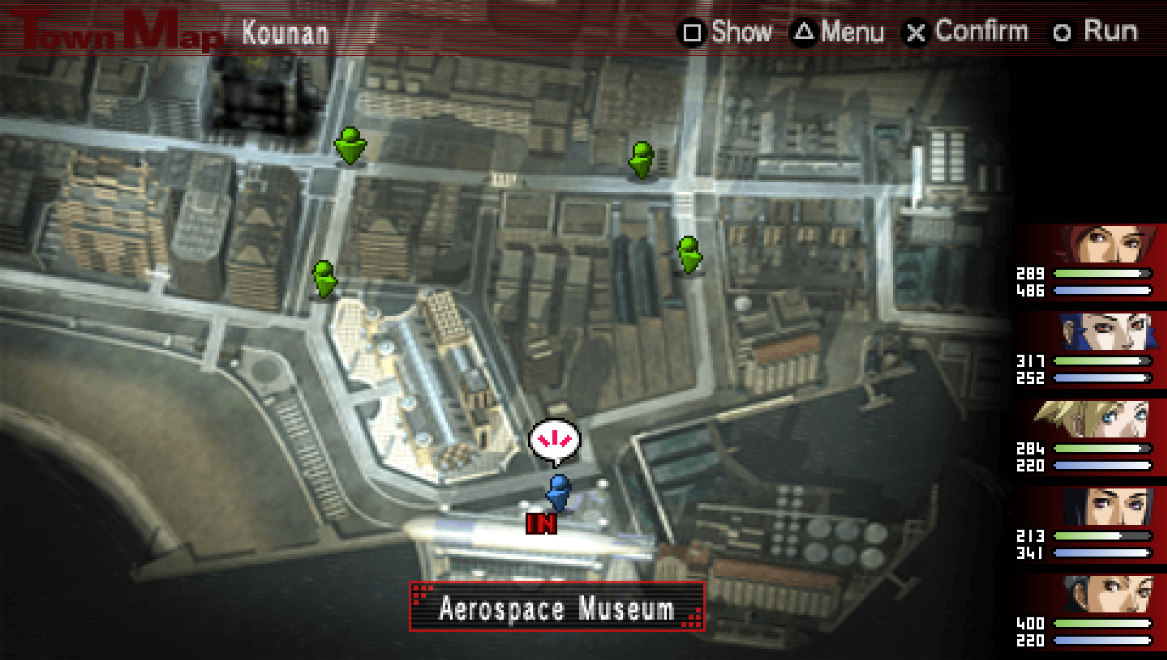
The next dungeon for us to complete is the Aerospace Museum which is located in the Kounan prefecture; head over there and into the Aerospace Museum when you're ready.
Demon Dialogue Choices for Aerospace Museum
Aerospace Museum is a dungeon that's a bit different than what you've been used to. For the first part of this dungeon there will be no enemies and you'll have to run around a building that's on fire and search for kids. Each time you progress up one floor you'll have to find the kids on that floor before you're allowed to proceed to the next one. That's this dungeon's gimmick.
As always when running around a dungeon my advice to you is to use the Square button to bring up the map and check it repeatedly to figure out where you've been and where you haven't been. You should also use L and R a lot (your bumper buttons) to spin the camera and see where you're going. I finished this dungeon with 4 minutes left on the timer my first time doing it so you should have an abundance of time while exploring this place.
Those of you playing on the Ps1 version of this game will not get a map which I can only imagine makes this dungeon significantly harder. If you'd like to see a video of me completing this dungeon I recommend you check out my Aerospace Museum Walkthrough Youtube Video. Text based directions aren't the best for stuff like this so hopefully the video will help you out more.
Tip: Pay attention to the top of your screen; each time you get near a door that leads into a room the text box at the top of your screen will change. Instead of always saying Aerospace Museum it'll change to Aerospace Museum: Exhibit Room. This is a good indicator that you're around a door since it's not always easy to see where things are with the camera angles in this game.
On the 2F you'll have one group of children to find as well as one special event involving Maya that we need to trigger in the Catwalk Anteroom. This event with Maya has a line of dialogue that you need to get right if you want Maya to get her Prime Persona later on in the game. More on this below.
Note: If you get lost on the 2F, the Catwalk Anteroom has two exits - go through the opposite door that you entered from in this room and you'll find a new section of 2F with stairs going up.
2F: 1 Group of Children in the southwest
2F: Catwalk Anteroom in the east (you run by the room with the kids to get here)
3F: 2 Groups of Children (one in the southeast and one in the southwest)
4F: 2 Groups of Children (one in the southwest and one in the
Important! During the scene in the Catwalk Anteroom you'll want to choose Leave this to Maya when prompted. This dialogue option is required for Maya to get her Prime Persona later in the game!
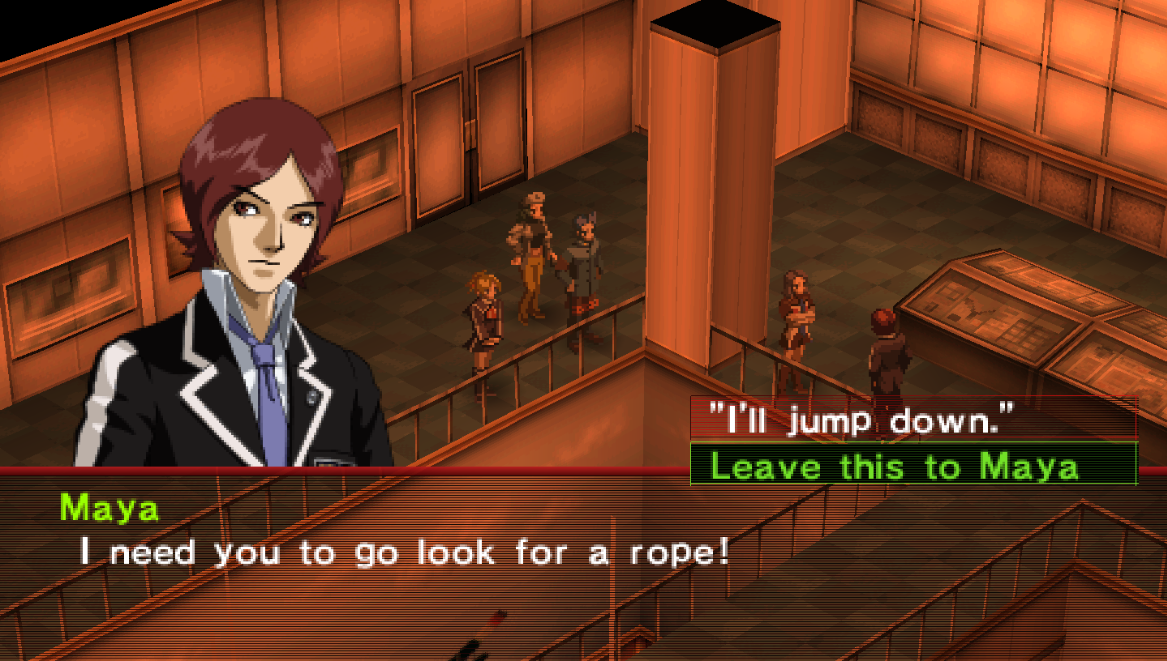
Make sure to choose the Leave this to Maya dialogue option if you want her Prime Persona
When you reach the fourth floor of this dungeon you will get a scene involving a kid stuck in an elevator - after this scene demons will now start appearing throughout this dungeon. If you took my advice earlier and got Estoma on one of your Personas then you'll be able to eliminate all random encounters with that skill (assuming you are a higher level than the demons). This will make exploring the 4th floor a lot easier.
As I said earlier, if you need help navigating this dungeon I strongly recommend you check out my Aerospace Dungeon Walkthrough Youtube Video. Providing you with a video of this dungeon (I believe) is a lot better than trying to explain where to go and what to do through text.
Once you've found all of the kids on the 4F head to the Aerospace Museum Roof and you'll have a boss battle against King Leo.
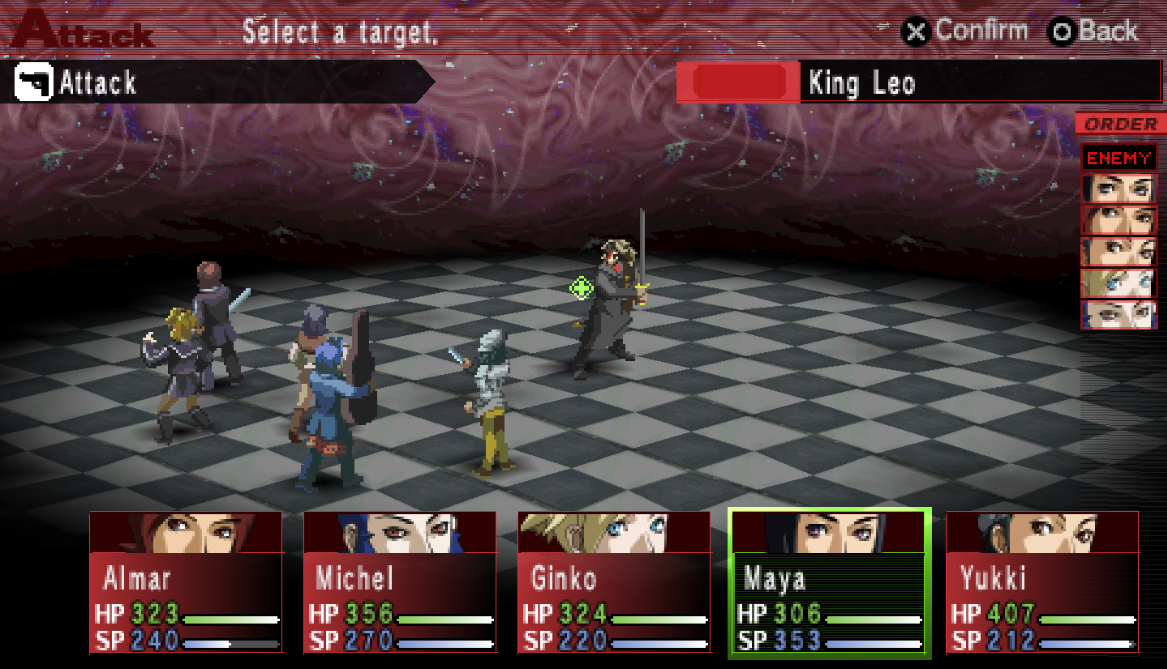
King Leo is weak to water so unload on him with your strongest water-based Fusion Spells and he will go down quickly. Much like all boss battles in this game King Leo is a total push over and he should be a piece of cake for you to defeat. When the fight is over you'll have a few more cutscenes after which you'll find yourself back in Kounan outside of the Aerospace Museum.
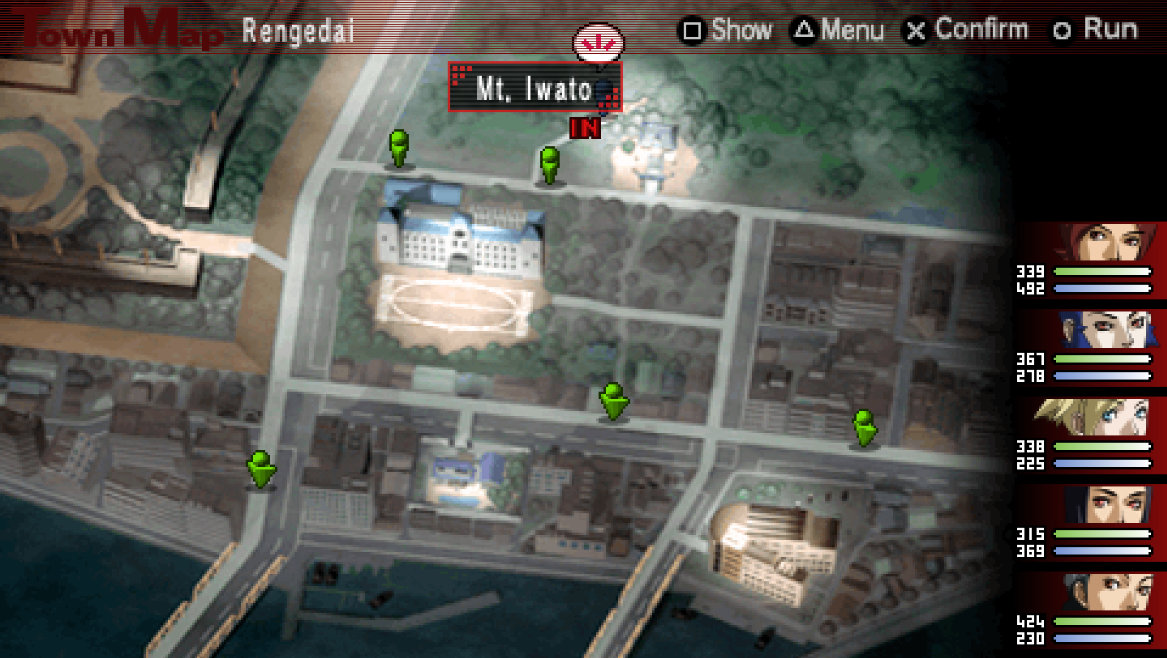
Before we continue to the next dungeon there is a bit of side questing we can do first. I recommend you head over to Rengedai and speak with people standing on the World Map near Mt. Iwato. One of them will be an old man who will tell you about the Kuchisake-Onna Rumor, once you acquire this rumor you can leave.
Return to the Kuzunoha Detective Agency and you will have a scene when you arrive. Spread the rumor involving Kuchisake-Onna after the scene - once you do that we're all done here. Before you leave Kameya Alley though you should consider visiting Shiraishi Ramen and Toua Defense because both of these stores have new weapons and armor to sell!
There is also the Abandoned Factory that you can visit, the door leading to Room #4 is now unlocked and you'll be able to collect the treasures from inside there. Since your team is probably getting close to level 30 now would be a good time to visit the Velvet Room and summon some new Personas as well!
Like I said earlier in this guide, if you don't know which Personas are good and why I recommend you check out my Persona 2: Best Personas Guide. That guide will go into detail about how the Persona system works and which Personas in this game are worth using.
Once you're done with all of the side activities and are ready to tackle the next dungeon you'll want to head over to Rengedai. In the Rengedai prefecture the first place you need to visit is the Alaya Shrine for some story exposition after that you'll find Mt. Iwato just north of this shrine, that's our next dungeon.
Mt. Iwato Demon Dialogue Choices
Note: For this entire dungeon Maya will be unavailable as far as making Contact with demons goes. Those of you who are paying attention may notice that her portrait is a little bit different now too... Wonder why that is...
Mt. Iwato is going to be a long and confusing dungeon - especially if you're playing on the Ps1 version of Innocent Sin. Throughout this dungeon there are four masks that you can find, each of these masks is associated with one of the characters in your party. Even though it is an optional objective to find these masks it's strongly recommended that you do it.
If you don't find a character's mask then it means they won't unlock their Ultimate Personas later in the game. The Ultimate Personas are a lot like the Prime Personas that you get when you choose the correct dialogue choices; except that they are higher level and you'll get them later in the game. Your Prime Personas you'll get at the end of this dungeon in a little bit.
Even though they are called the 'Ultimate Persona' - these are not the best Personas in the game for each of your characters. The Ultimate Persona for each character is a very good Persona and definitely one you can use until the end of the game if you want but they aren't best in slot, is what I am trying to say.
Since finding each of these masks is so important I will provide a bit of detail about where each one is as well as provide you with details about how to navigate this dungeon. With all of that said, the first thing you will want to do inside of this dungeon is to run around until you encounter Kuchisake-Onna and defeat her. She will drop Kuchisake-Onna's Mask which you'll want to turn into the Old Man who gave you this rumor. Once this side quest is out of the way you're free to complete this dungeon.
Locations of All 4 Masks in Mt. Iwato
Pink Azas Mask: On B1F after you visit the first Reflecting Pool you'll want to go east to find a Secret Room which contains this mask. This mask is extremely easy to find since it's legitimately right next to the first Reflection Pool room.
Yellow Owl Mask: On B1F after you visit the second Reflecting Pool you'll want to go south to find another Secret Room which contains this mask.
Red Eagle Mask: On B1F you'll find this mask a tad bit to the northwest of where you found the Yellow Owl Mask.
Blue Swan Mask: On B2F after you finish the room with pit fall traps there will be another Reflecting Pool (you learn that your characters did play the Persona game in this room). After you leave this Reflecting Pool room go directly south and you'll be lead straight to the Secret Room with this mask.
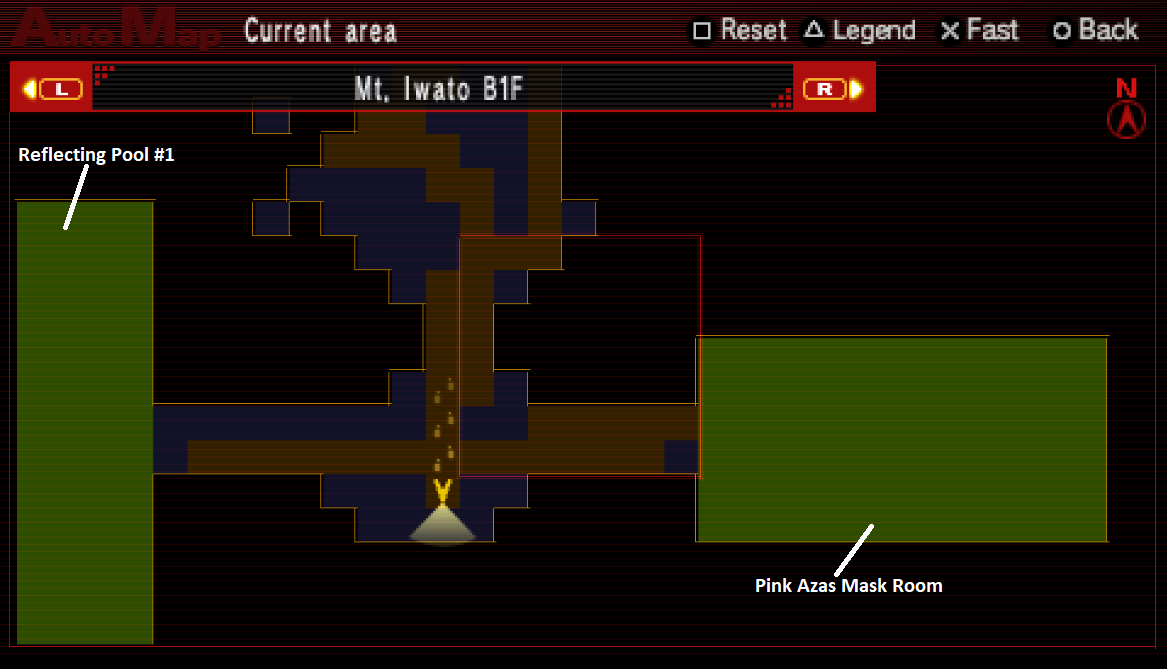
Pink Azas Mask Map Location
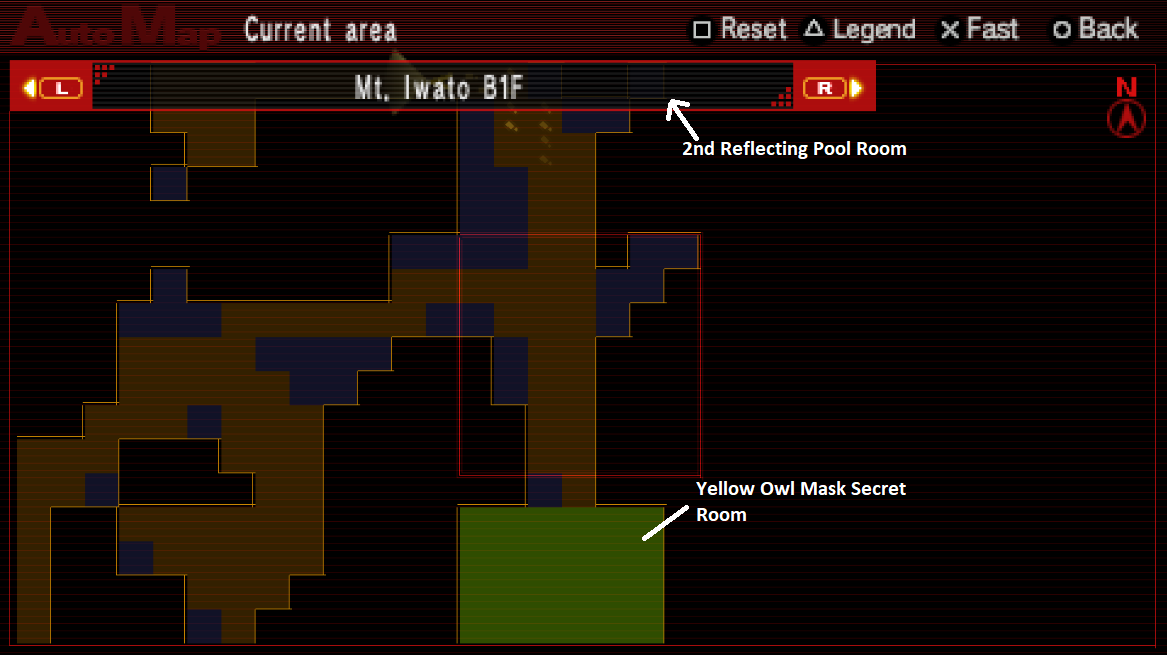
Yellow Owl Mask Map Location
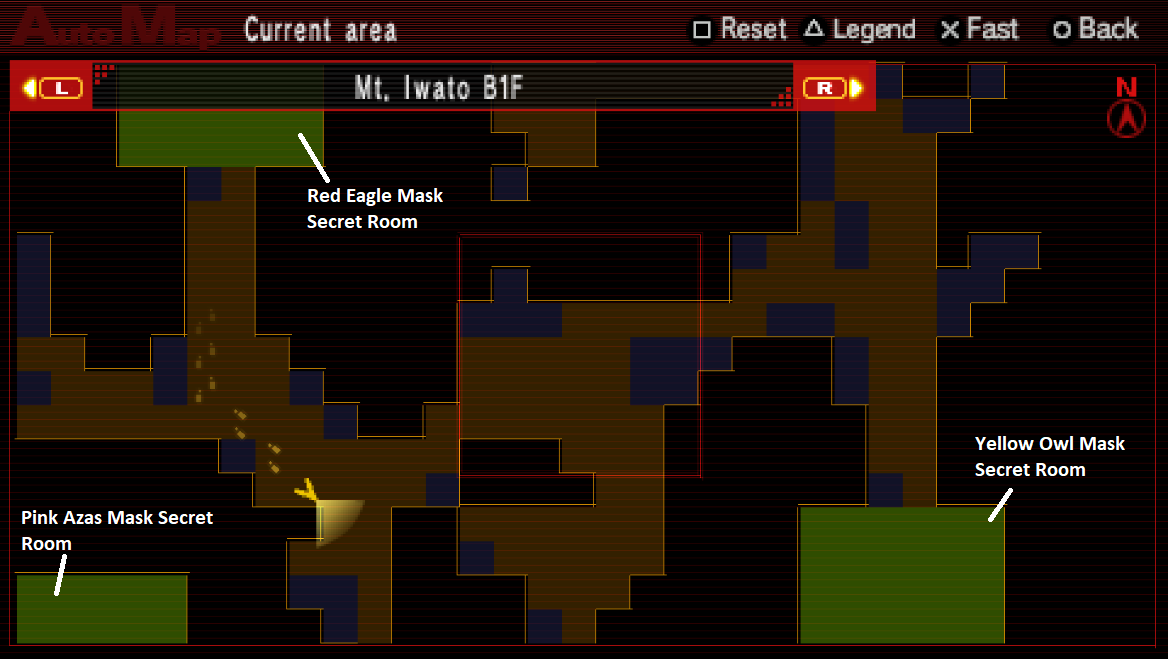
Red Eagle Mask Map Location
As far as completing this dungeon goes, the first half of it is pretty linear - you go from Reflecting Pool room to Reflecting Pool room and in between each of the Reflecting Pools is a small bit of dungeon. Things start to get a bit more complicated when you reach B2F. The first half of B2F has multiple secret paths that you'll need to discover and run through; this part is pretty easy since each room is so small - just look for the cave entrances.
For the second half of B2F you'll have to navigate a room with lots of holes in the floor that you can fall through. When you fall down one of these holes you'll have to return to B2F and start the 'puzzle' in this room over. It's not really challenging but it is very tedious. To hopefully make this room easier for you guys I have created a map below of the entire room which marks every hole you can fall through.
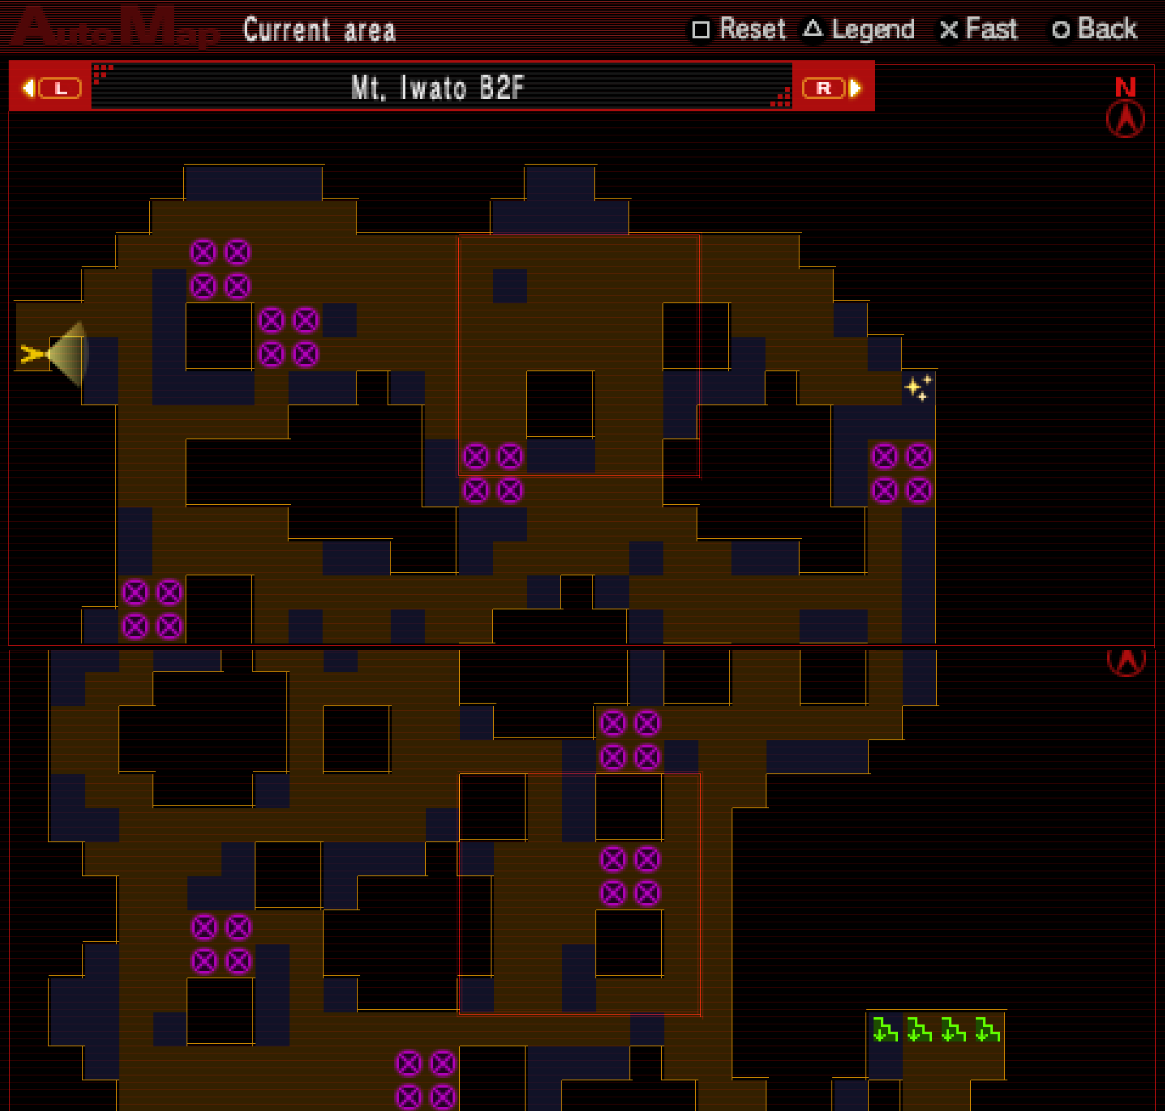
Map of Mt Iwato B2F Pit Fall Room (Click to enlarge)
Immediately after you complete the Pit Fall Room pictured above you'll encounter another Reflecting Pool. During the scene inside this room you'll learn that your characters did in fact play the Persona Game when they were kids (which explains why they can use Personas).
When you exit this Reflecting Pool room you'll want to go directly south until you find another Secret Room. This time you'll find the Blue Swan Mask inside! If you've been following my guide thus far then this should be the final mask for you to collect; if you missed a mask then you should backtrack immediately to collect it. Once you complete this dungeon you will never be allowed to return to retrieve these masks so now is your only opportunity to grab them.
After getting the Blue Swan Mask continue down the stairs nearby to B3F.

Blue Swan Mask Map Location
B3F is a rather linear floor, to the east of where you entered is another Secret Room but inside of this one the mask is mysteriously missing. To continue down to B4F you'll want to go to the north, the stairs leading down are pretty easy to find. Much like on the previous floor, on B4F you'll want to go north - there will be a secret cave entrance that leads you to an area with the final Reflecting Pool of the dungeon.
Warning! This is your last chance to collect all 4 of the masks hidden in this dungeon. When you enter the final Reflecting Pool room you'll trigger scenes, fight a boss and then leave the dungeon. You will not be able to return to this dungeon ever again so now is your last chance!
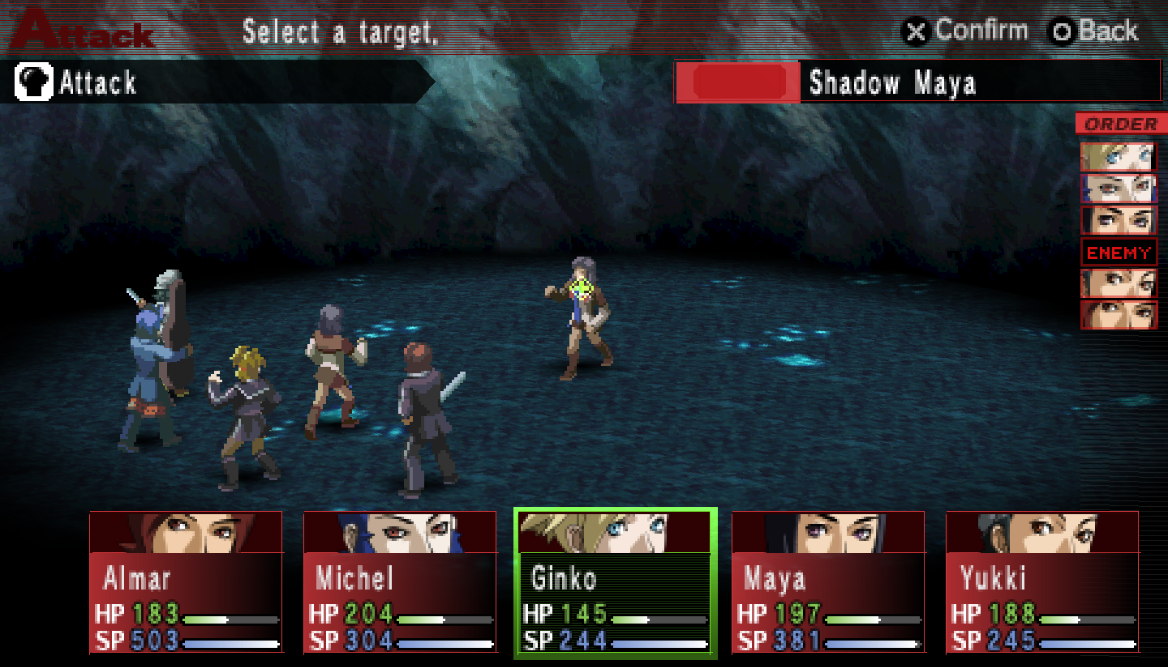
During the scene in this Reflecting Pool the Maya with your group will reveal that she isn't actually the real Maya. The real Maya will appear and save you from Shadow Maya after which you'll have a boss fight against Shadow Maya! You will start this fight at about half health on your entire team but that's ok considering Shadow Maya is a complete push over.
You'll have some scenes after the fight with Shadow Maya during which your characters will be granted their Prime Personas. If you made the correct dialogue choices when prompted earlier in the game every character in your group (excluding Yukki) will be given their Prime Persona.
Also, during this part of the game the amount of Personas that you can carry around with you and store is increased. This happens one more time when you gain your Ultimate Personas later on as well. Good thing too because I know many of you probably wouldn't have the extra space to carry these Personas!
Below is a quick list of each Persona that your party will be given.
Tatsuya: Vulcanus Prime
Michel: Rhadamanthus Prime
Ginko: Eros Prime
Maya: Maia Prime
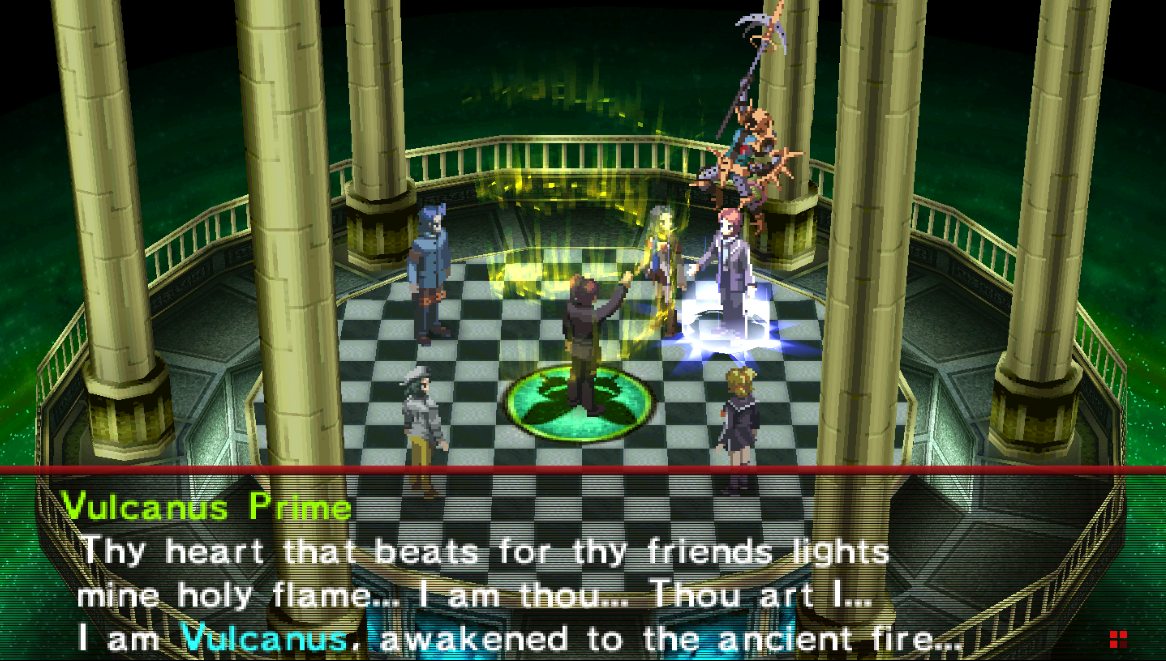
Tatsuya awakening Vulcanus Prime Persona
After you talk with Philemon and your party is given their Prime Personas you'll get a few more scenes back in the real world... This is where the story of Persona 2 really takes a turn for the eccentric! Since we are in a world where rumors can become reality, at least the story makes sense from a story telling perspective.
I usually don't comment on the story in my guides but I felt the need to here because it's so funny and interesting. Basically what happens is the fuhrer (yes, him, from World War 2) has an army consisting of robot gundams that attack Japan and seek to raise Xibalba, an alien spaceship, from under Sumaru City. What an amazing change of narrative in the story, right?
Once the scenes are over you will find yourself at the Alaya Shrine, exit and you'll find yourself back in Rengedai on the World Map. While you're still in Rengedai you can hit up the Lotus Shopping Center and buy new weapons at Time Castle and new armor at Rosa Candida; both of these stores carry new wares now.
The choice is yours but now is a good time to hit up the Velvet Room and get some new Personas or visit the Abandoned Factory and do new rooms in there. If you need any Tarot Cards grinding inside of the Abandoned Factory is a great place to get them. From this point forward Innocent Sin will start to get a bit harder and by that I mean more annoying.
Monsters in this game only pose a challenge to you because they use many one-shot mechanics which can/will instantly eliminate half of your party in a single hit. You will want to prepare for fights like this in a few ways, the first and best way is to get a Persona that has the Estoma Skill.
Estoma allows you to avoid encounters with enemies that are lower level than you. This means all you have to do is grind a bit and you'll be able to avoid most battles. My other recommendation to you is to get a low level Persona with a skill like Media or Mediarama and use that to heal your group up inbetween fights. You want a low level Persona because the SP cost will be much less.
Last but not least my final recommendation to you would be to use Personas on your character that have strong resistances or outright nullify Light/Dark attacks. For the most part Light and Dark elements are going to be the only thing that can one-shot you in this game. So, moving forward if you protect yourself against those elements you'll be able to avoid getting one-shot.
Below are some of the best Personas that are currently available for us at this level range. If you'd like to see a complete list check out my Persona 2: Best Personas Guide. There are dozens more Personas listed on that page than what you see below.
(Level 24) Nemesis (Empress): The only ability you're getting this Persona for is Estoma. When you use Estoma it avoids combat with all low level enemies - which is amazing. Nemesis is worth keeping in your Persona bank for the entire game solely for this spell.
(Level 29) Sakya (Hierophant): You'll get the item needed to summon this guy from Abandoned Factory. What makes this Persona so exceptional is it's strong to everything in the game and he nullifies almost all skills that will one shot you.
(Level 31) Agrippa (Magician): This is one of the first (if not the first) Persona that comes with the Summon Spirits skill. You can use Summon Spirits in many different Fusion Spells; almost every element paired with Summon Spirits will be a Fusion Spell. Another nice thing about Agrippa is he gives a +1 Dx bonus on level up which is arguably the best bonus you can get on a Persona.
(Level 31) Dementer (World): Dementer gives +1 Dx on level up and nullifies Light/Dark attacks which means you're effectively protected from being one-shot. The downside of Dementer is he doesn't have the best skill set. Diarama is nice since it's basically a full heal but the only elemental attack he has is Mamagnara (Earth). If you want to make Dementer better, when you Summon him make sure to use a Skill Card on him that will give him a Fire or Water attack.
(Level 36) Seioubo (Empress): In my opinion this is one of the best Personas in the game. She is one of the only Personas that come with Heartfelt Prayer which is used in some of the best Fusion Spells and she has strong resistances to every type of elemental damage in the game. Use a Skill Card on her that grants a Fire, Wind, Earth or Water Skill so that she is even more useful.
(Level 37) Baal (Emperor): He has a low SP Cost (25 SP) and comes with Mediarama which is an amazing group heal. Photon Cannon and Fear Torrent are also great skills to use when you're not using Fusion Spells. Another bonus for using Baal is he gives +1 Dx on each level up.
The last two side activities that I will bring up are the Casino and the Sweepstakes. We're getting to the point where we have enough money to participate in both of these things now and the rewards these quests give are still quite useful for us even now. Especially the Accessories for sale at the Casino - we'll be talking a little bit more about this later because the Casino's rewards get better after the next dungeon(s).
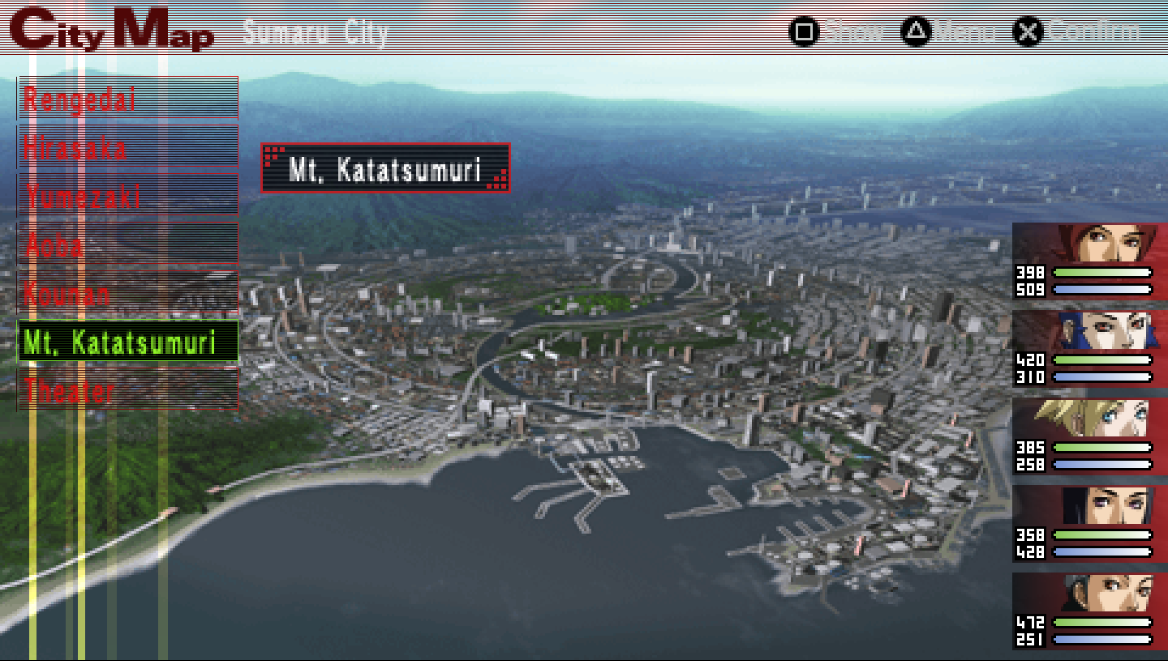
Once you're done messing around with Personas and the Velvet Room it's time to head over to the next dungeon - Mt. Katatsumuri. You can reach Mt. Katatsumuri by traveling to... Mt. Katatsumuri on the World Map. It's a new location that was added to your World Map after finishing the previous dungeon.
Continue to Walkthrough Chapter 4
Return to Walkthrough Chapter 2