
G Rank 2 (G2*) Guild Quests - MHFU
This page is a list and walkthrough of all the G Rank 2 (G2*) Guild Quests in Monster Hunter Freedom Unite. All of the quests on this page are exclusive to Monster Hunter Freedom Unite - none of these are in Monster Hunter Freedom 2. One other thing to note is the G Rank quests in this game are intended to be done with multiple people.
I've included all of the relevant information for each quest on this list such as which zone it takes place in, what type of quest it is, whether or not you're required to complete it to advance and (of course) how to complete the quest. Below is an example that will serve as your Key for this page. If you're confused as to what any of the categories on this page mean take a look at the Key below.
Key:
Name of the Mission
Advance Req: If you are required to beat the mission to progress
Type: The type of mission this is, Gathering, Combat or Hunting
Video: My Youtube Video Walkthrough of this mission
Location: Where this mission takes place
Goal: The objective of this mission
#1 G-Lvl Gathering - Forest & Hills
#1 G-Lvl Gathering - Forest & Hills
Advance Req: No
Type: Gathering Quest
Video: N/A
Location: Forest & Hills (Night)
Goal: Deliver the Paw Pass to complete this quest (or survive until time is up)
#2 G-Lvl Gathering - Old Volcano
#2 G-Lvl Gathering - Old Volcano
Advance Req: No
Type: Gathering Quest
Video: N/A
Location: Old Volcano
Goal: Deliver the Paw Pass to complete this quest (or survive until time is up)
#3 Ever-Present Shadow
#3 Ever-Present Shadow
Advance Req: Yes
Type: Hunting Quest
Video: Ever-Present Shadow Quest Walkthrough (Light Bowgun)
Location: Great Forest (Night)
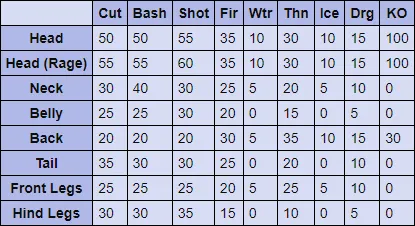
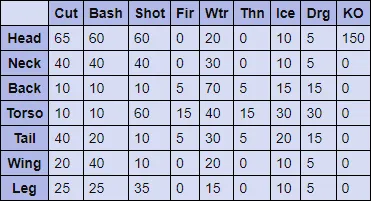
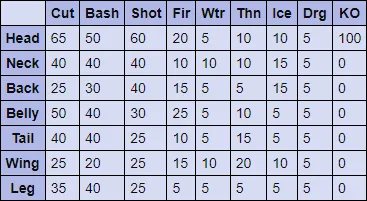
Goal: Hunt the Nargacuga (6840 HP). When the mission starts you can find the Nargacuga in area 5 on the map. It will stay here for about a minute before starting a patrol route through areas 7, 2, 4 and back to 5. From what I have observed it will follow this same route through each area every time.
Nargacuga Hitzones & Weaknesses:
#4 Assassin of the Swamp
#4 Assassin of the Swamp
Advance Req: No
Type: Hunting Quest
Video: Assassin of the Swamp Quest Walkthrough (Light Bowgun)
Location: Old Swamp
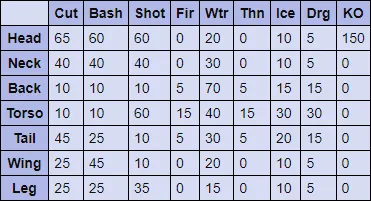
Goal: Hunt the Nargacuga (6840 HP). You can first find Nargacuga in area 7 at the start of the mission. It will stay here for about a minute before starting its patrol route through areas 2, 4, 5 and back to 7. From what I have seen it will always follow this same route through the map.
Nargacuga Hitzones & Weaknesses:
#5 Ancient Beauty, Black Beast
#5 Ancient Beauty, Black Beast
Advance Req: No
Type: Hunting Quest
Video: Ancient Beauty, Black Beast Quest Walkthrough (Light Bowgun)
Location: Great Forest (Day)
Goal: Hunt two Nargacugas (4320 HP). At the start of this mission one Nargacuga can be found in area 5 and the other is in area 7. Both of these monsters will visit the same locations on the map (sometimes at the same time) which makes them easy to track. The locations these monsters can visit are areas 5, 7, 6, 2 and 4.
Nargacuga Hitzones & Weaknesses:
#6 Lavasioth Sighting!
#6 Lavasioth Sighting!
Advance Req: Yes
Type: Hunting Quest
Video: Lavasioth Sighting Quest Walkthrough (Light Bowgun)
Location: Volcano (Day)
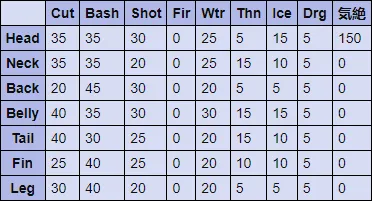
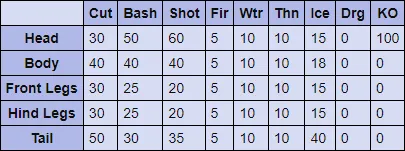
Goal: Hunt the Lavasioth (7600 HP). The Lavasioth spawns in area 10 at the start of this mission and roams back and forth between areas 10 and 9. These are the only two locations with lava on the entire map deep enough for it to swim so these are the only areas it can go.
Lavasioth Hitzones & Weaknesses:
#7 River of Fire
#7 River of Fire
Advance Req: No
Type: Hunting Quest
Video: River of Fire Quest Walkthrough (Light Bowgun)
Location: Volcano (Night)
Goal: Hunt two Lavasioth (4400 HP). Much like the previous quest you can find the Lavasioths in area 10 and 9 during this mission. The hardest part of this mission is trying to separate the Lavasioths or to deal with both of them together.
Lavasioth Hitzones & Weaknesses:
#8 Strong Sword, Strong Shield
#8 Strong Sword, Strong Shield
Advance Req: No
Type: Hunting Quest
Video: Strong Sword, Strong Shield Quest Walkthrough (Light Bowgun)
Location: Great Arena
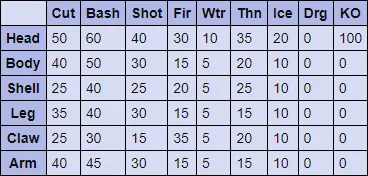
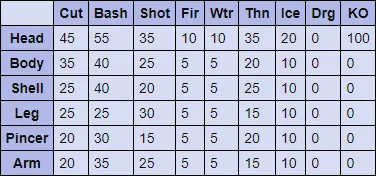
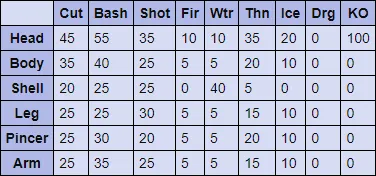
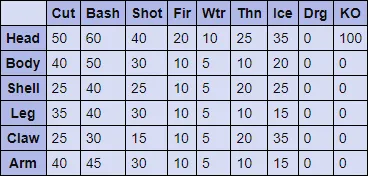
Goal: Hunt the Daimyo Hermitaur (3000 HP) and the Shogun Ceanataur (4000 HP). Both of these crabs are found in the Great Arena - you'll be fighting both of them at the same time for this quest too.
Daimyo Hermitaur Hitzones & Weaknesses:
Shogun Ceanataur Hitzones & Weaknesses:
#9 Commander in the Flames
#9 Commander in the Flames
Advance Req: No
Type: Hunting Quest
Video: Commander in the Flames Quest Walkthrough (Light Bowgun)
Location: Volcano (Night)
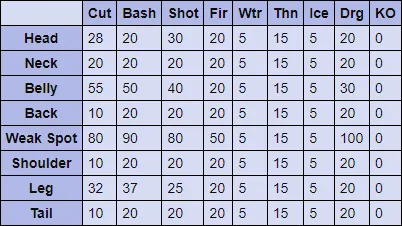
Goal: Hunt the Shogun Ceanataur (6240 HP). When the quest begins you can find the Shogun Ceanataur in area 6. It will hang out here for about a minute before starting a rotation through half the map. This monster will go through areas 6, 7, 3, 4 and 5 before returning to 6 and starting over again.
Shogun Ceanataur Hitzones & Weaknesses:
#10 Dark-Shelled Ceanataur
#10 Dark-Shelled Ceanataur
Advance Req: No
Type: Hunting Quest
Video: Dark-Shelled Ceanataur Quest Walkthrough (Hammer)
Location: Old Swamp
Goal: Hunt the Terra S. Ceanataur (7215 HP). It spawns in area 9 at the start of the mission and eventually goes to areas 4, 9, 10, 11, 6 and 5. From what I have observed the order it picks is completely random so I recommend bringing a Psychoserum to make finding him easier.
Terra Shogun Ceanataur Hitzones & Weaknesses:
#11 Under the Gaze of Heaven
#11 Under the Gaze of Heaven
Advance Req: Yes
Type: Hunting Quest
Video: Under the Gaze of Heaven Quest Walkthrough (Sword & Shield) - Shogun & Terra Ceanataur Attacks & Strats (Longsword)
Location: Swamp (Night)
Goal: Hunt the Shogun Ceanataur (3840 HP) and the Terra S. Ceanataur (4440 HP). When the mission begins you can find the Shogun Ceanataur in area 7 and the Terra S Ceanataur in area 2. Both of these crabs visit the same locations on this map which makes tracking them easy. The locations you can find these monsters are: Areas 7, 2, 3, 9, 6, 4 and 5.
Shogun Ceanataur Hitzones & Weaknesses:
Terra Shogun Ceanataur Hitzones & Weaknesses:
#12 At Birds' Hill...
#12 At Birds' Hill...
Advance Req: No
Type: Hunting Quest
Video: At Birds' Hill Quest Walkthrough (Sword & Shield)
Location: Forest & Hills (Day)
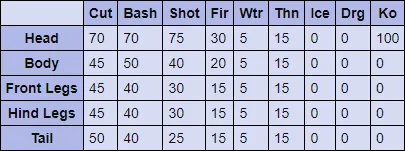
Goal: Hunt the Mini Yian Kut-ku (3200 HP). As the quest says, this is small version of the Yian Kut-ku. It hits just as hard as a normal Yian Kut-ku and has as much HP, it's just now harder to hit since it is small. You can find the Mini Yian Kut-ku in area 9 when the mission begins; it'll hang out here for about a minute before switching to one of the following areas at random 3, 4, 2, 5 and of course 9.
Mini Yian Kut-ku Hitzones & Weaknesses:
#13 A King, Robed in Smoke
#13 A King, Robed in Smoke
Advance Req: Yes
Type: Hunting Quest
Video: A King, Robed in Smoke Quest Walkthrough (Light Bowgun)
Location: Old Volcano
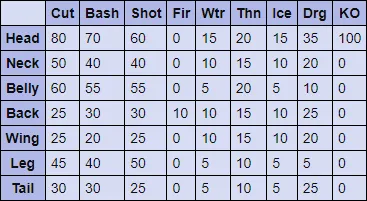
Goal: Hunt the Rathalos (6240 HP). When the mission first begins you can find the Rathalos in area 7 on the map. It will hang out here for about one minute before starting a patrol route through areas 3, 2, 6 and then returning to area 7. I don't think it goes anywhere else but these few select locations.
Rathalos Hitzones & Weaknesses:

#14 The King's Domain
#14 The King's Domain
Advance Req: No
Type: Hunting Quest
Video: The King's Domain Quest Walkthrough (Light Bowgun)
Location: Forest & Hills (Night)
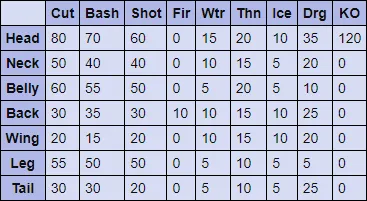
Goal: Hunt the Azure Rathalos (6840 HP). When the mission first begins you can find the Azure Rathalos in area 5 (The Den). It'll hang out here for about a minute before eventually moving to areas 4, 3, 10 and back to 5. From what I have observed this is the rotation it seems to follow 90% of the time. I've seen it land in other areas too thou (like 6,9 and 2) but it seems very rare. One thing to note about area #5 is there is a King Shakala in this area that never leaves. What that means is once the Azure Rathalos is badly wounded - if you let it flee to Area 5 then you'll have to deal with both enemies at the same time which is a bit of a pain in the ass.
Azure Rathalos Hitzones & Weaknesses:

#15 Her Eternal Majesty
#15 Her Eternal Majesty
Advance Req: Yes
Type: Hunting Quest
Video: Her Eternal Majesty Quest Walkthrough (Light Bowgun)
Location: Old Swamp
Goal: Hunt the Rathian (7800 HP). At the start of the mission you can find the Rathian in area 5; it'll stay here for about a minute before moving to areas 2, 4, 9 and back to 5.
Rathian Hitzones & Weaknesses:
#16 The Cherry Blossom Rathian
#16 The Cherry Blossom Rathian
Advance Req: No
Type: Hunting Quest
Video: The Cherry Blossom Rathian Quest Walkthrough (Light Bowgun)
Location: Old Jungle
Goal: Hunt the Pink Rathian (8580 HP). When the mission first begins you can find the Pink Rathian in area 6. It will hang out here for about a minute before switching to areas 3, 1, 2, 7 and 8. From what I have seen it seems to spend most of its time cycling through areas 1, 2 and 3.
Pink Rathian Hitzones & Weaknesses:
#17 Howling at the Moon
#17 Howling at the Moon
Advance Req: No
Type: Hunting Quest
Video: Howling at the Moon Quest Walkthrough (Hammer)
Location: Great Forest (Night)
Goal: Hunt the One-Eyed Yian Garuga (7030 HP). At the start of this mission you can find the One-Eyed Yian Garuga in area 4. It'll stay here for about a minute before visiting areas 2, 6, 7, 5 and of course 4. From what I have observed the area that he picks is completely random and there's no pattern to its movements... So bring some Psychoserum if you think you'll have trouble.
One-Eyed Yian Garuga Hitzones & Weaknesses:
#18 The Yian Garuga Twins
#18 The Yian Garuga Twins
Advance Req: No
Type: Hunting Quest
Video: The Yian Garuga Twins (Greatsword)
Location: Jungle (Day)
Goal: Hunt two Yian Garuga (4400 HP). When the mission begins you can find one Yian Garuga in area 3 and another in 2. Aside from these two locations the Yian Garugas will also visit areas 8, 1, 6, 7, 4, 5 and of course areas 2 and 3. Basically, they can visit most locations on this map so my advice is to bring Psychoserum and/or keep an eye out for Felyne Ballooners in the air that you can wave to. Waving to one of these Ballooners will mark the bosses on your map temporarily just like Psychoserum.
Yian Garuga Hitzones & Weaknesses:
#19 The King of the Mountains
#19 The King of the Mountains
Advance Req: No
Type: Hunting Quest
Video: The King of the Mountains Quest Walkthrough (Light Bowgun)
Location: Snowy Mountains (Day)
Goal: Hunt the Blangonga (5320 HP). You can find the Blangonga in area 8 when the mission first begins. It'll hang out here for about a minute before switching to areas 6, 3, 2, 7 and of course area 8. From what I have seen the Blangonga very rarely goes to area 2, it spends most of its time in the other areas. When it does venture into area 2 it'll be at the top-most portion in the snow.
Blangonga Hitzones & Weaknesses:
#20 Copper Sands
#20 Copper Sands
Advance Req: No
Type: Hunting Quest
Video: Copper Blangonga Attacks and Strats (Longsword) - Copper Sands Quest Walkthrough (Dual Blades)
Location: Old Desert
Goal: Hunt the Copper Blangonga (6460 HP). The Copper Blangonga spawns in area 4 when the mission first begins. After about a minute he will start his patrol route which goes through areas 10, 7, 3 and finally back to area 4.
Copper Blangonga Hitzones & Weaknesses:

#21 Wild Monk of the Dunes
#21 Wild Monk of the Dunes
Advance Req: Yes
Type: Hunting Quest
Video: Copper Blangonga Attacks and Strats (Longsword)
Location: Desert (Day)
Goal: Hunt the Copper Blangonga (6460 HP). At the start of this mission you can find the Copper Blangonga in area 3, it'll hang out here for about a minute before starting a patrol route through areas 7, 9 and 5. Once it reaches area 5 it will turn around and go back through all of the previous areas until it gets back to 3.
Copper Blangonga Hitzones & Weaknesses:
#22 Basarios Season
#22 Basarios Season
Advance Req: No
Type: Hunting Quest
Video: Basarios Season Quest Walkthrough (Light Bowgun)
Location: Old Volcano
Goal: Hunt multiple Basarios (3240 HP), you need to defeat at least two to complete this quest. When the mission first begins you can find one Basarios in area 3 and the other in area 2. If you're having trouble finding these enemies keep in mind that they're buried in the ground for the majority of the time. The only part of their body that will be visible is the rock on their back. Another thing to note is that this type of monster spends a lot longer in each area than usual. They often times will stay in the same location for a couple of minutes before moving. I've seen them visit areas 2, 3, 4 and 5.
Basarios Hitzones & Weaknesses:

#23 Operation Tropical Storm
#23 Operation Tropical Storm
Advance Req: No
Type: Epic Hunting Quest
Video: Operation Tropical Storm Quest Walkthrough (Light Bowgun)
Location: Jungle (Day)
Goal: Hunt the Plum D. Hermitaur (3307 HP), the Gypceros (2640 HP) and the Rathian (4200 HP). The first monster that you'll be dealing with in this mission is the Plum D Hermitaur which spawns in area 10. It will hang out here for about a minute before moving to area 3, another minute will be spent here and then it will start its rotation around the map going from 3, 9, 1, 2 and back to 3. If you leave it alone after this rotation it seems to visit any of the areas it's already been at random. He's a weird one. Once defeated the Rathian will spawn last in area 3. He'll spend a bit of time here before moving to areas 2, 1, 6, 8 and of course 3.
Plum Daimyo Hermitaru Hitzones & Weaknesses:
Gypceros Hitzones & Weaknesses:

Rathian Hitzones & Weaknesses:
#24 Save the Great Forest Town!
#24 Save the Great Forest Town!
Advance Req: No
Type: Epic Hunting Quest
Video: Save the Great Forest Town Quest Walkthrough (Longsword)
Location: Great Forest (Day)
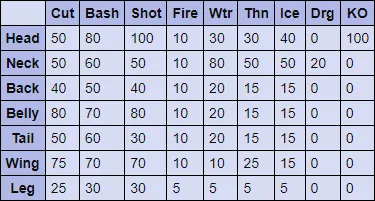
Goal: Hunt the Hypnocatrice (2990 HP), Emerald Congalala (3149 HP) and the Nargacuga (3600 HP). The Hypnocatrice spawns in area 4 and will eventually leave here and visit areas 5, 6, 1, 2, 7 and 4. Once the Hypnocatrice is defeated the Emerald Congalala will spawn next in area 4. It'll hang out here for a minute before moving to areas 2, 6, 5 and back to 4. After the Emerald Congalala is defeated the Nargacuga will spawn in area 5, it'll hang out here for about a minute before moving to areas 7, 2, 4 and back to 5.
Hypnocatrice Hitzones & Weaknesses:
Emerald Congalala Hitzones & Weaknesses:
Nargacuga Hitzones & Weaknesses:
#25 Three Walls
#25 Three Walls
Advance Req: No
Type: Epic Hunting Quest
Video: Three Walls Quest Walkthrough (Longsword)
Location: Forest & Hills (Day)
Goal: Hunt the Yian Kut-ku (2080 HP), Yian Garuga (4000 HP) and the Azure Rathalos (3779 HP). When the mission begins you can find the Yian Kut-ku in area 9, it'll hang out here for about a minute before moving to areas 3, 4, 2, 5 and 10. The next enemy you'll be fighting, the Yian Garuga, spawns in the exact same location as the previous. Much like the previous monster it will also visit the same locations on the map. Last but not least you have the Azure Rathalos which will spawn in area 5 and it will visit areas 6, 9, 3, 2 and 4 - basically all of the same areas as the previous monsters.
Yian Kut-ku Hitzones & Weaknesses:
Yian Garuga Hitzones & Weaknesses:
Azure Rathalos Hitzones & Weaknesses:
#26 A Hunter's Feast
#26 A Hunter's Feast
Advance Req: No
Type: Epic Hunting Quest
Video: A Hunter's Feast Quest Walkthrough (Longsword)
Location: Great Arena
Goal: Hunt the Daimyo Hermitaur (3120 HP), Blangonga (3639 HP) and the Shogun Ceantaur (3680 HP). This map is one giant arena and you will have to fight the enemies one by one until they're all defeated. Once one enemy is defeated another will spawn and rinse/repeat until they're all gone.
Daimyo Hermitaur Hitzones & Weaknesses:
Blangonga Hitzones & Weaknesses:
Shogun Ceanataur Hitzones & Weaknesses:
#27 Lao-Shan Lung Draws Near!
#27 Lao-Shan Lung Draws Near!
Advance Req: No
Type: Slaying Quest
Video: Lao-Shan Lung Draws Near Quest Walkthrough (Light Bowgun) - Lao-Shan Lung Attacks and Strats (Longsword)
Location: Fortress
Goal: Defend the fort from Ashen Lao-Shan Lung (26,666 HP); don't let the fort reach 0% integrity before the 35min timer runs out. Your goal for this quest should not be to kill Ash Lao-Shan Lung, it should be to deal enough damage to him to stop him from destroying the fortress. Each time you break a part of his body you'll slow him down and/or prevent him from attacking the Fortress. Until you get better gear and weapons this should be your main focus because killing him with weak weapons and gear is impossible. If you'd like more information about how to properly prepare for this quest check out my Hunt Preparation Guide. Or if you'd like to learn more about this dragon's weaknesses check out my Elder Dragon Weaknesses Guide.
Ashen Lao-Shan Lung Hitzones & Weaknesses:
Guild G Rank Quests
- G Rank Level 1
- G Rank Level 2
- G Rank Level 3