
G Rank 1 (G1*) Guild Quests - MHFU
This page is a list and walkthrough of all the G Rank 1 (G1*) Guild Quests in Monster Hunter Freedom Unite. All of the quests included on this page are exclusive to Monster Hunter Freedom Unite. Like I have been saying for all of the other guild quests, you'd eventually reach this point and you finally have.
I've included all of the relevant information for each quest on this list such as which zone it takes place in, what type of quest it is, whether or not you're required to complete it to advance and (of course) how to complete the quest. Below is an example that will serve as your Key for this page. If you're confused as to what any of the categories on this page mean take a look at the Key below.
Key:
Name of the Mission
Advance Req: If you are required to beat the mission to progress
Type: The type of mission this is, Gathering, Combat or Hunting
Video: My Youtube Video Walkthrough of this mission
Location: Where this mission takes place
Goal: The objective of this mission
#1 G-Lvl Gathering - Great Forest
#1 G-Lvl Gathering - Great Forest
Advance Req: No
Type: Gathering Quest
Video: N/A
Location: Great Forest (Day)
Goal: Deliver the Paw Pass to complete this quest (or survive until time is up)
#2 G-Lvl Gathering - Old Jungle
#2 G-Lvl Gathering - Old Jungle
Advance Req: No
Type: Gathering Quest
Video: N/A
Location: Old Jungle
Goal: Deliver the Paw Pass to complete this quest (or survive until time is up)
#3 G-Lvl Gathering - Old Desert
#3 G-Lvl Gathering - Old Desert
Advance Req: No
Type: Gathering Quest
Video: N/A
Location: Old Desert
Goal: Deliver the Paw Pass to complete this quest (or survive until time is up)
#4 G-Lvl Gathering - Old Swamp
#4 G-Lvl Gathering - Old Swamp
Advance Req: No
Type: Gathering Quest
Video: N/A
Location: Old Swamp
Goal: Deliver the Paw Pass to complete this quest (or survive until time is up)
#5 G-Lvl Gathering - Snowy Mountains
#5 G-Lvl Gathering - Snowy Mountains
Advance Req: No
Type: Gathering Quest
Video: N/A
Location: Snowy Mountains (Day)
Goal: Deliver the Paw Pass to complete this quest (or survive until time is up)
#6 Shakalaka Showdown!
#6 Shakalaka Showdown!
Advance Req: No
Type: Slaying Quest
Video: Shakalaka Showdown Quest Walkthrough (Dual Blades)
Location: Great Forest (Day)
Goal: Slay 20 Shakalakas.
#7 The Beating of Royal Wings
#7 The Beating of Royal Wings
Advance Req: No
Type: Slaying Quest
Video: The Beating of Royal Wings Quest Walkthrough (Light Bowgun)
Location: Jungle (Night)
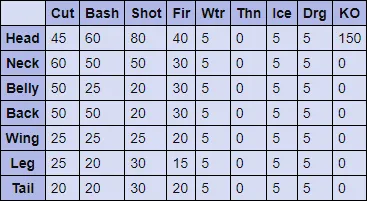
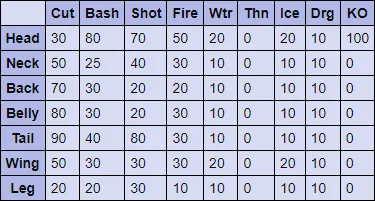
Goal: Defeat the Vespoid Queen (3510 HP). For this quest you need to run around the map killing Vespoids until you trigger the Vespoid Queen to spawn in area 6 on the map.
Vespoid Queen Hitzones & Weaknesses:

#8 The Big Dirt Nap
#8 The Big Dirt Nap
Advance Req: No
Type: Hunting Quest
Video: The Big Dirt Nap Quest Walkthrough (Light Bowgun)
Location: Old Jungle
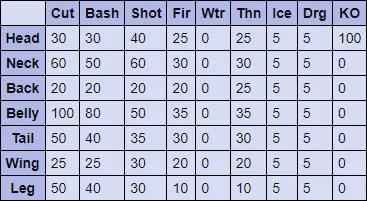
Goal: Hunt the Hypnocatrice (5070 HP). When this mission first begins you can find the Hypnocatrice in area 3. After about a minute it will leave this location and move to areas 7, 1 or 2. From my observation these are the only areas on the map that it will visit (3, 7, 1, 2).
Hypnocatrice Hitzones & Weaknesses:
#9 Hypno, Hypno!
#9 Hypno, Hypno!
Advance Req: Yes
Type: Hunting Quest
Video: Hypno, Hypno! Quest Walkthrough (Light Bowgun)
Location: Great Forest (Day)
Goal: Hunt two Hypnocatrice (3379 HP). At the start of this mission one Hypnocatrice can be found in area 4 and the other is in area 5. Just like usual, after about a minute they will leave their start locations and visit different areas on the map. As you may expect, since they're both Hypnocatrice's they will both visit the same areas. These locations are, 4, 5, 6, 7, 1 and 2.
Hypnocatrice Hitzones & Weaknesses:
#10 Trapped by Yian Kut-ku
#10 Trapped by Yian Kut-ku
Advance Req: No
Type: Hunting Quest
Video: Trapped by Yian Kut-ku Quest Walkthrough (Light Bowgun)
Location: Swamp (Day)
Goal: Hunt the Yian Kut-ku (2160 HP) and the Blue Yian Kut-ku (3780 HP). When this quest first begins you can find the Blue Yian Kut-ku in area 8 and the regular Yian Kut-ku in area 2. Both of these monsters will visit the same locations on the map which makes it a bit easier. You can find them in areas 2, 8, 6, 4 and 5. As usual on quests like this my biggest piece of advice is to not fight both of them at the same time in the same area. That won't be easy and will likely result in your death.
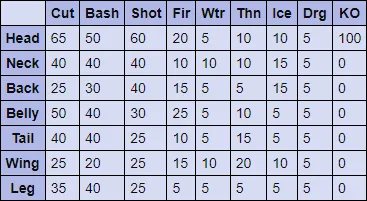
Yian Kut-ku Hitzones & Weaknesses:
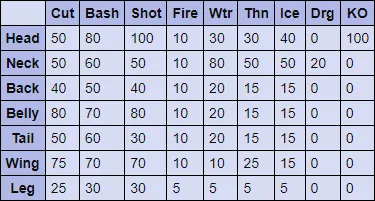
Blue Yian Kut-ku Hitzones & Weaknesses:

#11 Giant Crab of the Old Jungle
#11 Giant Crab of the Old Jungle
Advance Req: No
Type: Hunting Quest
Video: Giant Crab of the Old Jungle Quest Walkthrough (Light Bowgun)
Location: Old Jungle
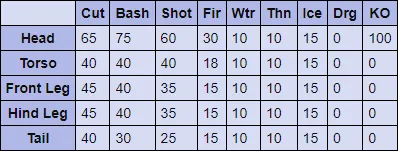
Goal: Hunt the Daimyo Hermitaur (4680 HP). You can find the Daimyo Hermitaur in area 8 when the mission first begins. It will hang out here for about 30 seconds before switching to areas 3, 2 or 1. From my observations it never goes back to area 8 after the mission starts and only cycles back and forth through areas 1, 2 and 3.
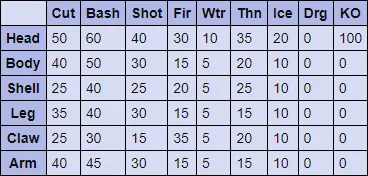
Daimyo Hermitaur Hitzones & Weaknesses:
#12 Daimyo of Sengoku Flame
#12 Daimyo of Sengoku Fame
Advance Req: Yes
Type: Hunting Quest
Video: Daimyo of Sengoku Fame Quest Walkthrough (Light Bowgun)
Location: Old Desert
Goal: Hunt the Plum D. Hermitaur (6142 HP). When the mission begins you can find the big crab in area 7. After about a minute it will start a patrol route through areas 2, 1 and 3 before returning to area 7.
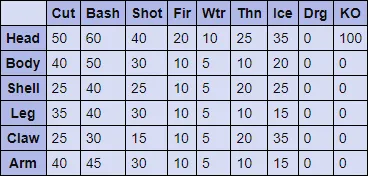
Plum Daimyo Hermitaur Hitzones & Weaknesses:
#13 Wag the Dog!
#13 Wag the Dog!
Advance Req: No
Type: Hunting Quest
Video: Wag the Dog Quest Walkthrough (Light Bowgun)
Location: Desert (Day)
Goal: Hunt the Daimyo Hermitaur (3240 HP) and the Plum D. Hermitaur (4252 HP). When the mission first begins you can find the Daimyo Hermitaur in area 3 and the Plum D Hermitaur in area 9. Each crab will stay in its starting location for about one minute before eventually leaving and going to one of the following areas at random: 3, 9, 5, 7, 1, 10 and 2. My best piece of advice is to never fight them both in the same area at the same time. If you're someone who uses ranged weapons you can get ontop of a ledge in areas 3 and 9 which will allow you to avoid almost all of their attacks while still being able to safely hit them.
Daimyo Hermitaur Hitzones & Weaknesses:
Plum Daimyo Hermitaur Hitzones & Weaknesses:
#14 Old Jungle Lightning
#14 Old Jungle Lightning
Advance Req: Yes
Type: Hunting Quest
Video: Old Jungle Lightning Quest Walkthrough (Light Bowgun)
Location: Old Jungle
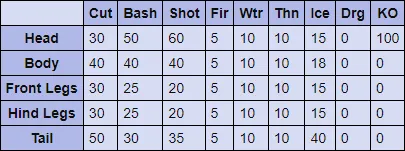
Goal: Hunt the Khezu (6400 HP). You can find the Khezu in area 4 at the start of this mission. After about one minute it will leave here and travel to areas 8, 9, 10 and 4. From what I have observed it normally goes to 8, 9 and 10 in order and then back to 4 after it is done with either 8 or 10.
Khezu Hitzones & Weaknesses:
#15 Red Shadow in the Snow
#15 Red Shadow in the Snow
Advance Req: No
Type: Hunting Quest
Video: Red Shadow in the Snow Quest Walkthrough (Light Bowgun)
Location: Snowy Mountains (Night)
Goal: Hunt the Red Khezu (7020 HP). When the mission begins you can find the Red Khezu in area 6. It'll stay here for about a minute before going to one of the following areas at random, 3, 1, 7, 8 and of course 6. From what I have observed there is no pattern to its movements and it picks each area at random.
Red Khezu Hitzones & Weaknesses:

#16 Tales from the Old Swamp
#16 Tales from the Old Swamp
Advance Req: No
Type: Hunting Quest
Video: Tales from the Old Swamp Quest Walkthrough (Light Bowgun)
Location: Old Swamp
Goal: Hunt two Red Khezu (3960 HP). When you begin this mission you can find one Red Khezu in area 8 and the other in area 7. These two locations are two of the three caves on this map and where the Khezu will spend most of their time. Aside from areas 8 and 7 you can also find the Khezu in 11 and 5. They seem to spend significantly less time in 11 and 5 though when they land there.
Red Khezu Hitzones & Weaknesses:
#17 Eyes in the Underground Lake
#17 Eyes in the Underground Lake
Advance Req: Yes
Type: Hunting Quest
Video: Eyes in the Underground Lake Quest Walkthrough (Light Bowgun)
Location: Old Desert
Goal: Hunt the Plesioth (7800 HP). The only place on this map that you can find the Plesioth is in area 5, this is where the underground lake is. It's cold down here so make sure you bring some potions!
Plesioth Hitzones & Weaknesses:

#18 Giant Green Waves of Verdure
#18 Giant Green Waves of Verdure
Advance Req: No
Type: Hunting Quest
Video: Giant Green Waves of Verdure Quest Walkthrough (Light Bowgun)
Location: Old Jungle
Goal: Hunt the Green Plesioth (8140 HP). You can find the Plesioth in areas 7 and 3 on this map. It spends about a minute in one area before switching to the next. One thing to note, if you're a ranged weapon user there is a ledge in area 7 that you can stand on. It's back near the wall where you climb up to area #6. When you're on this ledge you can dodge all of Plesioth's attacks and still hit him, it's great.
Green Plesioth Hitzones & Weaknesses:
#19 Prodigal Pack Attack!
#19 Prodigal Pack Attack!
Advance Req: No
Type: Hunting Quest
Video: Prodigal Pack Attack Quest Walkthrough (Light Bowgun)
Location: Swamp (Night)
Goal: Hunt the Congalala (5460 HP). When the mission first begins you can find the Congalala in area 8. He will hang out here for a minute before moving to areas 6, 5, 4, 2, 7 and of course back to 8 whenever he wants. The order he follows around the map seems to be random.
Congalala Hitzones & Weaknesses:
#20 Pelagus Pride
#20 Pelagus Pride
Advance Req: Yes
Type: Hunting Quest
Video: Pelagus Pride Quest Walkthrough (Light Bowgun)
Location: Old Jungle
Goal: Hunt the Emerald Congalala (5700 HP). At the start you can find the Emerald Congalala in area 6, it'll spend about a minute here before moving to areas 1, 2, 3, 7 and of course 6.
Emerald Congalala Hitzones & Weaknesses:
#21 Trickster!
#21 Trickster!
Advance Req: No
Type: Hunting Quest
Video: Trickster Quest Walkthrough (Light Bowgun)
Location: Great Forest (Night)
Goal: Hunt the Emerald Congalala (5850 HP). When the mission first begins you can find the Emerald Congalala in area 4. It'll stay here for about a minute before moving to areas 2, 6, 5 and back to 4. From what I have observed this is the set in stone rotation that it follows through this area.
Emerald Congalala Hitzones & Weaknesses:
#22 Stealing in the Jungle!
#22 Stealing in the Jungle!
Advance Req: No
Type: Hunting Quest
Video: Stealing in the Jungle Quest Walkthrough (Light Bowgun)
Location: Jungle (Night)
Goal: Hunt the Gypceros (4680 HP). At the start of this mission you can find the Gypceros in area 6 (The Den). It'll hang out here for about a minute before going to one of the following areas at random 5, 4, 3, 2, 9, 6 and 1.
Gypceros Hitzones & Weaknesses:

#23 Old Swamp, Shrouded in Mist
#23 Old Swamp, Shrouded in Mist
Advance Req: Yes
Type: Hunting Quest
Video: Old Swamp, Shrouded in Mist Quest Walkthrough (Light Bowgun)
Location: Old Swamp
Goal: Hunt two Purple Gypceros (3639 HP). You can find one Purple Gypceros in area 5 and another in 9 at the start of this mission. They will spend about one minute here before moving to areas 5, 9, 4, 6, 2, 10 and 3.
Purple Gypceros Hitzones & Weaknesses:
#24 Subspecies Three!
#24 Subspecies Three!
Advance Req: No
Type: Epic Hunting Quest
Video: Supspecies Three Quest Walkthrough (Light Bowgun)
Location: Jungle (Day)
Goal: Hunt the Blue Yian Kut-ku (2800 HP), the Green Plesioth (4400 HP) and the Plum D. Hermitaur (3150 HP). The first monster we need to eliminate is the Blue Yian Kut-ku which spawns in area 6 and travels to areas 5, 4, 3, 2 and 9. Next up is the Green Plesioth which spawns in area 3 and roams back and forth between areas 3 and 4. Once defeated the Plum Daimyo Hermitaur will spawn in area 10. It will hang out here for about a minute before going to area 3 next and then it seems to pick a random location from its list of locations... Or, sometimes it follows a set path through areas 3, 9, 1, 2 and back to 3. All of the locations the Plum Daimyo Hermitaur can go are 10, 3, 4, 9, 1 and 2.
Blue Yian Kut-ku Hitzones & Weaknesses:
Green Plesioth Hitzones & Weaknesses:
Plum Daimyo Hermitaur Hitzones & Weaknesses:
#25 Predators of the Swamp
#25 Predators of the Swamp
Advance Req: No
Type: Hunting Quest
Video: Predators of the Swamp Quest Walkthrough (Light Bowgun)
Location: Swamp (Day)
Goal: Hunt the Emerald Congalala (3000 HP), the Purple Gypceros (2880 HP) and the Khezu (3200 HP). When the mission begins you'll find the Emerald Congalala in area 8. After a minute or so it will leave this location and visit one of the following areas at random: 8, 7, 5, 4, 2 and 6. Next up the Purple Gypceros spawns in area 8 - much like the Congalala it'll stay here for about a minute before moving to areas 1, 2, 5, 6 and of course 8.
Emerald Congalala Hitzones & Weaknesses:
Purple Gypceros Hitzones & Weaknesses:
Khezu Hitzones & Weaknesses:
Guild G Rank Quests
- G Rank Level 1
- G Rank Level 2
- G Rank Level 3