
Breath of Fire 2 Walkthrough - Chapter 2
This Chapter picks up after getting the Royal Ring back from Nimufu at the Wildcat Restaurant. Once you've got the Royal Ring back in your possession you can return to SimaFort and present it to Jean, this will trigger a scene with the king. We are tasked with collecting ingredients for Jean to make some food for the king. All of the ingredients are in the actual dungeon, but before we go there we need to save someone's life.
Ingredients We Need:
WormMeat
RochMeat
GoldFly
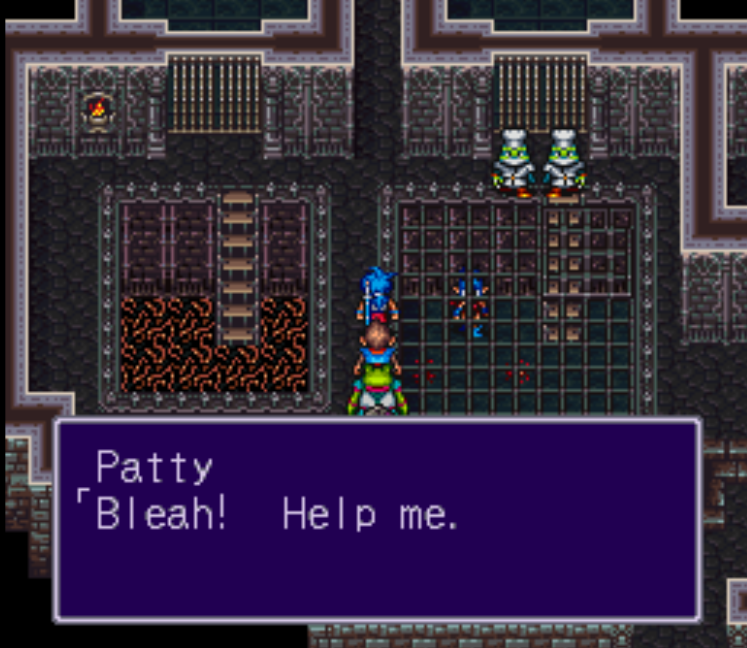
Head up to the throne room with the king and take the doorway on the right. This will lead you to the room in my picture below, there will be a very obvious arrow on the wall pointing down at a lever, this will move the painting to the side and open up a room with two stairs. Go up to find Tata tied up on the roof; give him water and he'll mention Fiolina.

Fiolina, oh Fiolina, you can find her by the pond inside of the castle. As you go down into the castle you'll pass through a large room with multiple ponds, one guy will be painting a picture next to a fountain. Fiolina is the girl frog near him. Speak with her then return to Tata on the roof and speak with him again to get keys for the two doors behind him. The little building will have a chest inside with 1000C and the windmill is door leads to the dungeon.
Inside the Windmill will be an empty bucket on the left hand side that you can jump into and ride down. This takes you into the real dungeon, so be prepared for combat! Our first fight will be against the Gold Fly, regardless of what you do the fight will end after 4 or 5 turns and the Gold Fly will buzz off. The path splits at this point, the door to the left will take you to the J.Worm boss and is the shorter of the two routes. Go this way first for the Worm Meat and dialogue with the Gold Fly, then back track and rest at an Inn before doing the rest of the dungeon.
The path on the right will lead to a couple of treasure chests and a few areas with blue cockroaches. Clear your way through them until you reach a big red roach and the Gold Fly, you'll be fighting the G.Roach for some Roach Meat, our second ingredient. Keep pursuing the Gold Fly to the north and you'll fight him too. As you could expect, he'll give you the final ingredient, GoldFly.
Now that we have all of the ingredients we should return to Jean in the kitchen and hand them all in. Petape will ask you to wait in the dining room; head over there and speak with the guard down south blocking the doorway to advance the story. The scene will end with you having to eat Jean's cooking, lovely. If you haven't already you may want to rest at an Inn again so that you're full HP/AP before the next boss.
If you talk to the head cook in the dining room he'll tell you that Petape and Jean took a "secret bathroom elevator somewhere in the castle". From the dining room with this chef, head through the north exit and down the stairs into the room with the letters "WC" right next to it. This is the secret elevator he's talking about. Press the button where the arrow is pointing down and you'll ride the elevator to the floor below. When the elevator docks, go immediately to the right and you'll find Jean and Petape.
Our next boss fight will be against the imposter who turns out to be a monster named Kuwadora. It's a tough fight, one tip is to use Ryu's dragon powers (not the puppy ones, the second tier ones) and also use W.Fruit to recover his AP (if you have any). Once the fight is over grab the "legendary sword" from the altar, you'll get a weapon called SoleSD when you do. Exit this area and you'll be teleported to the throne room for a scene.
Tip: Jean will rejoin your party at this point. Equip him with the SoleSD "legendary weapon" that we just got, it's a big upgrade for him.
There is one mandatory thing to do in SimaFort before we leave, along with a few chests to get. Do you remember the blue haired girl that is being held prisoner in the basement? Well, she is actually the thief we've been looking for since the start of the game. Talk with the frog here to take ownership of Patty, then head up the stairs in the top right of this area to collect 3 treasure chests. Equip whoever with the new loot.
Now that we've finally found the original thief we need to return to HomeTown and give her to Trout. Make sure Jean is in your party and you can use him to Warp to HomeTown instead of running all the way there. Once in town you need to speak with the guard blocking the entrance to the building, he'll let you into the building to see Trout. After some dialogue with Trout you'll need to explore the basement in his house, when you leave the basement he'll throw you out of his house.
Tip: Buy upgrades for Bow at the shops in TownShip.
Warp to TownShip and talk with Bow. You'll find him in the main building on the second floor in the first doorway. To be honest I don't even think you need to talk with him, just add him to your party and go back to TownShip to speak with Kilgore. Make sure Bow is at the front of your party when you talk with Kilgore, this will trigger the dialogue that you need. During dinner with Kilgore he'll ask you to steal from Trout again, make sure you say yes twice with Ryu otherwise you'll be playing as Bow alone.
Go back into the basement of his house then exit again, there will be a short scene with Trout after which you'll want to go down the new set of stairs. Talk with Patty and you will get another scene followed by a boss fight with Trout. Even without Ryu, this is a pretty easy fight. Once beaten you'll have a few more scenes before regaining control of your characters outside of Kilgore's house. There will be a girl blocking your route through town, talk to her and you'll be taken to the guild for more scenes.
As the game lays out for us, our next real task is to visit Gate and defeat the demon we encountered at the start of the game. To accomplish this we should first Warp to SimaFort. Use Jean to turn into the giant frog then travel south across the river(s) then east until you reach a lone house. Use the Dragon Statue here if you don't already have Katt in your party, you'll need her special ability for this next dungeon. My party was Ryu, Katt, Bow and Jean at this point; Bow replaces Rand as your healer and everyone else is a damage dealer.
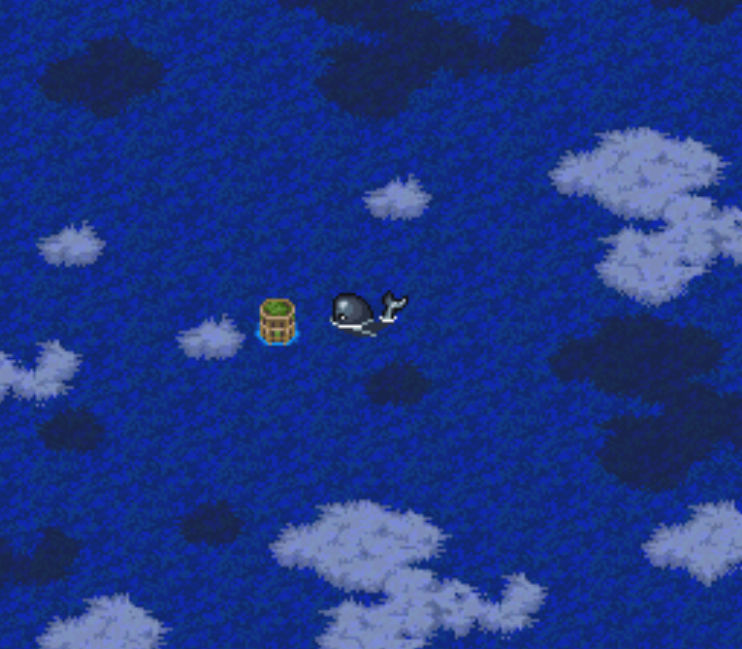
Talk with the man inside of the house and he'll thank you for saving him from Trout. As thanks, he'll give you access to our next dungeon! Right at the entrance of this dungeon you'll find a ladder going down blocked off by a wooden fence. This is where you need to put Katt at the front of your party and use her special skill (press Y on the controller). You'll drop down again into a large room with an old man and two dolphins. These dolphins can be rode to enter/exit this dungeon whenever you want.
Note: I recommend you grind inside of this dungeon or outside on the World Map for some levels at this point in time. This dungeon is far from an Inn so if you don't stop to grind, bring restorative items with you since you'll need them. Very rarely you'll find an enemy named C.Sludge inside of the Whale Caverns, this enemy will give you 1,502xp for one but it multiplies if you kill more than one. From my own experience, the spawn rate of this enemy isn't good enough to justify grinding inside of this dungeon.
Inside of the Whale Cavern you'll find multiple paths you can go, straight up is typically always the correct route forward. There will also be some "doors" inside of this dungeon which don't open and close normally like the rest of them do. You can use Katt's special power to hit the door and make it work normally again.
You'll find our next boss, Munmar at the back of this dungeon. He honestly isn't very hard, the dungeon's mobs are harder than he is--he just has a lot of HP. After taking him out you need to backtrack to the start of this dungeon in the room nearby where we found the two dolphins (pictured below). You'll find an Adam's Apple here swinging around, use Katt's special power to hit it and trigger a scene.
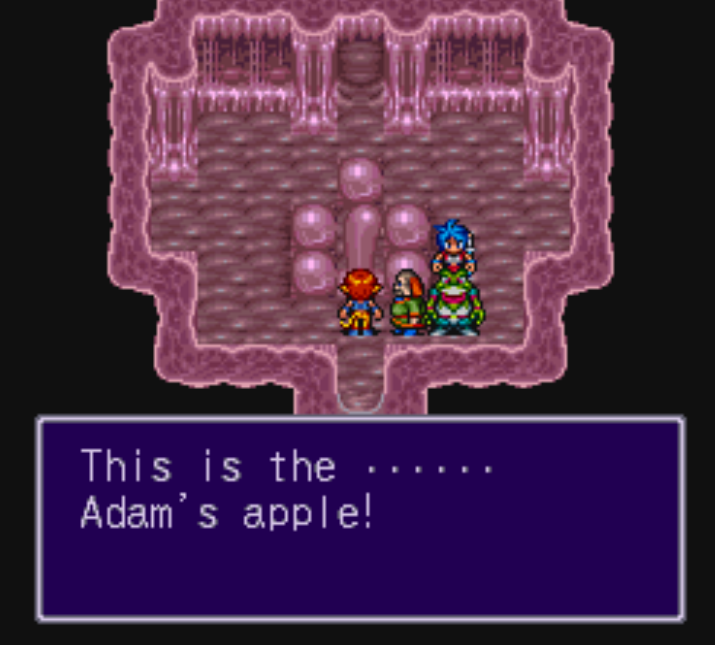
Smack the Adam's Apple in Grandpa's throat to wake him up
Grandpa will eject you from inside after hitting the Adam's apple, when the scene is finished speak with the old man inside the cave to get Whale Bell. This is a key item which will summon Grandpa at the shorelines throughout the world. If you don't already have Jean in your party you may want to consider him too because he comes with the Warp spell. This spell will let you fast travel to any town that you've already visited. Jean learns this at level 14.
If you skipped the optional content that I talked about on the previous page, now would be a good time to do it. Below are links to all of the optional content currently available to us.
Get Ryu's Dragon Powers using Jean's Frog Transformation
Recruit Hekkeller for House 1 in TownShip
Recruit Leminton for House 2 in TownShip
Recruit Baretta for House 3 in TownShip
(Optional) Learn More about TownShip and what value it has to you
(Optional) Learn More about Shaman Infusions in Breath of Fire 2
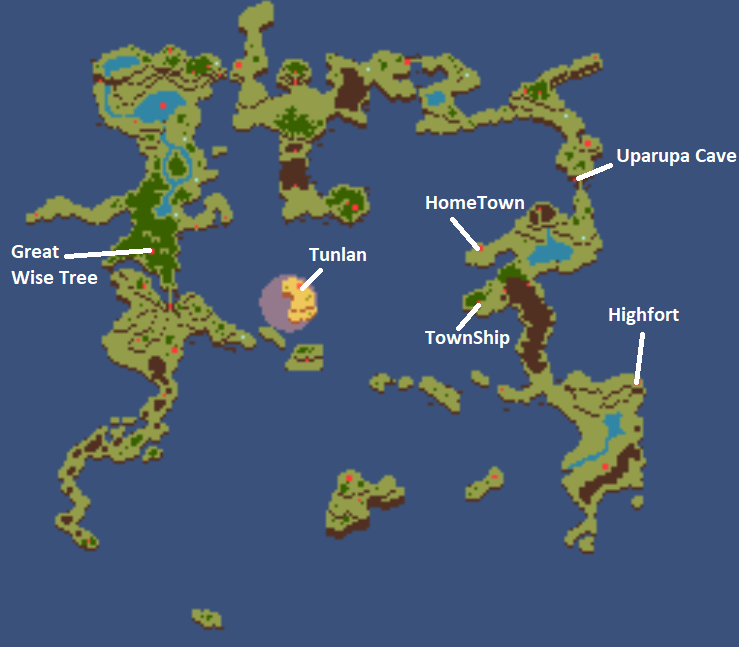
When you're ready to continue with the game you'll need to head over to Tunlan, it's found on a small island to the southeast of where you first got Grandpa. Use my screenshot below if you need help finding this place, I have marked a few other places nearby to help you.
Enter Tunlan so you can get the Warp flag needed for Jean, after doing that visit the circus just south of Tunlan for our story objective. Pay 100 Coins to get access to the carnival, head to the northern most room and speak with the guy standing next to the cage, his name is Chief. If you wish to spare Spar's life you'll need to bring Chief an Uparupa or 900,000 Coins.
You can find Uparupa inside the cave northeast of Tunlan, I have it marked on my map above. The entrance to this cave is in the water, you'll be able to ride Grandpa right on inside. Bring some W.Fruit (you can buy them in SimaFort) if your character's levels aren't all 20+. W.Fruit will restore your AP, you can pop a few of these on your healer when he gets low on AP. Once inside the cave, go straight north to progress forward. The other routes will have treasures.
Deeper into the cave you'll find Uparupa hunters, one will sell you a single Uparupa feed. The others will give you some information/advice on catching an Uparupa. There are two Uparupas that you can catch which are special and the rest will flee from you once the fight is over. For me the special ones were in the same location as what other guides talked about online. I've marked the two holes that contain the special Uparupas in the picture below.
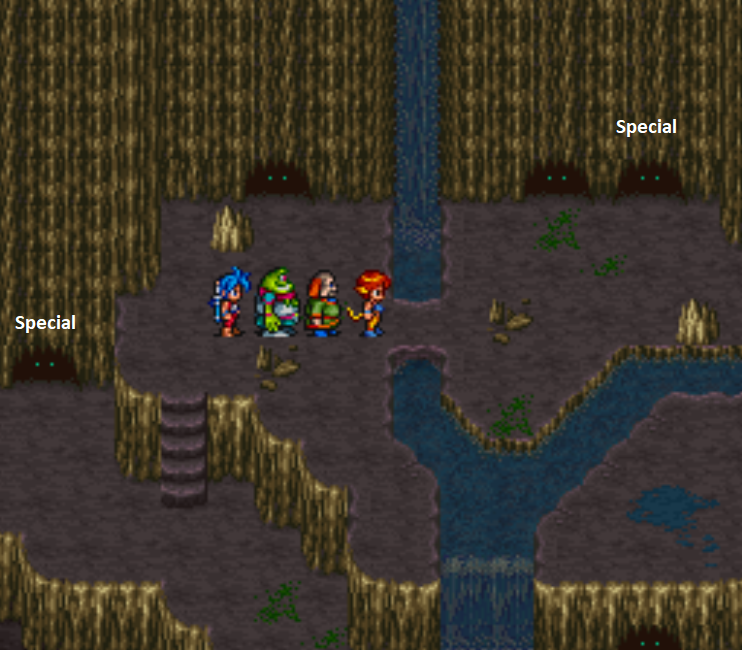
Make sure to catch one of the two Uparupa's marked "Special"
If you fail to catch an Uparupa or you don't catch a special one you'll have to exit this dungeon and go get more feed. This is kind of annoying to be honest, the whole Uparupa situation is. Below I will give you information about where to get more feed (Owl Woods). If you successfully caught an Uparupa, scroll down to the section below that one.
Tip: You need to be quick when catching the Uparupa, place the feed outside the hole and walk away 4 or 5 steps. The Uparupa will come out of its hole and when it does you must run towards it and interact with it to initiate combat.
Tip #2: Release the Uparupa when you catch it for loot. We can still progress the story even without keeping it, so just release it for the items instead.
Getting More Uparupa Feed - Owl Woods
Use Jean to teleport to Windia and from here travel west. You probably visited the Uparupa Cabin earlier in the game, it's a lone cabin sitting along the northern coastline west of Windia. You can only enter this cabin during the day, so you may have to run around a bit to progress time if you arrive early (or use Ryu's time spell). Owl Woods can be found north of this cabin, you must go through the cabin to access the woods though.
At the northern end of Owl Woods you'll find the Owl Fruit that we need along with a boss battle. There are 3 enemies in this battle, Algernon, Danielle and Suiky; you should expect a tough fight. One big tip for cheesing fights in this game, use Ryu's FireDrgn, IceDrgn or T.Drgn skills then restore his AP with W.Fruit and use those skills again. Each time you use these skills they will do 500+ damage, two of these and some melee attacks will take out Algernon.
Catching The Uparupa & Saving Spar - Continuing The Story
Once you successfully catch an Uparupa you'll be given an option, to release it or to keep it. Believe it or not, we actually want to release it. When you release it you'll get two items and you'll still be able to progress the story by returning to the circus near Tunlan. Letting it go will get you BusterSD and CharmSH. The first item is given to you immediately, to get the second item leave the room and return. You will be able to loot the chest a second time.
After letting the Uparupa go, it's time to return to the circus near Tunlan and talk with Chief again. We'll have a third dialogue option this time around, telling him that we'll give him nothing. He will transform into a monster and attack you, triggering a boss fight. Once you beat him Spar will join your party and suggest you visit The Great Wise Tree.
Before going to the tree though we should return to TownShip and fuse the Seso Shaman with Spar. This will change her appearance and buff her quite a bit (which is needed considering she starts at level 12). I'd recommend you put Sten in your party too and fuse him with Sana again (if he isn't already). The next few locations we visit will require both Sten and Spar's special powers.
Tip: Before you leave TownShip you should buy upgrades for Spar. If you haven't filled the town with Residents yet you should visit my TownShip Resident Guide and do so. You should also talk with your carpenter and expand the town after doing this. We're going to encounter an NPC later who we can only recruit while we're inside that dungeon. If you don't have the space in TownShip you'll lose the opportunity.
When you are ready to continue with the story use Jean and Warp to Tunlan again. Ride Grandpa back to the beach where you picked up the bell (north of Tunlan) and put Spar at the front of your party. Spar's special overworld ability is that she can walk through forests; we'll use her to go through the large forest by this location. Our destination is a large tree in the middle of the forest (the tree is almost directly south of SimaFort when you're looking at the map).
Upon your arrival The Great Wise Tree will lecture you and tell you to get it the Therapy Pillow from Tunlan. A tree... asking for a pillow? Well, now you've seen it all. Visit Tunlan during the day and right at the entrance of town you'll find a male NPC who stands out amongst all the dancing girls. Talk with him and he'll tell you that in order to speak with anyone in Tunlan you'll first need to get a famous flute from Highfort.
Teleport back to TownShip and make sure Spar and Sten are both in your party. Again, I strongly recommend you fuse Seso with Spar to upgrade her and Sana with Sten to upgrade him. The only downside of doing this is if your characters are downed (or brought below 30% ish life) they lose their Shaman fusions. So... try not to let that happen!
Call Grandpa at the shore south of TownShip and ride him south until you hit land. There will be a lone house sitting on a peninsula next to a sand bar-dock for Grandpa; if you find these things you'll know you're in the right spot. Dock here and travel east until you hit the other side of the continent, then travel north. Highfort is found ontop of the rocks in the northeast of this area.
Tip: In the area around Highfort you'll encounter C.Sludge enemies. We talked about these enemies back inside of the Whale Cave but the encounter rate was so low we barely ever saw them. Now they are common enough to justify grinding for a little bit. Don't try to defeat the sludges with melee attacks, instead use your Spells and it'll typically one-shot them.
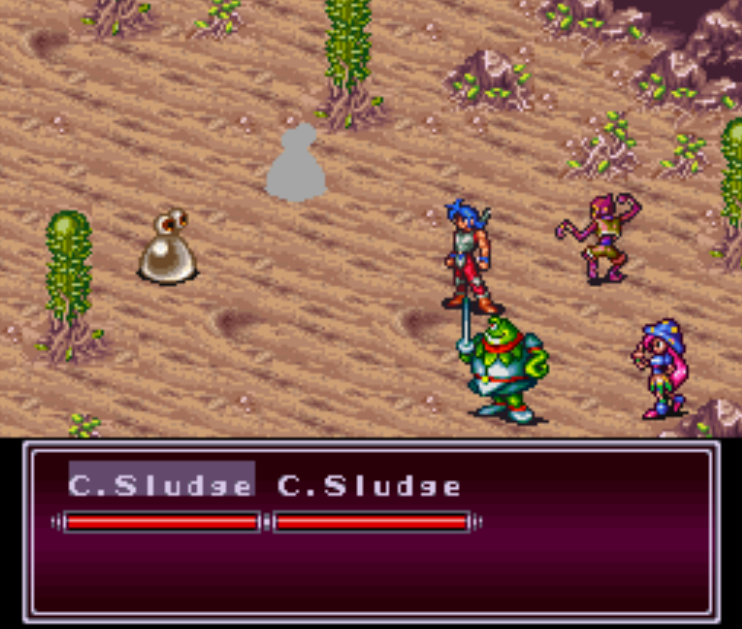
C.Sludge enemies give significantly more EXP than a normal mob. They make good targets for grinding.
How long you want to grind or if you want to grind at all is completely up to you. I personally grinded until Spar was above level 20 because I didn't want him to be so squishy. When you are ready to continue with the story you'll want to enter Highfort. Sten needs to be at the front of your party because you'll need his special power to get inside of Highfort. Once inside you'll have scene during which Sten leaves your party.
When you regain control of Ryu head north through the doorway and keep going north until you reach a room where a war plan is being held. You'll be warned before entering that you'll get in trouble but that's the game plan anyway so, enter the room and enjoy the scene. After the scene you'll find yourself in control of Sten, go down the stairs near Sten and grab the three chests in this dungeon area. You'll get a MothDR, QuickCL and an Extract. Equip the two items onto Sten immediately and head back upstairs.
If you're short on restorative items you should buy some from the shop and if Sten needs to rest, use the Inn. When you step onto the bridge north of the shops you'll trigger a scene with Trubo along with a battle. During the first fight just defend the entire time and heal yourself if needed. When Trubo gives up there will be another scene and more dialogue, after which you'll have a real fight against him. During the real fight you'll want to hit him twice with Sten's Flame Attack if you're having trouble beating him. Two hits with Flame and it's enough to take him out. Despite it being an AoE attack it still deals the most damage out of all your attacks.
Beating Trubo will trigger a scene after which you'll be in control of Sten again. Head through the same door as Trubo and use the fountain in here to restore your HP/AP. After doing that, go back outside and across the gap using Sten's special power. This will take us back into the castle, this part is pretty linear--the stairs going up will move us forward through the dungeon. Explore the side areas for treasures (if you want). Also I recommend you run from any battles with D.Brnger enemies, they can use instant death spells on you which will one shot you. Since you only have one character it'll be an instant Game Over.
Not far into the dungeon you'll see Ryu and the other party members trapped in a room, go up the stairs to their right to find a teleporter pad. Continue forward through the dungeon from here until you eventually run into another teleporter pad. This leads to the final part where Shupkay will be waiting for you. After a scene with Shupkay, Sten will rejoin the rest of the party and everyone will be under your control again.
The next area of this dungeon is basically a maze, our goal is to reach the stairs in the middle. On the second floor there will be a door way in the north and stairs in the middle, the doorway leads to a fountain which restores your HP/AP as well as a chest which has MoonMask inside. As you could imagine, the stairs going up will lead you deeper into the dungeon.
Eventually you'll come to the room shown in my screenshot below. This is the most annoying room of the dungeon because if you choose wrong it's going to be a costly time sink. Use the teleporter at the top, the one I marked as "Deeper Into dungeon" in the picture that's below.
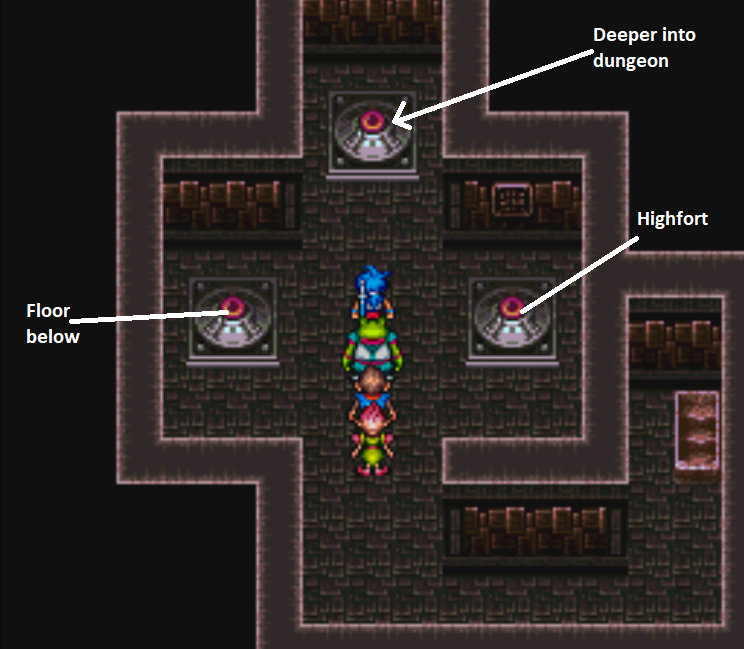
Make sure to enter the Deeper into dungeon teleporter! The other two are one way trips!
After taking the top teleporter you'll find Trubo injured on the ground. Talk with him then interact with the door to the north for a boss fight. For this next part of the dungeon our goal is to keep going up, sometimes stairs will lead to dead ends and sometimes they'll lead to chests. Each time you go up you'll typically be able to see what is around you which helps you understand which stairs lead where.
Shupkay will be waiting for you along with the Princess, you should be ready for a boss fight. When that's over you'll have a long scene during which you'll get the famous flute that we came here for. Head to the entrance of the castle and talk with Trubo there for another scene, during which Sten will rejoin your party.
Exit Highfort and Warp to Tunlan, now that we have the flute we can talk to the residents of this town. To progress the story you'll want to enter the castle and go to the top floor. You'll find the queen in bed with 3 people standing around her, speak with each of them. To help the queen you'll need to find Old Man Gedd, he is located on an island north of HomeTown.
Before leaving Tunlan visit the shop and buy upgrades for any of your characters that need them. When you're done teleport to TownShip, re-fuse party members with Shamans and then Warp again to HomeTown. Call Grandpa at the beach and then ride him a little bit west out into the ocean and then directly north. Not far from HomeTown you'll see a beach you can land on which leads directly to Mt. Maori (the location of Old Man Gedd).
Tip: Right inside of the entrance to Mt. Maori you'll find a fountain which fully restores your HP/AP. In this same room you'll be able to battle enemies, this makes it a very good spot to grind and catch up on some levels with your less used characters. To make every fight easy, just use Ryu's Dragon Powers every single battle. It'll one shot all enemies then you can drink from the fountain to fully restore your AP.
In the room after the fountain you'll find Old Man Gedd, he'll refuse to talk to you unless you put a girl at the lead of your party. Katt, Nina or Spar (fused with Seso) will work. After some dialogue Gedd will join you and it'll be time to return to Tunlan. Visit the queen again for some more dialogue after which you will be tasked with going back to the room where we met Gedd. Give his assistant the letter and he'll tell you to go up the mountain and grab a mushroom.
To climb this mountain you'll need to put Sten at the front of your party, every river going up the mountain has multiple poles that you need Sten for. There are multiple routes to the top and many different treasure chests you can collect along the way. Once you're at the top of the mountain you need to choose the correct Mushroom that is growing, a picture of the correct one is below.
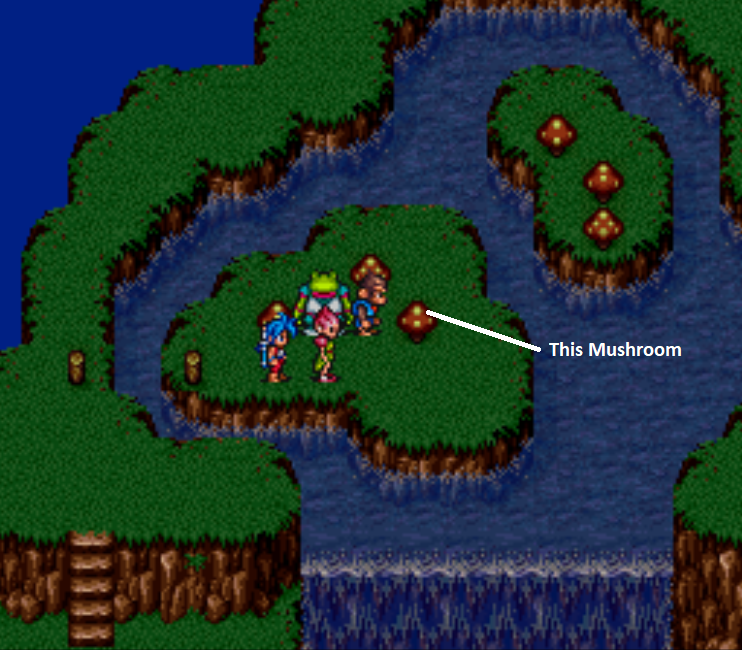
When you pick a mushroom it will automatically take you back down the mountain and put you back in front of the assistant. If you choose the wrong one, you'll have to go all the way back up to the top of the mountain again. After choosing the correct Mushroom, make sure you also loot the chest with a Mirror inside, we need both for this next task. Return to Tunlan with both of these items.
Entering the queen's room will trigger a scene, during which you will be shrunk and sent into her body. Our task is to walk around and kill all of the enemies in each of the areas. To advance you need to fight a certain amount of battles in each room, my advice is to just go from area to area and walk back and forth in each to see if a battle triggers. When they stop triggering, move to the next room. After defeating all of the enemies you'll automatically be pulled out of the queen.
There will be a scene during which you're told that the treasure vault has been left open for you. On your way up to the queen you may remember passing a door which was guarded by a monkey like Sten. The treasure vault is through this door, inside you'll want to speak with the girl and she'll give you the Therapy Pillow. For some reason she looted the chest for you...
Now that we've finally got the pillow, it's time to return to The Great Wise Tree. Use Spar or Jean to Warp to SimaFort then travel south; use Jean to get over the river and Spar to go through the forests. When you arrive, talk with the The Great Wise Tree using Spar and agree to enter his dream.
Inside this Dream World there are 3 towns of Inheart, one has old men, the other middle aged men and the last one young kids. We need to visit the one with kids to advance the story. There is a kid that walks around above the Inn who will give you a dialogue line about the tower and being able to see it from the lake. Make sure you get this line, it's the one required for advancing the story.
Before leaving the kid town you'll want to visit the Inn and recruit Barose for TownShip too. This NPC is probably the best NPC available for house 4. With that out of the way, return to the first town we saw in the Dream World (the town of old people). It has since transformed into a new thing entirely, it's now our next dungeon.
Tip: If you need an Inn to rest at you'll have to visit the Inheart with middle aged men.
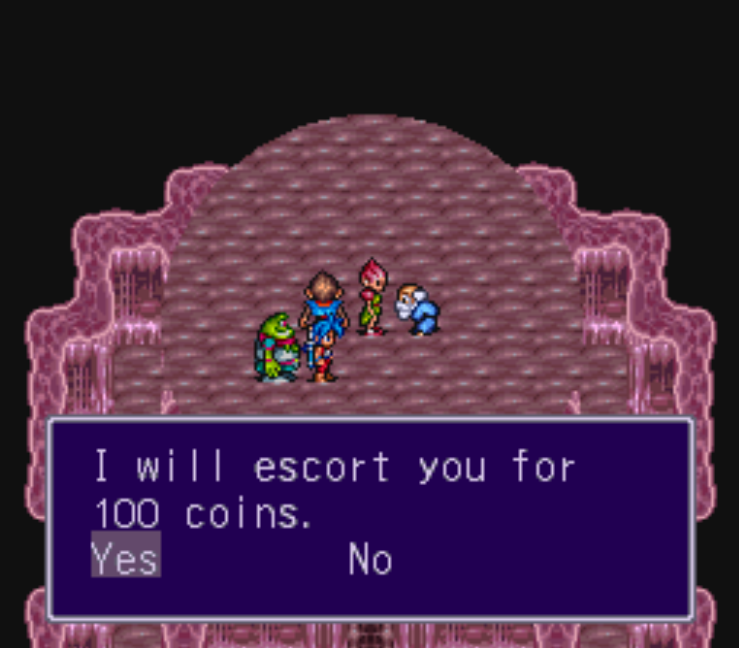
On the first floor of Memory Tower you're going to find two old men, the one in the north will offer to escort you to "the entrance" for 100G. Say yes the first time because the second time you ask the price will be 1000G. There is no other way of getting into the middle of this floor, you must pay him. Once you're in the middle talk to him again and he'll take you to "the exit" which is actually the two chests nearby. Open the chests and talk to him again to get an escort out of the dungeon. You'll need to enter the dungeon again and pay the 100G toll again, but this time we go up the stairs instead of getting the chests.
The second floor has another old man who will escort you to the 4th floor if you talk to him. However, this will skip a chest on the third floor (feel free to do this). The chest has MisoSoup in it, an item that gives you a permanent boost to Wisdom. That sounds great and all but keep in mind--if you grabbed the carpenter I told you to grab earlier in this guide you'll be able to cook food like this in TownShip. Also Wisdom sucks as a stat, probably the worst stat of them all. Don't feel bad if you skip this chest.
All in all this dungeon kind of sucks to navigate since it messes with your field of vision, what you're looking for is a single old man on the top floor. When you speak with him you'll trigger a boss fight. The boss is pretty easy, once you beat him use Exit on Spar to get out of this mess. Return to the village of kids and speak with the one kid in the item shop on the bank side. He will give you an option of leaving the dream world, accept this and you will get a scene.
Gandaroof will give you four dialogue choices when you speak to him, the only one you need to hear is "Green". All this running around for a few sentences which basically amounts to--go south and find some people. Exit to the World Map and head south across the bridge. You'll enter a new area, talk to the guy here for a dialogue flag about SkyTower.
Warp to Capitan and go south until you hit the beach. Call Grandpa and ride him a little south until you see the SkyTower in the ocean (pictured below). The tower looks extremely small, it takes up just a single tile of the World Map.
In front of Grandpa is SkyTower. Sail south of Capitan to find it.
Speak with the fishman at the top of SkyTower and tell him you want access to the dungeon. This place has underwater and above water portions, you have 3min from the time you go underwater to find a room with air in it again. This time ticks down during battles too, so it's best to try and be quick during combat. Or use items like Smoke to avoid combat.
When you enter the dungeon portion of SkyTower go east first, the first room in this area will be a shop which has some powerful equipment for you. If you continue further past this shop you will find a linear dungeon portion which leads to two chests, one has a GoblinSD (an upgrade for Ryu) and the other has SpiritRB (an upgrade for someone). Getting to these chests with enough time to get back is going to be difficult, I looted the second chest with 1:50 left on the meter. Oddly enough I had no encounters on the way back, which maybe intentional.
Back at the dungeon's entrance, west is the correct route for going deeper in. You're looking for a room with water currents circling a staircase. The way these currents work is you can walk against them in a straight line until you turn, then it will sweep you away. So walk up the water current and make sure you turn into the stairs. There will be a few more linear rooms, one will have treasures. At the top of this tower you'll find a girl named Spoor, she is actually a Wind Shaman and will be joining us in TownShip!
This next part is optional but highly recommended. Return to TownShip and fuse Spoor and Seso with Spar. If you're using Sten, fuse Sana with him again. Alternatively, you can fuse Spoor and Sana with Sten if you'd like (this will also change his appearance). I normally use Spar as my healer though so I try to keep her as Sprite at all times.
Many other fusions I didn't list exist, these are just the ones I typically use. My party is Ryu, Jean, Sten and Spar. For this next part you'll need to have Jean and Spar in your party too, because we're going back to that Fog Valley place.
Continue to Breath of Fire Walkthrough (Chapter 3)
Return to Breath of Fire Walkthrough (Chapter 1)