
Mega Man Legends Walkthrough Chapter 1
You begin the game of Mega Man Legends inside of the Mystery Ruins dungeon – this will serve as your tutorial and introduction of the game. As you explore the dungeon you’ll be in constant contact with Roll who is your companion and partner in crime throughout this game. Pay attention to her tutorials if this is your first time playing the game, she’ll break down pretty much all you need to know.
This entire dungeon is straight forward and you don’t need any guidance from me considering that Roll is giving you all the guidance you’ll need. One thing that I think is worth mentioning – each time you defeat and enemy in this game they’ll drop Refractor Shards. These shards come in all different sizes and colors and they will serve as the money throughout this game. A good rule of thumb is the bigger the shard the more Zenny that it is worth. Zenny is the currency throughout Mega Man Legends.
While exploring the dungeon you will eventually encounter a boss by the name of Club Reaverbot, he’s a pretty easy boss and only has a single attack. The strategy you use for this boss will be the same for most enemies you fight throughout this game. Focus on dodging the attacks and get in as many blaster shots as you can when you have the opportunity.
After you defeat the boss exit the ruins and you’ll get a cutscene; once the scene is over you’ll find yourself in a new area called Kattlelox island. This location is where the rest of the game will take place so it won’t hurt for you to spend sometime getting acquainted with your surroundings. I’d recommend you talk to everyone in this area to get some additional details including the small monkey-like creature which is named Data. Data has a few different options available including the ability to save your game and to restore your energy (health).
When you are ready to proceed with the story you’ll want to travel north towards the city to trigger a scene. A police car will come racing your way, after you regain control of Mega Man you’ll want to return to the crash site and speak with the professor for an update. Once you’re done with all of that continue north along the path again until you reach the Apple Market which is the first part of the city.
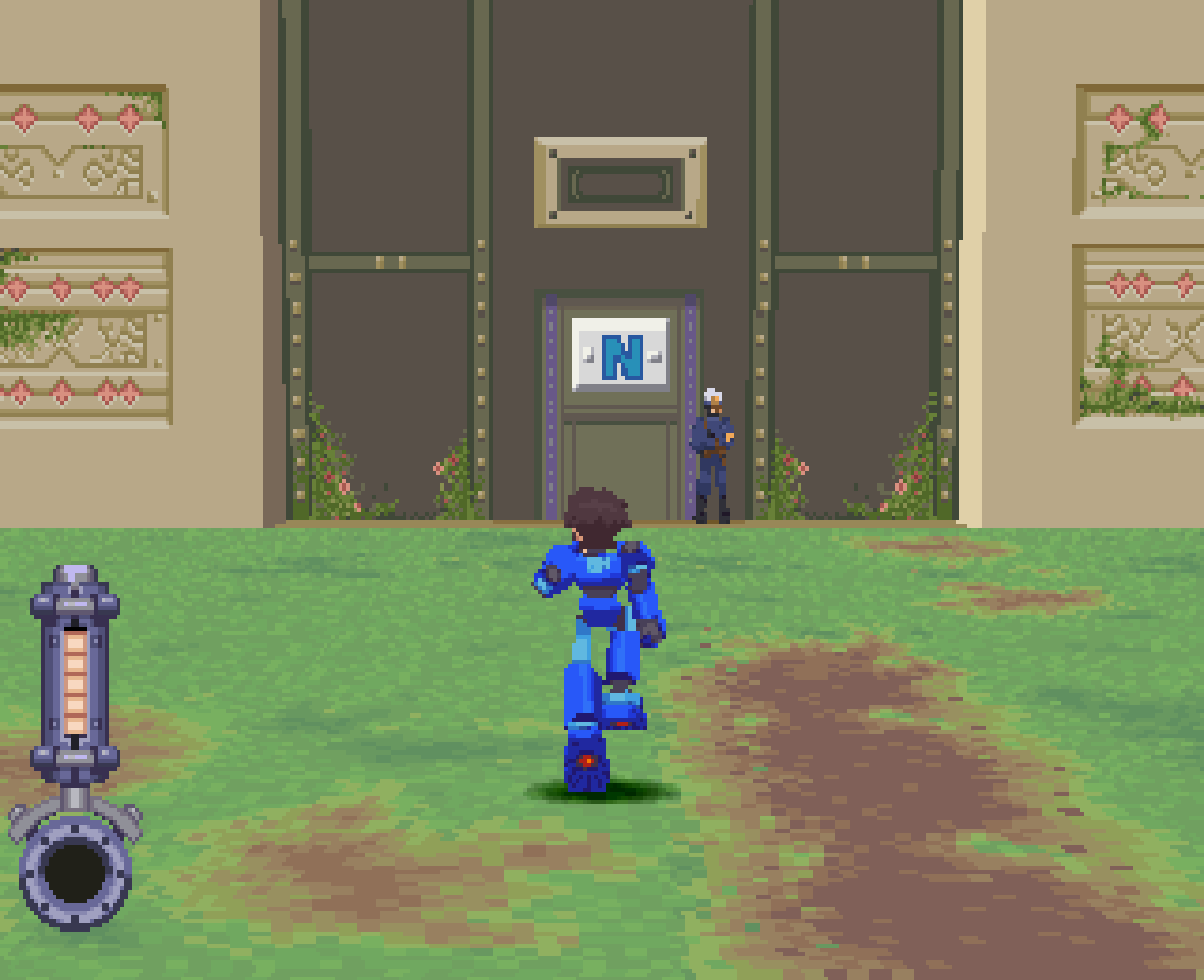
Before you enter into the Apple Market I would like to point out the large N on the front door. All of the doors in this city have a letter on them depending on what cardinal direction they correspond to. For example, since this door leads to the north it has an N on it. Since there is no compass in this game you’ll want to pay attention to the letters on each of these doors as they’re the only help you’ll get as far as navigating the area goes.
Inside the Apple Market all you need to do in order to advance the story is enter the Junk Store and speak with the woman inside. Agree to help find her husband and that will give you the story flag you need to proceed to the next part of the game. However, before you leave the Apple Market I recommend you do some exploring and collect some of the goodies scattered about the area.
Check both of the Trash Cans in this area by the S and N doors to get some extra Zenny. Also you should check the box next to the Junk Shop for 100 Zenny and the box next to the Electronics Shop for a Broken Cleaner. We’ll do more in the Apple Market in a little bit, for right now though we’re done. In the outside area surrounding the Apple Market you’ll find an entrance to Ruins 1. It’s pretty hard to miss this building as it’s the only other one in the area that you can enter.
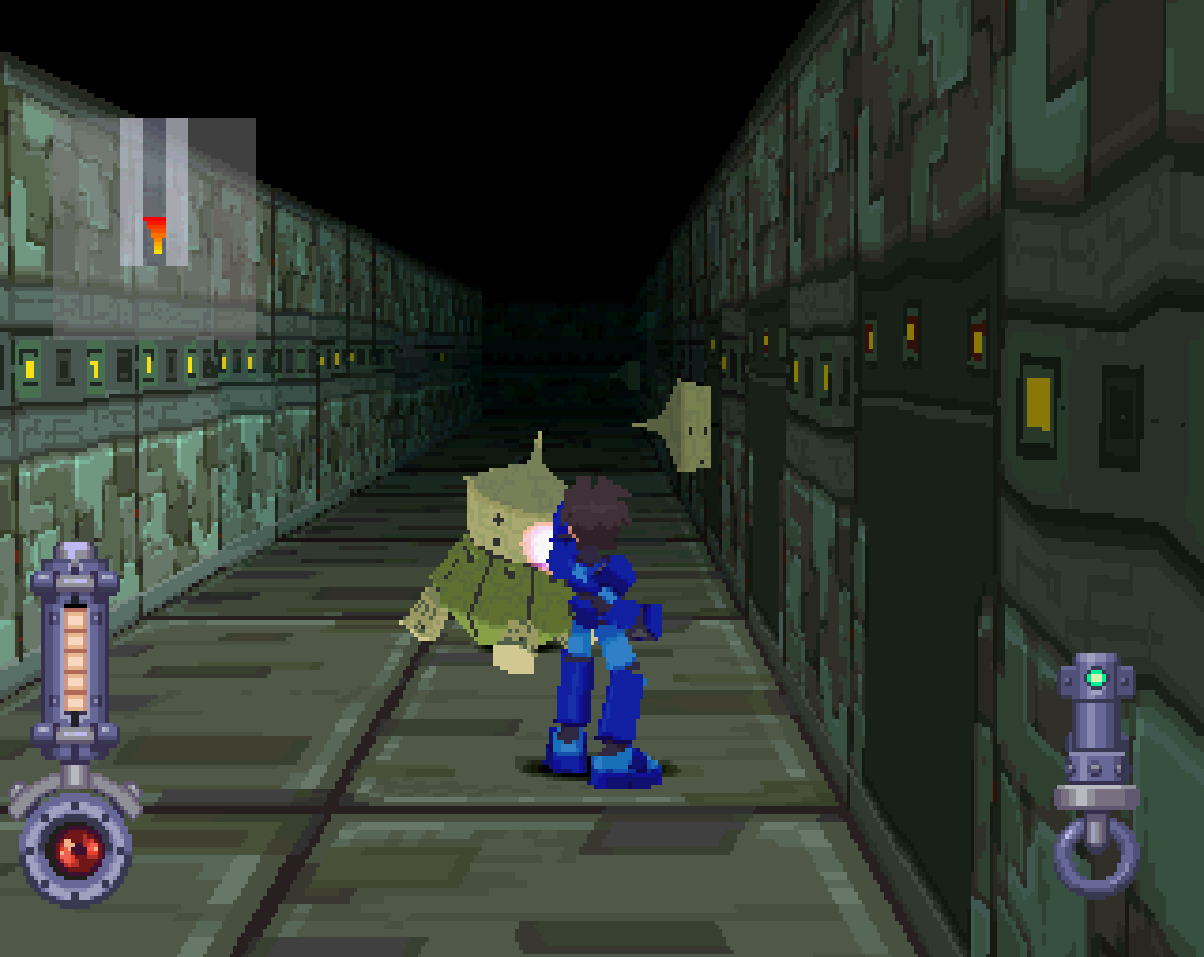
When you enter these ruins you’ll immediately start getting some dialogue of the man we’re looking for shouting for help. You can find this guy by going left after you enter the dungeon and down the hallway; this whole area is pretty linear so you shouldn’t have any trouble navigating it. The only thing I feel the need to point out in these ruins is you’ll pass a hole in the wall which you should inspect for 2,600 Zenny.
You will find the Junk Shop owner that we’re here to save on a ledge surrounded by a bunch of worm-like Reaverbots (pictured below). What you’ll need to do is destroy all of the Reaverbots in this area and then speak with the man to advance the story. He’ll thank you and then run off back to town. If you go through the nearby doors you’ll find a treasure chest with a Rapid Fire upgrade that you should equip to Mega Man now.
Once you’re done exploring inside of these Ruins you’ll want to return to the entrance and interact with the bluish green ladder to leave. Return to the Junk Shop in the Apple Market and speak with the owner’s wife to complete this task and get your reward. Your reward is the Mine Parts Kit, permission to use their Spotter Car and access to the Junk Shop.
Head back outside of the Apple Market and speak with Roll outside of the Spotter Car for a scene and some dialogue explaining what the Spotter Car does. Roll will take the Mine Parts Kit that you have and turn it into the Splash Mine Special Weapon; you can use this special weapon by pressing the Triangle button. When you exit the Spotter Car you’ll be approached by a cop who gives you the Citizen’s Card item that allows you to access the rest of the city.
Return to the Apple Market and approach the kids by the northern door for a scene. To get them out of the way you’ll have to hold down the Circle button and tip-toe towards them. Doing this will eavesdrop on their conversation and get them to leave once they notice you. If you’d like to do some exploring search the trash cans in this part of town for some Zenny and a Broken Vacuum item. When you’re ready to proceed with the story continue through the northern door (marked with an N) and proceed to City Hall (pictured below).
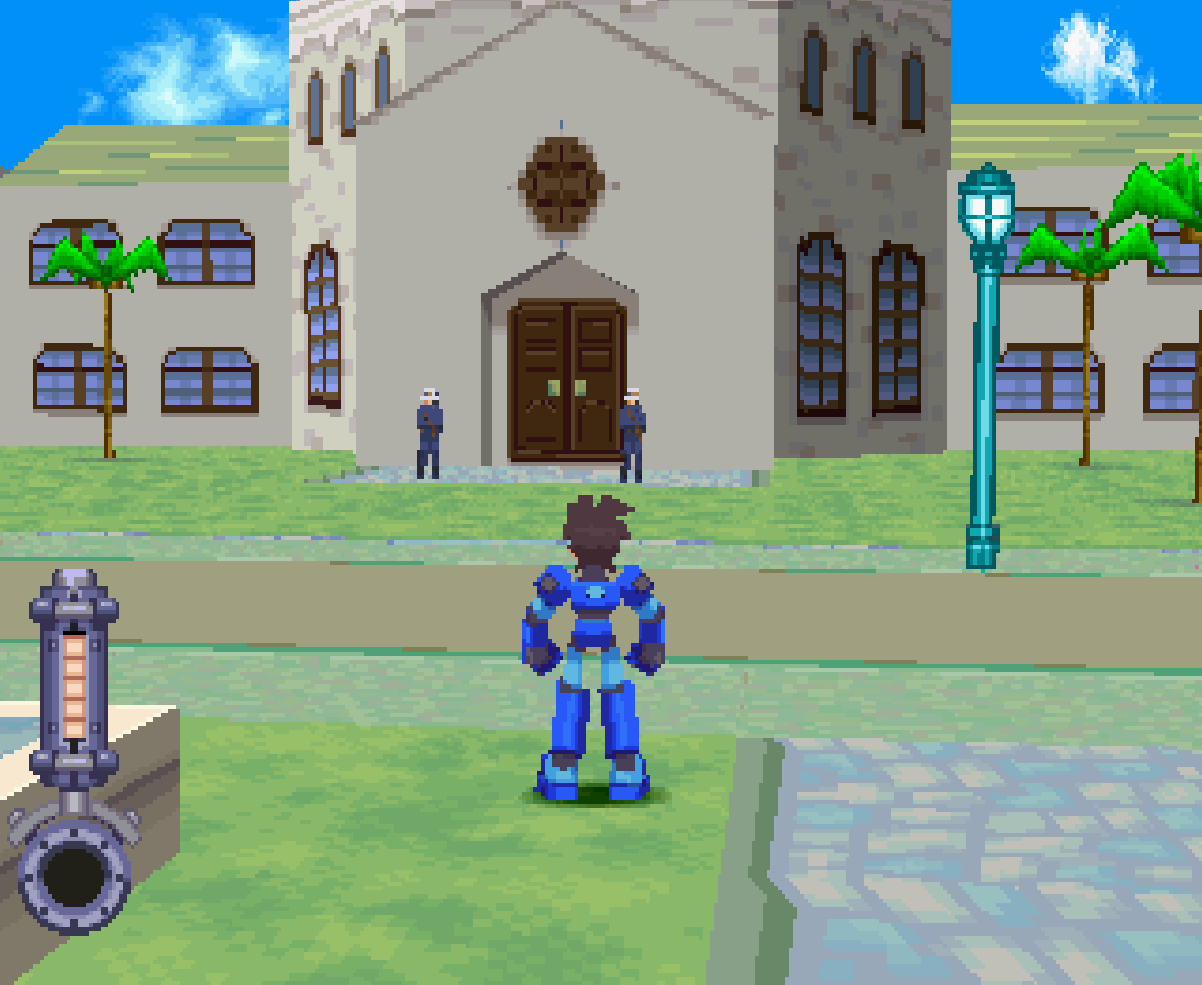
You can find City Hall in the central portion of this part of town. Once you go inside you’ll automatically get a scene with the Professor and the Mayor, Amelia. Upon leaving City Hall you’ll get another scene with Tron Bonne, this time being chased by a dog. Return to the Downtown portion of the city for another scene with Tron Bonne and the dog, this time Tron will be clinging to a light post and the dog will be barking at her.
Speak with Tron Bonne as she is hanging off the light post and then speak with the dog to advance the story. Once you’ve done this return to Roll at the Spotter Car in Cardon Forest and talk to her for a cutscene. During this scene Pirate Ships will fly into town and Roll will run off in search for Professor Barrel whose still at City Hall.
Enter the Apple Market again and this time visit the Junk Shop. You’re going to want to purchase Power Raiser d (it isn’t actually a d, it’s a symbol that looks like a d though) along with as many Life Gauge upgrades that you can get. Before doing anything else you should also return to Data (the monkey) and ask him about the Junk Shop and Shields to get the Shield Repair item. If you don’t get this item now from Data you’ll have to purchase it later from the Junk Shop.
I strongly recommend that you save your game at this time since the upcoming boss fights can be pretty difficult for new players. When you are ready to proceed with the main story you will want to go through the door leading north into the downtown area.
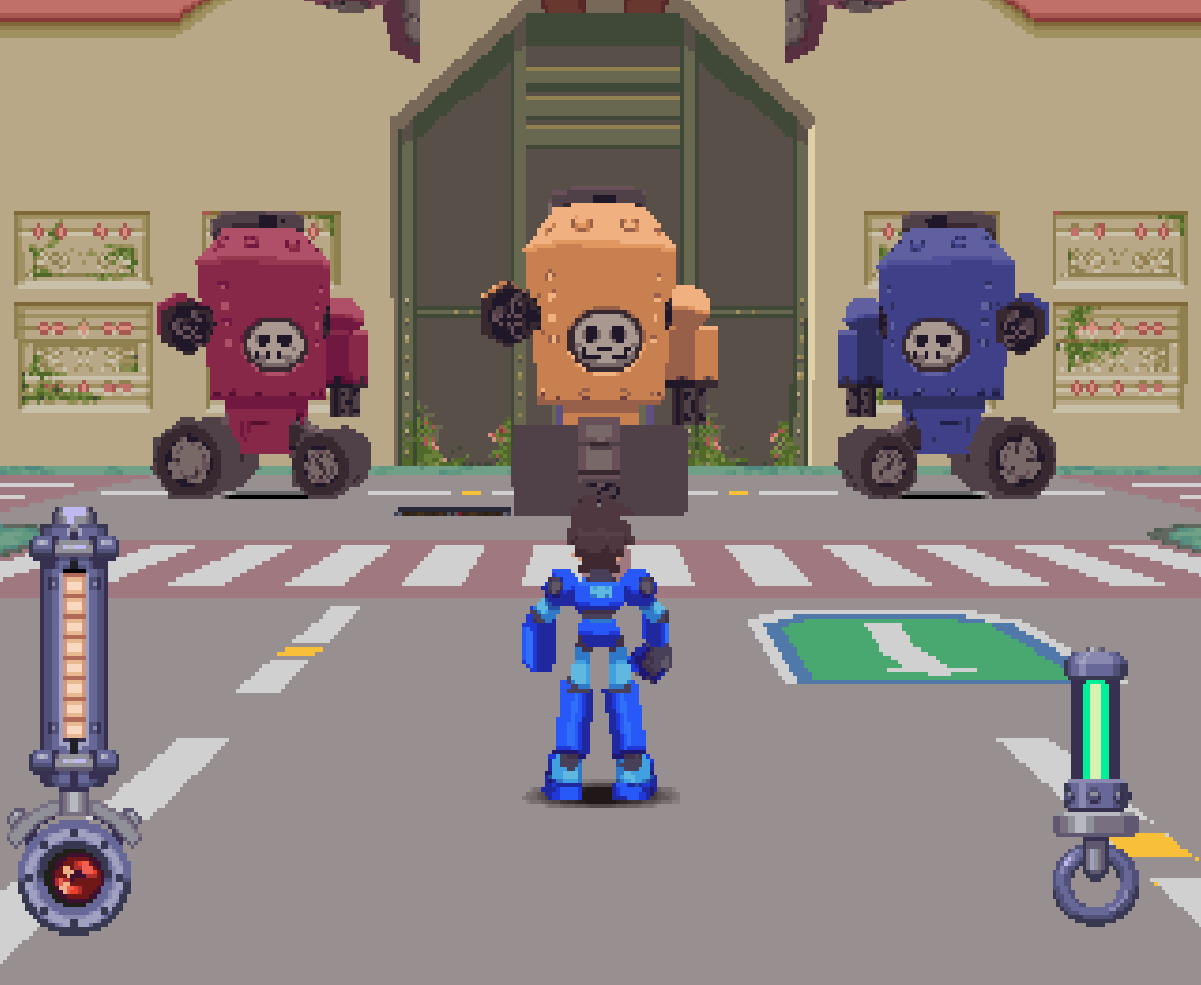
Your first boss fight will be against 3 different colored robots, one is yellow, one red and one blue. Our goal for this fight is to defeat all 3 robots and claim the key item that they drop which will allow us to access the next part of town again. At the start of this fight you’ll want to spam your Splash Mine weapon at the Yellow Robot, you’ll deal enough damage to it that you’ll likely defeat it before it even moves from this location.
With the Yellow one out of the way all that’s left is to chase the Red and Blue Robots around the town and shoot at them with your blaster or to use the remaining Splash Mines that you have available to defeat them. Throughout this boss fight you’ll also be attacked by robots from the sky but they aren’t very hard to defeat. Once you loot the Bonne Family Key from the robots you’ll complete this mission.
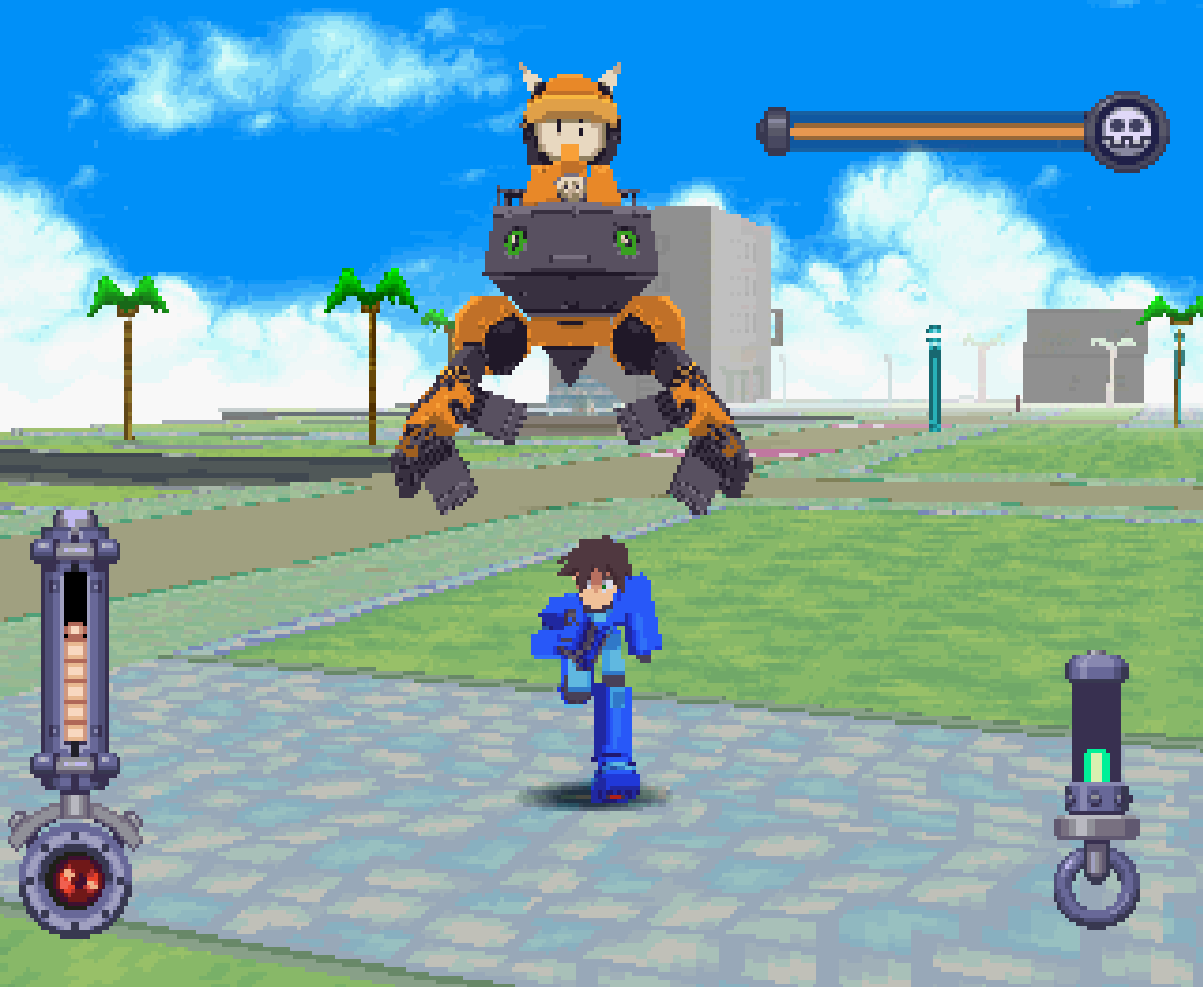
Immediately after this fight ends another will begin, this time you’re going to be fighting against a robot that’s being controlled by Tron.
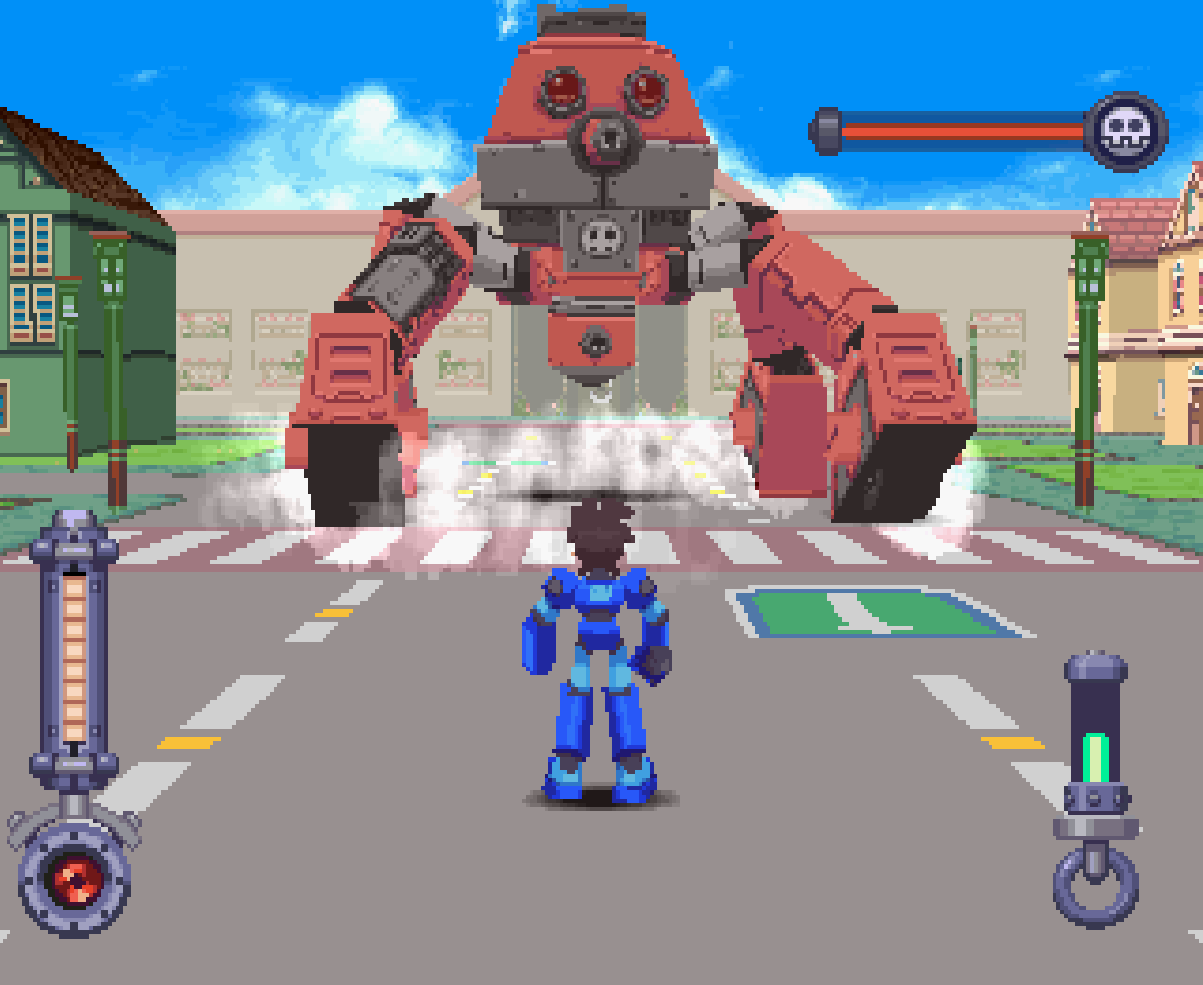
This boss has a couple of different attacks – the most dangerous of which are the AoE bombs and bullets that it shoots while spinning around in a circle. As per usual your strategy should be to dodge as much as you can and fire off blaster shots at the boss’s legs when you get the opportunity. When the boss pulls all of its legs together for the fire wave attack you’ll want to run up close and chuck a few Splash Mines at it for a lot of damage.
Once the battle is over you’ll want to head north towards City Hall and speak with Data who is standing next to the door. Use Data to replenish your Health and Special Weapon Ammo then speak with him/ask him questions until he asks you if you have any Buster Parts that boost your Range. Answer “No” and he’ll give you the Range Booster Alpha. Make sure you answer “Yes” when Data asks you if he’s a good boy otherwise he’ll take this part away from you.
Save your game and I recommend you equip the Range Booster Alpha because this next fight will be quite challenging without it.
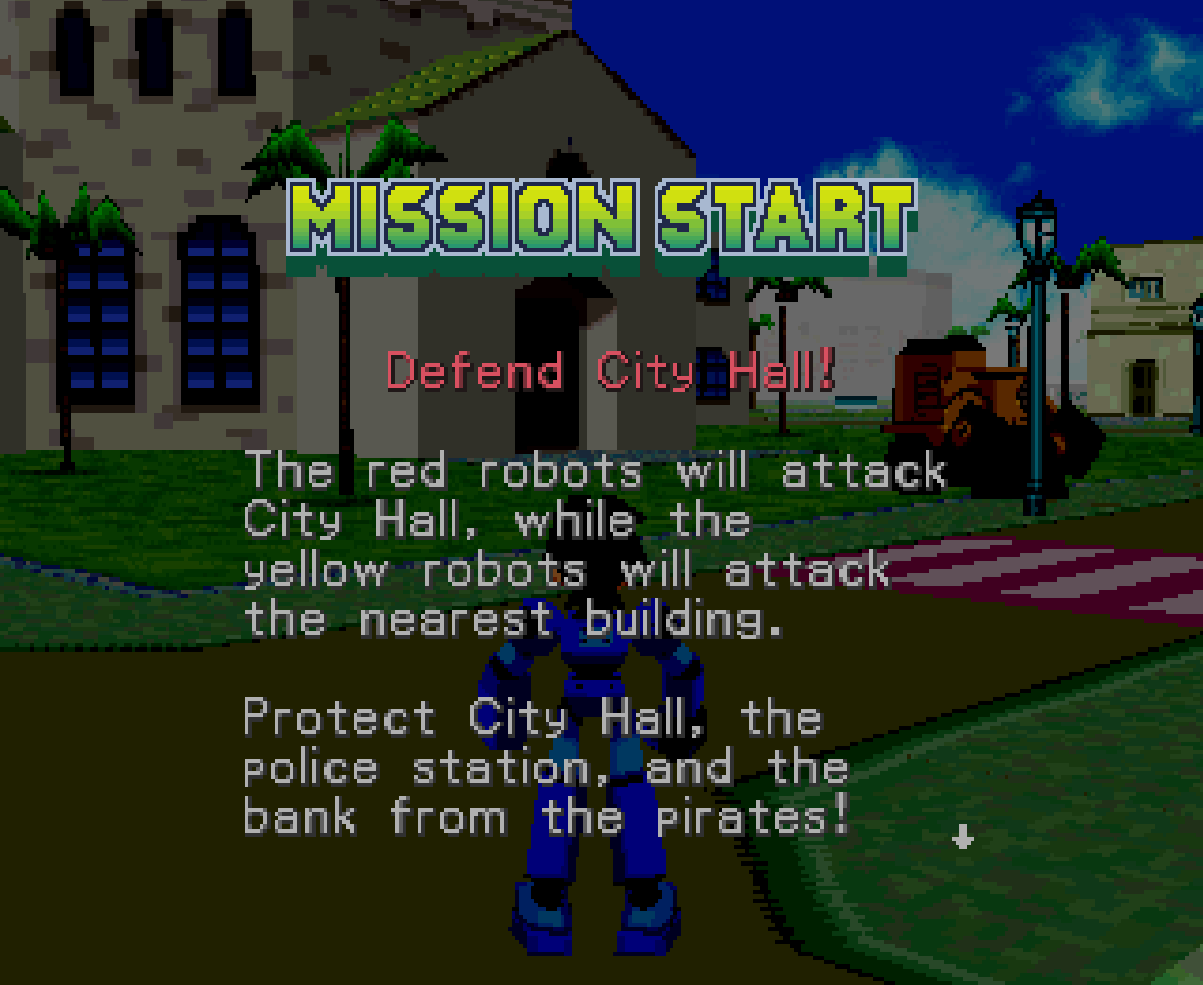
When you first arrive at City Hall there will be a scene and an explanation of how this event works. Essentially your goal(s) will be to protect City Hall and eliminate the flying robots that keep bringing in more tanks. Yellow tanks will focus on the nearest object which means you can leave them alive for a little while without much worry. Red tanks will focus solely on City Hall so they should be your first targets when they spawn.
Flying robots should be your main priority because they will bring an endless amount of tanks until they are destroyed. Unless you are using Buster Parts that boost your range you’ll only be able to hit the flying robots if you’re standing almost directly below them. You can also wait near the edge of the map for them to reenter after picking up a tank, during their reentry they fly pretty low to the ground and can be easily targeted. Use your Splash Mines on the tanks to make quick work of them when they are attacking an important building – otherwise stay focused on the flying robots since they’re the more immediate problem that needs to be dealt with.
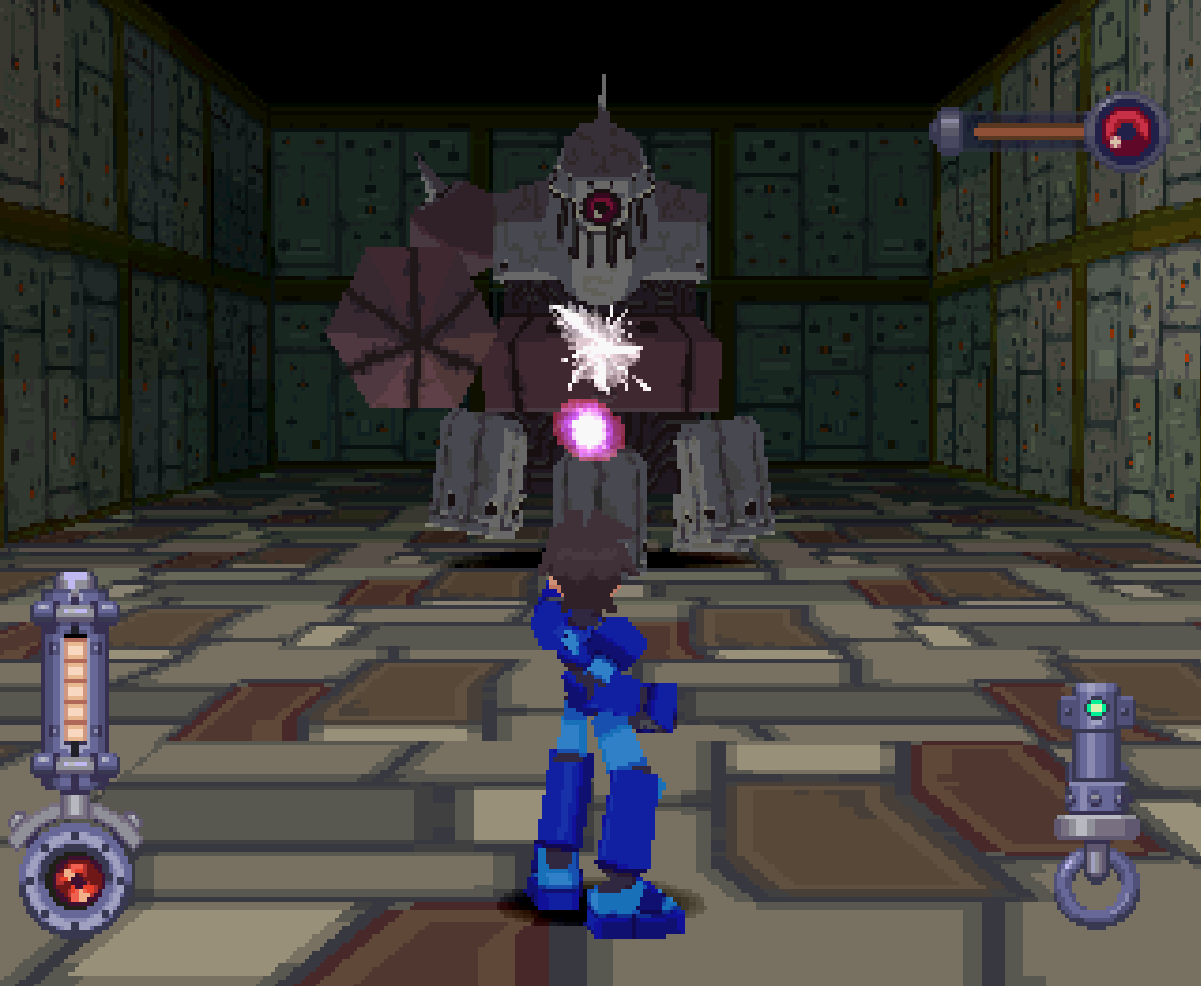
Once you complete this event you will have yet another boss fight – this time you’re going to be fighting a big robot named Bon Bonne.
Despite being the “final boss” of this event Bon Bonne is actually quite easy to defeat. His most threatening attack is homing missiles which is not easy to dodge unless you know the trick involved. The secret to dodging this boss’s homing missiles is to run directly at him when he unleashes them. Homing missiles have a very slow turn speed which will give you ample time to avoid them. Splash Mine will be useless for this entire fight so just use your blaster and keep firing.
With Bon Bonne defeated you’ll get a scene during which Mega Man will be given a Class B License by the Mayor. This will allow us to access new dungeons in the Yass Plains and in Cardon Forest. Outside of City Hall you’ll find Roll who will tell you that the Support Car has been all fixed up and is ready to roll. She’ll give you the Walkie-Talkie item which allows you to summon the Support Car to you in most areas throughout this island.
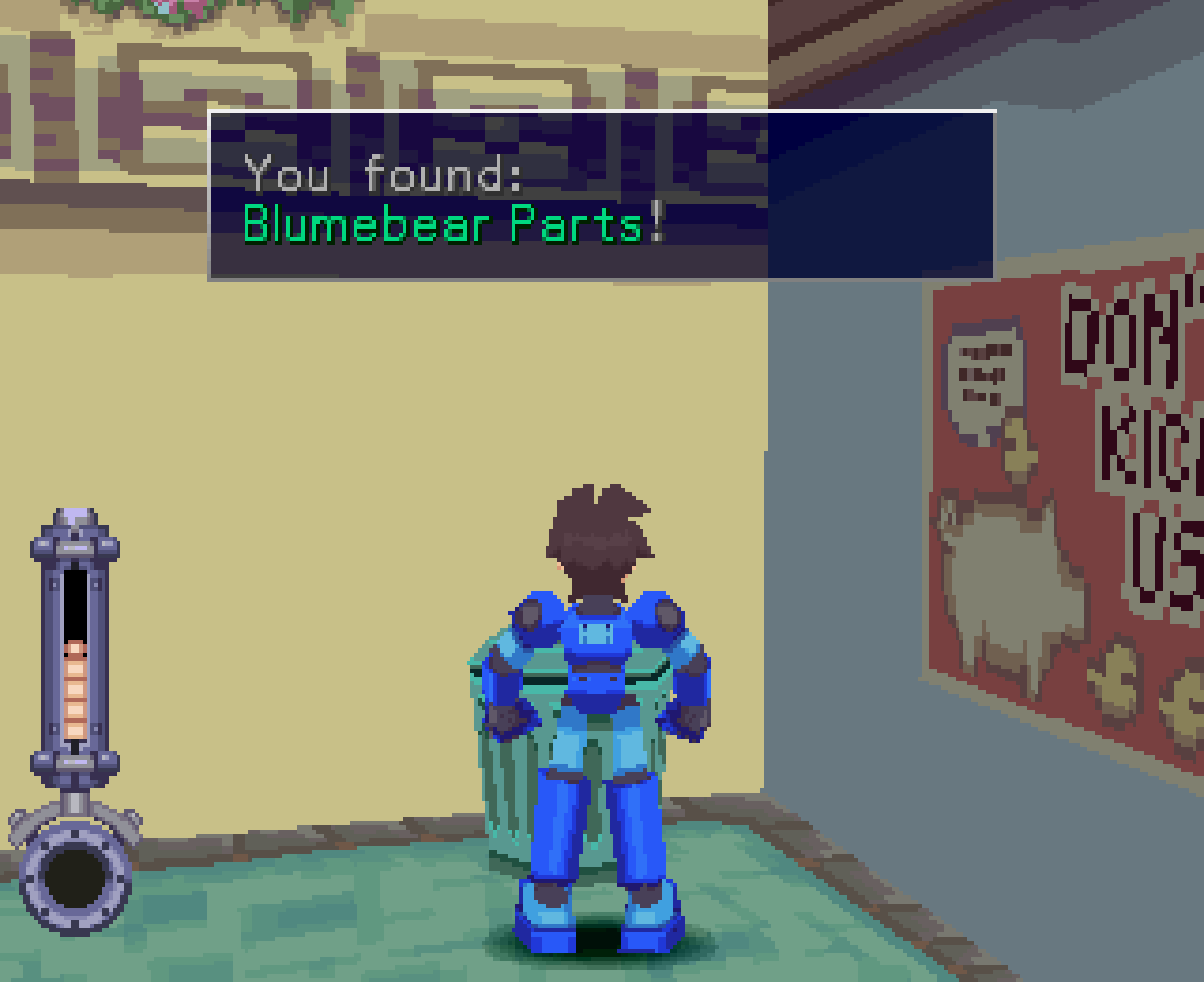
Don’t forget to speak with Data to recharge your Health and Energy while you’re inside of the Support Car. Before you continue with the story I strongly recommend you swing by the Downtown area and search the trash cans until you find the Blumebear Parts item. Take this item back to Roll inside of the Support Car to craft the Machine Buster weapon which is one of the best weapons in the game for Mega Man.
After you’ve crafted the Machine Buster weapon I recommend you spend some Zenny upgrading it to make its attack stat higher. You can upgrade other stats on this weapon too if you’d like, otherwise you should head back to the Junk Shop and purchase the Flak Jacket item for 9500 Zenny. Flak Jacket reduces all damage taken by ¼ which is insanely useful as you can probably imagine. Purchasing the Flak Jacket also unlocks Kevlar Jacket which reduces all incoming damage by 1/2! You’ll probably have to wait until you get more Zenny to buy this item though.
With all that out of the way you will want to return to Cardon Forest (where our adventure first began on Kattlelox Island) and enter Ruins #2. You can find the entrance of Ruins #2 just a tad bit south of where our ship crash landed.

Most of Ruins #2 will be inaccessible to us right now since we can’t get up onto the ledges so instead just follow the linear path which will lead you to Ruins #3 instead. Much like with Ruins #2 our path here will be quite linear, there will be a chest you can grab with 2,280 Zenny inside of it but otherwise you’ll just want to continue to Ruins #4.
If you’d like a more detailed map of these ruins and where you can find all of the treasures check out the map I have provided below. Click on the map to enlarge it so you can see everything easier. For the most part right now these dungeons will all be extremely linear since all of the side areas are inaccessible to us.
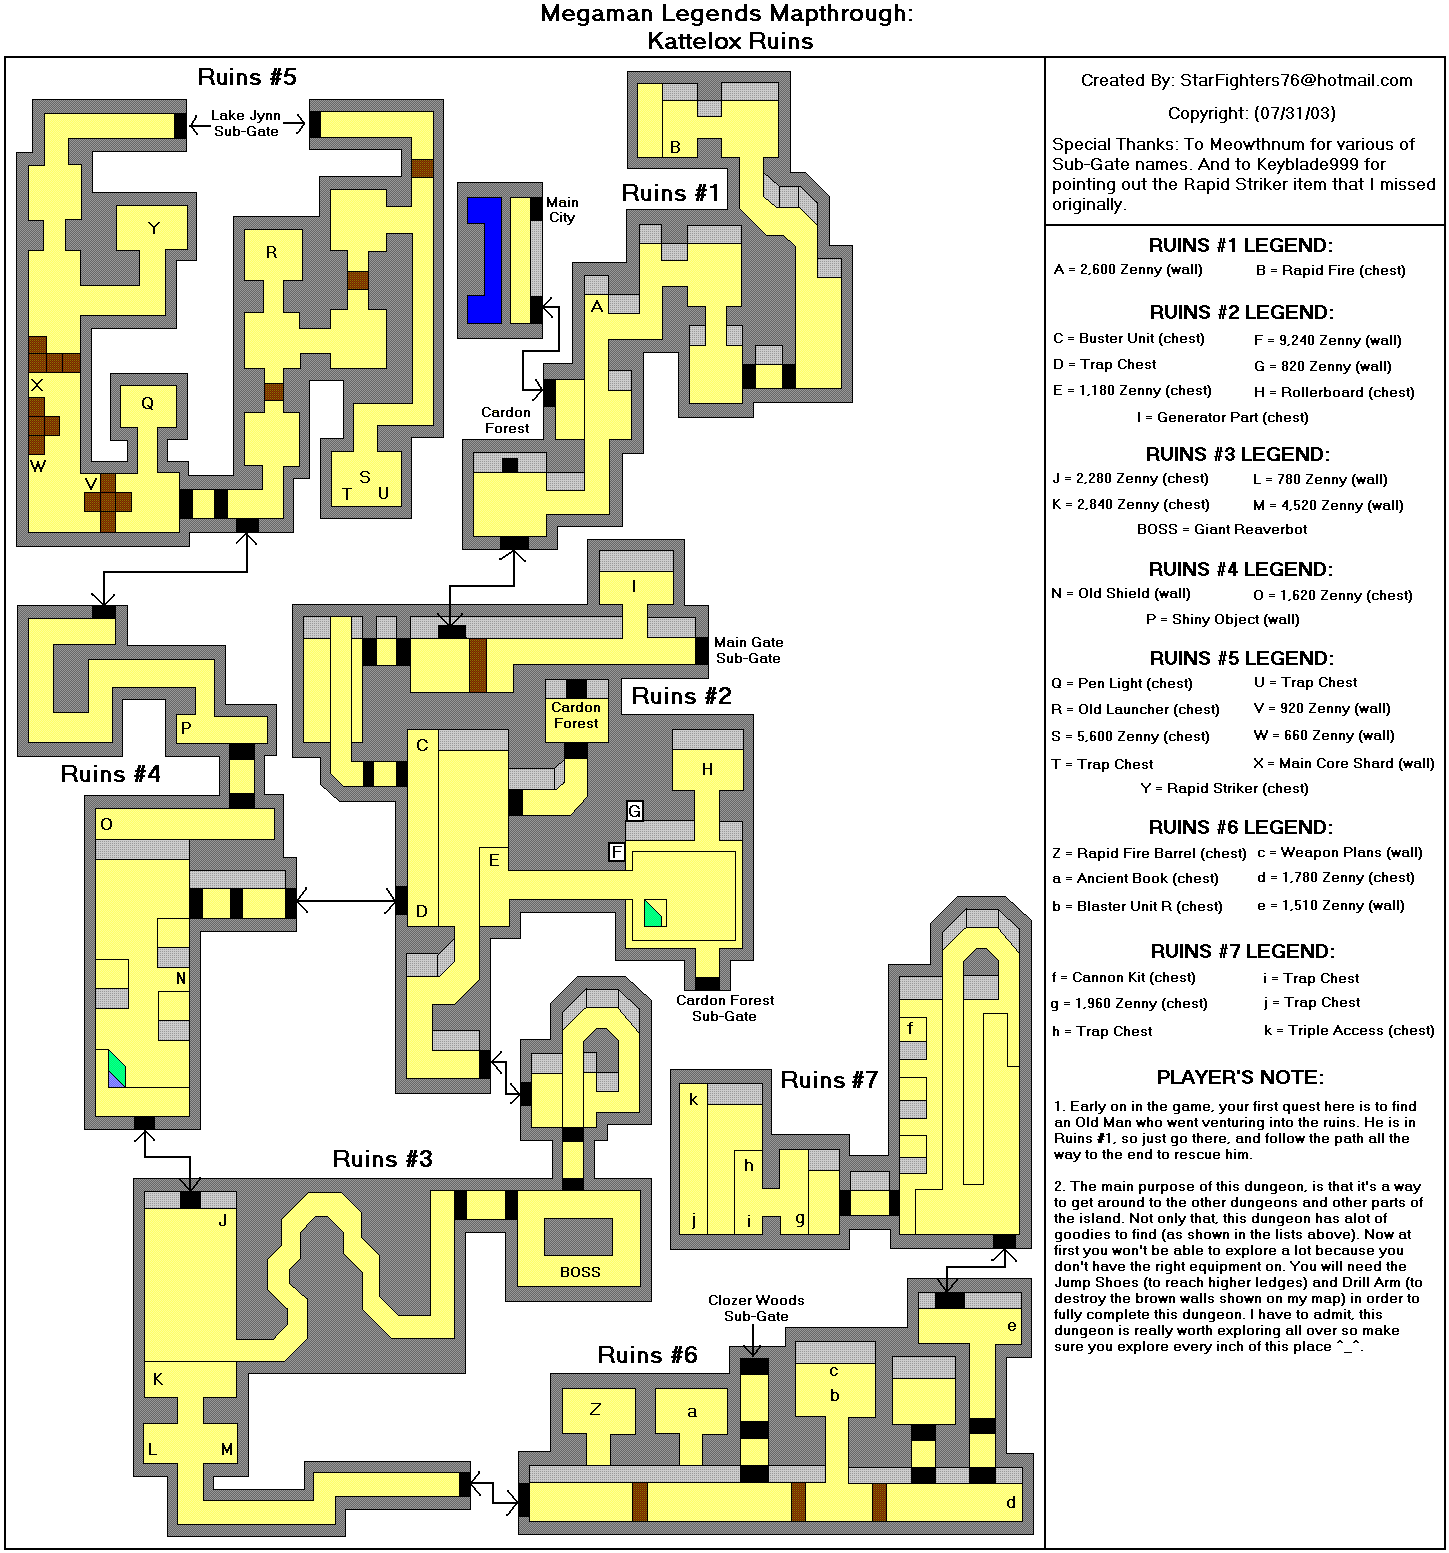
Full credit goes to the original author of this map. Click to enlarge map.
In Ruins #4 make sure you grab the Old Shield item which is found by searching a hole in the wall, otherwise continue along the linear path back to Ruins #2. This time you’ll find yourself on a raised platform with 2 treasure chests – the southern chest is a trap but the northern one contains a Buster Unit which you should definitely grab. Again, follow the linear path and you’ll find yourself back at the entrance of Ruins #1 which is where we’ll be exiting.
Tip: Use the Walkie Talkie to call Roll and fast travel to City Hall to save some time!
Our next destination is the Yass Plains which you can find by going through the northern door located behind the City Hall in the map of the same name. While you’re in the Yass Plains the most important thing you’ll want to pick up is the Safety Helmet item which you can find by inspecting a box outside of the Junk Shop on this map. Roll will be able to make Mega Man’s Helmet with this item which not only is a fantastic item – it also finally makes us look like Mega Man!
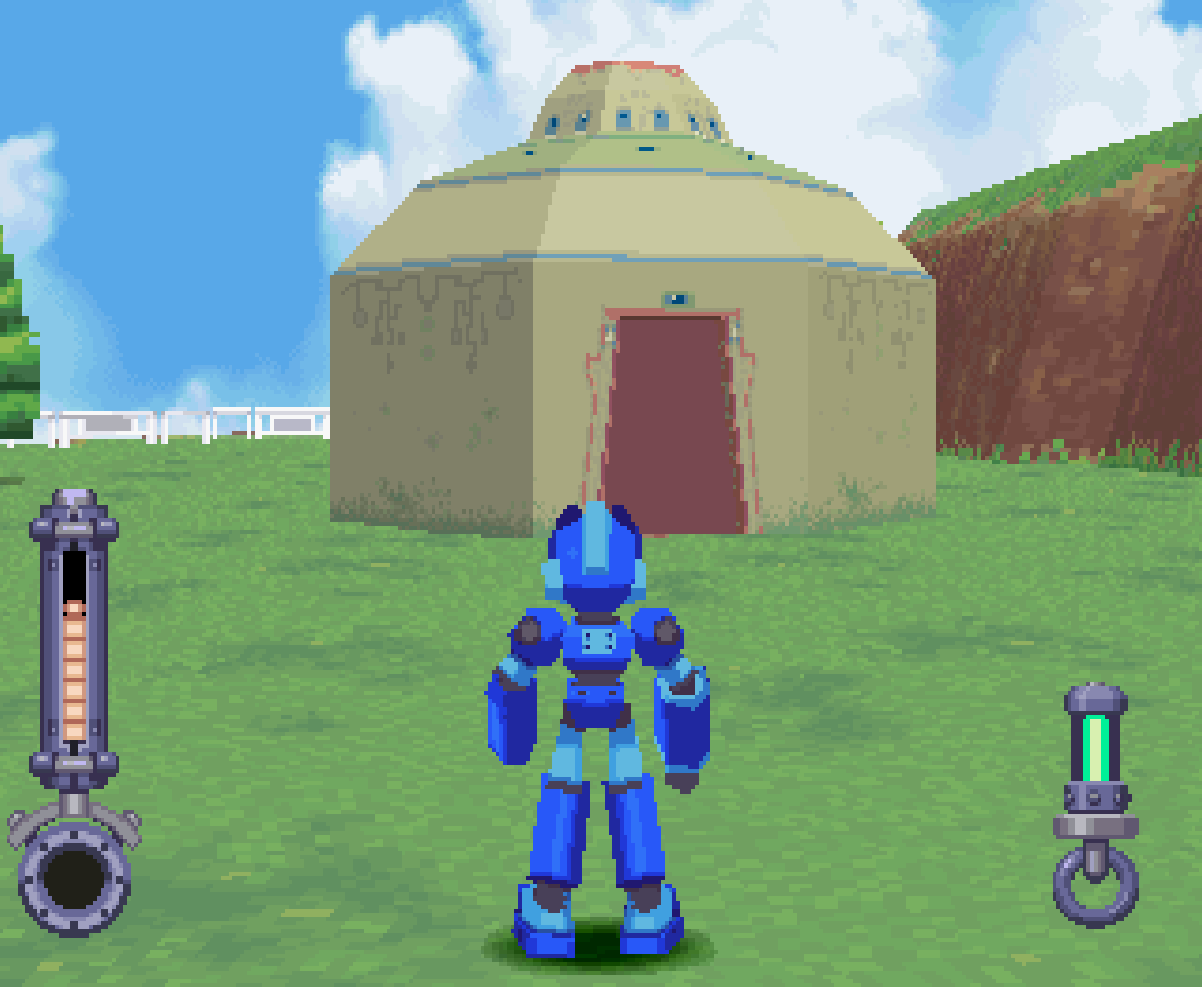
At the far end of the Yass Plains you will find a tunnel that you can travel through to reach the Clozer Woods area. There is a Ruins entrance in this area (Ruins #6) for you to explore and another tunnel you can go through which will lead you to another story boss. Standing next to the entrance of this tunnel is Data, he’s a good landmark that lets you know which tunnel is which in the area. I recommend you explore the Ruins first to get that out of the way. You’ll only have access to a small portion of the ruins at this time so it won’t take very long to explore it.
Note: In the area outside of Ruins #6 you’ll find a Flower on the ground that you can pick up. This item can be given to Roll by selecting Talk while you’re in the Support Car.
Inside Ruins #6 you’ll find a treasure chest with 1,780 Zenny along with a trapped chest that you’ll need to eliminate. There will also be a hole in the wall you can examine for another 1,510 Zenny. Head through the doors in the northern portion of this area to enter into Ruins #7. All you can do in Ruins #7 right now is grab the Cannon Kit by jumping across the ledges – once you have this item you’ll want to exit the ruins the same way you came in.
Before challenging the next boss you may want to call up Roll and have her craft you some new items – you can turn the Cannon Kit into the Powered Buster and the Safety Helmet into a Helmet. Remember that you will have to equip the Helmet to use it (and equip the Flak Jacket from earlier if you haven’t already). When you’re ready to proceed to the next boss travel through the tunnel next to Data and head down to the quarry.
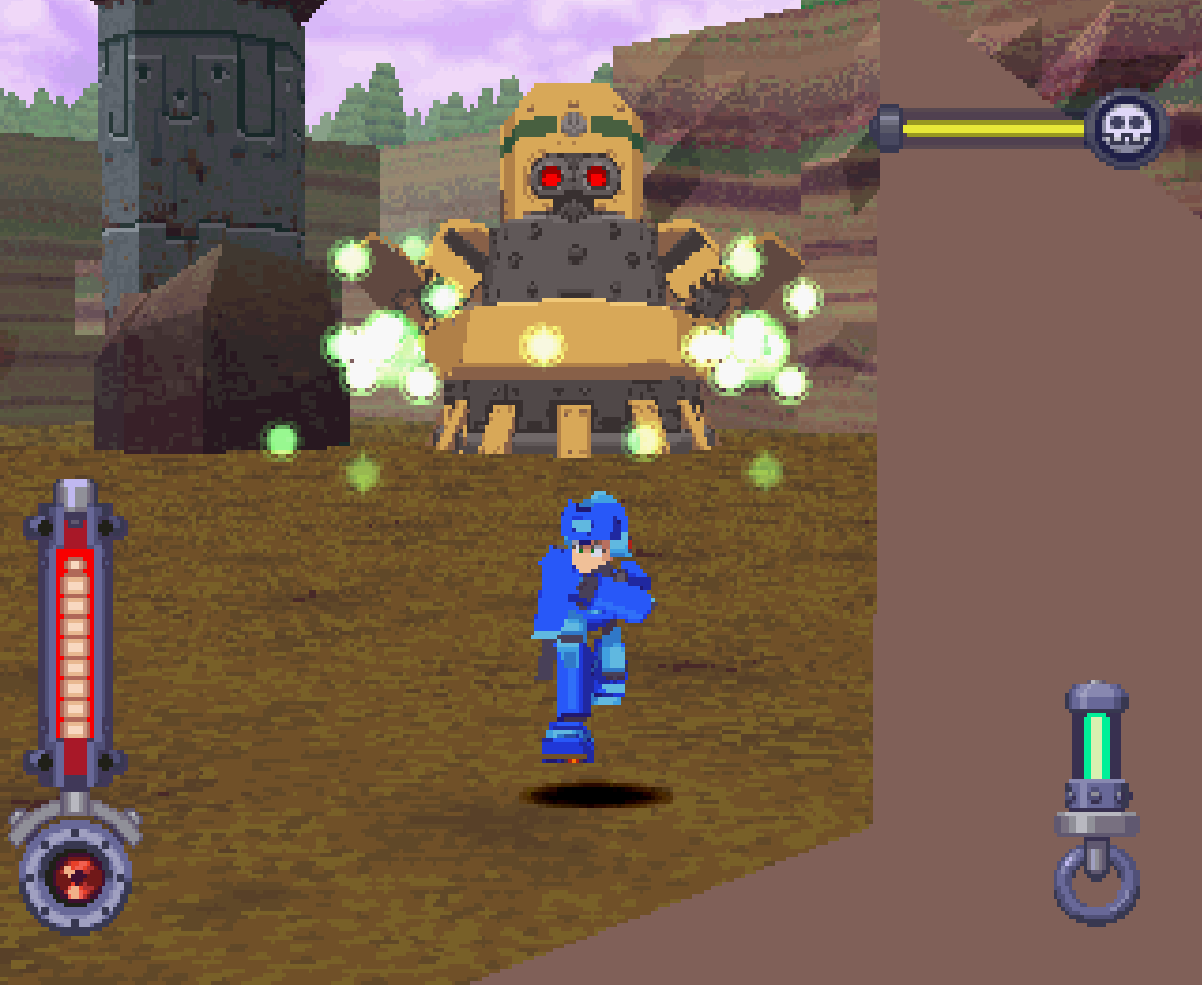
Marlwolf is the name of this boss and unlike all of the previous bosses you’ll need a unique strategy to defeat this one. What you’ll need to do is shoot at the tank treads while you’re on the ground until you see them start to smoke and the machine starts to move much more slowly. Once this happens you’ll want to climb onto the nearby ledges and wait for Marlwolf to get close enough that you can jump on top of it. While you’re waiting for Marlwolf to get close to you I recommend trying to shoot at the hatch on the back of the machine.
Throughout this fight the hatch will open from time to time as Marlwolf uses different abilities – the best strategy to damage it is to jump on its back and use your Special Weapon while aiming at the open hatch. If this isn’t an option though your next best bet is to shoot at the hatch when it opens from a nearby ledge with your buster.
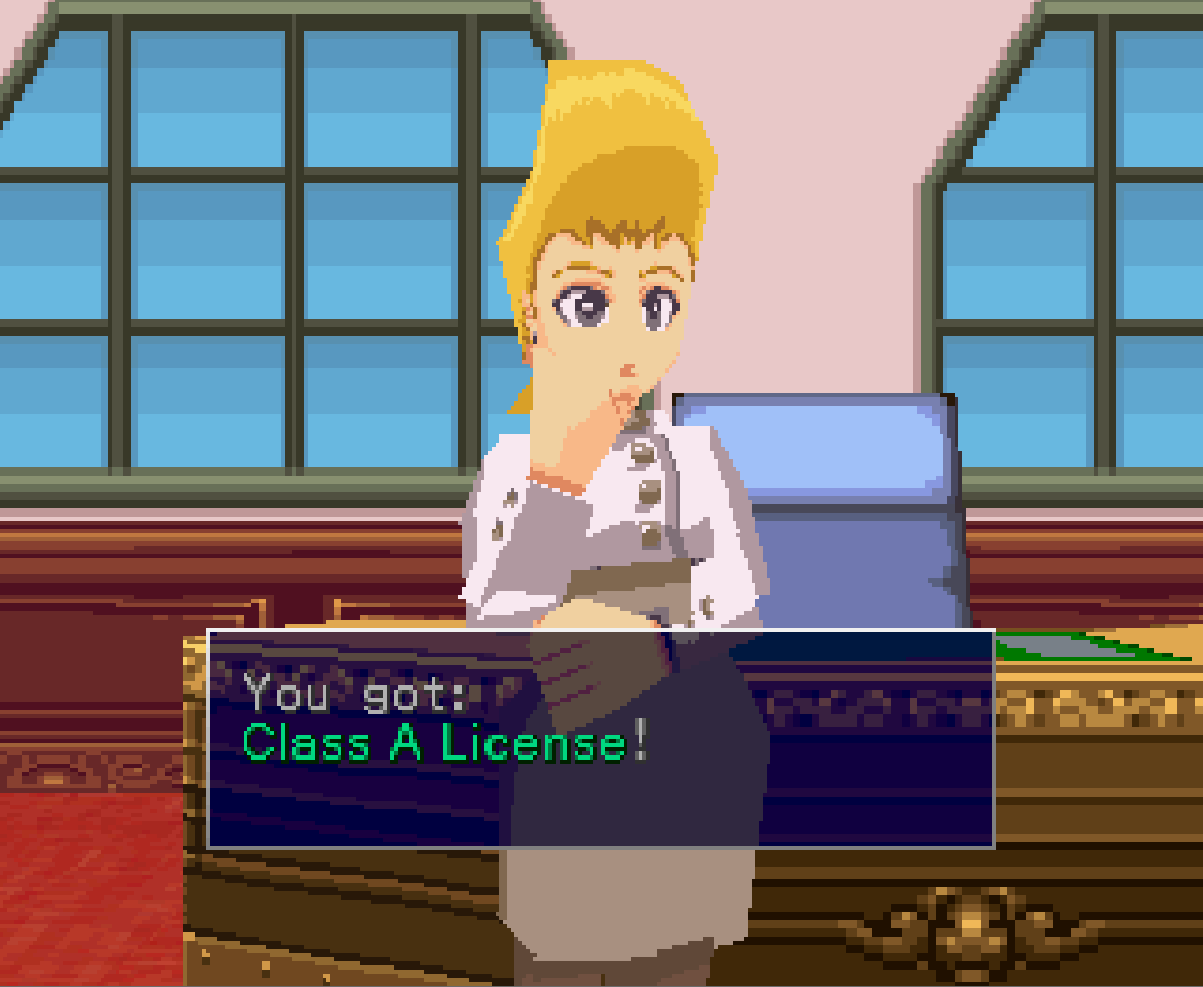
Once you’ve eliminated Marlwolf climb out of the quarry and you will be contacted by Roll who asks you to return to City Hall. Back at City Hall the Mayor will give you a Class A Digger’s License which will allow you to access the Sub-Gates on Kattlelox Island.
Before we proceed to the first Sub-Gate you’ll want to visit the Uptown portion of town and loot some trash cans. You can reach Uptown by first going to Downtown (the middle portion of town) and going through the western gate. The trash can we’re after is next to the Hospital, inside of it you’ll find the Broken Propeller item which is one of 3 needed items to make the Vacuum Arm.
The Vacuum Arm will allow you to suck up Zenny from a distance but comes with the obvious downside that it takes up your Special Weapon slot to use it. Usually it’s best to use this weapon when you are grinding/exploring and you know that there won’t be any tough fights coming up. While you’re still in Uptown there are multiple Side Quests that you can complete too – if you’re interested.
For more information about the available Side Quests and how to complete them follow the link provided below. You can win some decent items and some Zenny by completing these quests, the choice is ultimately yours.
Continue to Repairing the Town Side Quest Walkthrough
Requirement: Defeat the Pirates attacking the town
Continue to KTOX Mini Games Walkthrough
Requirement: Acquire the Class A Digger's License
Continue to Museum Donations Side Quest Walkthrough
Requirement: Unlock Uptown and help the Curator
Continue to Chapter 2 of my Mega Man Legends Walkthrough