
Chapter 9 Walkthrough for Baldur's Gate: Siege of Dragonspear
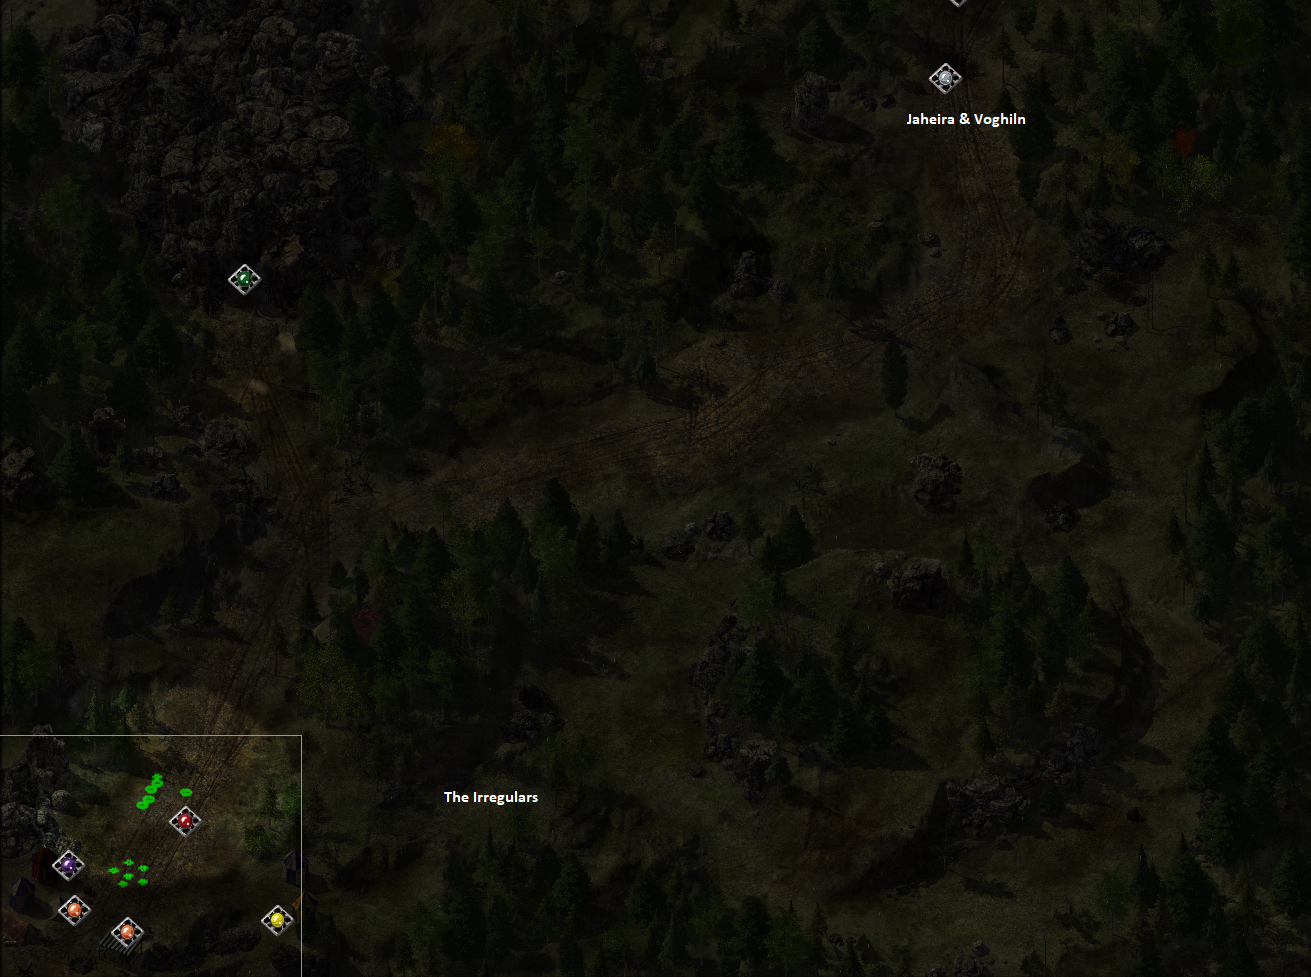
Chapter 9 begins with you at another Flaming Fist Camp, this time in the Troll Claw Woods. Speak with Lieutenant Otilda in the camp to begin The Irregulars side quest (more info on this below). Aside from this side quest there are two potential companions to find on this map, Jaheira and Voghiln who can be found in the northeast by following the path.
In this map and future maps you'll start to encounter a lot of troll enemies which can only be defeated with fire damage. When you get a troll very low life they will fall to the ground incapacitated, if you fail to deal any fire damage in a certain amount of time the troll will stand back up and begin fighting again. For those of you wondering why you can't defeat the troll enemies - hopefully this helps you out!
The Irregulars: Speak with Lieutenant Otilda in the Flaming Fist Encampment to begin this quest; you'll be tasked with speaking to 3 half-orcs a little east of camp. To easily solve this quest all you need to do is talk to Rend and agree to a duel then kill one of the orcs, the others will leave. Alternatively, when you speak to them you'll be given a few options for solving this quest, Rend wants a non lethal duel which you'll want to use your fists for so you don't accidentally kill anyone. Kava wants you to bring some him some alcohol, you'll need the Tepid Mug of Ale which is obtained from the crusader camp at Boareskyr Bridge later on in Chapter 9. Both of these options will allow you to the half-orcs to stay with the army.
After you've explored this map and cleared all that you wish to it's time to exit to the north and move to the next area - the Forest of Wyrms. There is actually quite a bit to do in the Forest of Wyrms including a couple of side quests and an entire dungeon to explore which is involved in the main story of this expansion.
In the eastern portion of the Forest of Wyrms you'll find a mountain with 2 caves on it, the bottom cave is small and contains some beetles and spiders. The top cave has the very first dragon that you'll come across in this game and connects to the Temple of Bhaal which has an item we need to advance the story. Let's start with the bottom cave since it's easy to get out of the way.
Beetles and Spiders: After clearing all of the spiders inside of the Spider Cave in the Forest of Wyrms you'll automatically begin this side quest. In the center of the cave we just cleared a giant Rhinoceros Beetle will spawn and you'll have to fight it to complete the side quest. This beetle drops 2 items that you should pick up, a Rhino Beetle Shell and a Giant Spider Leg. The Rhino Beetle Shell can be used to craft armor at Bridgefort by talking to Jegg. As for the Giant Spider Leg that's part of Neera's Side Quest The Call of the Wild Mage.
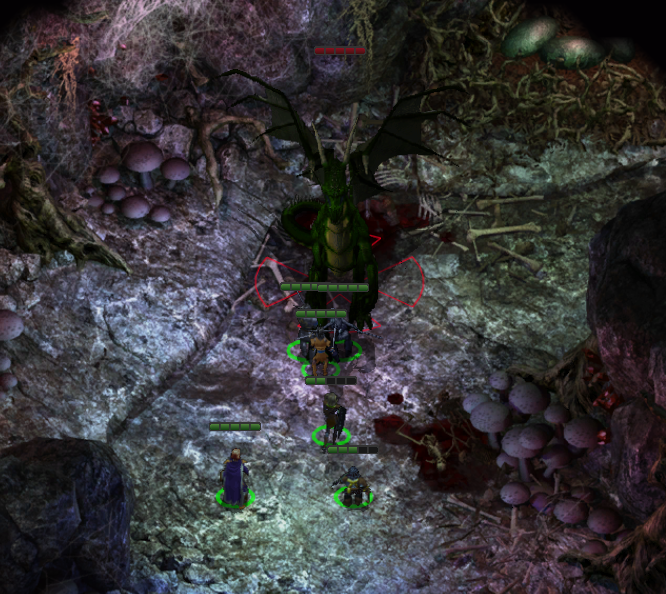
Morentherene the dragon who drops Dragon Scales
Just after entering the top cave you'll come across a large green dragon named Morentherene. You technically have 2 options, you can sneak by the dragon and continue to the eastern exit which will take you to the Bugbear Cave then to the Temple of Bhaal. Or, you can defeat the dragon and loot the Dragon Scales from her corpse which can be used to create a powerful shield or suit of armor later on in this Expansion Pack when we reach Bridgefort or in the Coalition Camp.
After passing the dragon's cave you'll find a Bugbear Cave which doesn't have much to note inside. The Temple of Bhaal entrance can be found in the northeastern most portion of the Bugbear Cave, there will be a Cultist standing outside that will talk to you before you enter.
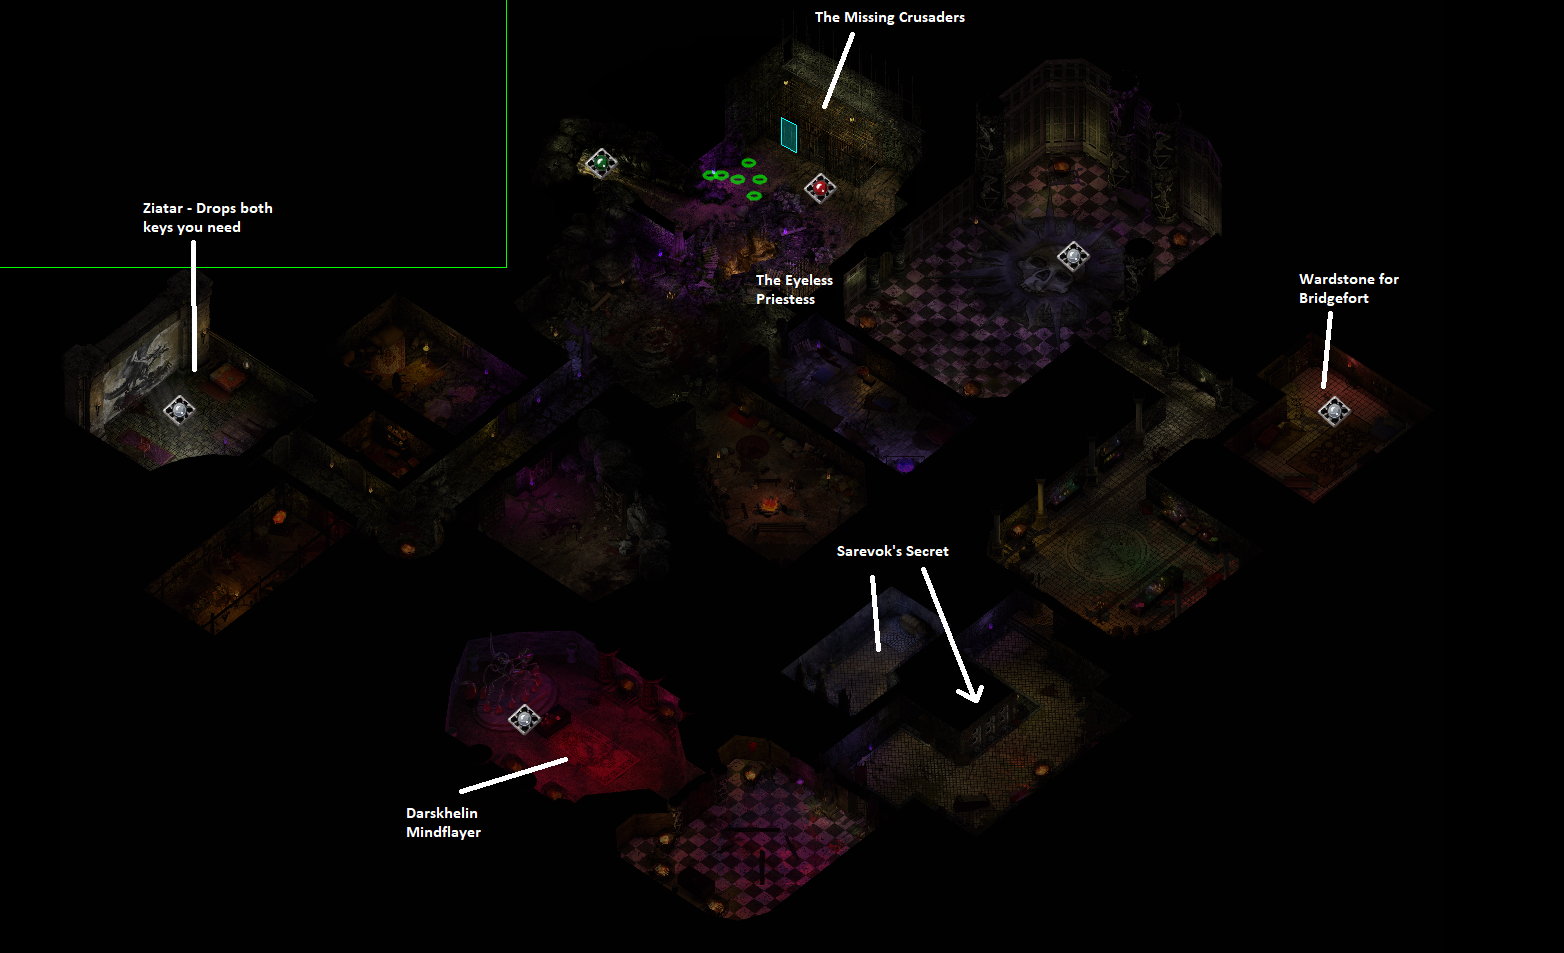
Shortly after entering the Temple of Bhaal you'll be greeted by some crusaders who have been taken prisoner as well as a lady named Madele. Both are involved in side quests which I will talk more about below. Our first goal inside of this dungeon is to defeat Ziatar in the northwestern portion of the area and loot both keys from his body. Use my map above if you need help finding anything in this dungeon.
The Missing Patrol: You begin this side quest shortly after entering the Temple of Bhaal in the Forest of Wyrms and you have 2 options. You can choose to kill the crusaders in their cage by pulling a switch which will automatically complete this quest or you can defeat Ziatar inside the Temple of Bhaal and loot the key to free them. Freeing them will get you more rewards later on when you visit the Crusader Camp. It's also one of the ways you can easily get into the camp without any guards asking questions.
The Eyeless Priestess: Much like The Missing Patrol you'll begin this side quest shortly after entering the Temple of Bhaal. Madele will talk to you and your party and you can tell her whatever you want at this time. Again, much like The Missing Patrol you need to defeat Ziatar inside the temple to retrieve the key to Madele's cell. Open her cell and you'll be given more options about what to do with her, choose whichever you want and the quest will end.
Once you've defeated Ziatar you'll want to use one of the keys you got on the door next to Madele back in the main room. This will allow you access to the second half of this dungeon which is where you'll find the Wardstone which we need to access Bridgefort along with the real boss of this dungeon, Darskhelin the Mindflayer.
All we need from this dungeon is the Wardstone which is in Akanna's possession. This Wardstone allows us to take the portal into Bridgefort and do some side quests inside there as well as continue with the main story. Before leaving this dungeon there is one more side quest that is worth bringing up too, Sarevok's Secret. If you've been following my guide since the start of this Expansion then you'll already know about this quest.
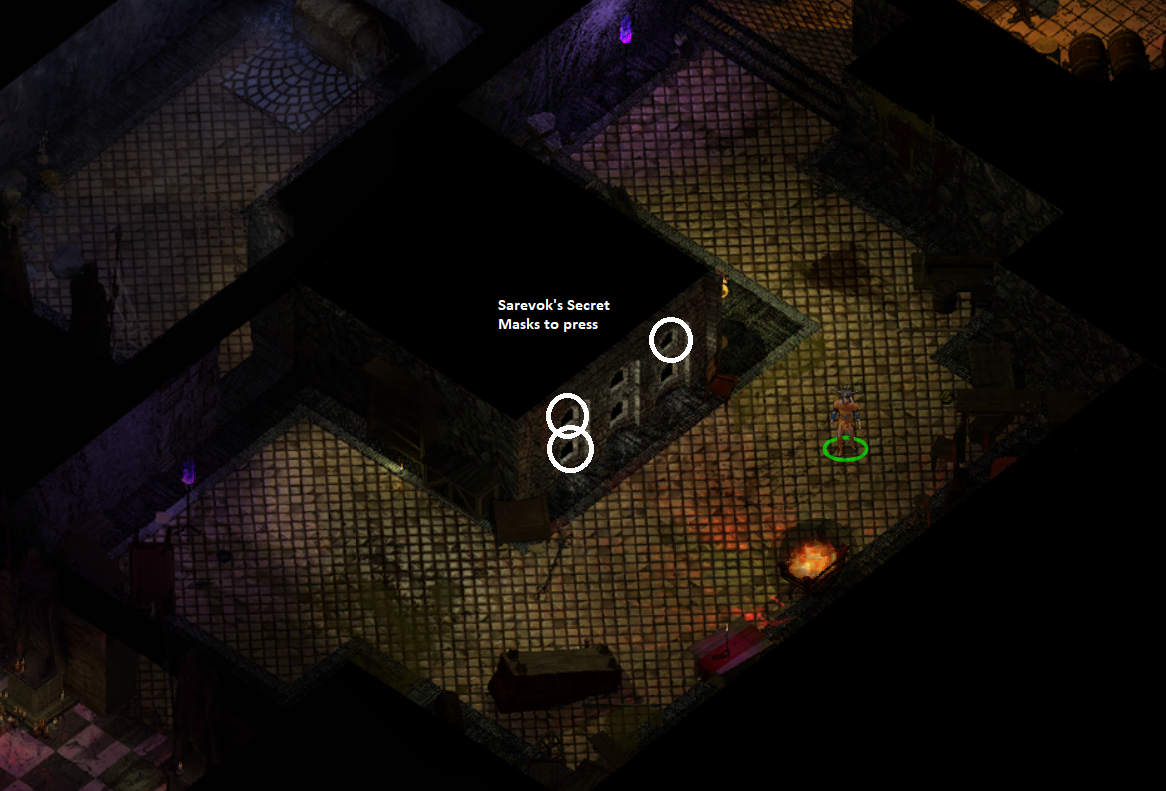
Sarevok's Secret: If you started this side quest inside of Korlasz's Tomb during the first part of the Siege of Dragonspear Expansion then you'll be able to enter a secret room in this temple. In the hallway leading to the room with the Mindflayer you'll find an easy puzzle for you to complete involving pushing some masks into the wall, a picture of this puzzle is shown below. You need to push in the upper right, upper left and bottom left masks. Do this and it'll reveal a secret room with a chest that has Fractal Blade +3 and the Godsbane book.
When you are done with the Temple of Bhaal you will want to return to the Forest of Wyrms and exit to the world map. Now that we have the Wardstone it's time to continue north to the Boareskyr Bridge map. There are 2 notable locations at Boareskyr Bridge - the crusader camp in the south and Bridgefort in the north.
You can get inside the crusader camp a couple of different ways; if you saved the group of crusaders during The Missing Patrol side quest inside the Temple of Bhaal you can mention this and be granted immediate access. Alternatively you'll have to talk your way into the crusader camp... or fight your way in. I'd recommend you hold off with fighting at this point in time because we won't be able to complete many of the side quests in the area if you do.
There are a total of 3 potential companions for you to recruit on the Boareskyr Bridge map. Dorn II-Khan is found inside a jail cell in the crusader camp and you can find Khalid and Neera inside of Bridgefort.
The first thing you should do is go up the eastern coastline and use the teleportation circle along the shore to enter Bridgefort. Here you will have some dialogue with Khalid and you'll be filled in on the current situation. To advance the story you have 2 different available methods. Depending on what you choose it will create more or less soldiers at Dragonspear Castle at the end of the expansion.
You can either surrender to the crusader forces or you can fight them head on. Regardless of your choice I recommend you wait awhile to decide so that you can do as many of the available side quests as you desire. We can take as long as we want making up our mind so don't worry. I'll cover both options in more detail later, for now let's take a look at the available side quests.
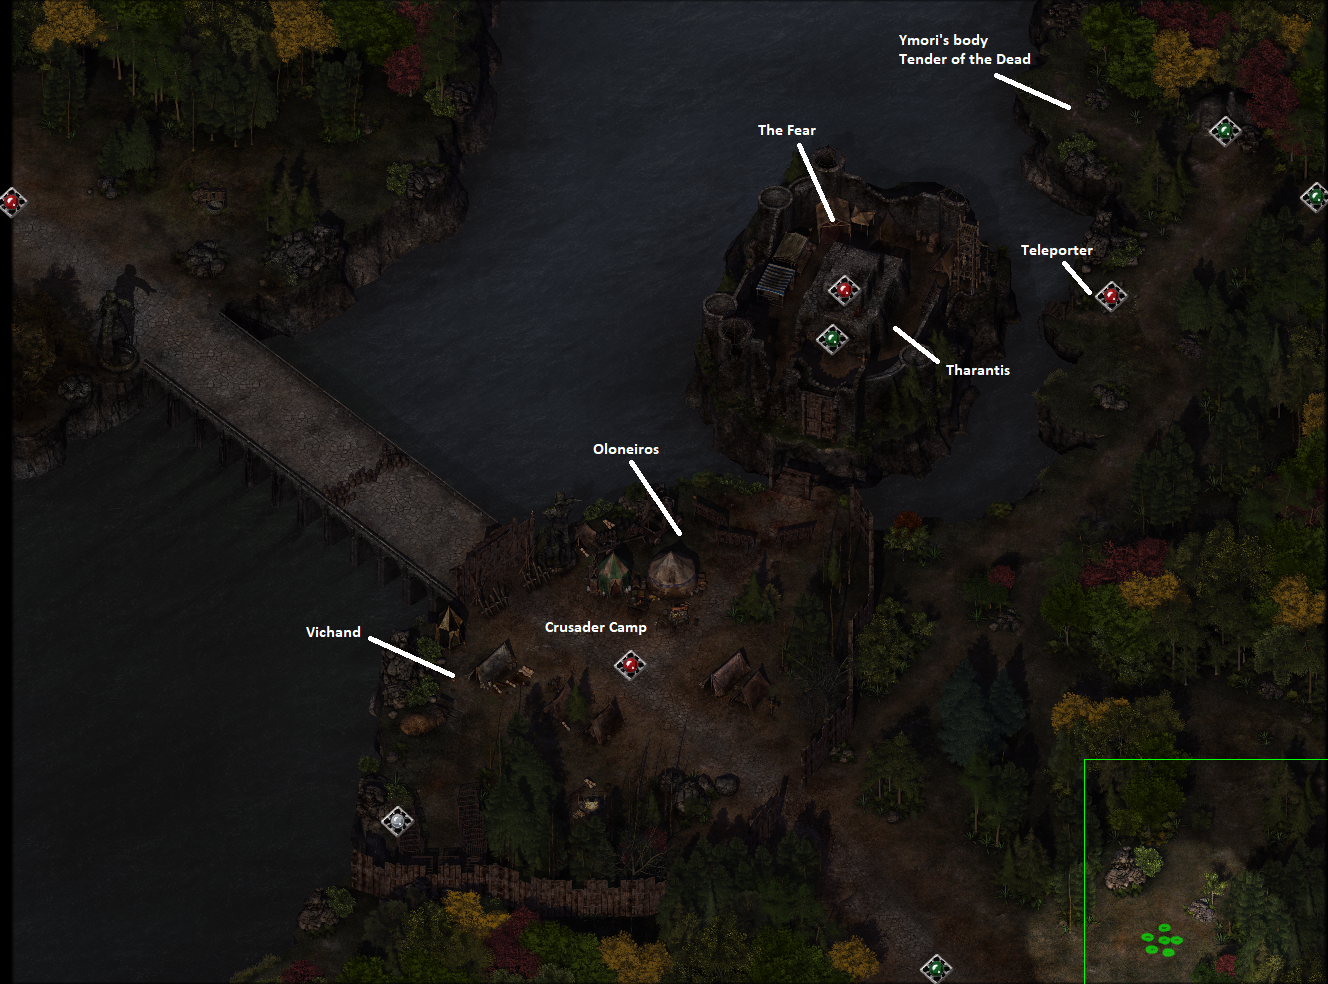
As always, my #1 advice to you when exploring the crusader camp and Bridgefort is to hold down the TAB button and talk to every NPC with a unique name. This will ensure that you find every side quest and dialogue event available to you. Be warned that there is an NPC in the crusader camp you shouldn't talk to for very long as he knows who you are. His name is Oloneiros.
Boareskyr Bridge Side Quests:
The Creeping Darkness: You begin this side quest inside of Bridgefort by speaking with Wynan Hess in the eastern most room. During your dialogue with him a magical boulder will come crashing through the ceiling of the fort. Investigate the sound and you'll get a quest update. You'll want to speak with Vichand inside the crusader camp next as he has the scroll you need to dispell the aura from the boulder. To easily get the scroll from Vichand reveal your true identity to him to 'persuade' him. Alternatively you can steal the scroll from him too using pick pocket. Once you have the scroll return to Wynan Hess and give it to him. There will be one more fight with a Wraith enemy then you're done this quest.
The Fear: When you speak to Elandro in the northern portion of Bridgefort and bring up a topic that causes him to freak out you'll summon a Greater Feyr monster. Fight it and you'll get 13,000 EXP once it's dead.
The Call of the Wild Mage: The Call of the Wild Mage is one of the companion quests in the Siege of Dragonspear Expansion.
Tender of the Dead: This quest begins by speaking with Junia inside of Bridgefort after the magical boulder comes crashing through the ceiling during The Creeping Death quest. She will ask you to carry 3 bodies from the main room into the altar room to the north and place them inside the altar that is here. Once you've done that talk to her again and she will ask you to tell Tharantis about his sister's death. You can find Tharantis by exiting the interior castle portion of Bridgefort and walking around the exterior island portion. During your conversation with Tharantis he'll inform you of a necklace, return to Junia and ask her about it. She will point you to a man named Ymori whose body you can find on the northern portion of the Boareskyr Bridge map. Examine it, fight the undead, then return to Junia and decide what her fate shall be. Last but not least you will have to speak with Tharantis a final time to finish this quest.
Once you've completed the side quests you want to complete it'll be time to decide the fate of everyone on this map. If you want to surrender to the crusaders then talk to Jegg in Bridgefort and have him destroy some of the supplies then tell Khalid you're ready to surrender. This will cause more enemies to spawn at Dragonspear Castle later on when we visit.
Alternatively you can tell Khalid you want to fight the crusader camp in a battle and then return to the Flaming Fist camp in Troll Claw Woods where you'll want to inform Lieutenant Otilda of your decision. This will allow you to call in Flaming Fist Reinforcements to the fight which will make it a lot easier. You're actually able to fight the crusader forces all by yourself or solely with the help of the people in Bridgefort if you want but both of these options are more difficult.
Regardless of your choice once you've cleared the crusader camp of enemies you'll get some dialogue notifying you that the remaining crusaders have fled to the bridge nearby and placed bombs on it. Defeat these stragglers then return to Bence Duncan whose now standing in the middle of the crusader camp we just cleared.
Go through some dialogue with Bence Duncan after which a path will be cleared on the bridge and you can cross. While crossing the bridge there will be an event and cutscene followed by a decent amount of dialogue. When it's all finished exit the map to the northwest and head towards the Coalition Camp.
Continue to Siege of Dragonspear Chapter 10 Walkthrough
Return to Siege of Dragonspear Chapter 8 Walkthrough