
Chapter 8 Walkthrough for Baldur's Gate: Siege of Dragonspear
You will begin Chapter 8 in the Coast Way Crossing zone in the bottom left hand corner of the map. For the time being this will serve as your main camp where you'll find a vendor and any companions that you tell to "return to the camp". In order to advance the story forward in this area all you need to do is travel northeast up the path to the Coast Way Blockade where there will be a story event involving the bridge and Caelar Argent.
Once this story event is over return to the main camp and you'll speak with Corwin who will tell you it's time to depart for Troll Claw Woods. Now that you know exactly how to advance the story forward, let's go over all of the side quests and optional objectives that you can complete throughout Coast Way Crossing and the adjacent Coast Way Forest zone. There is actually quite a bit here that I would recommend you do.
Available Companions in Coast Way Crossing: Glint, Corwin, Edwin, Baeloth, M'Khiin
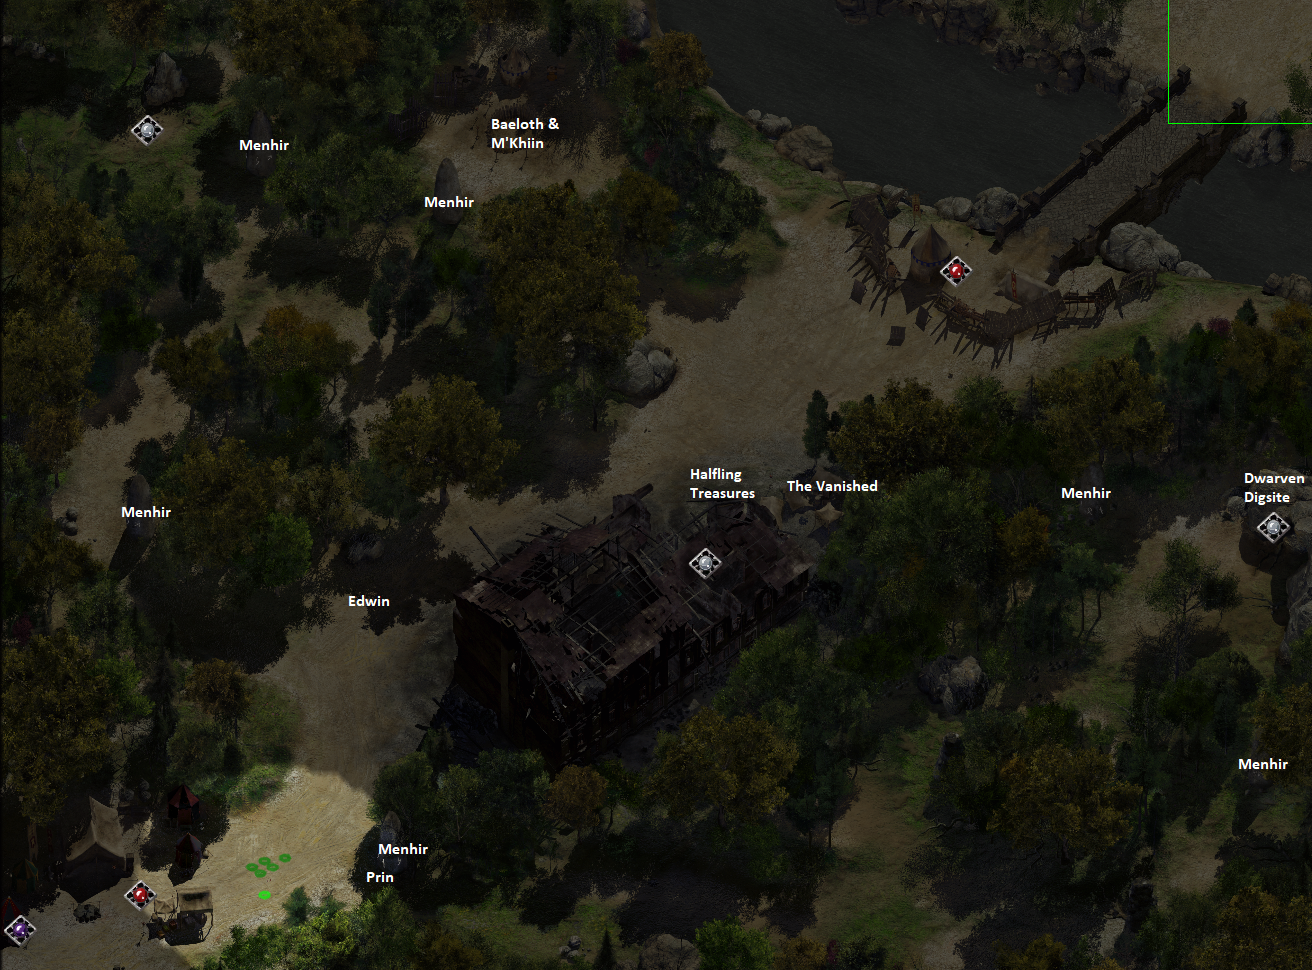
Take a look at my screen shot above if you'd like to see where all of the important locations are on the map. You're free to venture around and recruit whomever you desire and complete whichever of the side quests suites your fancy. I've included a list of all the side quests you can find in the area below.
Halfling Treasures: You'll meet a Halfling named Takos in the middle of the Coastway Crossing zone and he'll ask you to collect 3 items for him. Two of these items can be found in the nearby burned inn; Gentrus's Hand Mirror is hidden inside of a nook (hold TAB to find it) and the Cloak of the Beluir Watch is found behind the scorched building inside of a chest that needs to be lock picked. As for the shield you need for this quest, you'll get it by completing the Isabella and Ikros side quest OR by killing them and ignoring their quest. Returning to Takos with all 3 items will get you a dart as a reward, if you complain about this reward you'll be able to keep 1 of 3 items that you collected for him.
Ancient Menhirs: This quest begins by speaking with Prin who is found a little bit to the east of the Flaming Fist Encampment. Prin asks you to go around the Coast Way Crossing map and interact with each of the 6 different Menhir stones. Visit each of the 6 stones and hum to them to activate them. Make sure your quest updates at each one, sometimes it doesn't and acts silly. Once you have activated all 6 you will (sometimes) be asked a question, the answer is "The wind blowing in a tree next to a river". Sometimes you're not asked a question and Crommus spawns anyway. Regardless the quest ends when you speak to Crommus. For the additional reward you'll have to go into the Dwarven Dig site and open your map, you'll now have a map marker for Crommus' Grave in the northeast which contains 4 different magical items for Bards.
The Vanished: Speak with Herod at the refugee camp next to the Burned Inn and he'll tell you about people that have gone missing recently. Then speak with Teleria who is a tad bit south of Herod and accuse her of having something to do with the disappearances until she offers to meet you in a forest clearing northwest of this location. Here you'll find Teleria who will tell you that she turned people into stone and you're next. Fight Teleria and defeat her then loot the 5 Stone to Flesh Scrolls and use them on the nearby statues.
Dwarves of Dumathoin: Dwarves of Dumathoin is the longest side quest of this chapter and I will explain it in much more detail below. For now all I will say is that it begins by speaking with Daran Highhammer in the eastern portion of this zone and it requires you to explore the dig site in the cave right next to him.
Before we tackle the dig site involved in the Dwarves of Dumathoin Side Quest I would recommend you exit this map and travel over to the Coast Way Forest. This is an extremely small zone and there is only 2 notable things to do here, both of which are mentioned below.
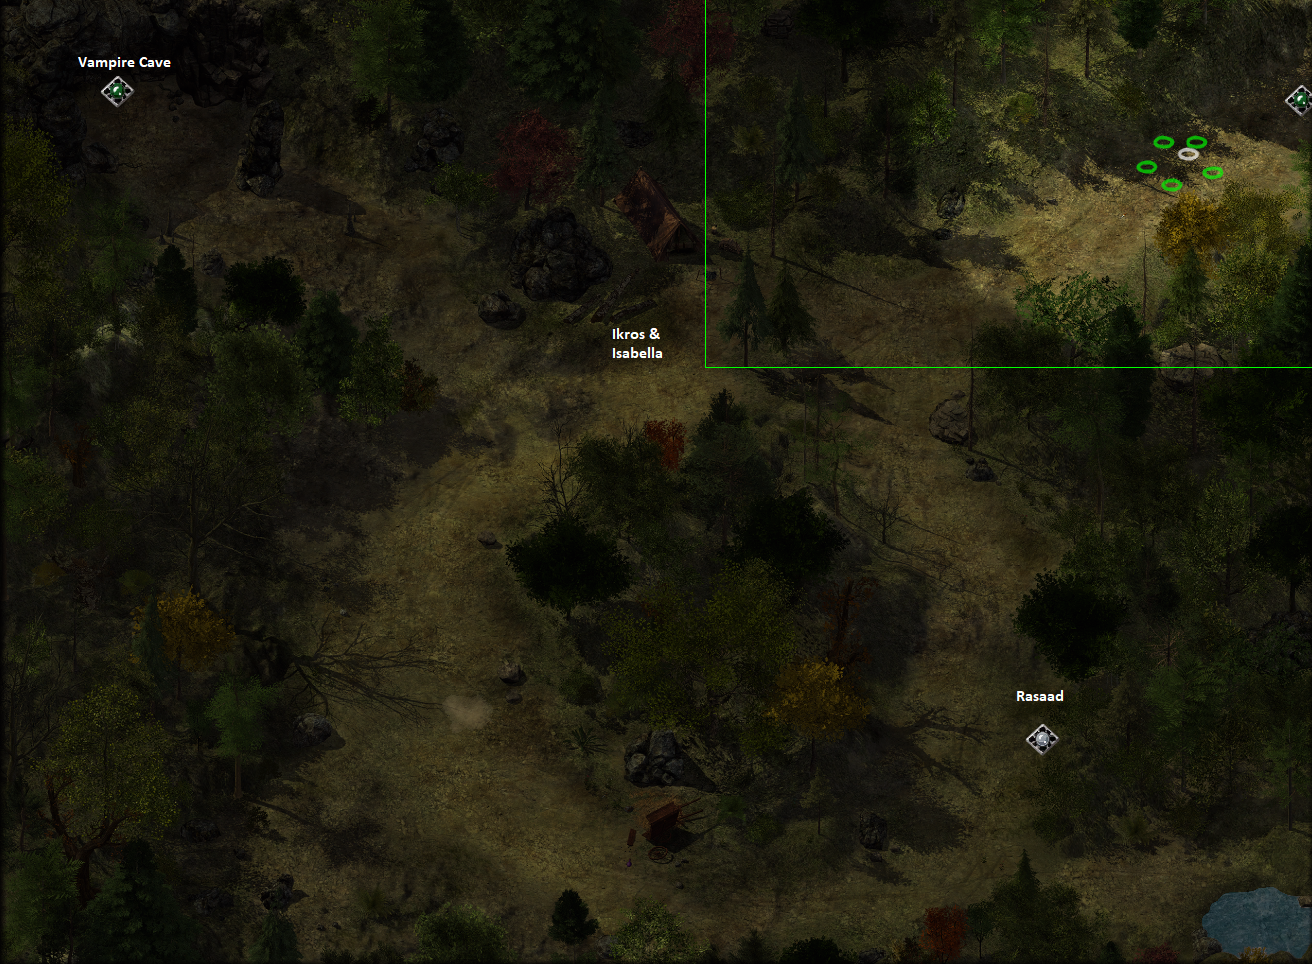
Here you'll find Rasaad, another potential recruit for your party and you'll also find the Isabella and Ikros side quest. Isabella and Ikros have The Suncatcher +2 shield which is one of the items you need for the Halfling Treasures Side Quest. You can get this item from them by completing the side quest (mentioned below) or by killing them.
Isabella and Ikros: This side quest starts in the Coast Way Forest by speaking with Isabella and Ikros whom are found in the north central part of the zone. Both of these NPCs will ask you to help them defeat a vampire who resides in a cave in the northwest; if it is currently day out they will ask you to come back at night if you agree. When the vampire comes out of his cave you'll be given the choice of siding with him or with the vampire hunters. Siding with the vampire will get you a Trollblood Ioun Stone later on at one of the Flaming Fist encampments. If you side with the vampire hunters you can ask them for The Suncatcher +2 shield which is needed for the Halfling Treasures side quest.
With everything out of the way in Coast Way Forest return to the Coast Way Crossing area and turn in the Halfling Treasures Side Quest then head east into the Dwarven Dig site. Inside the first room of the Dwarven Dig site you'll find Brother Deepvein, you'll be thrown into dialogue with him immediately after entering the area.
North of Brother Deepvein in the large open room you'll find a friendly giant named Semahl who is under attack by some undead enemies. You have the option of saving his life and sending him back to Brother Deepvein or killing him, the choice is yours. I'd recommend saving him and sending him to Brother Deepvein as this will make it easier to get Deepvein's trust later.
There isn't much else in this part of the Dwarven Dig site, you'll have to continue east into the next map to find the 'real' dungeon where all the fun stuff takes place.
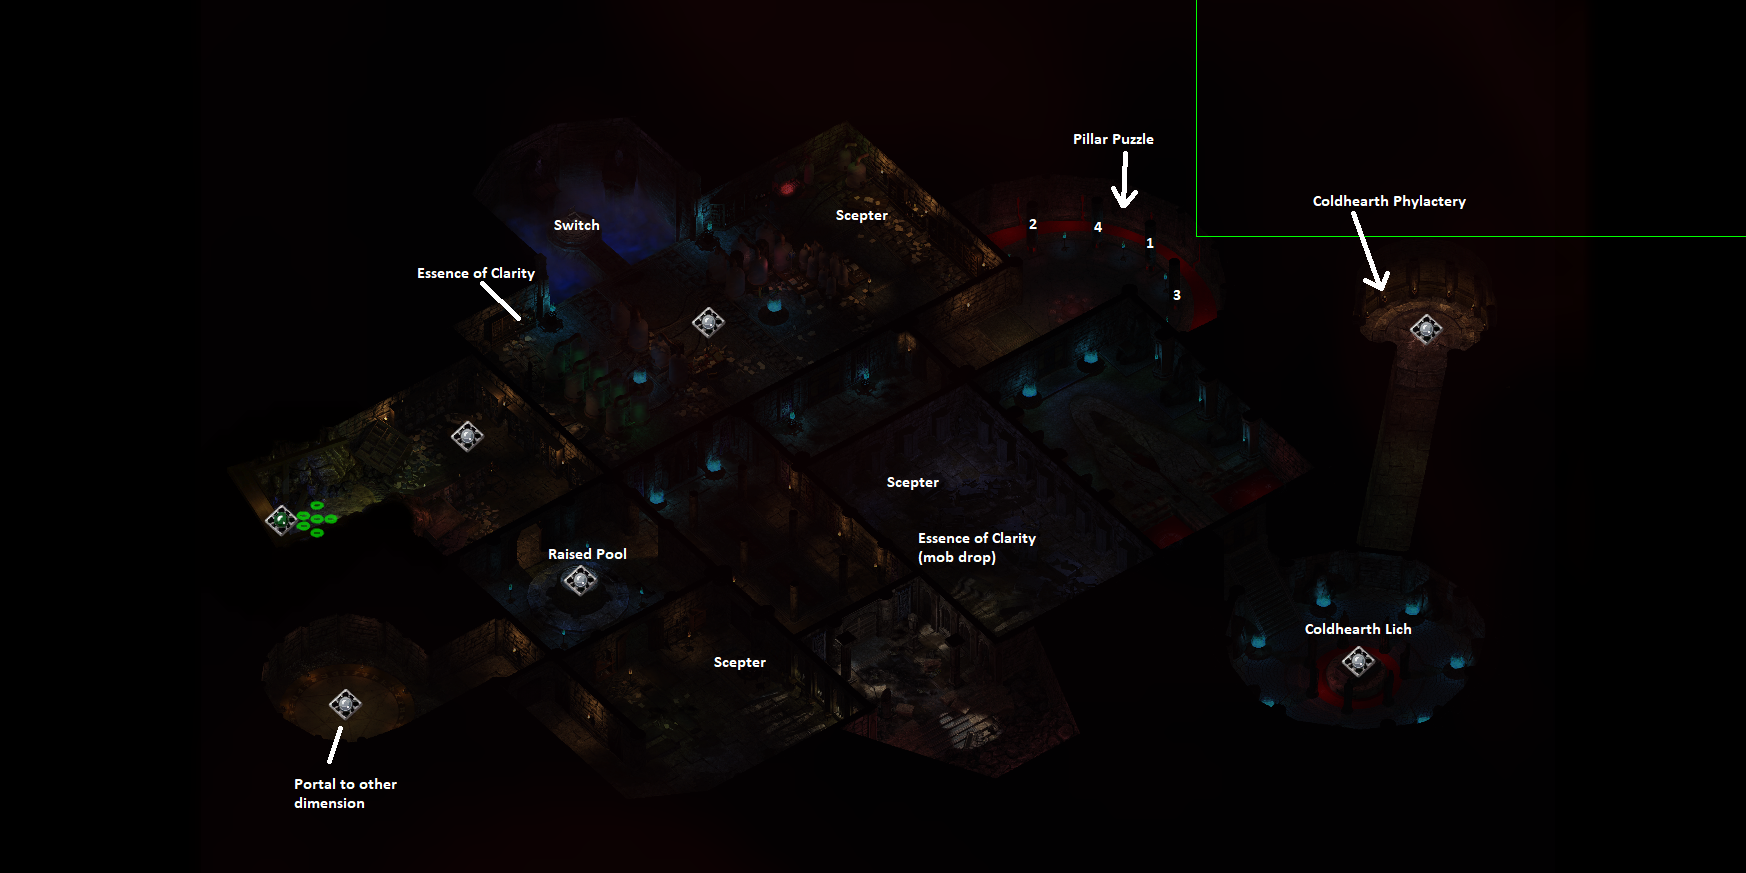
In order to 'beat' this dungeon what you need to do first is visit the pillar puzzle in the northeastern portion of this area, I have it marked on my map above. You'll need to press these pillars in a specific order in order to open the nearby door - the order is also shown on my map above. When you interact with each pillar for the first time you'll get some dialogue about what season the diagrams on the pillar relate to.
Essentially how this puzzle works is you need to click the pillars in the order of seasons starting with Winter as #1 and ending with Spring as #4. I've included the order below if you need additional help. Failing to activate the pillars in the right order will summon enemies.
Season Order: Winter (1), Fall (2), Summer (3), Spring (4)
With the puzzle complete the secret door to the south will open which will grant you access to the Ritual Room where you'll find Coldhearth Lich. This is the boss of this dungeon and he's quite a challenging one to boot. Picking a fight with Coldhearth right now is not recommended as it'll probably result in a few people of your group dying.
Before challenging Coldhearth what you want to do is return to Brother Deepvein at the entrance of the dig site and speak with him. If you saved Semahl earlier you will have an easier time convincing Brother Deepvein that you speak the truth and that Coldhearth is now a Lich. Once Deepvein is convinced he'll give you The Secret Revealed item which you'll immediately want to put into a quick slot on one of your characters.
The Secret Revealed is a consumable item that you'll want to use on Coldhearth Lich at the start of the fight to make him vulnerable to all attacks. Without using this item he'll be invulnerable to all of your attacks and reflect the damage of them as well. Even though Coldhearth will be vulnerable to your attacks with this item you still won't be able to kill him permanently. This item's purpose is technically to buy you enough time so that you can dispose of Coldhearth's Phylactery in the method I describe below.
In order to kill Coldhearth Lich permanently what you need to do is grab Coldhearth's Phylactery from the Phylactery Cache north of the Ritual Room. To reach this area you'll have to unlock and open the secret door near Coldhearth. You can find Coldhearth's Phylactery on the pedestal that's 2nd from the left; use my screen shot below if you need a picture for guidance.
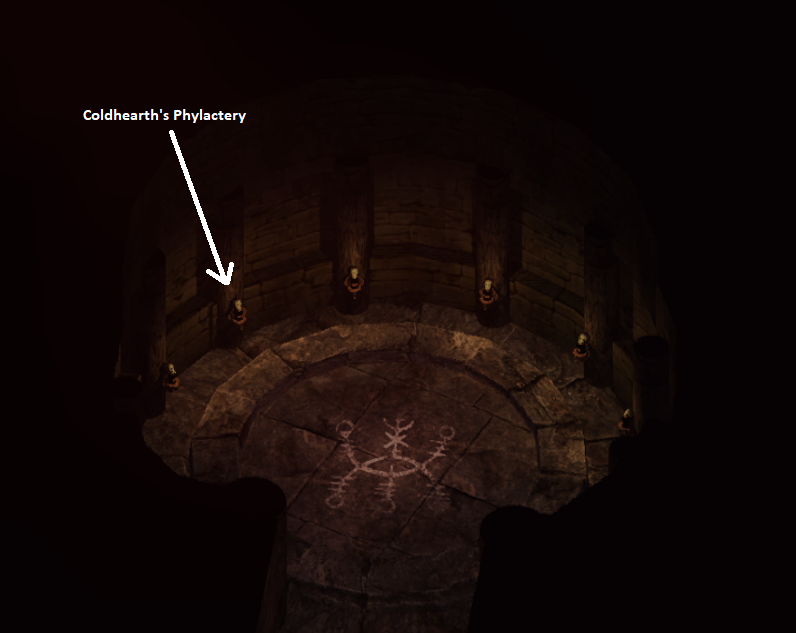
Location of Coldhearth's Phylactery (second from the left).
Once you've obtained Coldhearth's Phylactery you'll want to bring it over to the portal to Avernus in the southwestern most portion of this area. In the map screen shot for this area that's above I labeled this area "Portal to other dimension" and on in the ingame map this spot is labeled, "Broken Portal to Other Planes". There will typically always be some Fire Imps or other enemies spawning in this room at the broken portal so it's recommended to bring 2 or 3 characters to handle the enemies.
Left click in the center of the room with the "broken" portal inside of it and you'll throw Coldhearth's Phylactery inside. This will permanently defeat Coldhearth and prevent him from respawning anymore. You'll get a ton of EXP when you destroy the Phylactery but the true reward comes from Brother Deepvein at the entrance to the dig site. He'll give you a Helmet of Dumathoin which is one of the best helmets in the game and arguably the best item in this entire expansion pack.
With the main event out of the way there is a single side quest that you can do in this area. This quest won't appear in your quest log but it will give you EXP as well as unique dialogue that you can't see any other way. I've included information below about how to complete this quest.
Dwarven Dig site Side Quests:
Raised Pool: In order to use the pool in the Dwarven Dig site you'll first need to locate 3 Silver Scepters from the surrounding area. All the locations are marked on my map above if you need help locating them. Once you've found all 3 place them into the sockets around the pool by left clicking it and then click the pool again to activate it. You'll be able to choose from 3 different people, Imoen, Hooded Man and Caelar Argent. To view all 3 scenes you'll need to collect the Essence of Clarity potions that are scattered throughout the area. After viewing one cut scene click the pool again and you'll use an Essence of Clarity on it allowing you to view another scene.
To proceed with the rest of this Expansion Pack all you need to do now is return to the Flaming Fist camp and go through some dialogue with Corwin. Once you've finished this you'll be able to exit the map and travel to Troll Claw Woods which is the next zone we have to visit.
Continue to Siege of Dragonspear Chapter 9 Walkthrough
Return to Siege of Dragonspear Chapter 7 Walkthrough