Chapter 10 Walkthrough for Baldur's Gate: Siege of Dragonspear
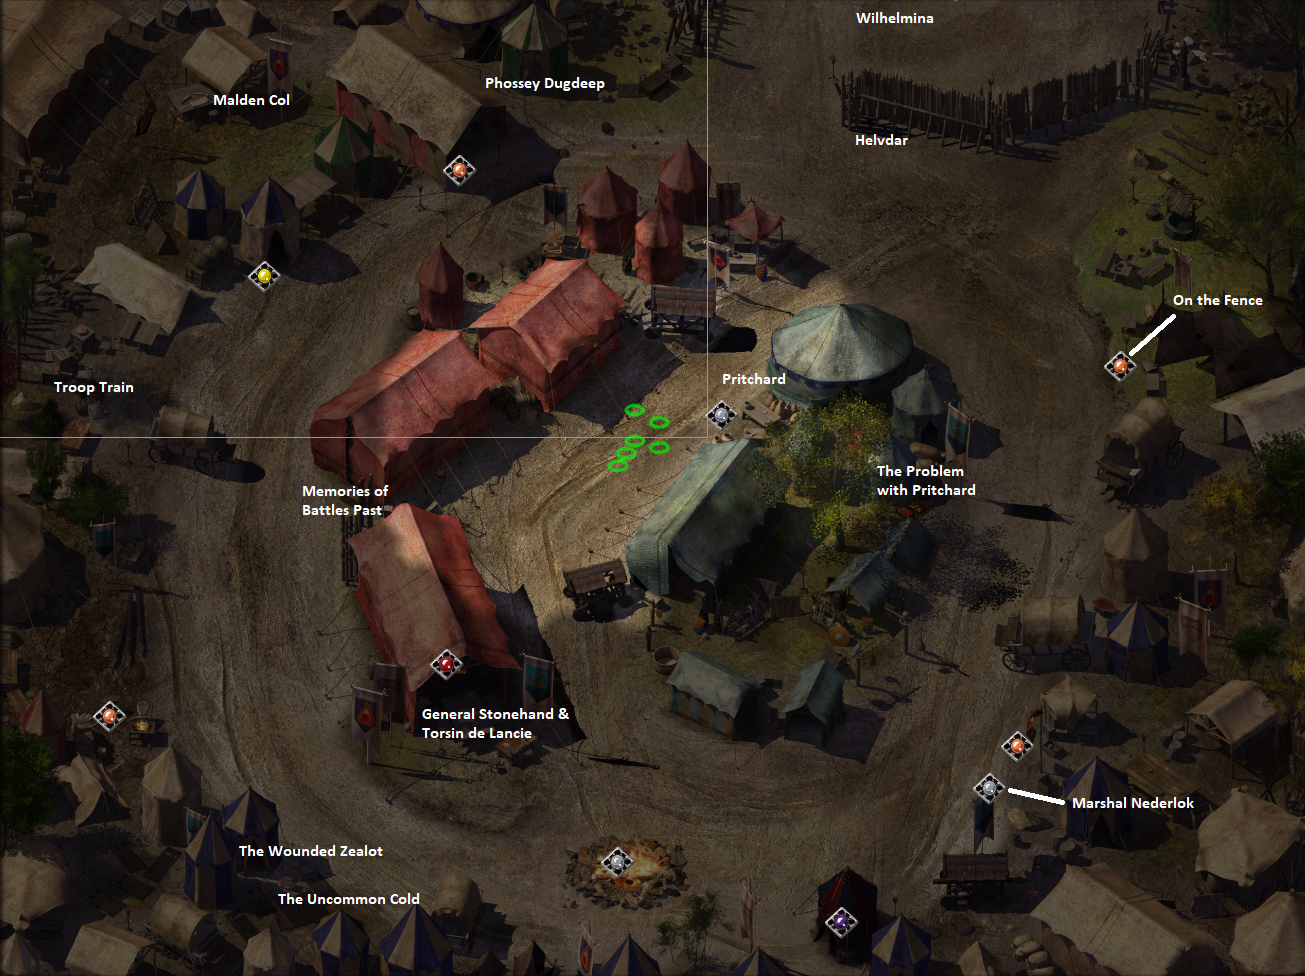
Chapter 10 begins as you arrive in the Coalition Camp. To advance the story the first thing you'll want to do is go to the big red tent in the southern portion of the camp near the bonfire. When you get close enough to this tent you'll automatically be thrown into dialogue with General Stonehand and Torsin de Lancie. They'll tell you about your next objectives which are essentially break into Dragonspear Castle and learn about Hephernaan.
After speaking with these 2 NPCs you'll have a couple of new locations added to your map and you're free to leave and continue with the story if you want... However I recommend you do a few more things here first - they aren't required for the main story but are highly recommended.
In the northern portion of the Coalition Camp you'll find Torsin de Lancie talking to a dwarven alchemist by the name of Phossey Dugdeep. You'll want to join their conversation and agree to help both of them. For Phossey you have to place a Barrel of Bwoosh in just the right spot and for Torsin you'll have to poison the crusader troops. I'll talk more about both of these objectives when we get into the correct areas.
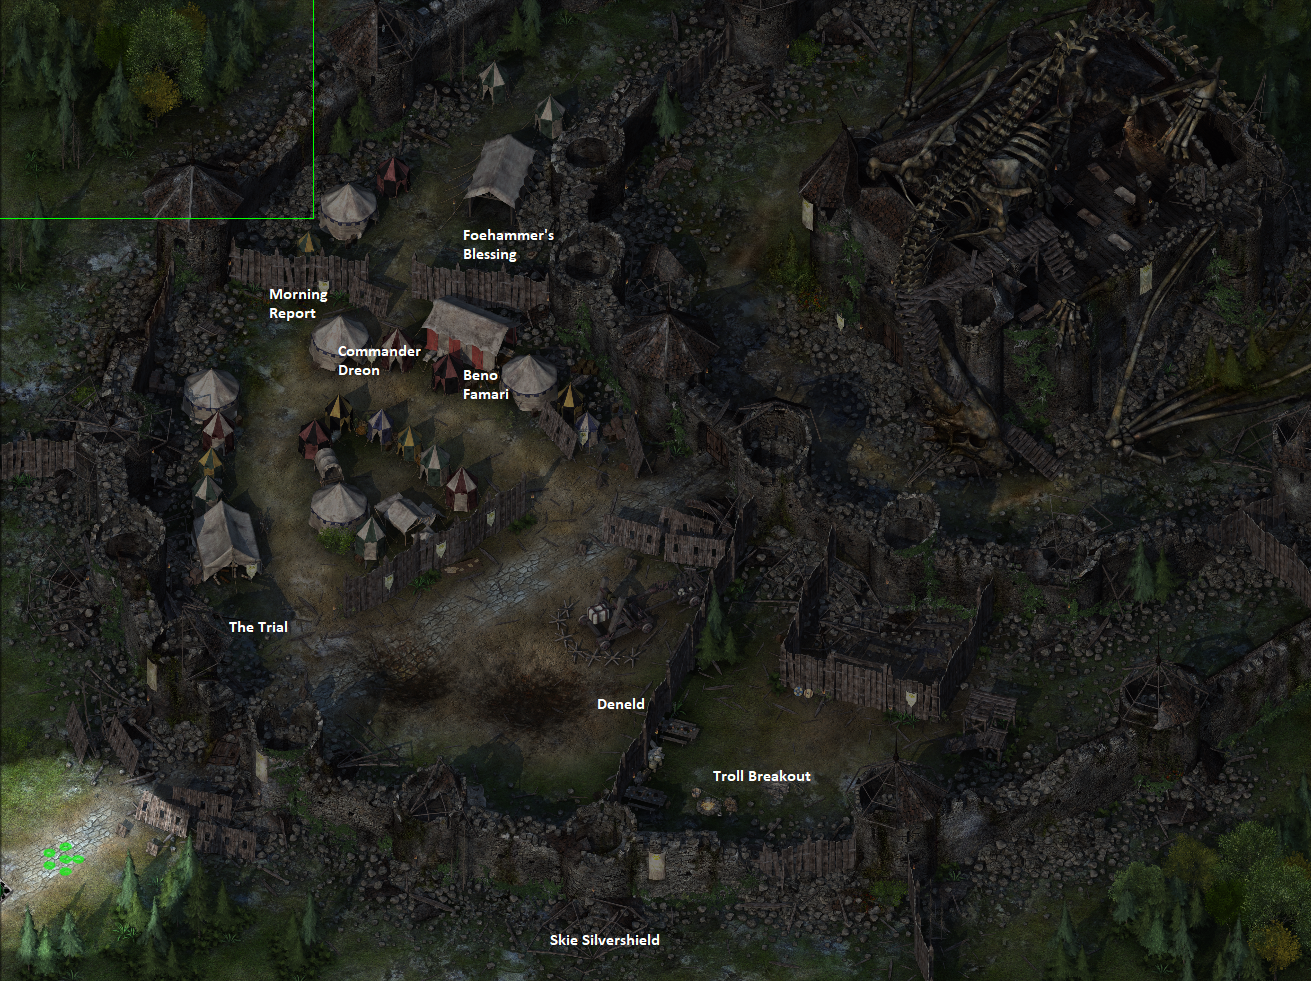
We're now done with the story events that take place in the Coalition Camp. Now let's take a look at all of the side quests available to you within this camp - as always you can find their locations listed on my map above if you need help finding any of them. Details about how to complete the side quests are below.
Tip: If you need any help finding NPCs with available side quests or unique dialogue hold down TAB while exploring camp. A good rule of thumb is any NPC with a unique name is worth talking to.
Coalition Camp Side Quests:
The Traitor: If you have Safana in your party you'll automatically start this quest at some point while exploring the Coalition Camp. To solve this quest you'll want to speak with Mizhena then to Malden Col. Once you're done with this part talk to Nederlock for your reward.
On the Fence: On the Fence is a side quest that begins by speaking with Waizahb. This quest requires you to collect 5 items from the crusader camp at Dragonspear Castle and return them to Waizahb - for every item you bring Waizahb you'll be rewarded with 2000 EXP. The 3rd and 5th items you turn into Waizahb will also get you some magical item rewards. For a list of where to find all 5 of these items check the BG1 Wiki I linked to.
The Problem with Pritchard: This side quest begins by speaking with Damius in the eastern portion of the Coalition Camp and is intertwined with Find Glint's Relatives. For The Problem with Pritchard quest you're asked to kill Pritchard, for Glint's quest you're asked to beat him within an inch of his life. Regardless of your choice it's typically best to lure Pritchard to the northwestern portion of the map before beating him up so that no one bothers you when you do. Return to Damius when you're done for your reward of potions.
Troop Train: Speak with Vigilant Halasan to start this quest; all you need to do for this quest is to speak with Garrold, Morlis, Hester, Taield, Danine and Clovista nearby. Each of them have some dialogue that you have to go through in order to 'train' them after which you'll want to speak with Halasan again to complete the quest. The reward is 6000 EXP and a Commander's Chain Mail +3.
The Wounded Zealot: Begin this quest by speaking with Hyreth in the southwestern portion of the Coalition Camp. You can convince him to accept your healing if you damage yourself in return. Healing him will complete the quest and get you your 6000 EXP.
Memories of Battle Past: In order to begin this quest you need to speak with Simonetta Twoedged in the center of camp. To complete this quest all you need to do is speak with Belegarm and Halasan then return to Simonetta for 6000 EXP.
The Uncommon Cold: To begin this quest speak with Dosia in the Coalition Camp then examine her 3 patients with names (Xerra, Zidrand and Yestimell). If you have a Cleric or healer in your party like Glint, M'Khiin or Viconia then they will offer you some insight into how to cure the illness. Ultimately you'll need to collect bark from a Blackthorn tree in the Bloodbark Grove woods and return it to Dosia to complete the quest.
Helvdar's Lucky Charm: Speak with Helvdar in the northern portion of the Coalition Camp by the barricade to begin this quest. For this quest you will need to defeat a bear for Belegarm in Dead Man's Pass and loot its hide for a pair of boots. Give the hide to Belegarm then return the boots to Helvdar to complete the quest.
Skie's Gone Missing: Speak with Marshal Nederlok or when leaving the Coalition Camp for the first time you'll get stopped by Bence Duncan who tells you that Skie has gone missing. You can find her just outside Dragonspear Castle which is 2 zones north of the Coalition Camp. Zone into Dragonspear Castle then follow the southern castle wall around to the back to find her.
Now that we are done with the Coalition Camp there are a few areas we can visit and do more side quests - including Dragonspear Castle itself. In order to get into Dragonspear Castle you'll need Caelar's Seal which you'll get when we visit the Underground River in a little bit.
On the world map we'll have a few new wilderness zones to explore, Dead Man's Pass and Bloodbark Grove both of which have entirely optional content. Both of these zones are filled with lots of enemies, loot and EXP. You need to visit Dead Man's Pass for the Helvdar's Lucky Charm side quest and The Uncommon Cold requires bark from a tree that grows in the Bloodbark Grove. These are the only 2 side quests that I am aware of that take place in these zones.
When you're ready to continue with the story our next destination is the Underground River zone. This is going to actually be 2 zones, an above ground portion and a below ground portion both of which have side quests that intertwine with one another.
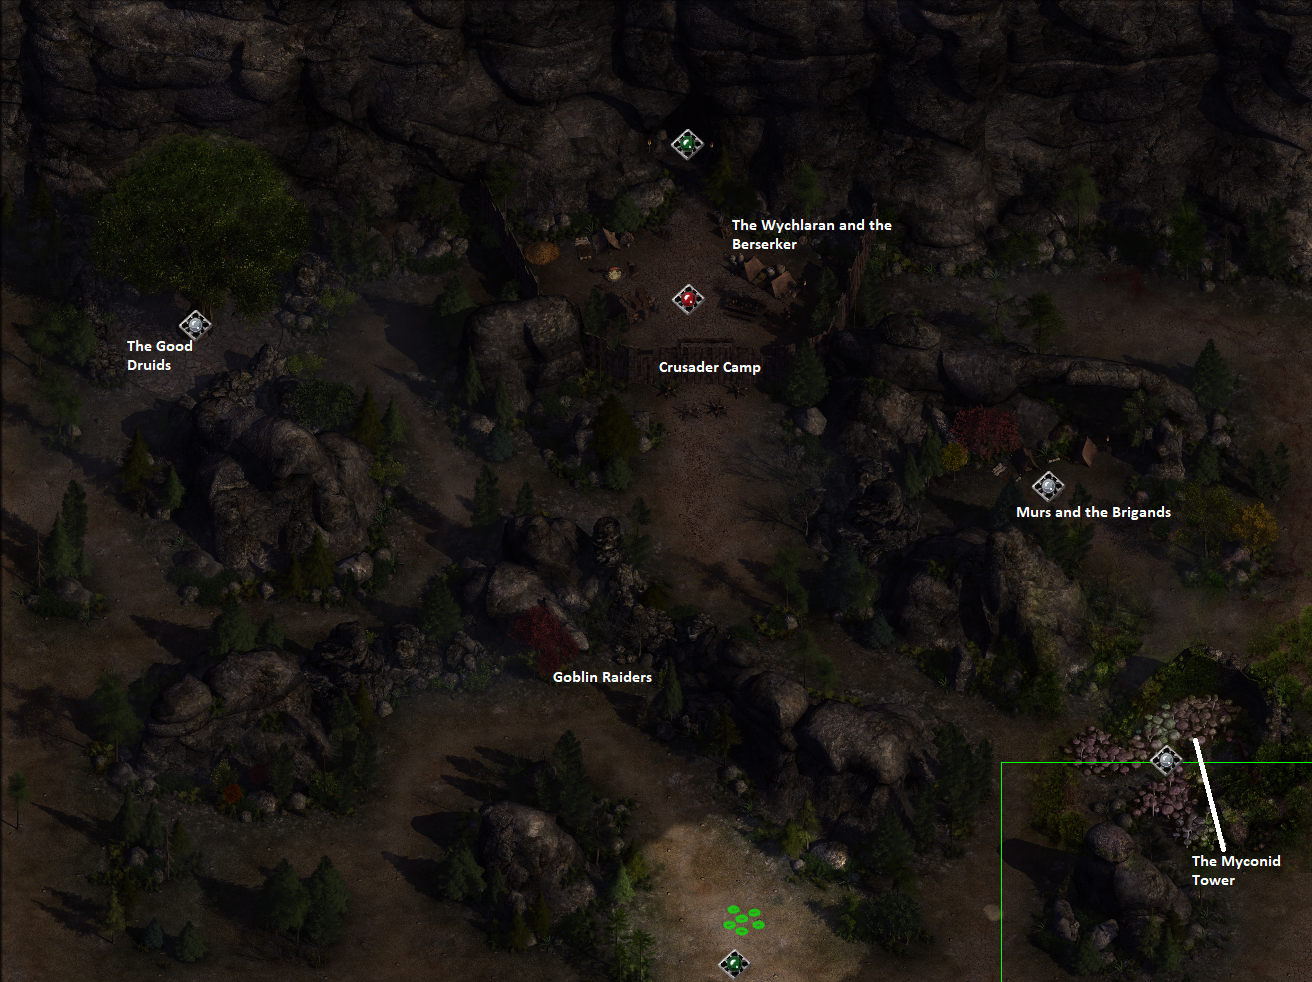
Note: There are 2 zones named Underground River in this area; the first one is the above ground portion which is shown in the screen shot above and also the first zone you'll visit. The second zone is an underground portion of the same area which I will talk about more below. From here on out in this guide I will refer to the above ground portion as Underground River (outside) and the below ground portion as Underground River (inside). Hopefully this will prevent confusion when it comes to the zone I am talking about.
In order to progress the story forward in the above ground portion of the Underground River map all you need to do is attack the crusader camp in the north-central part of the map and loot Caelar's Seal. This seal is kind of a get out of jail free pass when it comes to entering crusader encampments. You can show it to almost any group of crusaders (including those at Dragonspear Castle) for entry into their camp. Using this seal to diffuse tension also works too if someone accuses you of not being a crusader.
There are also a couple of side quests you can complete and start in the Underground River (outside) portion.
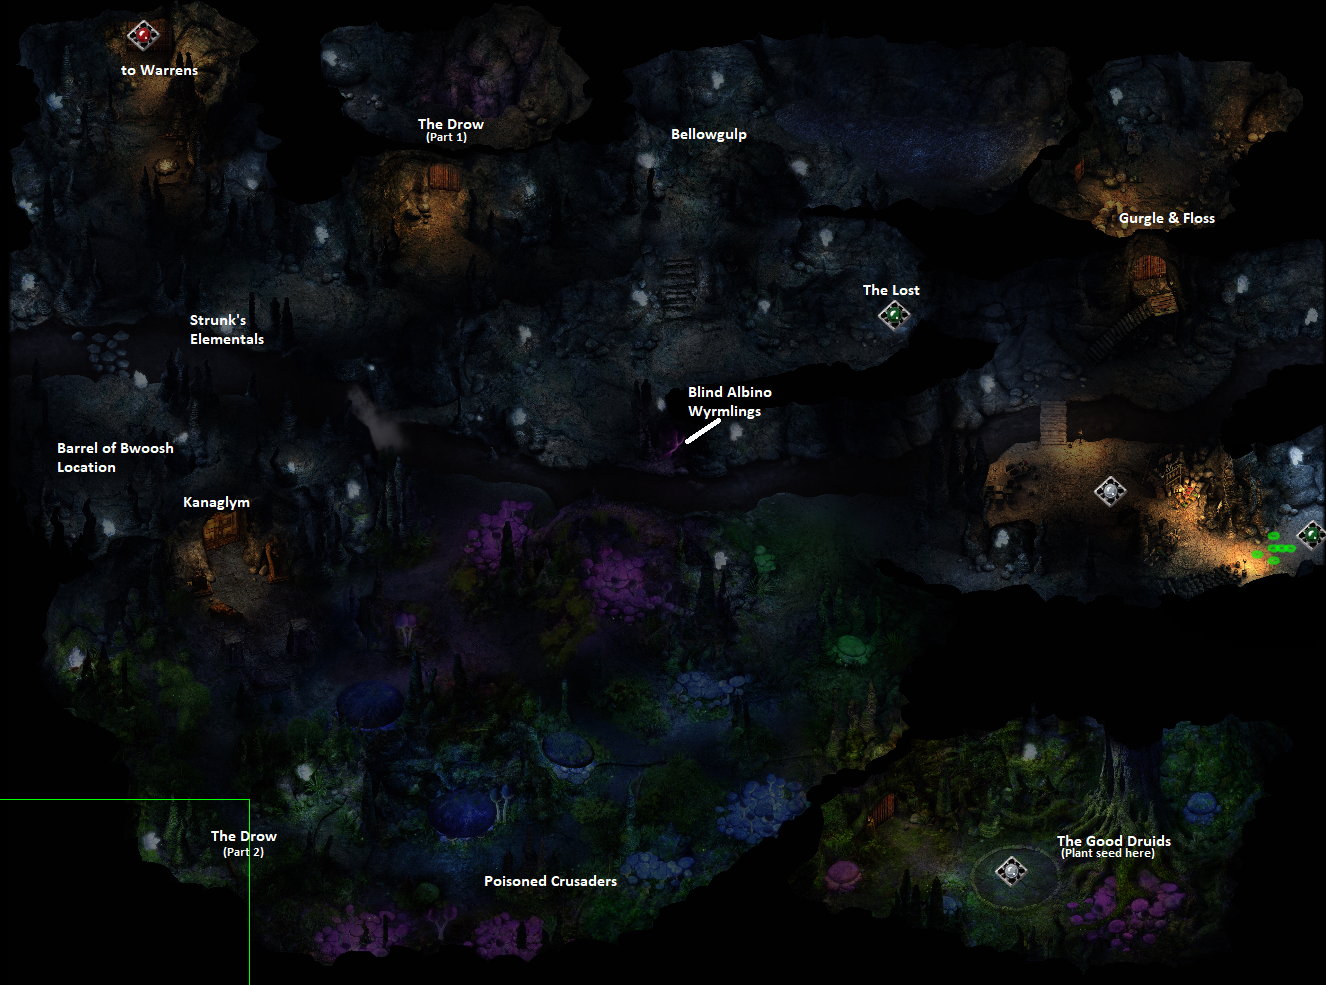
The Good Druids: This quest begins by first freeing the 2 druids, Jamven & Chorster in the northwestern part of Underground River (outside). Ask them about their plight and if you agree to help them they'll give you an Enchanted Seed which needs to be planted at the base of a tree in the Underdark which is in the next portion of the Underground River (inside). Use my map locations in the screen shots if you need help finding it.
The Myconid Tower: You begin this quest when you're attacked by the Myconid enemies after you interact with the nook on the ground in the eastern portion of the Underground River (outside). All you need to do is defeat the Myconids to complete this quest. Inside the nook on the ground you'll find a Myconid Pod which you should look since it's part of the Slime Sickness Side Quest later on.
Murs and the Brigands: In the eastern portion of the Underground River (outside) you'll find a camp of ogres which are currently in the middle of arguing about who the next chief should be. There are numerous ways to resolve this quest but typically the 2 best ways are to duel Arbinge & Cheski as Murs' champion or kill Arbinge & Cheski and become the chief yourself. Solving the quest through either of these 2 methods will get you more EXP and also open up additional side quests such as Blind Albino Wyrmlings, The Lost, Accessing the Warrens and Dark Druid Circle.
The Wychlaran and the Berserker: The Wychlaran and the Berserker Side Quest is only available to you with Minsc and Dynaheir in your party. You have a few different ways of solving this quest but the only way to convince these 2 that the crusade is evil is by showing them Hephernaan's plans which you can find inside Dragonspear Castle Basement when you visit.
When you're ready to proceed to the Underground River (inside) you'll simply want to enter the cave in the northern portion of the map.
As far as story objectives go in this zone we have 2. The first thing we need to do is place the Barrel of Bwoosh! in the western portion of the zone where the Stone Dowser tells you; wear it as a necklace and you can pinpoint the location you need.
The next task on our list is to infiltrate the Dragonspear Castle Basement. You'll find a cave which is filled with crusaders in the northwestern portion of the Underground River with an elevator that will lead you upstairs and into Dragonspear Castle.
WARNING: Entering the Dragonspear Castle Basement will advance the story and essentially put you on rails from now until the end of the game. I'd highly recommend you finish everything you want to finish before entering the Dragonspear Castle Basement as once you enter you'll no longer have the opportunity to do any of the side content. I will talk more about the Dragonspear Castle Basement at the bottom of this page.
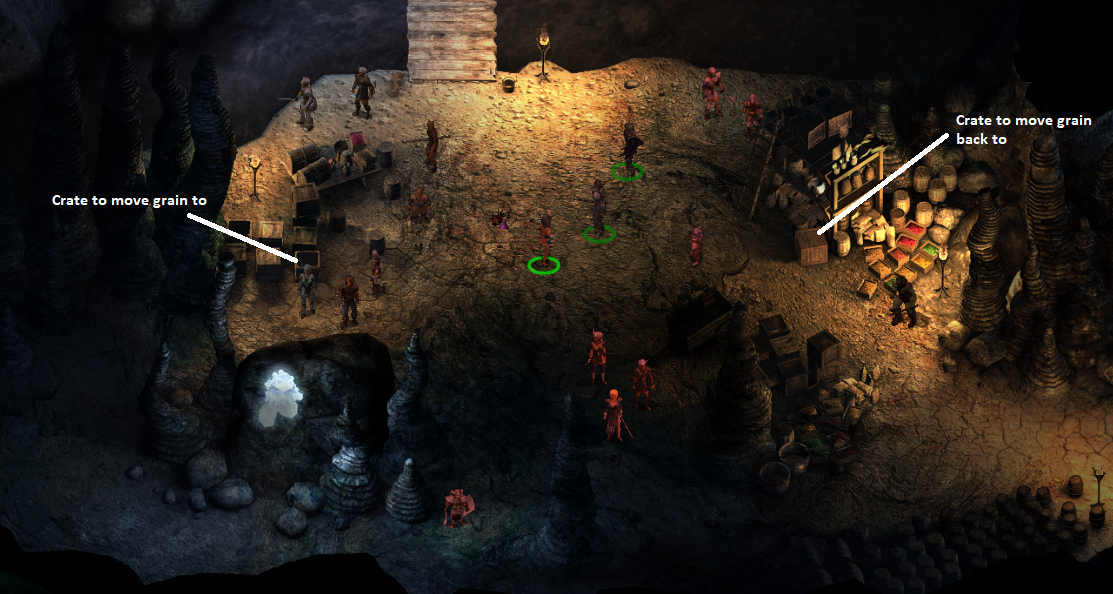
Moving Crates: This quest begins when you ask Ladle in the Crusader Supply Depot how you can help out. He tells you to move sacks of grain from the crate next to him to the crate on the other side of the supply depot. I've included a screen shot of where both these crates are below to prevent any confusion like what I had.
Gurgle & Floss: You can start this quest by speaking with Ladle in the Crusader Supply Depot about the fishfolk who are slowing down their operations. The 2 Sahuagin in question can be found by traveling across the bridge and into the room to the northeast. You have a few methods of dealing with them involving defeating them, tricking them or telling them a story to get them to leave the area. All these methods will complete the quest.
Slime Sickness: In the southern portion of the map you will find a group of crusaders who have been poisoned; when you get into the same area as them dialogue will start with you. To get the cure that will save their lives you need to complete The Myconid Tower side quest that I talk about above and loot the Myconid Pod item. With the Myconid Pod + 2000G you will get the cure from Ferrusk. Return to the crusaders with it and you'll save their lives.
The Drow: This quest begins when you encounter the Drow search party in the northern portion of the Underground River (inside). What you need to do for this quest is to find the 2 Drow runaways who are in the southwestern portion of this area in the Myconid/Underdark section. You have numerous options for solving this quest including returning the kids to the search party, fighting any of the Drow or letting the lovers go free. The Drow runaways drop some pretty powerful items if you do decide to fight them. If you happen to stumble across the 2 Drow runaways before starting the quest then you'll only be able to report their deaths or tell the scout party that you let them go.
Ghost Dragon Guardian: When you approach the Kanaglym dungeon in the western portion of this area you will begin this side quest. A Ghost Dragon will appear and you can either ignore it, defeat it or question it. The door the dragon is guarding leads to Kanaglym. To complete this quest you'll have to enter Kanaglym and defeat all of the wizards inside. I recommend you focus on Kherriun when you notice her and get her health to about quarter. This will cause the Ghost Jar she is holding to shatter and the dragon, Halatathlaer will join the fight on your side. When everyone is defeated there will be some unique dialogue with Halatathlaer and you'll be rewarded 32,000 EXP.
The Lost: Inside of a cave in the northeastern portion of the Underground River (inside) you'll find a couple of spirits who ask you for help delivering their remains to the Fugue Plane. Loot their remains from the bodies on the ground (hold TAB to find them all) and take them to Kanaglym. Inside Kanaglym simply interact with the portal to the Fugue Plane with the character holding the remains to send them all off.
Strunk's Elementals: A man by the name of Strunk can be found near the river binding Water Elementals into his service. No matter what you say to him you'll have to fight him, if you only defeat him then a Neriad will appear to thank you as well as reward you with a Purification Stone. taking out both Strunk and the Water Elementals will cause the Neriad to be hostile to you when she spawns and you'll have to fight her too.
Dark Druid Circle: You begin this quest after your first dialogue with Ferrusk in the southeastern portion of the Underdark area in the Underground River. This is a side quest that you can do if Ferrusk is alive and well. Ask him about Hephernaan then inform him that Caelar plans to open a gate to the nine hells.
Before we move onto the final part of Chapter 10 (Dragonspear Castle Basement) I recommend you visit the Dragonspear Castle Crusader Camp to complete the optional stuff there. As stated earlier in the guide the moment we enter the Dragonspear Castle Basement we can no longer do any of the optional content in this zone.
In order to enter the Dragonspear Castle Courtyard you'll need to show Caelar's Seal to the guards at the entrance. You can get Caelar's Seal from the crusader camp outside of the Underground River (inside) entrance which I mention in the section above. Everything inside the Dragonspear Castle Courtyard is completely optional and nothing you do here will effect the final chapters of the game so far as I am aware.
As always my biggest advice to you will be to hold down TAB while running through the crusader camp and interact with every NPC that has a unique name. This is the #1 way to guarantee that you find every bit of dialogue and every side quest in the area. Otherwise, check out my map above and the section I have below explaining everything I believe is worth doing within this zone.
The Trial: To begin this quest speak with Leopas in the crusader camp. You'll need to interview Valis, Corinth, Ravoc, Delton and Damarr for this quest to learn all the information you need - then you'll have to determine the outcome. Regardless of whom you choose as guilty and innocent you'll get the same amount of EXP, though Corinth does drop better loot when he dies.
Foehammer's Blessing: In the northern portion of the crusader camp you'll find 2 recruits, Qing and Kjarvin who will talk to you about a destroyed symbol of Tempus. Agree to help them and fix the symbol and you'll begin this side quest. You can find the First Stone Fragment in some rubble nearby (hold down TAB to easily find it) and the second can be found by speaking to Deneld. Once you have both fragments you should return to Mizhena in the Coalition Camp to have her bless them. Return to the 2 crusader recruits and place the Sanctified Shards into the container next to them to trigger some dialogue. Accept the test from Tempus and you'll have to fight a Sentry of Tempus in battle, defeat it and you'll get The Bloodied Guardian (Large Shield +2).
Morning Report: You can start this quest by speaking with Crusader Nan or Crusader Pedro in the northwestern portion of the crusader camp. For this quest you will need to fill the Empty Wineskin at the barrels behind Pedro then take it to Deneld whose found in the central portion of the crusader camp near the catapult and large crater. Tell Deneld that Commander Dreon sent for the report and he'll give it to you then send you on your way. As for Commander Dreon, you can find him close to Crusader Nan and Pedro at a tent just south of them. Give him the report and his wine then return to the 2 crusaders for your reward.
Troll Breakout: Start this quest by speaking to Sindret in the eastern portion of the crusader camp. If you have a Drow in your party she will refuse to interact with you at all. Otherwise, she'll ask you to acquire a pair of Troll Shackles from a crate a little south of Commander Dreon and return them to her. At this point Sindret will have you beat up the troll and shackle it before you get your reward.
Understanding the Crusade: This quest begins by speaking with Deneld in the central portion of the camp near the catapult and large crater. He asks you to learn more about the crusade, to do this you'll have to speak with Zare, Ravoc and Sindret before returning to Deneld. When you return to Deneld he'll quiz you to make sure you really paid attention to the dialogue (sigh) the answers to his questions are all the first dialogue option. Make sure you ask for a reward too otherwise you don't get anything. Your reward is Ring of the Crusade.
Shael Corwin (Companion Dialogue): If you have Shael Corwin in your party when you walk by Beno there will be some dialogue between the two. Your reward will be 6000 EXP which is standard for most of this Expansion Pack.
On the Fence: We got this quest back in the Coalition Camp earlier in this Chapter. In order to complete this quest you will need to collect various objects from within the crusader camp; a list of all the different objects that you'll have to collect can be found below.
Dreon's Signet Ring: Wear a Crusader Uniform from a crate in the crusader camp and speak with Commander Dreon. Ask him for his signet ring for the purposes of making reports and he'll give it to you.
Battle Standard: Found in a chest right next to Commander Dreon. Coordinates are x=1240, y=1440
Token of Faith: A lot of different crusader recruits have this item on them. You can pick pocket any of them for it. One of the easiest targets is the Crusader Recruit standing next to Damarr in the same area The Trial quest takes place.
Annotated Map: Interact with the table in the central portion of the crusader camp with invisibility or stealth active to steal this map; you can find the table a little bit northwest of the catapult. The coordinates for this table are x=1807, y=2218
Tristian's Holy Symbol: To get Tristian's Holy Symbol you'll need to first retrieve the Coroniir board game from Mizhena back in the Coalition Camp and then gamble against Tristian for at least 200G to win the Holy Symbol.
Once you've completed every side quest available in the crusader camp you have the option of turning the entire camp hostile against you and attacking them. As far as I am aware this will not change the outcome of any future quests during this Expansion Pack so it's completely up to you.
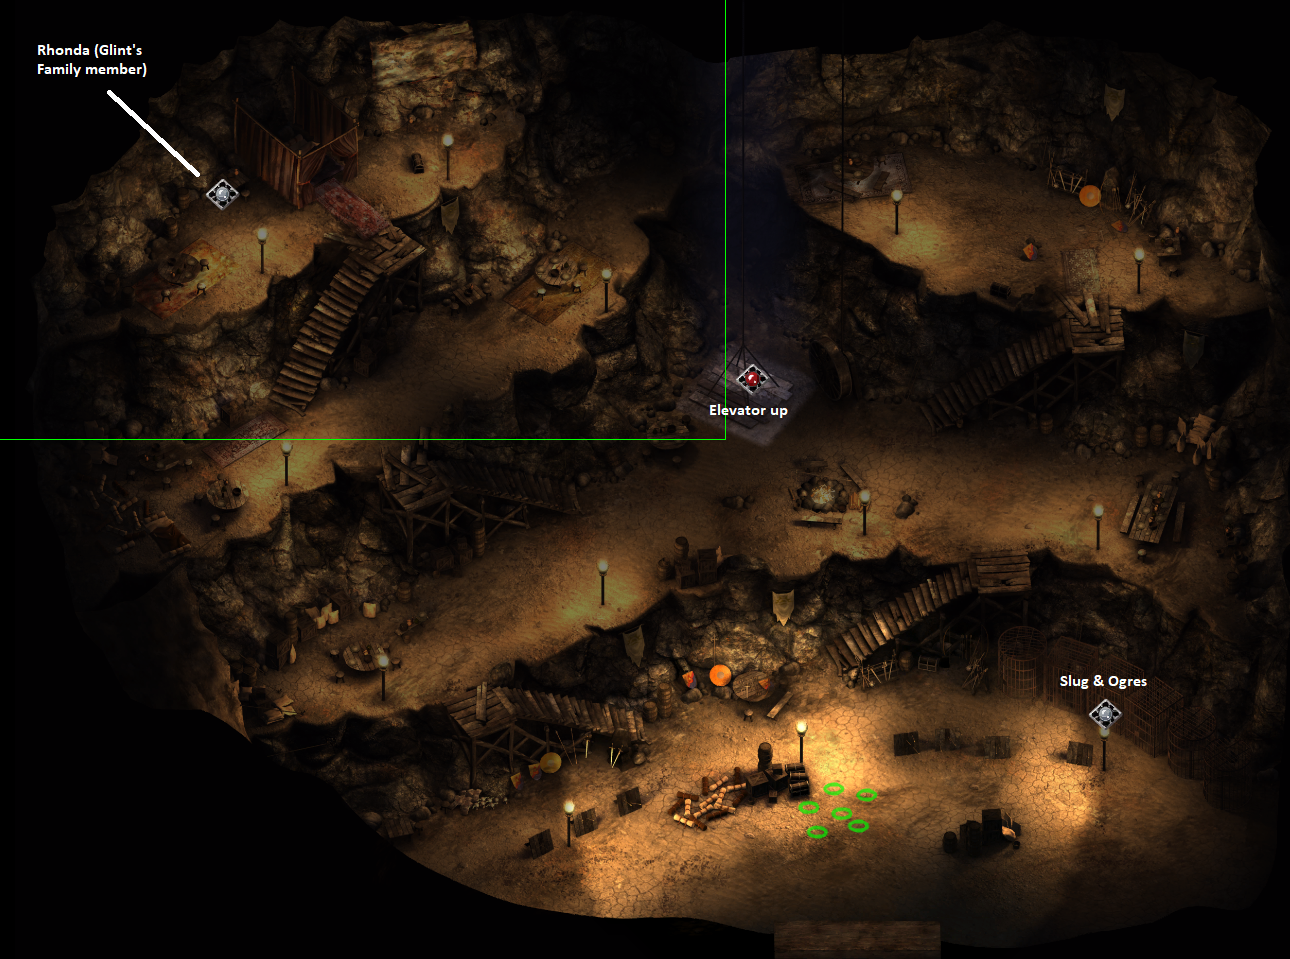
Now with all of the optional content in Chapter 10 out of the way it's time to head over to the Dragonspear Castle Basement. As aforementioned you can find the entrance to the Dragonspear Castle Basement in the northwestern most portion of the Underground River (inside). There will be a doorway guarded by a pack of crusaders that leads into a new area known as the Warrens (pictured below).
All you need to do in order to advance the story forward in The Warrens is visit the elevator in the middle of the area and ride it up. You'll have to choose the right dialogue options to convince the ogres you're friendly, if you fight them without going into the basement then you can't go up since the elevator requires ogres to opearate.
Note: From my own personal experience you can permanently break your save file at this part if you kill the ogres or fail to convince them. I had it happen to me once, the ogres asked me for wine that I could not find ingame nor on google and I could not get into the basement to advance the story. For this reason I recommend you save first before talking to them.
You have a few optional things you can do in The Warrens as well including breaking Slug the Ogre out of his prison in the southeast and speaking with Rhonda (Glint's Relative) in the northwest. If you failed to convince Einer & Betror to let you ride the elevator up into the basement you can have Rhonda speak to them on your behalf and convince them. You'll need Glint in your party for Rhonda to agree to this, however.
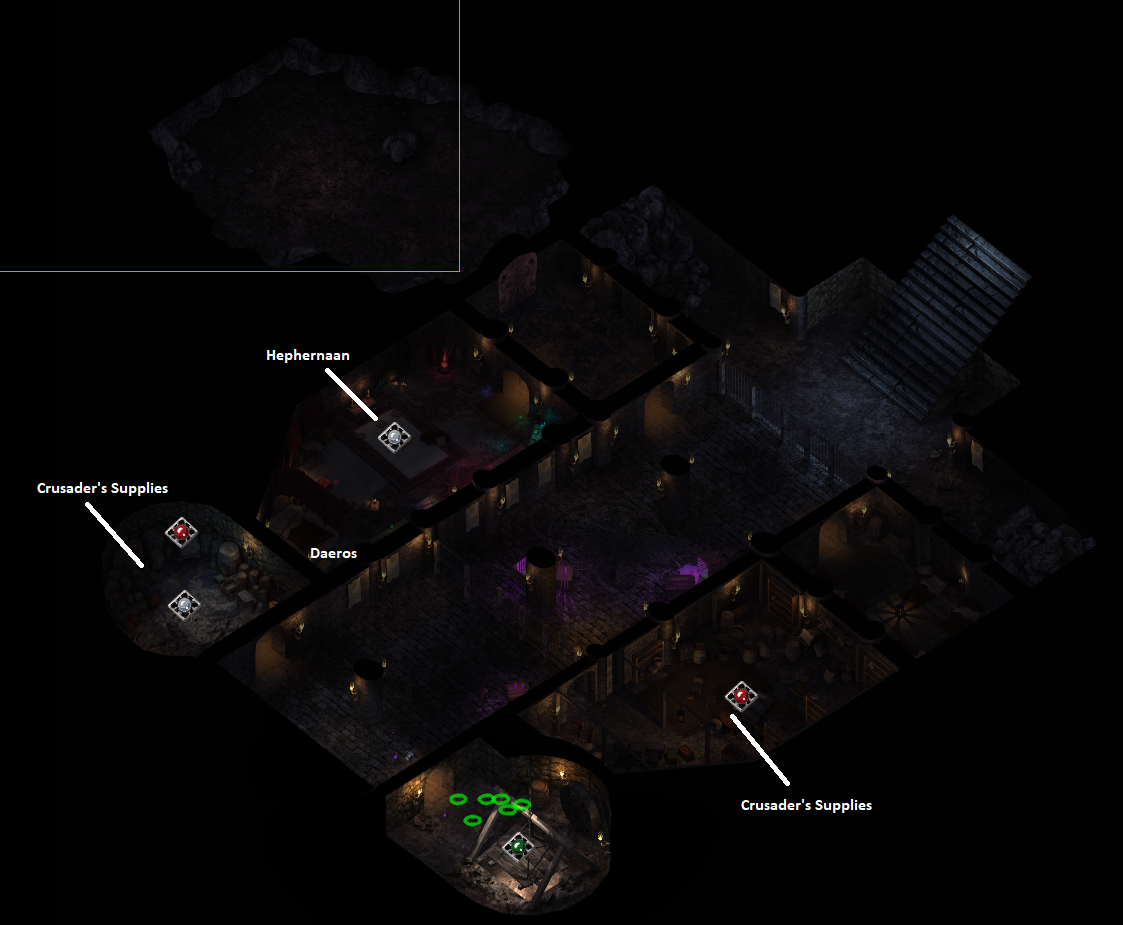
Once inside the Dragonspear Castle Basement there are 3 things you can do to advance the story forward. The first 2 are to poison the Crusader's Water and Food Supply. The water supply is in the northwest and the food supply is in the south. You'll find a troll named Bjarn Littleclub hanging out near the food, it's up to you if you wanna fight him or not.
While here you can also confront Hephernaan and fight him -- even kill him. Be warned however that fighting Hephernaan will be a seriously difficult fight at this point in time. There are many Crusader Mages in this area along with Hephernaan and his guards. Even if you kill Hephernaan he'll respawn later on during this Expansion Pack.
Inside the room Hephernaan is found in you'll find a dwarf named Daeros whom you can talk to and free for 18,000 EXP. There's also various loot from the chests in Hephernaan's room as well as from Hephernaan himself that you'll want to grab before leaving the area. Once you are done all you need to do in the Dragonspear Castle Basement it'll be time to return to the Coalition Camp to update the main quest.
Upon arriving back in the Coalition Camp you'll be informed that all of the leaders left for negotiation talks with Caelar Argent. Proceed to Dead Man's Pass when you're ready to participate in these talks.
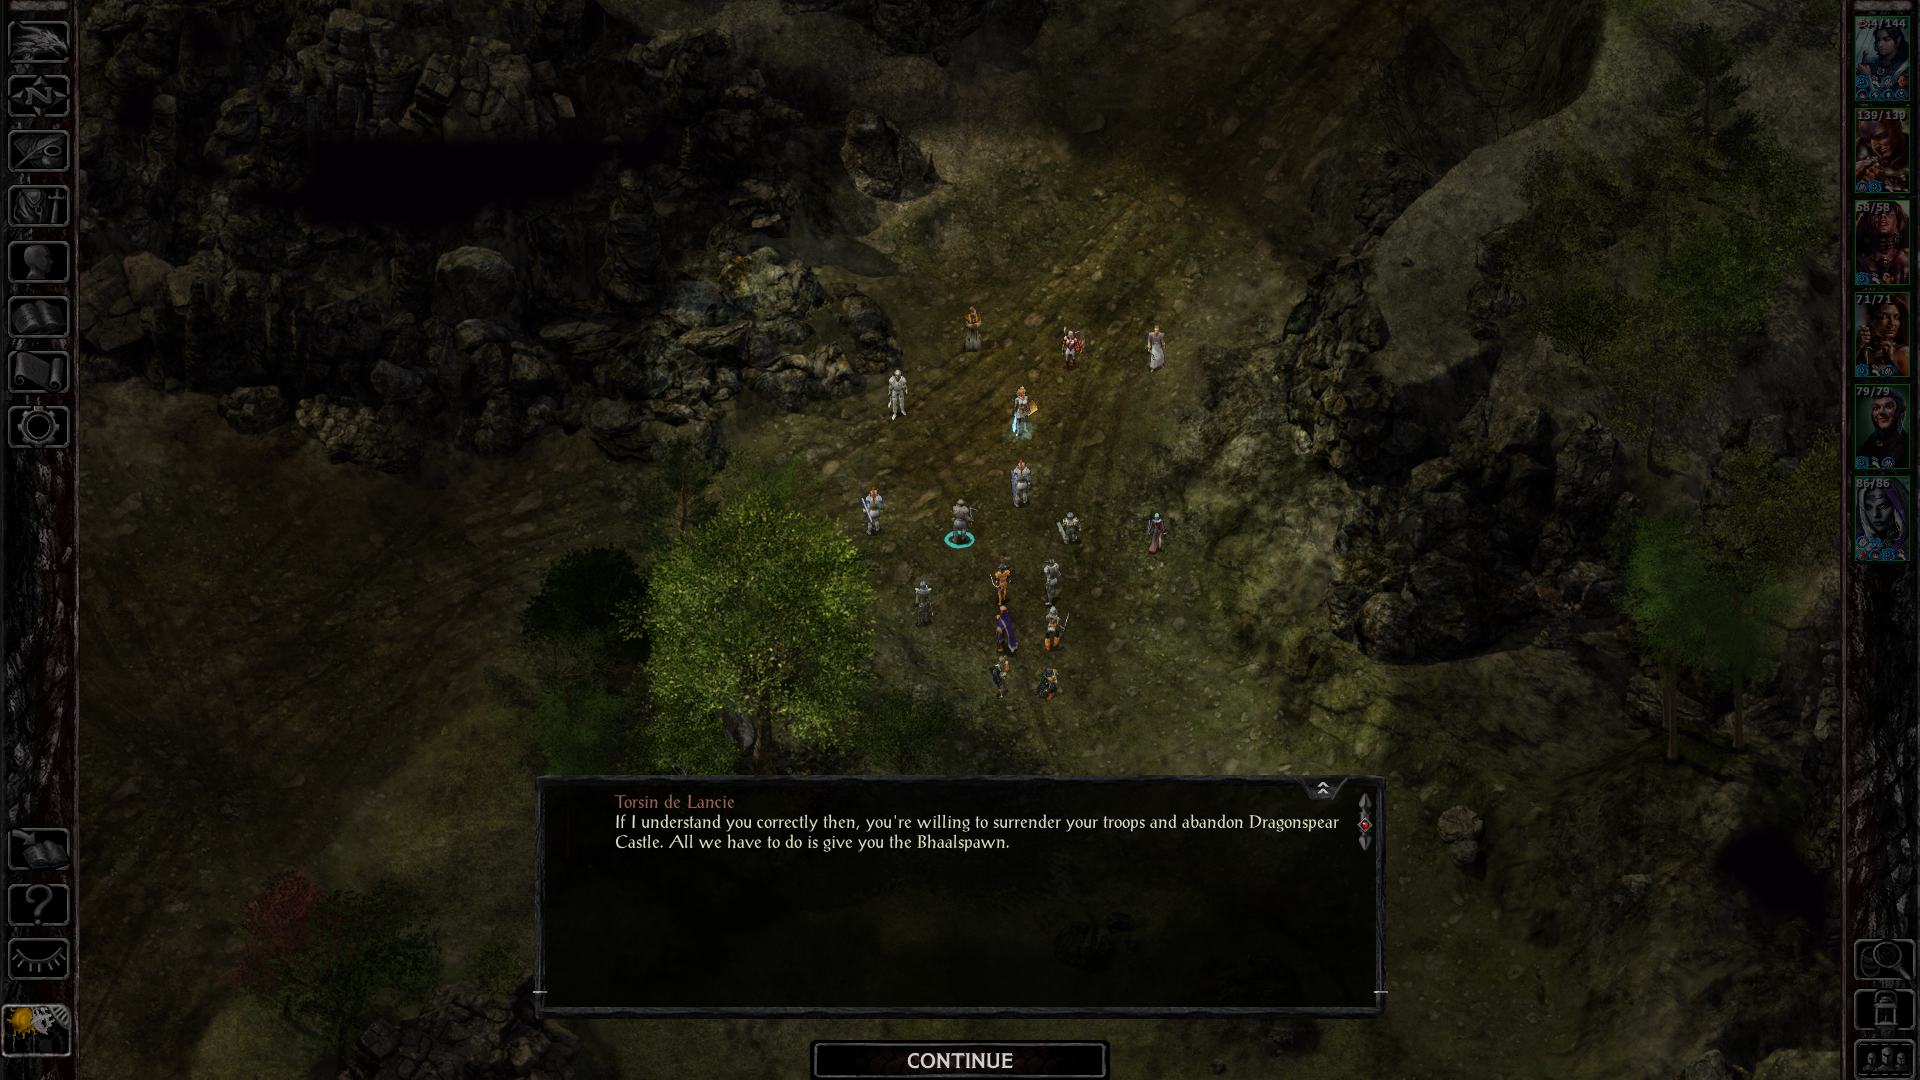
You're free to say whatever you want during this dialogue, no matter what you say the outcome will always be the same however. When it's all done return to the Coalition Camp and you'll learn that in your absence the crusaders have attacked. The first thing you should do is go to the southern end of the Coalition Camp which is where you'll get more of an update about everything that is happening as well as instructions about what comes next.
Essentially there is no one to command the troops now except you and you'll have to fight a total of 3 heavily scripted battles which can be difficult or easy depending on the choices you make with the units you're commanding. I will give you a quick run down below with the information you need in a better format than paragraphs like this.
1st Wave Ogres & Trolls: You'll fight these guys on the western path in the Coalition Camp and the best reinforcements to use against them is Archers.
2nd Wave Mages: Probably the hardest fight amongst the 3, you'll want to request the help of the wizard slayer unit that you have. Once the fight against the Crusade Mages is over be sure to cure any characters who have a debuff. Debuffs in this game last insanely long and they will stay with you into the next fight if you do not cure them.
3rd Wave Soldiers: Last but not least you'll have to fight a large group of elite crusader soldiers. Warmages are typically the best choice against this group of enemies.
After all 3 of these scripted battles are complete you will be told to go on the offensive and take out the remaining enemies in the northern part of the camp. The reinforcements that you did not use during the previous battles will join you for this fight without you having to ask them.
Once all enemies are dead you'll have some dialogue with Marshal Nederlok and you'll also (probably) notice Ophyllis who is at the northern end of the camp by the barricades. Talk to Ophyllis and you'll get a very dramatic scene after which you'll be able to pick up his weapon, Ophyllis's Short Sword +2.
When you are ready to continue to Chapter 11 of this Expansion Pack exit the Coalition Camp and travel to Dragonspear Castle.
Continue to Siege of Dragonspear Chapter 11 Walkthrough
Return to Siege of Dragonspear Chapter 9 Walkthrough

