
Persona 2: Eternal Punishment Walkthrough - (Nate Nanjo Route) Chapter 2
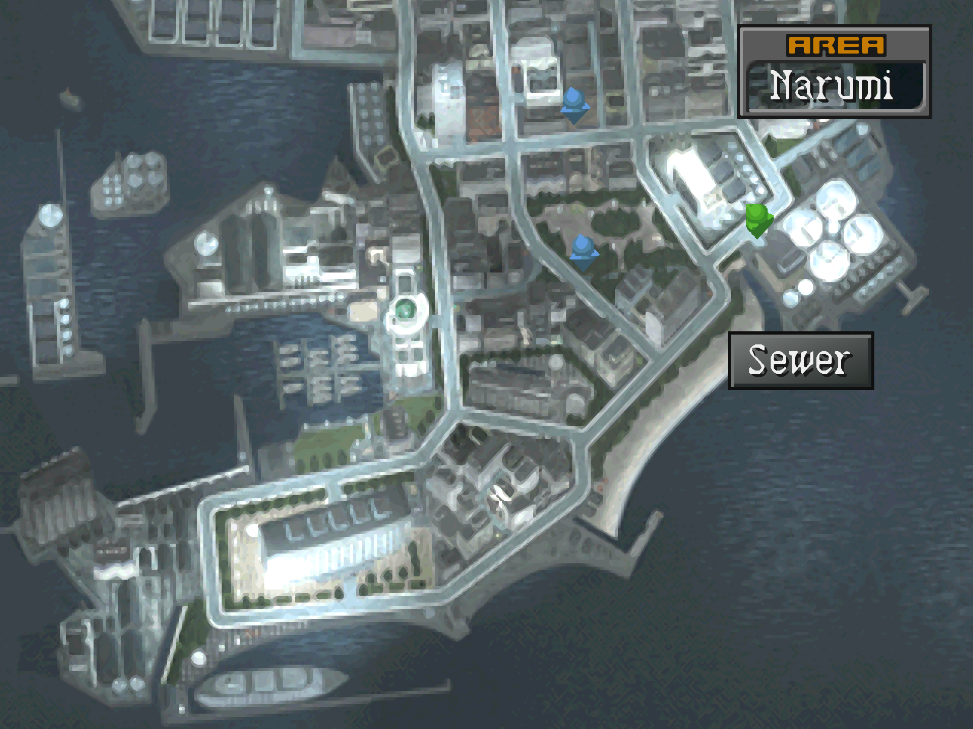
Nate's (also known as Nanjo) route begins with a dungeon in the Sewers. The entrance to this dungeon is in the northeastern portion of the Narumi Ward (pictured below). You will be given an option to go route A or B at the start of the dungeon and each time you finish an area. You'll always want to choose route B; there will be more treasure in this route and it's much more straight forward in terms of navigation.
One of the first things you'll notice about the Sewers is that they're timed, just like the Sky Museum. However, you won't get a game over if you run out of time... You just get washed back to the entrance of your current area. This isn't even as bad as it sounds because you'll keep your explored map as well as any treasures you found. If you want, you can take your time exploring each area and mapping it out then advance only when you're ready.
The Sewer consists of multiple parts, you'll have 10minutes per part and after each part you'll be able to choose between A and B routes again. Honestly, despite the dungeon being a maze of sorts it's pretty straight forward... having a map helps a lot! When you reach the end of the Sewer you'll find a door that leads to the Parking Lot.
You'll have a short scene when you arrive at the Parking Lot after which you'll gain access to the next dungeon, Science Lab.
At the entrance of this dungeon you'll find a Velvet Room along with a Trish's Fountain, for now the only thing we can do is head down to B1F. Search the northwestern portion of B1F to find a Scientist who will hand over the Lv1 Card without any fuss. This will unlock doors on B1F and 1F for you.
Note: If you're planning on doing Salam's dungeon mapping you will need to step on every single tile in the dungeon. That includes trap tiles; I explain more about this back on the Walkthrough Chapter 2 page.
Now that you have the Lv1 Card head south on B1F to some stairs that will lead you back up to the 1F but in a different area. You'll find a control panel in this part of 1F which lets you change which shutters are open and which are closed. Currently the B shutters are opened, you'll want to change that to A. This will give us passage to the 2F of the dungeon. A map of the first floor is shown below.
Tip: While you're grinding out this dungeon I strongly recommend you Summon the Marduk Persona from the Velvet Room and put it on either Katsuya or Baofu. Level it up to max rank and then Return it in the Velvet Room for an Agility Source. When you have an Agility Source equipped every level up will get that character an additional +1 Agility. This is very useful for characters who are naturally slow, like Katsuya and Baofu.
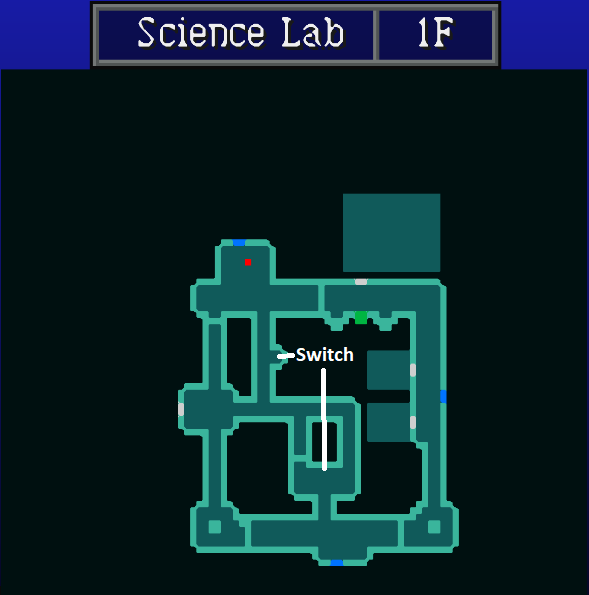
The 2F has floor traps and some new demons but the puzzle here is more or less the same as the previous floor. In the middle of the room with the HP floor traps you'll find a switch on the wall, press it if your administrative mode setting isn't already B. After pressing this button you need to go up to the 3F then back down to the 2F, with the right doors opened you'll have access to the eastern portion of the 2F.
Note: If you are mapping out this entire dungeon you'll also have to fix the elevators. To do this you'll need to form Contracts with demons in the dungeon and ask them for information. Eventually one will tell you that Rasputin found a Fuse Box Key. Once you have this information Contact a Rasputin, form a Contract and then ask him for the Fuse Box Key. The Fuse Box is found on 1F next to the elevator (marked with a green line).
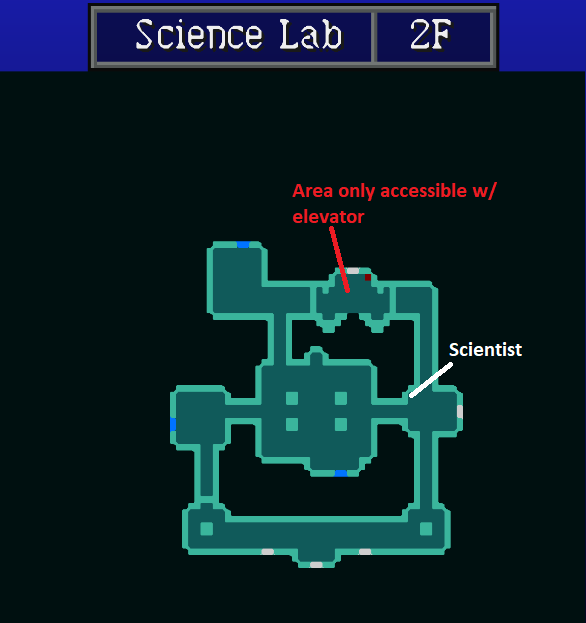
In the eastern portion of the 2F you'll find another Scientist, this one will give you the Lv. 2 Card which you can use to open the door right next to the Scientist and another door on the 3F. Once you've obtained this Lv. 2 Card all you need to do is open the shutter in the northern portion of the 3F and go through the door to find the boss.
Tip: If you're doing 100% of the map, you'll get a notification letting you know that you've finished it when you have stepped on every tile. I show a picture of what this looks like back on the Walkthrough Chapter 2 page.
Like I mentioned before, when you're ready to finish Nate's dungeon head to the northern portion of the 3F and open the shutter with your Lv. 2 Card. You'll have a short scene after which you'll be thrown into a boss fight with Devil Sugimoto. As you can probably imagine, the best strategy is to take out the two humans first then focus on the boss. Use your strongest Fusion Spells for a quick victory.
There will be some more scenes after which you'll regain control of your team in Baofu's Lair. Speak with everyone inside and then exit. At this point in time we're technically done the unique Nate route, however I will give you a bit more information before merging you back into the main guide.
While on the Narumi Ward map you'll want to turn in the corpse of Tsuchinoko to the Adventurer, he'll reward you with an Item Breeder. After doing this, collect the dialogue flags then head over to Salam to turn in our completed map and grab the next blank...
Nate Dialogue Flags: Speak with Nate at Sumaru TV in Aoba and at Parabellum in Aoba Dr. While in Parabellum speak with Baofu too and you'll unlock the Cynical People Group Contact. There's also apparently a dialogue flag at Shiraishi for Nate too, but for me the dialogue seemed normal.
Salam works a bit different with Nate than he does with Elly. When you have Nate in your party and you turn in a map you'll get a rare card as a bonus reward... I am honestly not sure why he doesn't do this for Elly too but ok...
Below is a complete list of all the rare cards you can get from Salam. If you wish to do some more save scumming the best one out of this list is probably the Flame Card since it will teach you Maha Agidyne. You can do the Meltdown Fusion Spell with this which will do a ton of damage.
Flame (Maha Agidyne)
Torrent (Maha Aquadyne)
Hurricane (Maha Garudyne)
Earthquake (Maha Magdyne)
Lightning (Ziodyne)
Ice (Bufudyne)
Torment (Freidyne)
Shockwave (Zandyne)
Pressure (Grydyne)
Annihilation (Megidolaon)
Recovery (Diarahan)
Blessing (Mediarahan)
Divine Light (Sama Recarm)
Sacrifice (Recarm Dora)
Anti-Force (Tetrakarn)
Anti-Magic (Makarakarn)
Return to Walkthrough Chapter 2