The Grounds - HoT Leveling Guide
The Grounds is one of the most popular places to level once it's added into the game. You can port directly here if you're a Wizard or Druid and there are dozens of different locations for you to make camp and TONS of enemies to kill. Plus the whole zone is basically a field! What more could you ask for in a leveling zone!!
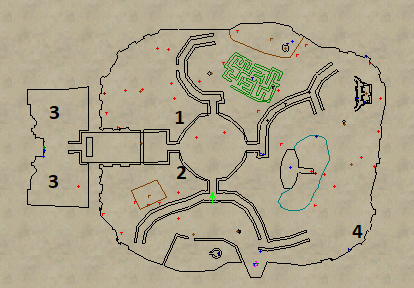
Using my map above, let's take a look at a few of the different locations that are good to hunt at in The Grounds. First up on the map we have #1 which is in the northwestern field area. This is my favorite camp in the entire zone - I've literally spent days here!
There's a few nameds that spawn in this part of the zone, generally they're all push overs except for the dervish named, Pelias. He has a really painful DD Knockback ability that is a real treat. Here is a list of all the named enemies which you'll encounter in this part of the zone:
Raze: Raze's Brainstem (Aug), Hollowed Rotdog Skull, Raze's Empty Cranium
Chaotic Heap:
Biunahde:
Compost Cube:
That just about covers this whole camp! Even with a full group it's unlikely that you'll be able to clear this entire camp without having to stop and med or get respawns. The second camp that I would like to draw your attention to is marked with a #2 on the map above.
Camp #2 is arguably the same as camp #1 just on the southwest side instead of northwest. It even comes with its own annoying dervish enemy that also has a DD Knockback - but wait there's more! This time it has a PBAE knockback which means it affects the whole group this time (yay)!
Here is a list of named enemies that you'll find in Field 2:
Helias: Helias' Howling Loop, Earring of the Blustering Winds, Contained Black Winds of Corruption, Box of Lifting Winds
Beget Cube: Gardener's Amice, Pristine Amice of the Garden Keepers, Scaled Fist
Rend: Belt of Flayed Rotdog Skin, Rend's Festering Rotskin Girdle, Rend's Hollowed Legbone
That's all for Field 2s named enemies. Not nearly as many as Field 1 which may be better for you if you only care about the EXP. The next place I have marked on my map above, #3 is right next to the zone in and this camp usually involves a bit more running around than the previous 2.
The mobs in this area are 'slightly' more spaced out than the other areas in the zone and you're right next to the zone line incase poop hits the fan you can bail immediately into House of Thule for safety (though you may wanna be careful HoT isn't exactly a safe zone).
You only have two named enemies to worry about in the area marked 3. Both of them are fairly easy in terms of the abilities they use against the player. Here's a list of drops from both nameds:
Kijaemz: Intricately Carved Visor of Treant Bark, Visage of Kijaemz, Sap of Rejuvenation, Treantwood Longbow
Andrevas: Pearl of the Courtyard, Fantastic Gem of the Garden, Glyphed Barrier
That's all there is to location #3! The last and final location I have marked on the map above is all the way at the eastern end of the zone shoved up against the wall we have #4. This camp is basically the same as the rest, although the 'camp sight' is a bit more unsafe than 1 and 2.
Technically there are 3 different named enemies that you can pull from Camp #4. Let's take a look at each named and their drops:
Angry Wasp: Striped Belt of the Wasp Drone, Striped Belt of the Wasp Commander, Band of Honeycomb, Waspwing Cleaver
Riggbit: Brilliantly Glowing Frog Eye, Riggbit's Glowing Red Eye, Dried Frog Skin Totem, Totem of Riggbit's Bouncing Banality
Distraught Heap: Dirt Encrusted Shoulderguards, Dirty Pauldrons of the Distraught, Golden Faceguard of the Devoted, Distraught Tendril
There you have it! All the different camps that I recommend in The Grounds and the nameds you can find there as well as the loot that they drop. Of course these aren't the *only* areas you can camp in The Grounds but they're some of the best areas I have found that I recommend to you.
Additional Information
- The fastest way for players to reach The Grounds is by Druid or Wizard portal. If you can't get a Dru/Wiz port you'll have to take the Oggok PoK Stone to Feerrott The Dream (or the Guild Hall).
- The Hotzone Aug that drops in this zone is for Int/Wis casters and is called Sentinel's Claw.
- If you're having trouble managing your Inventory Space I highly recommend you invest in some Extraplanar Trade Satchels which are 32 Slot Tradeskill Bags. Alternatively you could also buy Unexpanded Tailored Backpacks as well. Though, the Backpacks will likely be more expensive. Follow the links provided to learn more about each item.
- If you need more plat while leveling I strongly recommend you check out my How to make more plat while leveling by Bartering Guide. It'll give you a list of all the different items you should be keeping an eye out for to Barter/Sell!
The Grounds EQ Resource Zone Information
The Grounds Allakhazam Zone Information

