
Getting Started with IsBoxing In Everquest
This guide is the introduction guide to setting up your interface with isboxer. It's the second guide in my boxing with Isboxer series and it assumes that you've read Part 1 and you understand Key Maps and how to set them up. It also wouldn't hurt if you've already read Almar's Interface & List of Macros. I'm going to be talking a lot about my interface during this guide and referencing my own ideas.
One of the very first things you're going to have to do after logging in with Isboxer is setup your interface and figure out how to box. This guide will help you understand the basics of boxing as best as I can. For those of you out there who want to box but just can't figure it out, hopefully this guide will lead you down the right path.

The very first thing we need to do is setup a Hotbar for boxing. What I do is create keys that are specifically for boxing by using the Key Map Wizard in Isboxer. I use keys that are separate from all other ingame hotkeys, as you can see above, I am using the Num Pad.
I do not recommend you use hotkeys that serve any other ingame purpose other than being your boxing hotkeys. That also means I wouldn't recommend people use 1, 2, 3, 4, 5, 6 etc etc. If you read my Key Maps Guide you'll know that I taught you how to setup Key Maps that way you could use those exact keys I am telling you not to use right now. The reason for that is I know people won't listen to me and they'll do whatever the hell they want anyway. This way it'll at least cut down on some of the problems you'll face for being a WASD player.
Note: You'll have to turn Key maps OFF to utilize 1 - 9 for chat purposes with this setup. The most common issue with leaving 1 - 9 bound with isboxer is there's a very slight but noticeable delay with Isboxer and keys that you have bound with Key Maps. I very often find myself typing / 1 then my message. Instead of typing /1 then my message. If you can't tell the difference there's a space between the slash and 1 on the first line. The reason for that is Isboxer sends the number 1 command to my clients a fraction of a second slower than it sends the space bar which I hit after having typed 1. Still confused? Well, you'll see what I mean soon enough if you use Isboxer long enough.
So, the very first thing you need to setup is identical Key Maps and in game hotkeys. Find 10 buttons you really like that you wouldn't mind ONLY using for boxing. The screen shot below shows you 12 keys which I have bound to Hotbar 1 in Everquest. Press Alt O to open the options and then go to Keys and select different Hotbars to bind keys. Below are 12 of my Boxing Hotkeys - meaning they're bound in game and with Key Maps. Get it?
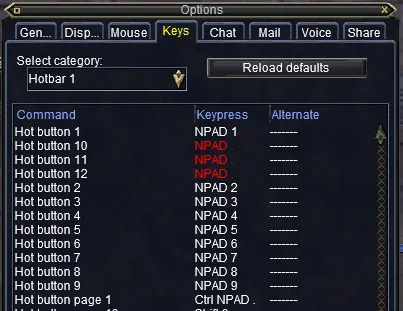
One thing you might notice is I have duplicated the DPS key. You should do this too - you'll want at least 4 key binds for your DPS key. They don't have to be all on the same hotbar. I explain why in more detail later, it's too much information to swarm you with now.

The hotbar that you see above this sentence is for Everquest commands only. Nothing you see here is bound in Isboxer for me - I only bind what's on this hotbar to the options menu (Alt + O) in Everquest. Also from here on out - I am going to be calling the keybinds on the hotbar above Character Specific Keys. This means that they will only work when playing that specific character. The other keybinds we're going to be using are Boxing Keybinds which means they're for your Boxteam, not just one character.
Those of you out there who need some hotbutton ideas I would recommend you utilize the F keys. F1, F2, F3 and so on and so forth. You will need to go into Everquest and unbind any keybind you see that is utilizing one of these keys (except the one you want to keep of course). The F keys are mostly used for camera repositioning and if you don't unbind all of them it'll reposition your cameras while you're trying to play and it'll be a total nightmare.
Another option for players is the numpad, which is what I primarily use. Again, you'll need to unbind all the keys in Options that utilize the Num Pad. Once you've chosen your keys, use my Isboxer Key Map Wizard Guide and add every key you want to use for Isboxer. Don't add the 6 - 8 character specific keys to isboxer but add them to Everquest under Options.
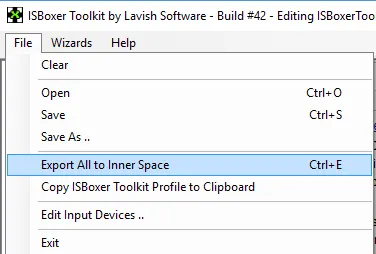
Here's a quick tip for everyone out there too. While you have Isboxer up and your box team loaded into the game you can instantly make any changes you've made to the isboxer console live ingame by going to File > Export All to Innerspace. This is shown in the screen shot below.
What this means (in English) is after you make a Key Map you can Export All to Innerspace and then immediately test it ingame to see if it works without having to relog!
It's going to take you awhile to choose your keys, set them up and then test them ingame to see if they work. After you do all of this though you'll be ready to move onto the next part of the guide. The next part of the guide covers what macros to make for your team that way you can actually play them and goes over some of the best ways to move around multiple characters at a time.
There's still lots more for you to learn and I am going through things as simplistically as possible that way everyone can learn how to box through this guide. If you feel the information is a bit too slow for you then I recommend you just skip over to Almar's Interface and Macros and read that page. It's a less hold-your-hand type of guide and I believe about half of you would prefer that guide to this one.
Those of you who like this guide and would like to continue forward, let's skip on ahead to part 2!