
Dragon Quest 2 Walkthrough - Chapter 3
Chapter 2 concluded with us entering the Cave of Rhone to get the Life Crest item. We then took that item to the Shrine of Spirits and turned it in along with the other 4 Crests. Doing this got us the Charm of Rubiss which is something we'll be using in a bit.
For now, we need to return to the Cave of Rhone and continue through the dungeon. Our destination is the snowy area in the middle of this continent. Take your time in this dungeon because the next dungeon is the final dungeon and we will want our hero to be level 30 - 35 minimum before challenging the final boss. My hero was level 25 at the time of starting this dungeon which means I had to put on about 10 levels in total.
Keep an eye out for the Metal Slimes that roam this cave, on the SNES version they're called Metal Babble. Each time you beat one of these enemies you'll get 10,150 EXP per party member. My advice is to use a save state every time you get into a battle with one of these and keep reloading until you beat it. Doing this will save you a lot of time grinding for levels. I got a bit carried away and went to level 40 here.
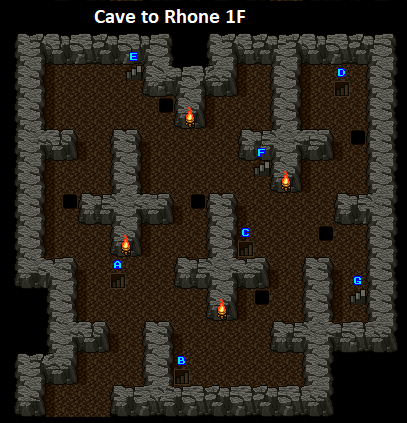
So, as for the Cave of Rhone, there are two stretches which are extremely confusing. In the first part of the cave you'll have numerous pit falls, multiple stairs going down and 3 stairs going up. The stairs you want to take for progression are in the middle of this area (marked F on the picture below).
Note: Full credit for the map on this page goes to this website. It was the best map I found online for this dungeon but it was too big so I chopped it up into floors to make it easier to digest.

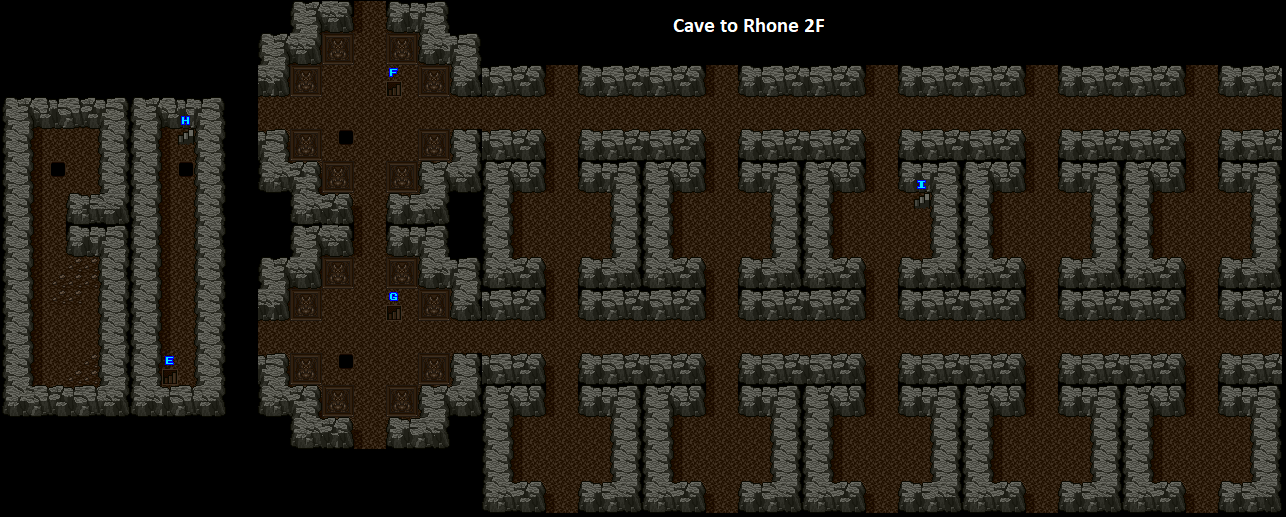
The 2F is a lot more confusing since it has the same layout and you can only see parts of the floor at one time. You'll literally have to count the entrances as you go east to make sure you always get the right one with the stairs. For this dungeon I am only going to point out the obvious treasures and for the most part I will mention them on the pictures of the map themselves.
On the 2F you're looking for the stairs marked T on the image below to advance. They're found 3 entrances to the east from where you come up the stairs on the 1F.
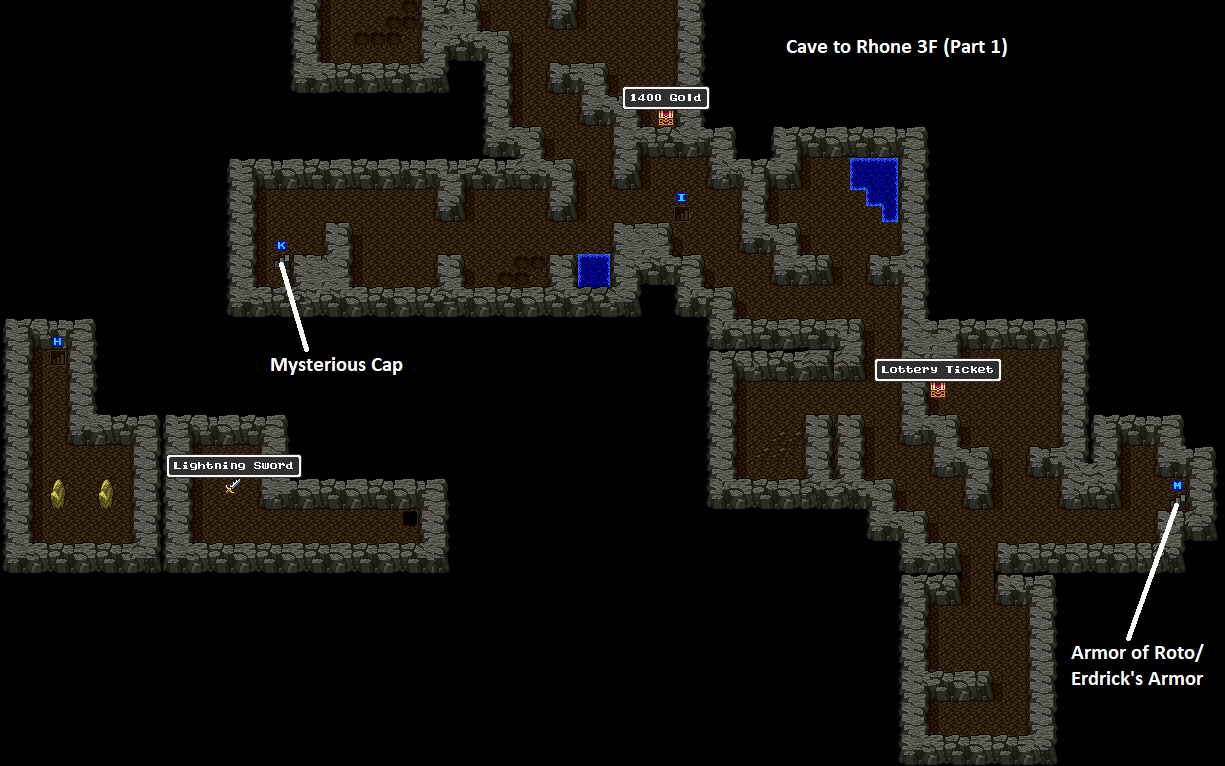
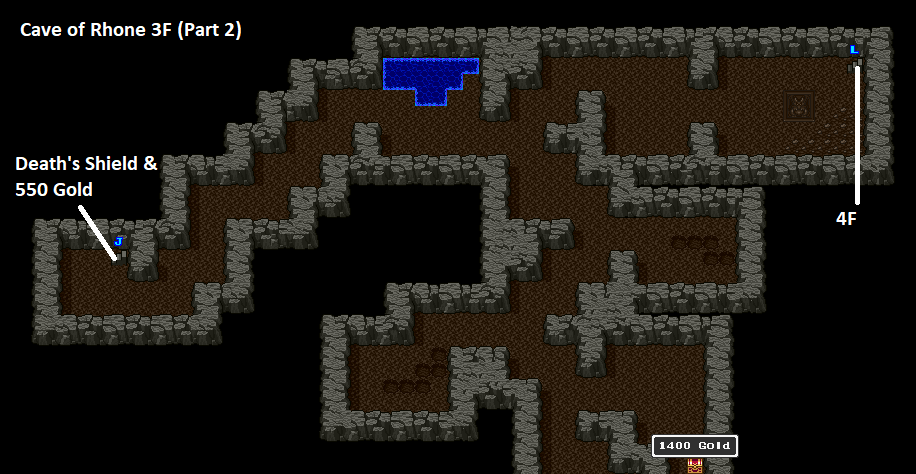
I split the map for the third floor into two parts, it has a lot of alternating paths but they all dead end pretty quickly into treasures. One thing to note about the treasure rooms though... As you advance up in floors you'll start to get random encounters with harder enemies, like Dragons. If your Hero is still in his mid to low 20s you should be wary of the Dragons because they hit very hard and hit multiple targets every round.
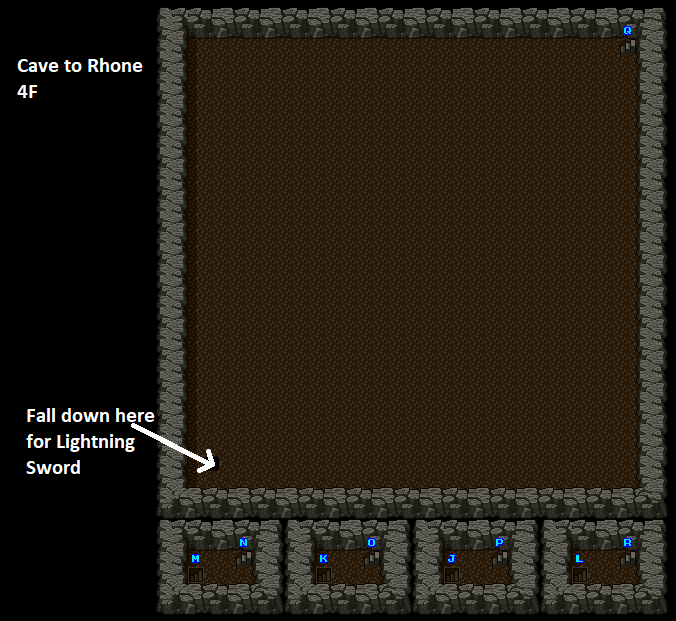
While you're in this part of the dungeon I strongly recommend you collect the Mysterious Cap and the Armor of Roto/Erdrick's Armor. Both of these items are best in slot (cap for princess and armor for our Hero). Once you have these items you can go up the stairs marked L in the picture below (I have an arrow too that says 4F). This will take you to the next floor(s).
The 4F is one you'll mostly skip, but it does have one very important thing to grab... In the bottom left corner of the large room you can fall through a trap floor and into the room with the Lightning Sword. You should definitely get this item because it is a best in slot weapon for your Hero. To reach the 4F giant room all you need to do is visit the 5F and fall through one of the trap floor holes.
When you're ready to complete the dungeon go up the stairs that I marked "to final floor" in the picture below. There will be one more puzzle left before we complete this dungeon.
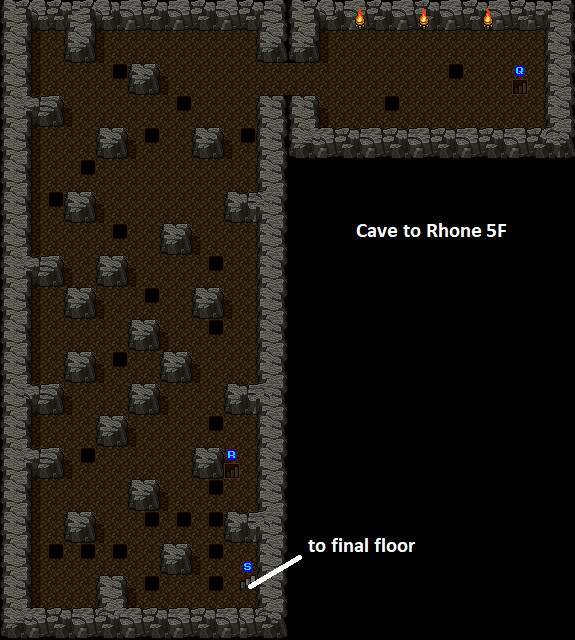
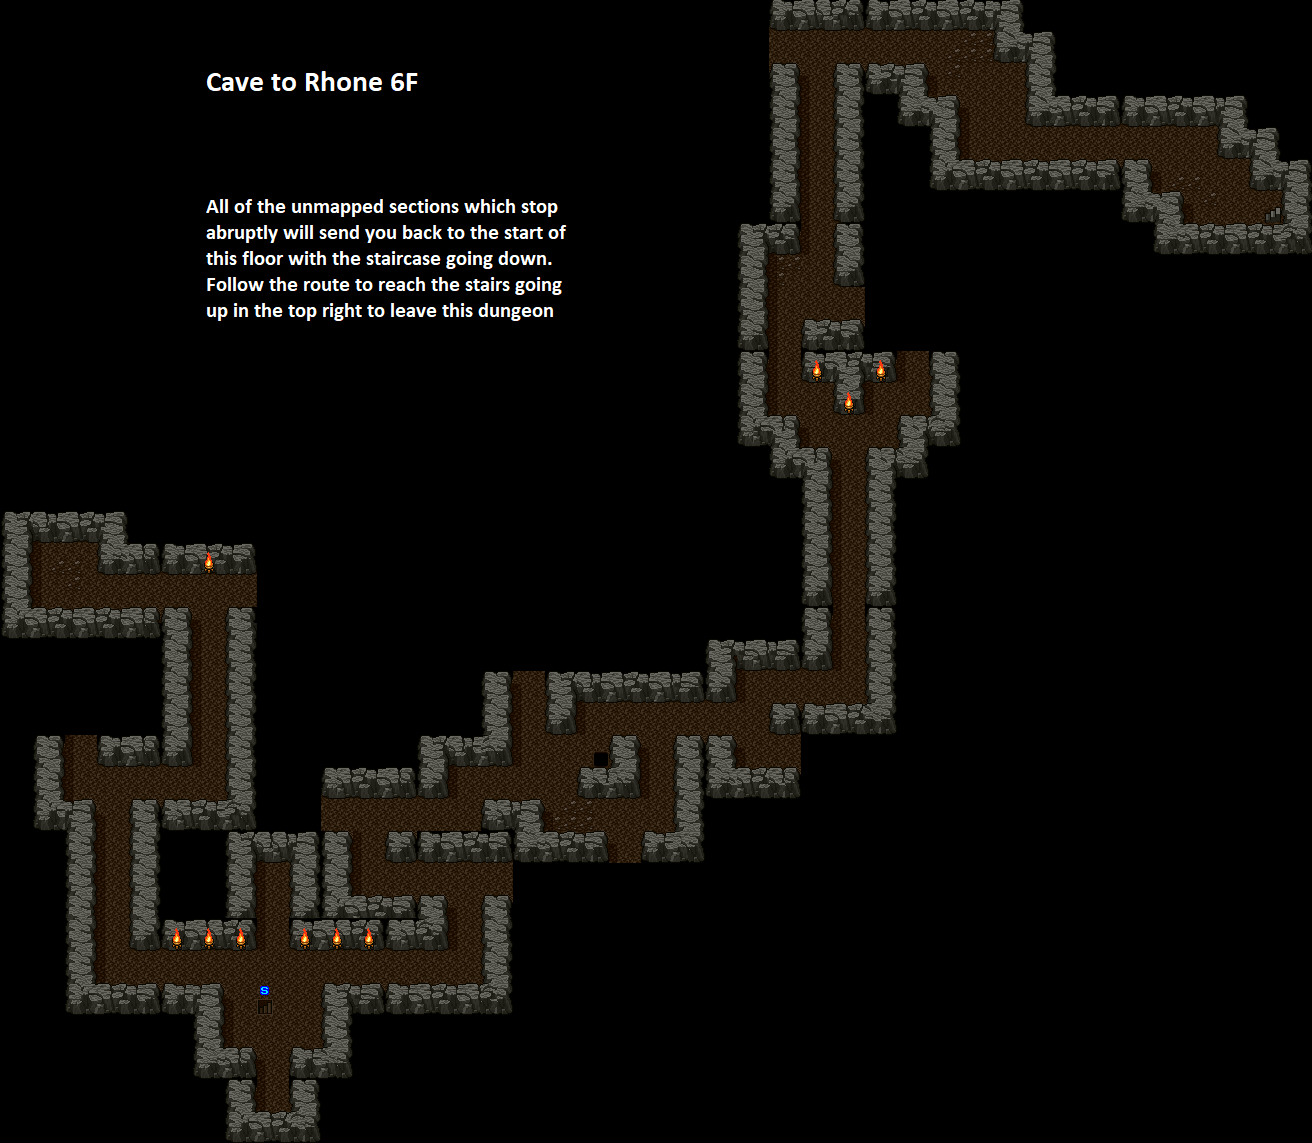
On the final floor of this dungeon you'll find a puzzle that resets you back to the entrance if you go the wrong way. There are certain paths that you can take which will allow you to move forward, if you take the wrong path you will be sent back to the start of this floor.
Instead of learning this entire floor through trial and error, take a look at my map below. Any route that abruptly ends will send you back to the entrance. Our goal is to make it all the way into the northeast - you will find a set of stairs going up here which lead out of the dungeon.
Leaving the dungeon will put you in the land of Rhone, you can find the Rhone Shrine to the northeast. If you need to restore your HP/MP you can do so by talking to the guy here. It also has a teleportation pad which takes you back to the Rhone Southern Shrine before the Cave of Rhone dungeon.
As I mentioned before, you should really get your Hero to level 35+ before we continue with the last dungeon. Even at level 35 you're going to find some difficulty with the enemies in this area... everything hits really hard! I got to level 46 on my Hero, I spent about 2hrs in total grinding Metal Slimes in the Cave to Rhone. I'd recommend you be about my level if you used your Prayer Ring items from earlier in the game... Since everything hits so hard you consume mana quickly and there's no way to restore your mana except to leave the dungeon and return to the Shrine nearby.
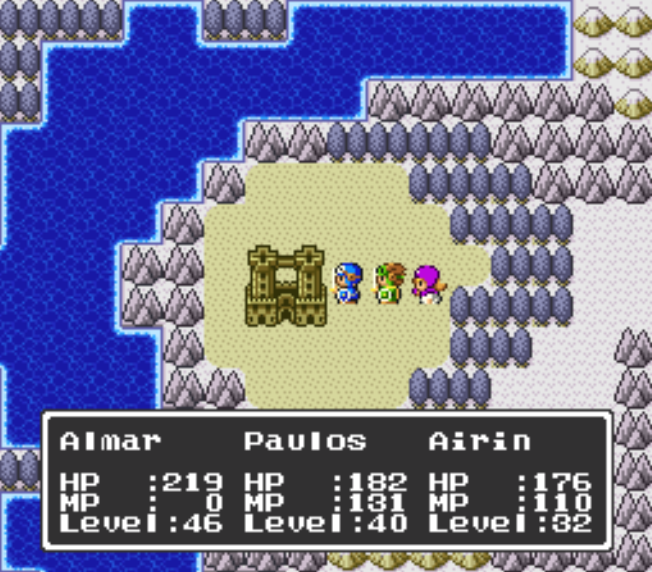
The final dungeon of the game is found to the west of the Rhone Shrine, you're looking for Hargon's Shrine (pictured below).
When you first enter Hargon's Shrine you will need to use the Charm of Rubiss item that we got earlier. The whole area will look like the first town of the game but it's an illusion, the only way to dispel it is by using that charm. Once the charm is dispelled you need to go up to the wall behind the throne in the middle of the room. Use the door command when you're standing in the area shown below. The Jailor's Key is required to unlock the door here.
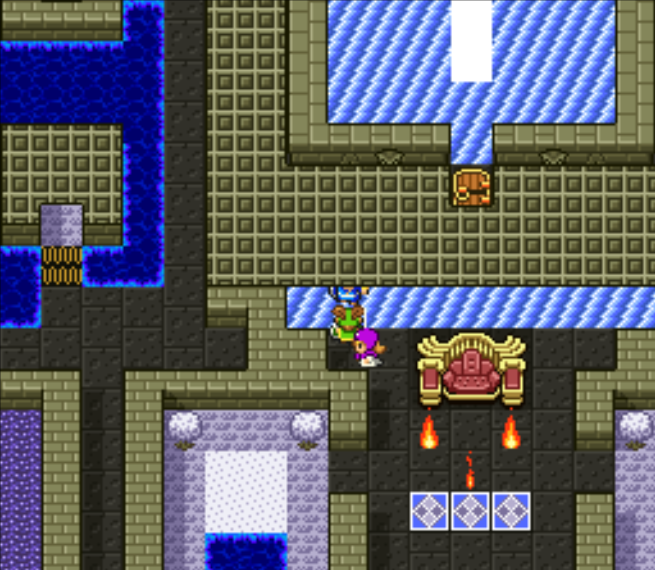
Use the Jailor's Key to unlock the door
Once you get past this door you should cast Stepguard on yourself if you haven't already. We're going to be walking across a lot of tiles that deal damage. Go through the Jailor's door and use the Door command again on the black hole three tiles east to the north. If you look at the picture above you can see there is obviously a gold door there... although it doesn't show up ingame inside of this room.
In the next room you'll find some more floor tiles which hurt and a large white cross in the floor. Stand in the middle of the cross and use Eye of Malroth to be teleported to the next floor. The next few floors of this dungeon are very linear but are filled with boss battles before many of the stairs and also tough random encounters throughout. One upside is you can still encounter Metal Slimes here which will give you 10k EXP when defeated. This makes leveling up a bit easier if you still need some levels.
My other piece of advice while climbing up this tower is to use your Prayer Rings. If you took my advice earlier in this guide and saved them, you can finally start burning them now... turning around to go back and rest at an inn is very time costly.
Below are the bosses you will fight on your way up the tower and what to expect from them.
Atlas: He sometimes attacks twice per round.
Bazuzu: Caster, he has a lot of spells but the heals and AoE ones are the most annoying.
Veliar: Basically an Atlas and Bazuzu combination. He is a strong melee fighter with HealAll and Explodet. If you're unlucky he can pump out some serious AoE damage.
Hargon: Much like the previous boss just more difficult.
When you beat Hargon you'll want to use Prayer Rings to restore MP and heal up. This is your last opportunity to do this before the final boss. Walk around in the area you're in to make a bunch of fires pop up and corner you. Once you trigger them all Malroth will appear.
Honestly there isn't much to say about this boss, he is a slightly stronger version than the other bosses you've faced in this dungeon. Once you beat him all random encounters are disabled throughout the dungeons and world. You'll have to return to the town we started the game in to finish though. Sail (or Zoom on later versions) back to Tantegal and speak with the King for the final scene and end screen.