
Dragon Quest 2 Walkthrough - Chapter 2
The previous section of my Walkthrough ended with many side objectives to collect better items and loot as well as some requirements to advance the story. After obtaining the boat there was a lot for us to do - if you think you missed any of those locations I recommend you go back to Chapter 1 of my Walkthrough for more information.
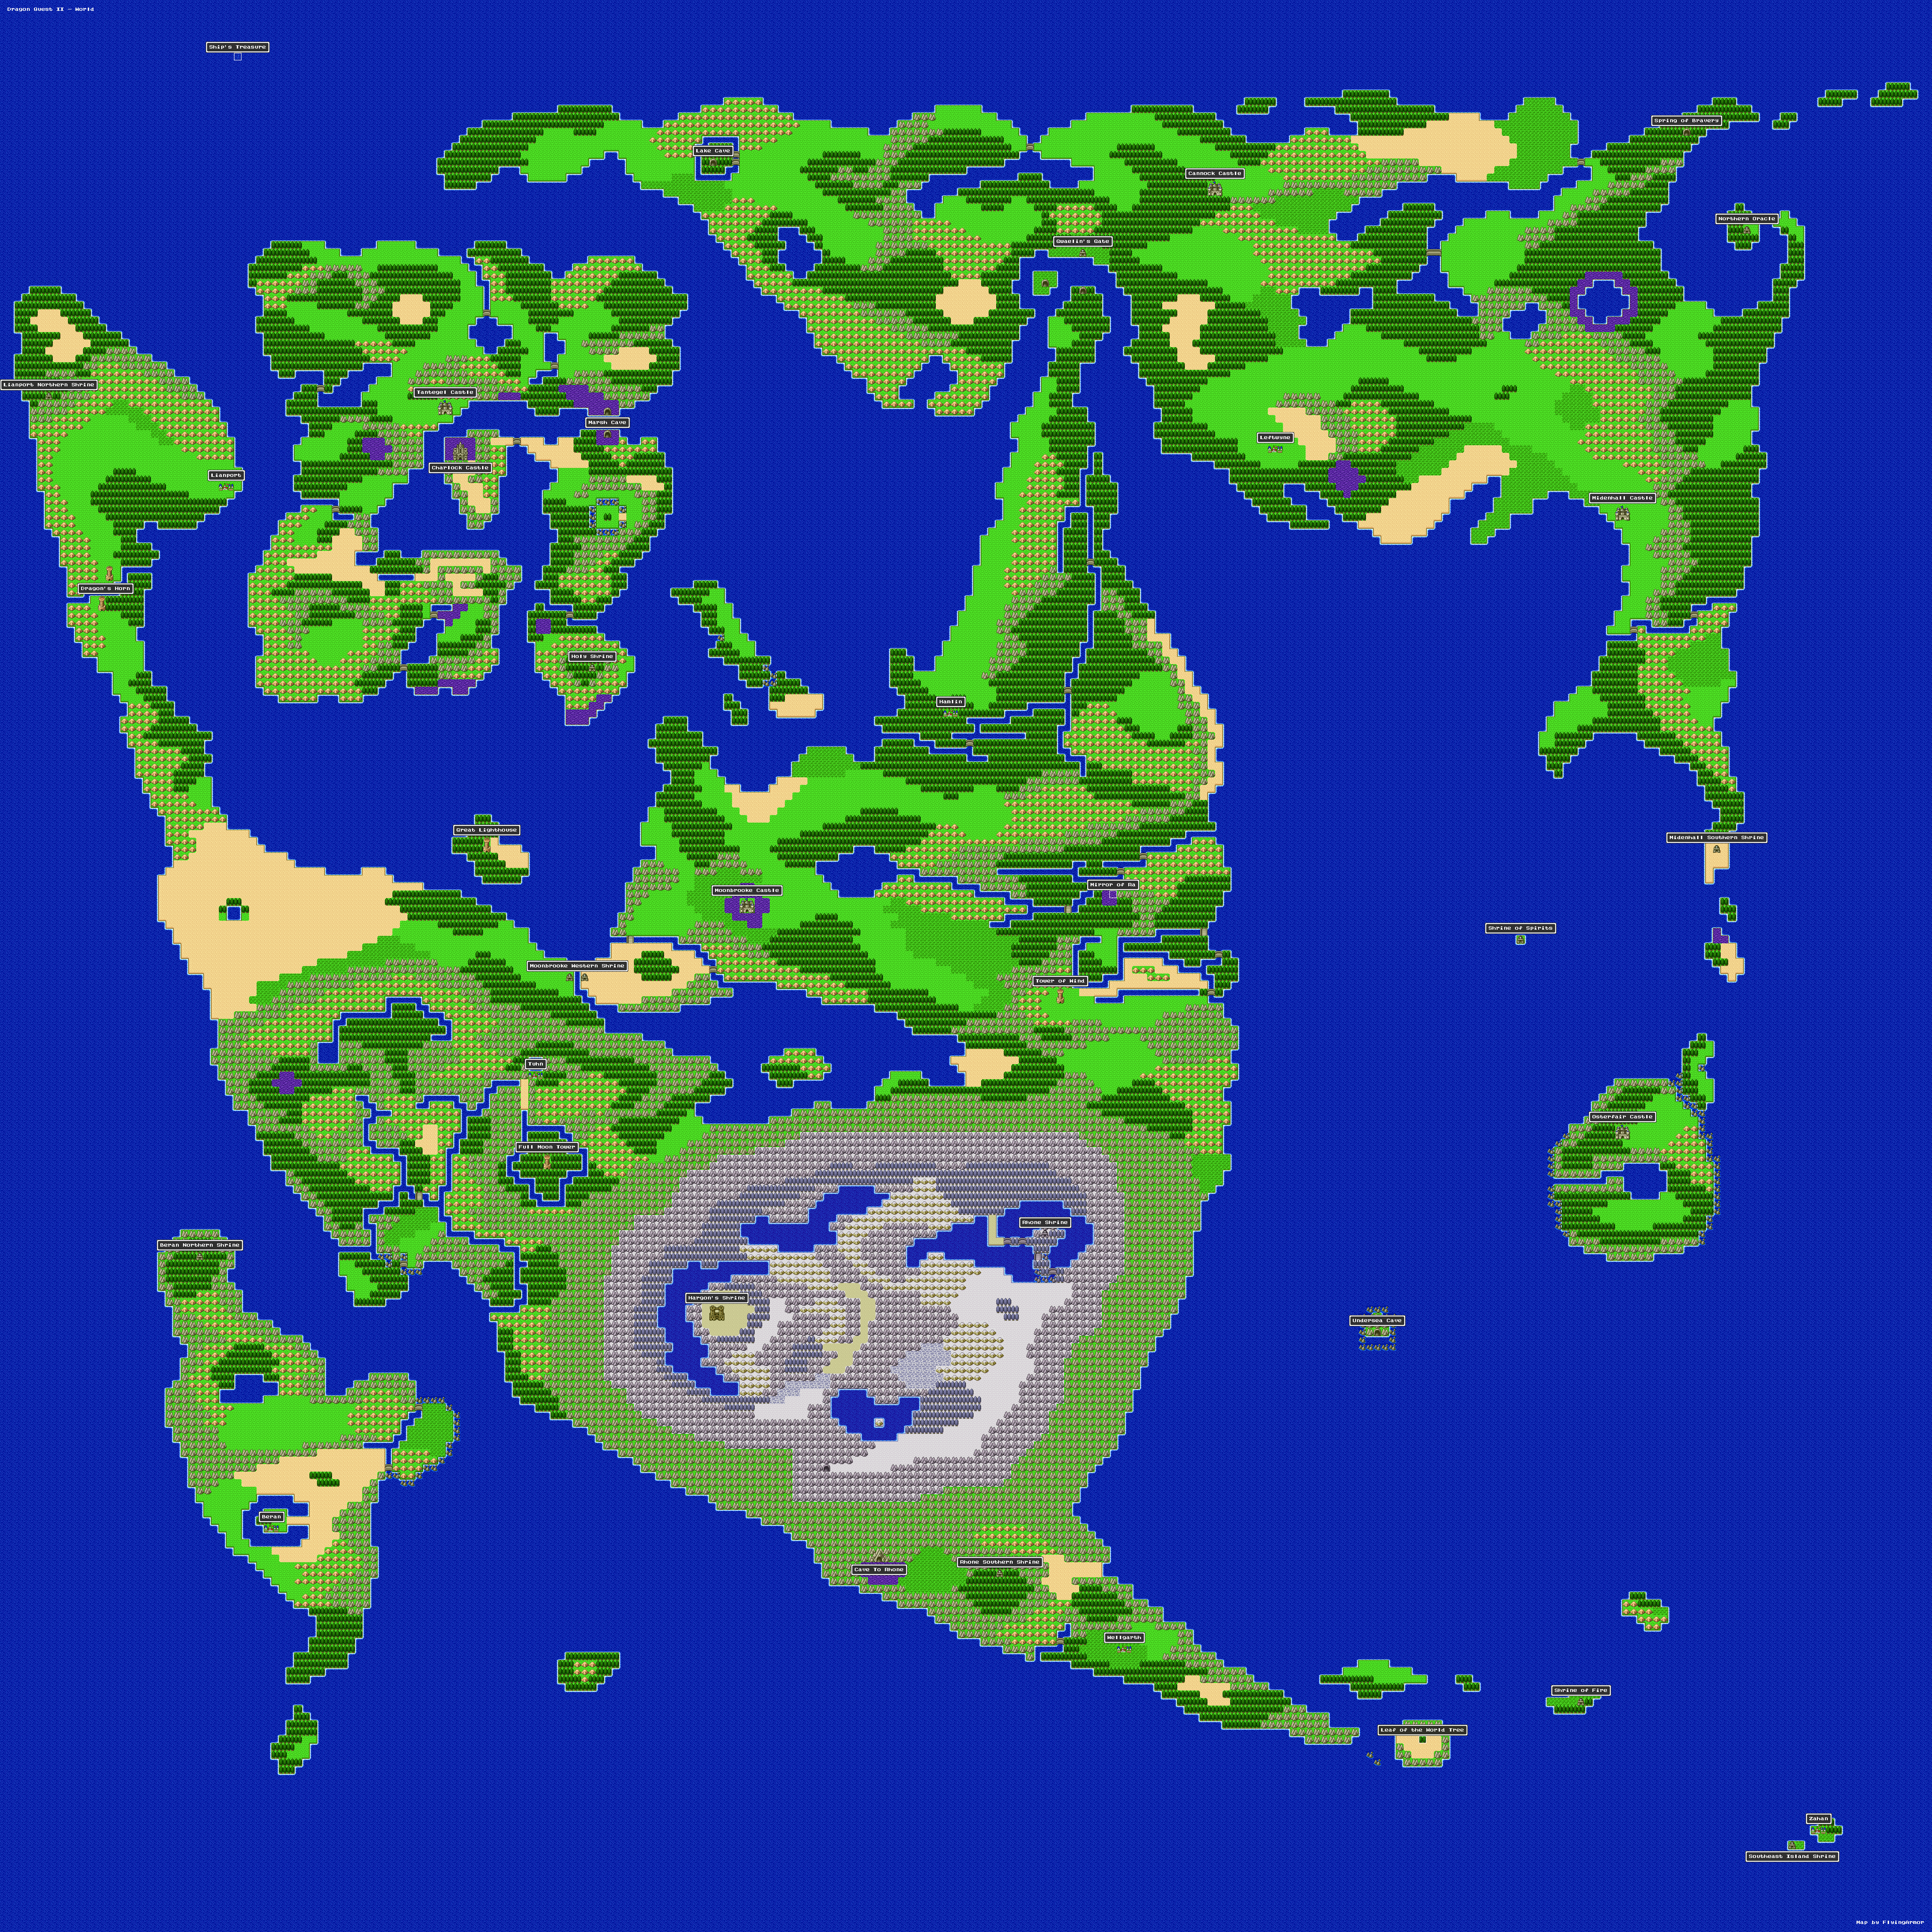
Below you'll find an abridged list of the locations on the previous page. There is one story location below as well as the most important items that you should collect. If you need help finding these locations check out my extra large World Map.
(Required For Story) Jailor's Key/Watergate Key: Visit the town of Wellgarth/Burrowell and purchase the (blank space) from the Item Shop in the west. This will give you the Jailor's Key. Next, visit the jail in the northeast and go into the cell on the right. The cell will have perfect floor tiles except the one to the right of the pillar, if you walk into the wall to the right of the pillar you'll find a secret room with Rogue Fastfinger. Talk with him to get the Watergate Key/Floodgate Key (name changes depending on your version).
Important Optional Loot:
Erdrick's Shield (Shield of Roto): Visit Cannock Castle once you obtain the Gold Key and open the one door here. Inside is a chest with Erdrick's Shield aka the Shield of Roto.
Erdrick's Helm (Helm of Roto): First you'll need to visit Midenhall and raid the treasure room to get the Mark of Erdrick/Token of Roto. Once you have this item you'll need to visit the Holy Shrine which is southeast of Tantegal; trade the Token/Mark to the NPC inside and you'll be given Erdrick's Helm.
Sword of Erdrick: You must visit Charlock Castle aka the old Dragonlord's Castle from DQ1. You will obtain this item about half way through the dungeon; just like in the first Dragon Quest game you will go down a few staircases then switch to a new set of stairs and go back up to reach this sword.
World Map: That's right, as the name suggests this will let you view a World Map ingame! In the final portion of Charlock Castle you will find a treasure room which can only be reached by going across a floor that damages you with every step. Heal every 3 or 4 steps and you will be fine, you can teleport out after looting the chests.
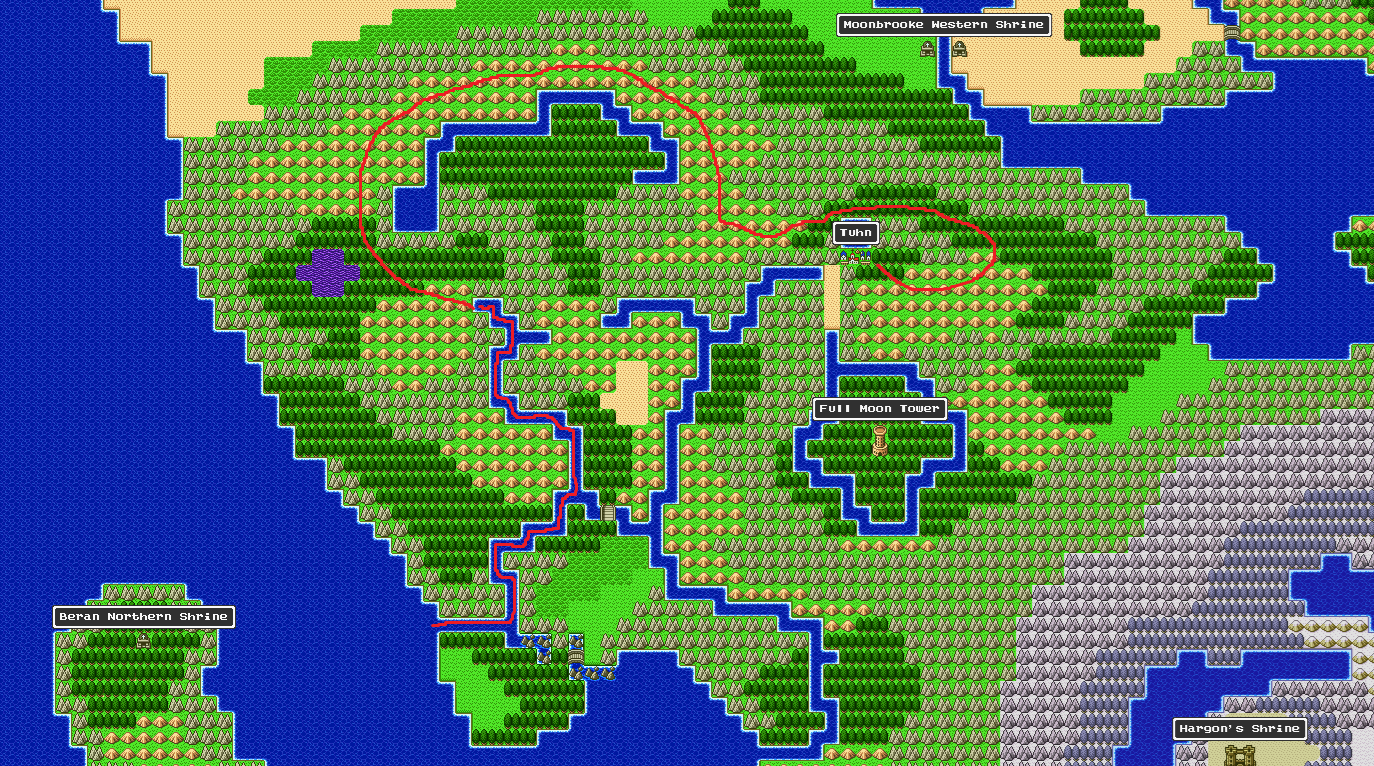
After you're done sailing around it's time to continue with the story and clear some of these items out of our inventory. Our next destination is the city of Tuhn... or if you're playing on the Switch/Mobile it's called Slewse. To reach this place you'll first want to go to Welgarth (or Burrowell on Switch/Mobile). If you're on Switch you can just Zoom here which is really great, NES and SNES can't.
Follow the coast northwest from this town and you'll come across the two rivers shown in the map above. Enter the second river you come across and follow it up to the north. You'll have to dock it at the end of the river and then continue along land to reach our next town.
The first thing I recommend you do in this town is sell your junk and purchase any upgrades that you can. If you want, grind some on the enemies outside of this town to make more gold too because there are many good upgrades here. When I first came to town I had about 30k Gold ready to spend and I got mostly everything I needed.
Open the gold door in this town and go downstairs to meet Don Calico, if you have the (SNES: Sacred Loom + Dew's Yarn) or (Switch/Mobile: Subtle Shuttle + Celestial Skein) he will automatically take them from you and start crafting the Flowing Dress. Or as it's known on the SNES and NES, Robe of Water.
If you're playing on the SNES or NES you will need to save your game and stop your adventure. Log out of the game and restart it then log back in and Don Calico will be complete. Those of you playing on the Switch/Mobile will have an easier time, you can rest at the Inn.
Before you leave Slewse (Tuhn on the NES/SNES) you will want to open the Floodgates in town, this will give you access to a future story dungeon. To reach this location you will want to travel north along the item shop in the northeast part of town. There is a dog running back here which lets you know that you can walk back here. Continue west from this location and you'll find the area in my screenshot below.
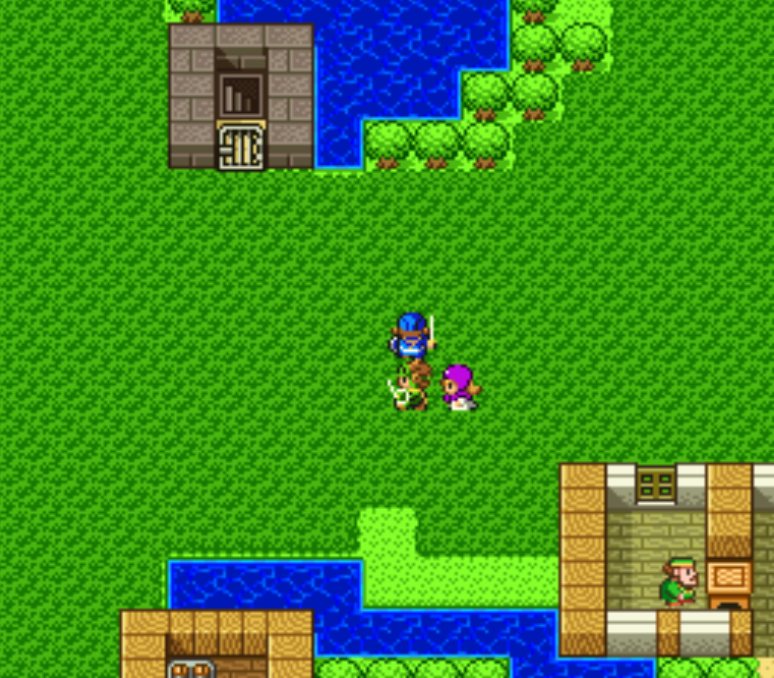
Go into the building shown above in northern Slewse to reach the Floodgate.
Enter the building in the northern part of this area, you'll need the Jailor's Key to open the door. Inside you'll have to stand in front of the lock on the wall and use your Floodgate Key (SNES: Watergate Key). Doing this will give you an easy access to this town in the future and it will also give you access to a very hard dungeon which you are likely not prepared for.
Instead, let's return to our boat and sail it west of Slewse to a new castle town called Dirkandor (SNES: Osterfair Castle). Check the extra large World Map if you are having trouble finding Osterfair Castle (it's called Osterfair Castle on this map). When you arrive in town the first thing I recommend you do is run around the entire town counter clockwise.
Stay in the tight tunnel as you do this, at the end of the tunnel you'll find a teleporter which you'll want to ignore. Southeast of that teleporter you will find a door which you can open by selecting "Door" in your menu. This will give you access to the back room of the Item Shop which has the Tectonic Plate and Divine Dagger items inside of the chests.
If you want a Seed of Strength open the jail cell in the top left corner of Osterfair and talk to the guy to free him. Search the ground in the back corner of this room for a Seed of Strength! For the story objectives here, speak with the King and tell him you will entertain him. Walk south and you'll battle a sabercat, beat him and speak with the King a second time for the Moon Crest.
That's all we need to do in this town, the next dungeon that we need to do is the Lighthouse. Before we head over there though let me explain more about this Crest item and why it's important. We need 5 of these to unlock an item that is required for game progression. We're about to get another required Crest in the Lighthouse. If you'd like to get the others now you can, otherwise you'll have to get them later.
Getting them now means you'll get more EXP and level ups which will make the next two dungeons easier. The choice though is ultimately yours.
Star Crest: Found in the Lighthouse dungeon, it's guarded by 4 Gremlins. We'll take about this further down the page.
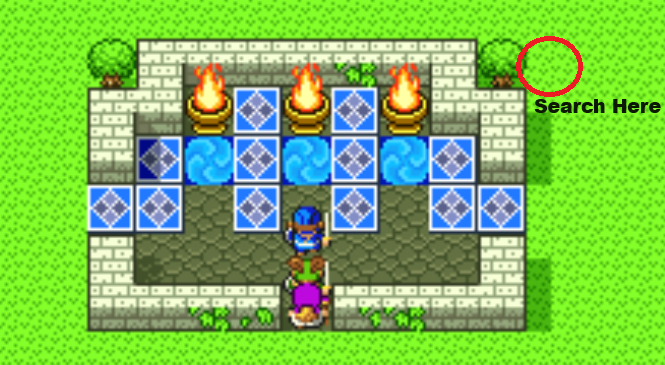
Sun Crest: You'll find this by searching a specific tile in the Shrine of Fire which is on a small island south of Osterfair Castle (Switch/Mobile: Dirkandor). The tile you need to search is in the top right portion of the dungeon, next to the tree outside. A screenshot of the tile I am talking about is shown below.
Water Crest: Return to the town of Moonahan (SNES/NES: Hamlin) and use the Jailer's Key and Gold Key to reach the jail cells and unlock them. Inside you'll beat 2 Grimlins, Search the cell once they're defeated to find this item.
Soul Crest (We get this later): On the original NES version of this game you'll need to visit Tantegal and use the Gold Key to open the door on the second floor of the Equipment Shop. Speak with the King inside to get the Soul Crest. When playing the SNES/Switch/Mobile remake you'll find the Soul Crest inside of a chest on B1 of Rhone Cave (Rendarak).
Moon Crest: Speak with the King in Osterfair (Switch/Mobile: Dirkandor) and agree to entertain him, go south and beat the cat then speak with him again to get this item.
The Lighthouse Dungeon with the Star Crest is found south of Tantegal and Charlock Castle. It's almost directly south on the World Map on a small island (pictured below).
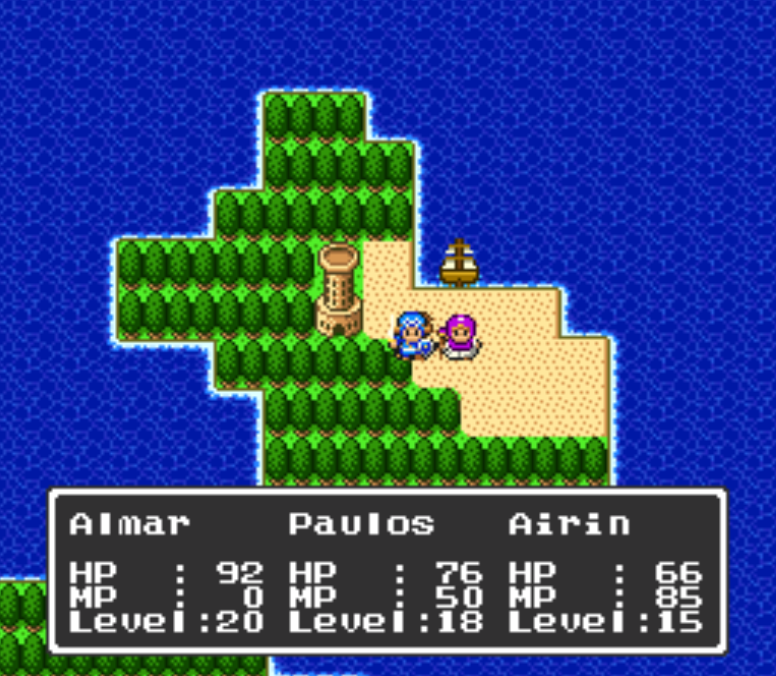
The Lighthouse is your first confusing dungeon of the game. You will find many branching paths which take awhile to hit dead ends, I am only going to cover the route we need to follow that goes up to the Old Man on the 7F. In the middle of the first floor you'll find four staircases, we need to take the one in the bottom left. It will lead you to an area that's exposed to the outside on the west. Go south and up the set of stairs here (pictured in the top left in the image below).
From here you'll go up the set of stairs shown in the top right of the image below. The next set of stairs is to the north and you have to avoid falling off to reach them; this is shown in the bottom left image. Once you make it to these stairs it's pretty straight forward through to the end with the old man (bottom right picture).
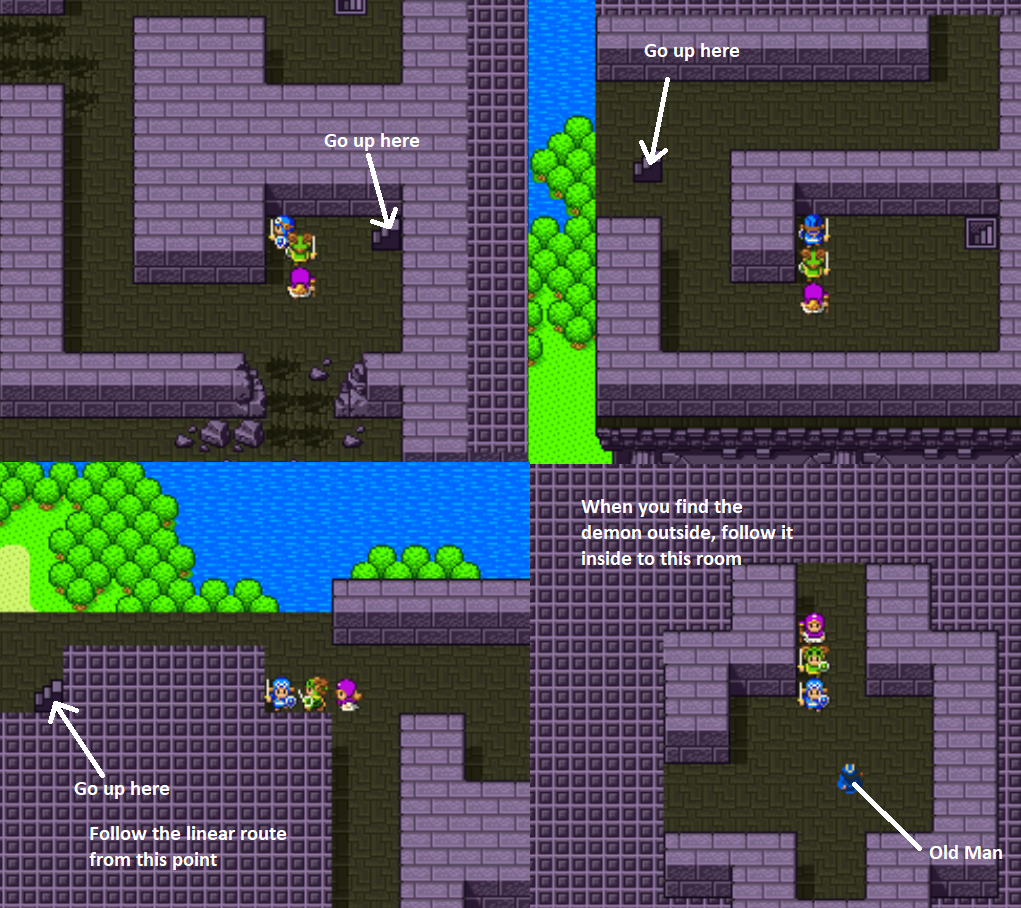
If you get lost in this dungeon just go back to the 1F and follow my directions above. Only the correct staircases are shown in the picture above so there shouldn't be much confusion. When you reach the Old Man talk to him and then follow him to the chest. The chest is empty, when you open it the Old Man will transform into some Gremlin enemies and attack. Beat them and the Star Crest will be your reward.
Once you've finished the Lighthouse and obtained the Star Crest it's time to collect any remaining Crests that you need. The full list of all 5 is above. When you have all 5 it's time to visit the Full Moon Tower which is found south of Tuhn. As I always recommend, use the large map to see where you're going. Navigating this overworld without some sort of map is a total nightmare.
You can reach this dungeon by following a river up the coast and past Tuhn. On the map we're using the river will appear to stop at Tuhn, but if you used the Watergate Key in that town like I told you to do earlier in the guide... this sand bar will be a river now. After opening the water gate in Tuhn you'll have easy access to the Full Moon Tower.
Like the last dungeon there will be many different routes you can go for loot... There's a Prayer Ring in the chest at the top and many more useful items throughout the dungeon. I had no trouble finding my way through the place, it seems confusing at first but there aren't many branching paths. What you're looking for is two doors that are blocking a staircase going down (pictured below).
Tip: Save these Prayer Rings for the final dungeon. We will need them to restore our mana.
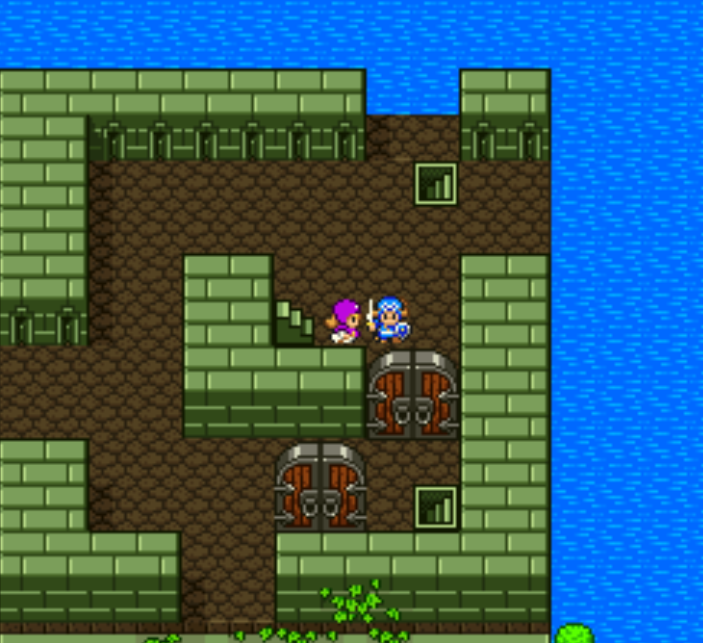
Open the door(s) and go down the stairs to find the Moon Fragment.
Go through the doors pictured above and down the various stairs until you reach a small room with an old guy and a chest. Talk to the old guy and open the chest for the Moon Fragment. Leave this dungeon and head to the 'Leaf of the World Tree' island in the bottom right of the World Map. The next place we need is almost directly north above this island; it's called the Undersea Cave. I recommend you use the map for best directions.
If you go north of the island I am talking about you'll have to sail around the small island just above it... don't let this screw up your line up though, just reposition then sail directly north. When you reach the Undersea Cave line up with the entrance (hug the stones in the water) and use the Moon Fragment in your inventory. The rocks surrounding it will sink when this is done, now you'll have entry to the dungeon.
This dungeon was extremely buggy for me on my version of the game, I am not sure if it will be like that for everyone... but I advise spending as little time here as you can. For the most part the glitches were all graphical but one time my screen went totally black and I was basically frozen. I had to reload a save state to fix it.
As far as navigating this dungeon goes... You'll want to search for the area in the picture below (on the left). In my opinion the best land mark for this is the guy standing next to the stairs to my right in the picture. There aren't many friendly NPCs throughout this dungeon so they stand out when you find them. Run up the lava river next to him to the stairs shown in the picture.
Tip: Cast the Stepguard spell when moving across terrain that damages you. It will prevent you from taking damage.
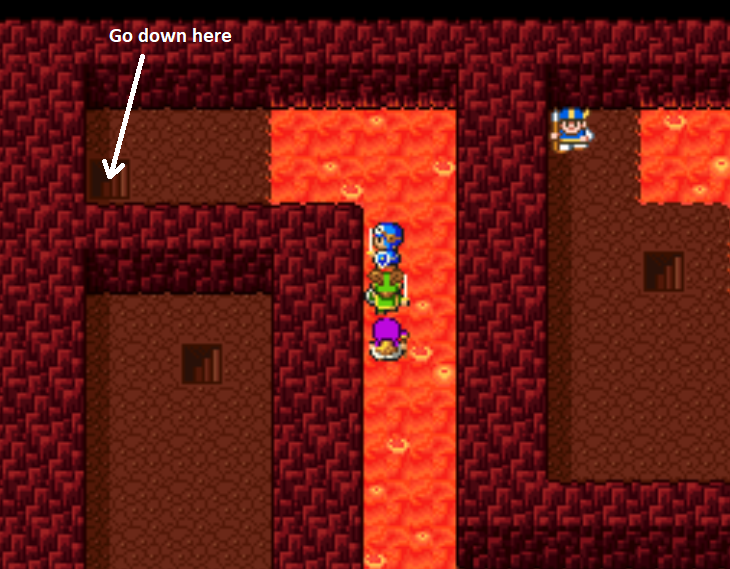
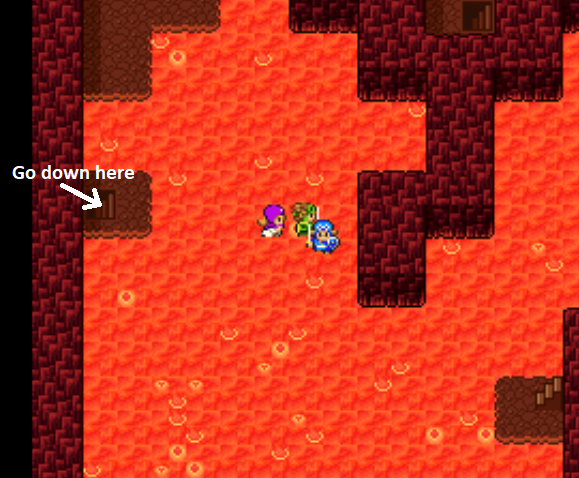
The next room has a ton of staircases which go down in all different places. Some of them will lead to treasure chests so I recommend you explore a bit as you grind some EXP. When you're ready to advance you'll want to go down the stairs shown in the picture above on the right. You will need to run across a lot of lava to reach these stairs, they are found in the western portion of the room.
After going down those stairs you will have a little bit more dungeon before finding the 'boss' room. Interact or try to run by the monster you see standing in the open and he'll attack you with a friend. Once you've beaten them interact with the "chest" in the back to get the Eye of Malroth item. Technically the whole box is the item, it's not actually a chest (despite looking like one).
Once you have the item we came for cast Outside to leave the dungeon. Our next stop is the town of Beran, use the map for better directions. It's a short sail northeast from Zahan. Inside Beran you'll need to visit the Church and unlock the door behind the Priest to gain access to a teleportation pad which will take us to the Rhone South Shrine.
Note: If you rest at the Inn in Beran the Prince of Cannock will fall ill. The only way to cure him is by using Leaf of the World Tree on him. You can obtain this leaf from the island west of Zahan that I have talked about earlier in this guide. Use the item on the Prince through the regular item menu. When you stand next to his bed he'll show up as in your party.
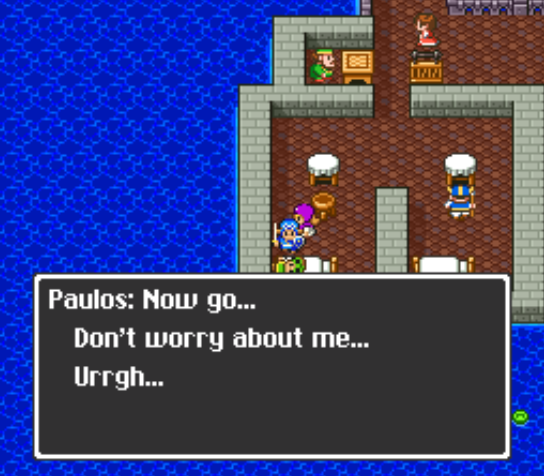
Feed the Prince of Cannok the Leaf of the World Tree if he falls ill in Beran
When you take the teleportation pad behind the priest you'll arrive at the Rhone South Shrine. From here go directly south of the teleportation pad to exit the building. Travel west of this shrine to the poison swamp, use the Eye of Malroth while standing near the mountains to the north inside the swamp and you'll make a door appear.
This gives us access to our next dungeon, Cave of Rhone or as it's called in later releases Rendarak. Our first time here is going to be brief, you'll want to go down the first set of stairs you see and walk over to the three tombstones. Search the one that's broken on the right and you'll discover a merchant who is hiding from Hargon. He's always hiding behind a different tombstone in here. Go south of this tombstone to find a chest with the Life Crest inside.
Now that we have the Life Crest we can get an item we need... I strongly recommend you do this now since we're still near the entrance. Cast Outside on Prince of Cannock then cast Return. If you're on the fancy Switch version then Zoom over to Tantegal. Almost directly south of Tantegal will be a place called Shrine of Spirits; use the map if you need help locating it. It's a lone island in the middle of an ocean with a shrine on it.
Enter the shrine and follow the stairs down to the bottom. When you step into the middle of the circle in the bottom room you'll trigger a scene (assuming you have all 5 crests). A 'beautiful voice' will award you with the Charm of Rubiss, an item which will be useful at a later time...
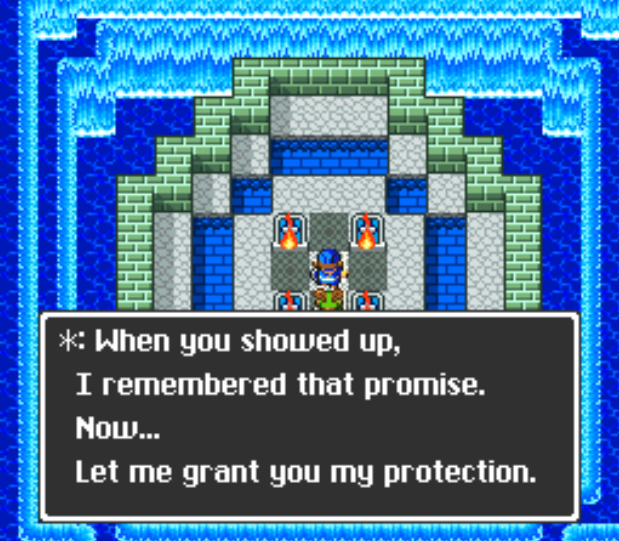
Make sure to get the Charm of Rubiss from the Shrine of Spirits
With the Charm of Rubiss in hand, return to the Cave of Rhone so that we can continue with the dungeon.
Continue to Dragon Quest 2: Walkthrough Chapter 3
Return to Dragon Quest 2: Walkthrough Chapter 1