
Dragon Quest 1 Complete Walkthrough
When you gain control of your character for the first time open the chests for a Torch, 120 Gold and a Magic Key. Use the Magic Key to open the door in the south so that we can access the stairs and go down. Search the pot on the left near these stairs for a Medicinal Herb and then exit the castle to the south or the north.
If you're playing one of the new releases you'll already have a weapon, but those of you who are playing on the SNES or NES, you will start with nothing. So, you'll want to visit the town NE of Tantegel Castle and purchase a Bamboo Pole as well as Leather Clothes. These two items will make our next grind a lot easier.
Before you leave town you'll want to visit the item shop too and purchase a Dragon Scale. Go into your inventory and equip this or select Use are choosing the item. With all of that out of the way it's time to exit town and spend about an hour grinding on monsters to level up!
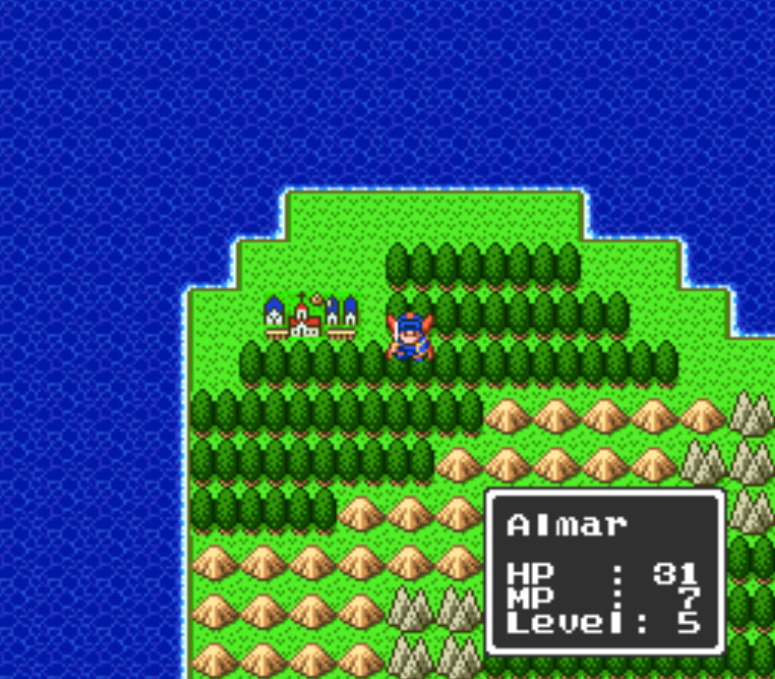
Your goal is to reach level 5 before leaving the area we're currently in. Feel free to explore the surrounding area as much as you want, if you start seeing monsters other than slimes be cautious. One thing to note about this game is that you will be alone for the entire game. Unlike other RPGs you won't get a party - this means you'll have to play a lot more conservatively because if your main character dies it's game over.
At Level 5 you'll want to travel northwest until you reach the town of Galenholm (pictured below). For this town you'll want to grind until you can purchase the Iron Axe and the Chain Mail. Don't bother with the Iron Shield because it's extremely pricey and we will get a free one later.
Galenholm on the World Map
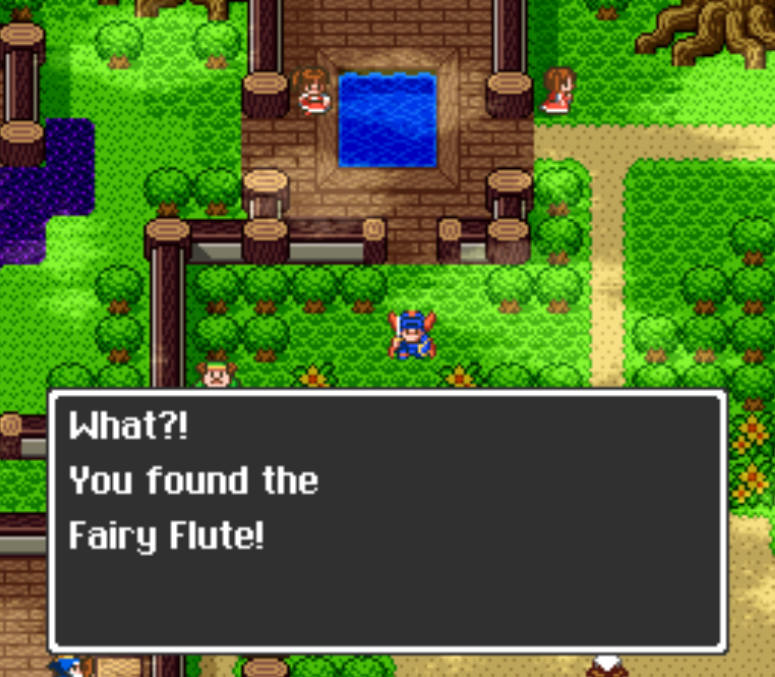
Location of the Fairy Flute in Kol
From Galenholm travel far to the east, cross one bridge and continue southeast to cross another. From here head north and look for the town surrounded by a forest, this is Kol and our next stop. Search the grass four steps below the pond in Kol for the Fairy Flute (pictured above). Search the dressers north of where you got the flute to get Plain Clothes and also Seed of Strength.
Use the Seed of Strength since it gives you a permanent boost to strength and then exit town. Before advancing the game, many guides online recommend you do some grinding now so that you can reach Rimuldar in the south. You'll have to go through the Swamp Cave to get here but you'll be able to buy new weapons and armor there which will make the game easier for you. Use the map below for more information about where you're going and how to get there.
Otherwise, return to Galenholm and travel south to a dungeon called Mountain Cave. I know some of you would prefer a map instead of text directions for this part so I have included one of the best pictures of a World Map that I could find on google.
If you look at the map, directly south of Galenholm you can see a cave. You need to cross one bridge to get there - but make sure you don't cross 2 as that's going too far!
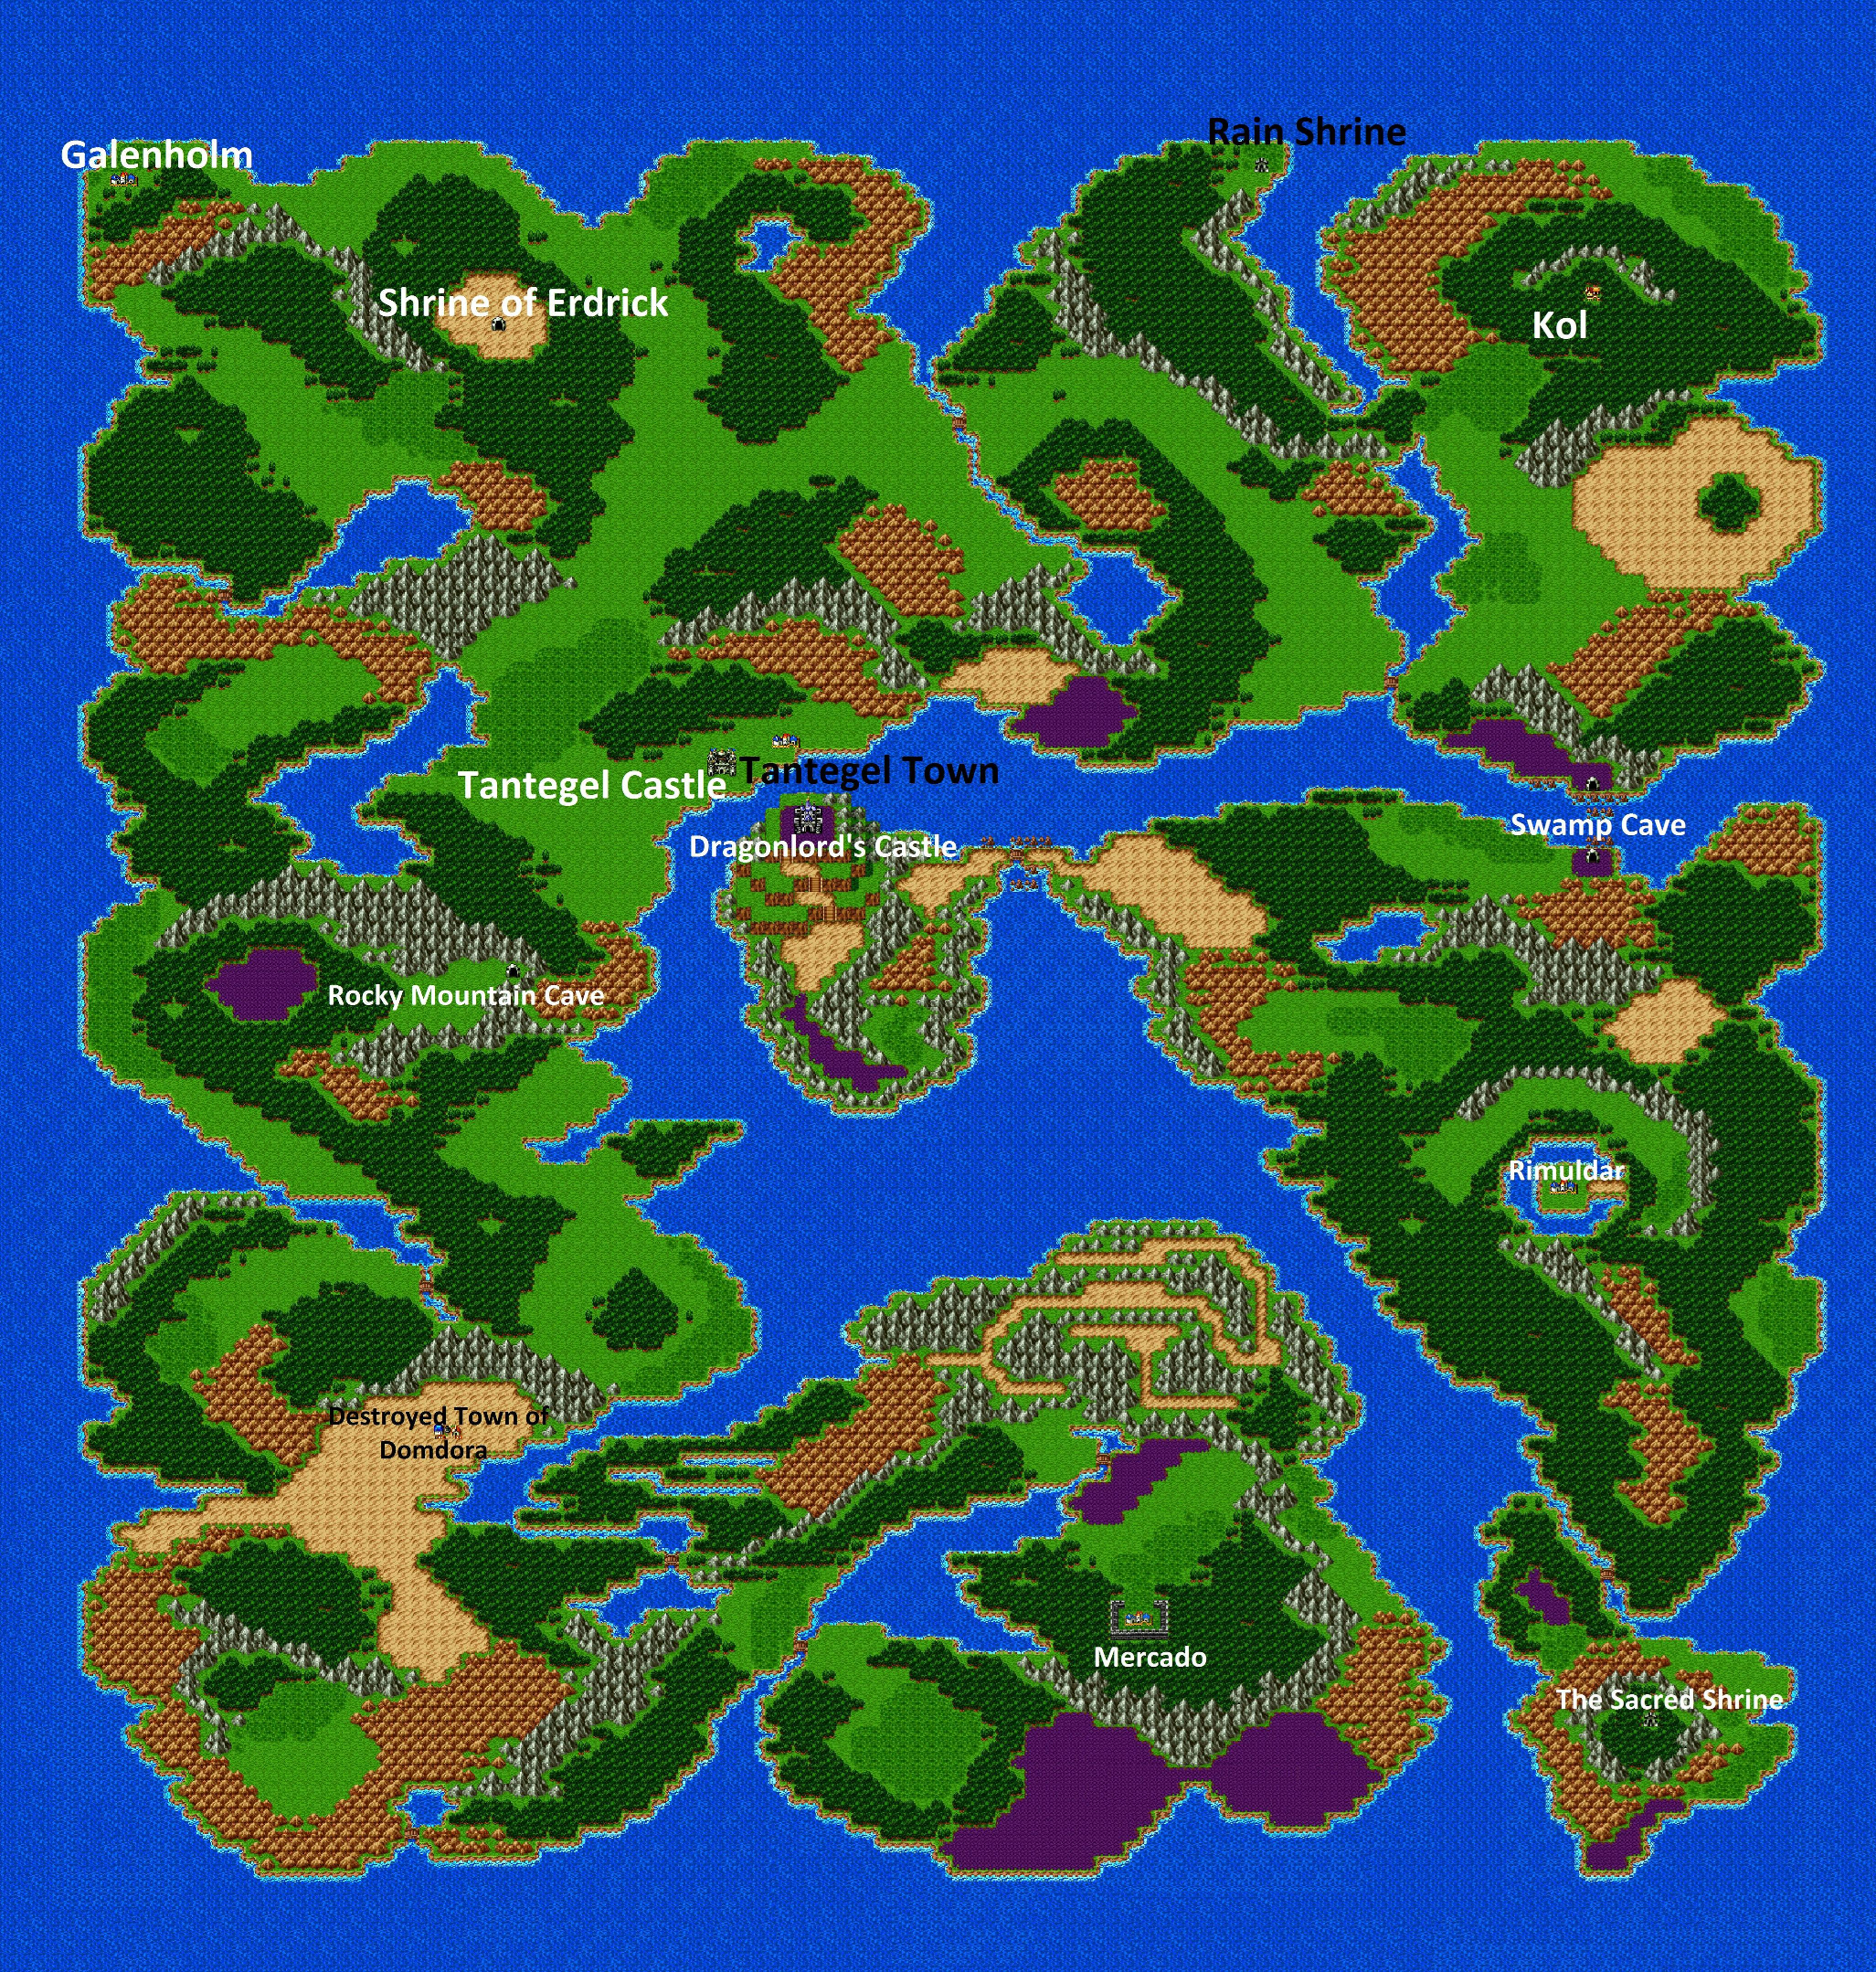
Click to enlarge; full credit goes to the original author
Note: Many of the translations are wrong on the map above. Apologies, not much can be done about that since it was probably created in the 1980s/1990s!
This cave is apparently called Rocky Mountain Cave, what a name. I strongly recommend you get your character to level 9 before you enter this cave because at level 9 you will unlock a new spell called Glow. This will cause your character to radiate light and it will remove your need for a Torch. Without Glow you will need to always have a Torch with you when you enter one of these dungeons because it will be dark. Additionally, Glow has a larger radius than a Torch which is why it is so much better.
First Floor Treasures: Gold
Second Floor Treasures: Gold, Torch, Iron Shield, Warrior's Ring, Seed of Strength, Seed of Magic
All of the treasures on the second floor are found in the middle of the map and along the northern wall. The layout is pretty straight forward once you see it. Once you're done inside of this cave it's time to return to the Kol area. South of Kol you'll find the Swamp Cave/Quagmire Cave which is where we need to go next.
Enter Quagmire Cave and go straight south to find the stairs that lead up. Back on the World Map travel south to reach Rimuldar which is our next town and grinding location. This time you'll mostly be grinding for the gold because we need quite a bit to purchase all of the items and upgrades from Rimuldar.
Rimuldar on the World Map
In Rimuldar you'll want to purchase the weapon upgrade and the upgrade for your chest armor. Ultimately it's your choice if you want to do the Magic Armor or the Full Plate Armor, I did the Magic Armor even though you'll replace it in the near future. Normally in these games you always end up with way more gold than you need anyway so.
Once you're done upgrading your armor the important thing you need to purchase in this town is the Magic Keys. Visit the shop in the top left of town (you'll have to walk around the outside portion of the river that surrounds town) and purchase as many Magic Keys as you can hold. Inspect the pots inside of this building too for some gold and a Seed of Resilience.
Exit Rimuldar and enter it again, see those two doors in the Inn? Use your Magic Keys on both to open them up and get the chest in the back which has a Seed of Life. After you do this make sure you buy 2 more Magic Keys so you're fully stocked with 6 again.
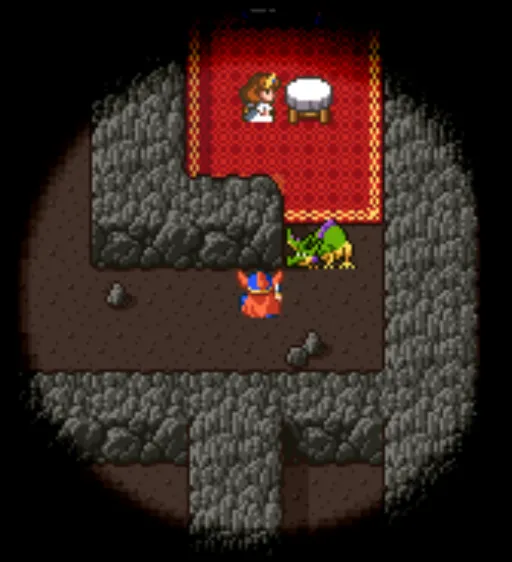
We're done inside of Rimuldar for the time being so head north back to the Swamp Cave and enter. Directly east of where you enter you'll find Princess Gwaelin (pictured below). You'll need to open the locked door with a Magic Key and then talk with the dragon protecting her to fight him. Once you win speak with the Princess and you'll carry her - use Evac to leave the dungeon and Zoom to return to Tantegel Castle.
Back at the castle you'll need to speak with the King, you'll be given Princess's Pledge as thanks for saving her life. Go back downstairs and use a Magic Key on the door to the treasure room. Inside you'll find 345G, Magic Key, Seed of Magic and a Seed of Agility. Before you leave the castle go through the door in the top right, the vendor outside the castle will sell more Magic Keys but for 24G instead. Oh well, buy as many as you need.
When you're done follow the eastern wall of the castle south, when you hit the water go east one more tile and south again until you find stairs. The room these stairs lead to will have two dressers, inside one will be a Medicinal Herb and inside the other will be a Seed of Life. Last but not least, inside the chest you'll find the Sunstone which is one of the Artifacts that we need.
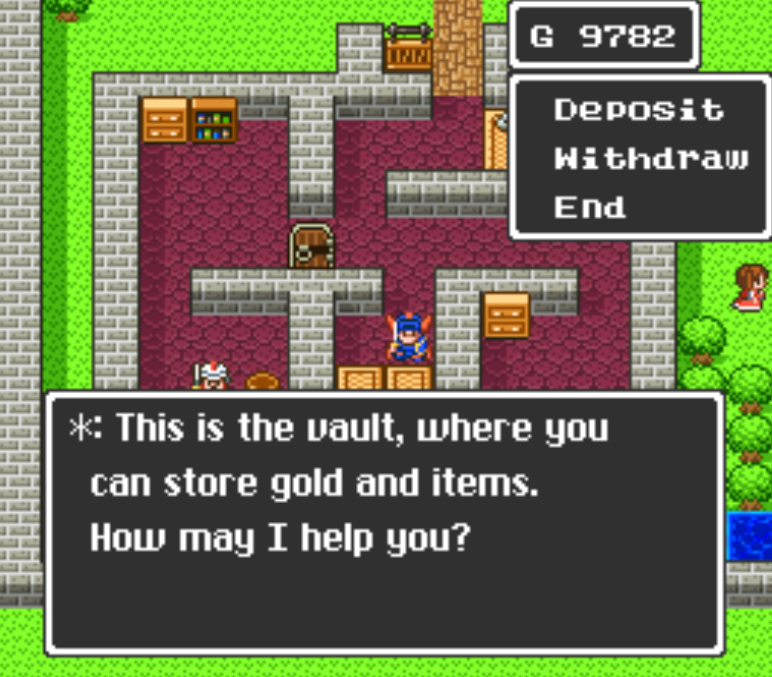
How To Get More Inventory Space
If you're anything like me you're struggling really bad for inventory space at this point in the game. What you should do is visit the town of Tantegal which is right next to the castle. Go into the building with the Inn and the shop right below that (pictured below) is the bank. Here you're able to deposit any items in your inventory for safe keeping.
You should deposit the Sunstone that we just got along with the Fairy Flute and Princess's Pledge. The pledge is worthless and the other two items are used for a quest later - right now all they're doing is taking up precious space.
Back To The Story
When you're ready to advance the story you'll want to travel northwest of Tantegal to the town of Galenholm. Use a Magic Key to open the door to the big building in town and then collect the three treasure chests to get a Copper Sword, Torch and 630G. If you open the door to the small room with the old lady, you can speak with the old lady to get another Magic Key.
Note: You will need at least 2 Magic Keys for this next dungeon! Make sure you have them before entering!
To enter the next dungeon position yourself above the table in the room with the old lady and go north. You'll exit in a new part of the building which will lead you to stairs that go down into a dungeon.
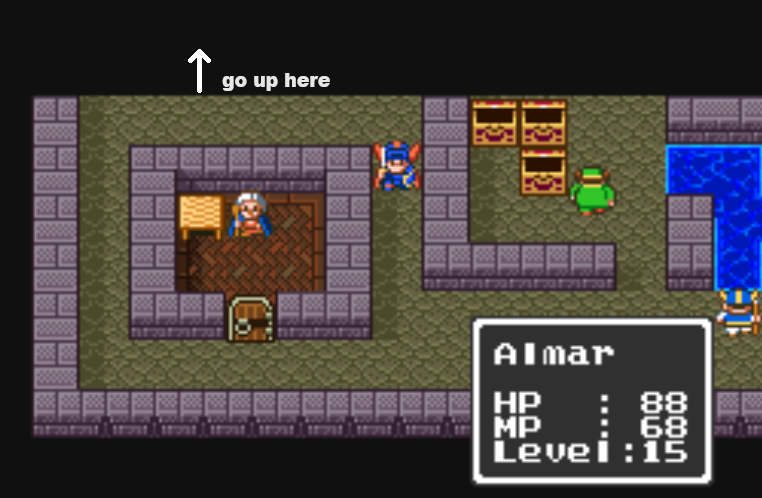
The main thing that you're looking for in this dungeon is the Lyre of Ire (aka the Silver Harp). You'll have to go down a few floors and then back up a few floors to reach this item. When you finally do find the Lyre of Ire it will be surrounded by blue floor tiles, some water and a tombstone looking thing. Grab it and then use Evac to leave the dungeon.
Galen's Grave (B1) Treasures: Seed of Life, ~535G and Magic Key
Outside the dungeon you'll want to use Zoom to return to Tantegal - from this town you'll want to travel northeast to Kol. When you arrive at Kol you'll want to travel west of town, follow the thin strip of forest that cuts through the mountains and go north to reach a lone shrine.
Speak with the man inside of this shrine guarding the chest, he'll take your Lyre of Ire (Silver Harp) and let you loot the Staff of Rain from the chest. This is the second artifact that we need, exit this area and Zoom back to Tantegal because we need to deposit this item so that we're not choked for inventory space.
Make sure you withdraw your Fairy Flute if you deposited it because we're going to need it for this next part. From Tantegal you'll want to travel southwest to our next destination - Damdara. You'll find Damdara far to the south of Galenholm on the World Map. It's a small town surrounded by a desert, calling it a town may not be accurate either since it's currently abandoned.
Depending on what level you are - you may or may not be able to handle the Knight Aberrant inside of this town. I was level 16 at this time and he was no problem for me. Either way, if you want to give it a try head over to Damdara and go to the same spot you see me standing in the picture below. When you get close to this location you'll have a battle with the Knight Aberrant. If you beat him then search the ground where I am standing to find Erdrick's Armor (aka Armor of Roto).
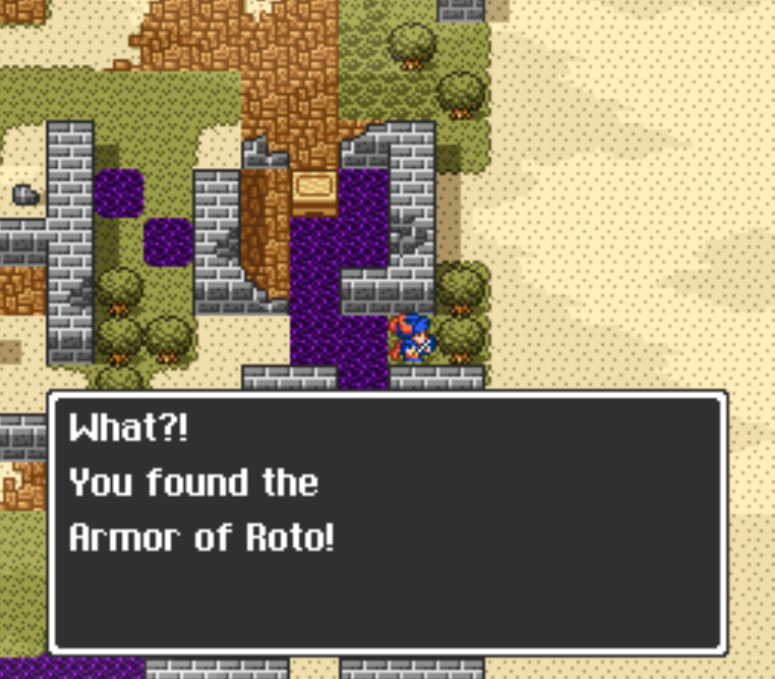
Erdrick's Armor is the best armor in the game; it heals you with every step, offers the most armor class and it reduces the damage of fire attacks by 25%. If you're too low level to get this item right now that's ok we can come back in a little bit when we're done with Cantlin.
Directly east of Damdara you'll find another town, this one is called Cantlin. This is our next stop; when you try to enter Cantlin for the first time you'll have to fight a Golem. If you use the Fairy Flute to put the Golem to sleep the fight will be a total piece of cake. Failing to use the flute will make this one of the hardest fights in the entire game.
Once you're inside of Cantlin you'll want to purchase a Fire Blade and a Silver Shield for your character. You can find these items for sale in a shop on the eastern side of town. Inside the Inn you'll want to search the drawer for a Seed of Resilience. Search the drawer in the southeastern part of town and you'll find a Seed of Magic.
If you can't afford the upgrades in Cantlin you should grind around town a bit until you have enough gold. Before you leave this area you will want to go south of Cantlin and grab the Mark of Edrick (Token of Roto) from the poison swamp. Check out my picture below for the exact location of where you can find this Mark.
Luckily, if you're playing on the Nintendo Switch you will see an exclamation point above your head when you're standing overtop of this area. Those of you playing on the SNES or NES won't see any ! which means you'll have to search around the old fashion way! My advice is to line up your character with the passage to the west and the line of mountains to the north. It shouldn't be too hard!
Note: If you don't have Erdrick's Armor from Damdara yet scroll up to my picture above and get it. You'll want to get that before you navigate this swamp otherwise you'll take way too much damage.
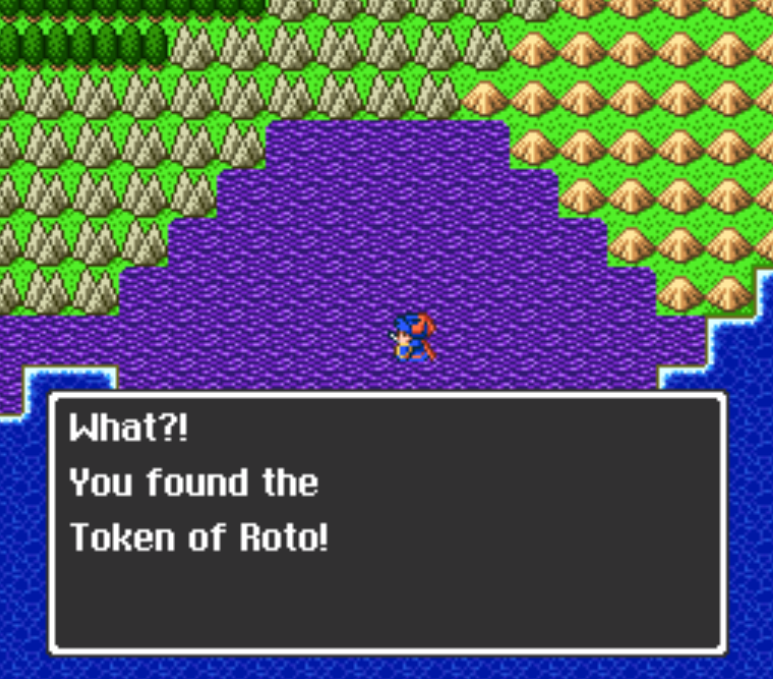
Mark of Erdrick (aka Token of Roto) Location
What I recommend is you get to level 19 before you leave the Cantlin area and return to Castle Tantegel. Ultimately the choice is yours and it will depend on when you get bored typically, but you'll need to do the grinding at some point. To stand a good chance against the end boss of this game you'll want to be at least level 20 and that's for players who know what they're doing. If you want more security or you're not great at RPGs you'll want to be 23 - 25 before the end fight.
Endgame/The Final Dungeon
In order to reach the final dungeon you will need 3 different items, if you've been following the guide up to this point you already have all 3. For those of you who are just joining us I will provide a bit of information below about each of these items. Check my walkthrough above for the full details on where each is found.
Sunstone: Found in Castle Tantegal; use a Magic Key to open the door.
Staff of Rain: North of Kol you will find some ruins, bring your Lyre of Ire (Silver Harp) to the man inside of these ruins and you will be able to loot the Staff of Rain.
Mark of Erdrick (Token of Roto): This is found in a poison swamp on the World Map; use the picture above to figure out the exact location.
Once you have all 3 of these items you'll need to travel back to Rimuldar and then go south to the lone shrine sitting on the island. Here you'll find an old man protecting a chest, give him the Sunstone and Staff of Rain and he will grant you access to the chest. If you don't have Mark of Erdrick he'll refuse you access as well - so make sure all 3 items are in your inventory!
There will be a short scene after which you'll be able to pick up the Rainbow Drop item from the altar. You can use this to make a bridge that connects the mainland to the Dragonlord's Castle. Head back to Rimuldar and go northwest to find the location I am talking about. If you're having issue finding it use the picture below.
Use the Rainbow Drop where I am standing to make a bridge
Cross the bridge and enter the Dragonlord's Castle. Right now we're only going to do some of the dungeon, basically we're going in for Erdrick's Sword and the chests at the end - then we're leaving. We'll rest up, save the game and then return for round 2. Doing this first part of the dungeon twice will help us memorize the route too which will allow us to conserve more MP the second time around.
On the first floor of this dungeon you'll want to use a Magic Key on the western door and follow the path to get behind the throne. Search the area behind the throne to find a hidden staircase, this is the real staircase that lets us advance through the dungeon, the other two are fake.
The only chests you'll find on your way to Erdrick's Sword are on B3, here you'll find a Medicinal Herb and a chest with ~500G. When you reach the room with the zig zag walls and the torches (pictured below) you'll know that you're close to the sword. Inside this little enclosure you'll find a set of stairs that go up and a set of stairs that go down. The stairs that go down are ones that endlessly loop through the same hallway over and over. If you take the stairs that go up, you'll be lead to a chest with Erdrick's Sword.
Take the stairs that go up on B4 to reach Erdrick's Sword (the best weapon in the game)
Now that you have the sword return to the room pictured above. This time you'll want to travel east to another staircase, this will lead you through a few linear rooms until you eventually reach the boss room. Inside the boss room you'll want to go north to find the treasure room. You'll find a Wasteband (Cursed), Seed of Magic, Medicinal Herb, 424G and a Magic Key. Really the only item that's worth getting is the Seed of Magic.
At this point in time you have to make a decision too. Do you want to rush to the end boss and try to beat him? Or do you want to evac out of the dungeon and then Zoom over to Tantegel? Another choice is to grind a little bit then Evac out and do all that jazz. Honestly, you may need to leave now anyway depending on how much MP you have left.
If your choice is to return to town make sure you restock on Medicinal Herbs and Magic Keys. Once you're done return to this dungeon and give the final boss a visit (pictured below).
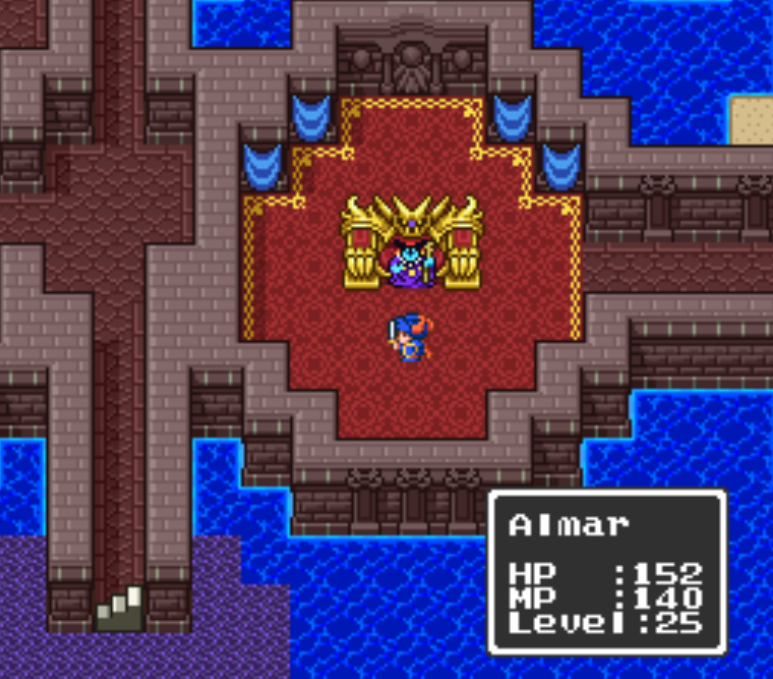
This boss fight has two phases, the first is against a very weak Dragonlord. I was able to take him out without having to heal a single time - mostly because I was very overleveled. Once you beat Phase 1 you'll get some dialogue after which Phase 2 begins. For the second phase you'll be fighting Dragon King and this fight is a bit harder.
Every time your health drops down to half you'll want to use Midheal; other than that this fight is a back and forth. You attack, he attacks, you attack, he attacks, you heal, he attacks, you attack, he attacks. That's quite literally the entire fight. Once the boss has been beaten you'll want to warp back to Tantegel and speak with the King a few times to advance the story and get the credits to roll.