
Dark Cloud 2 Scoops
From my experience in Dark Cloud 2 Scoops are generally the pictures that are more difficult to obtain and usually are of items or objects that are of key signifigance in the game. Some of the bosses you fight in the game will count as Scoops too which means there'll be only one chance to take that photograph. This makes Scoops some of the hardest and most annoying photos to get!
There are a total of 54 scoops that I know about in Dark Cloud 2. Since so many of the scoops must be taken at specific times I am going to sort them based on what Chapter they're first available for you to acquire. Also, along with my listing of each of these scoops I am also going to give you a little bit of information on how to acquire it. Some of the more difficult scoops will even get pictures of when is the right time to take the picture.
I have one more tip for you when it comes to taking photographs at the right time in Dark Cloud 2. That tip is... Save states! If you're playing on an Emulator it will be a gigantic advantage here. Just use a save state when you get near a monster and toy with it for awhile to learn its attack patterns and when you'd need to capture a photo. Even better, use a save state as you have your camera out/open just before the monster attacks. That way if you blow it and don't get the photo you don't even have to force his attack animation again!
Before we get started with my list of scoops, it's important that I mention my guide that covers all of the missable photos in Dark Cloud 2. You may want to reference this guide throughout the game as you play that way you don't miss any important photos.
Anyway, here's a list of all the scoops I know!
Chapter 1 Scoops
Baron's Hanging On (Underground Channel)
The monster you're after for this Photograph is a Vanguard. They have an attack they do that causes them to jump up into the air and turn upside down. You'll need to take a picture of them as they perform this attack. In order to trigger this attack you'll need to play with the monster a bit. Get close to him then back up and force him to attack you normally - then repeat getting close/backing away to force his second follow up attack (which is usually the one we want a picture of).
This is one of the harder earlier photographs to get since the Vanguard is pretty tough when you have no Defense.
Brave Little Linda (Underground Channel)
For this photo you have to capture a picture of Linda while she is rearing to attack. You have to get close to her and run away, toying with her to get her to attack you. Otherwise she just chases you. This is a missable photo.
Clown Robo's Attack (Underground Channel)
For this picture you have to take a picture of the clown robot thing Flotsam attacks you with while it has rockets coming out of its eyes. This is a missable photo.
Night Stalker (Underground Channel)
You can find these starting on the Ghost in the Channel floor and you'll want to snap a picture of them as they're doing their spinning swooping attack. They only have two attacks, a fire ball they shoot at you if you're far away and they do the spinning attack when you get up close. You'll have to toy with the mob, getting close and backing away + pulling out your camera to get the picture
Chapter 2 Scoops
Hmm! Jurak (Future Sindain)
In future Sindain after you revive Jurak you'll want to snap a picture of him.
Find the Golden Egg! (Future Sindain)
In future Sindain after you complete all the Georama conditions go up the ramps around Jurak and at the end of them you'll find a nest of Golden Eggs. Inspect them for Golden Paint (needed to recruit Parn for the next Chapter) and snap a picture of them for this scoop!
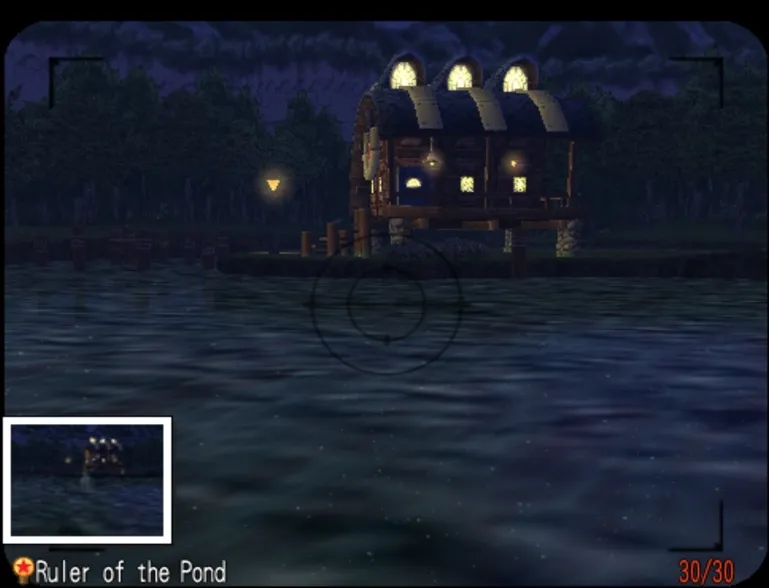
Ruler of the Pond (Palm Brinks at night)
This picture is the first in a line of scoops that requires you to photograph a ghost! For this ghost what you will want to do is head over to the lake in Palm Brinks where Dell Clinic is located. Stand on the pier by the un manned boat where you recruited Fabio earlier in the game. Point your camera at Dell Clinic and wait until the hours between Midnight and 4am. During that time take some pictures of the lake and keep an eye out for a patch of white fog that only appears in the photograph. Position the camera over it and snap a picture until you get credit.
Spooky Grass Smile (Rainbow Butterfly Woods)
For this Photograph you'll need to find a Man-Eating Grass in the Rainbow Butterfly Woods. While the monster appears to be chewing on something snap a photograph of it for this scoop. It usually starts chewing right before an attack. I just let it chain attack me and after each attack I took out my camera again and waited for it to start chewing.
You can find the Man-Eating Grasses on the very first floor, Frightening Forest, of Rainbow Butterfly Woods.
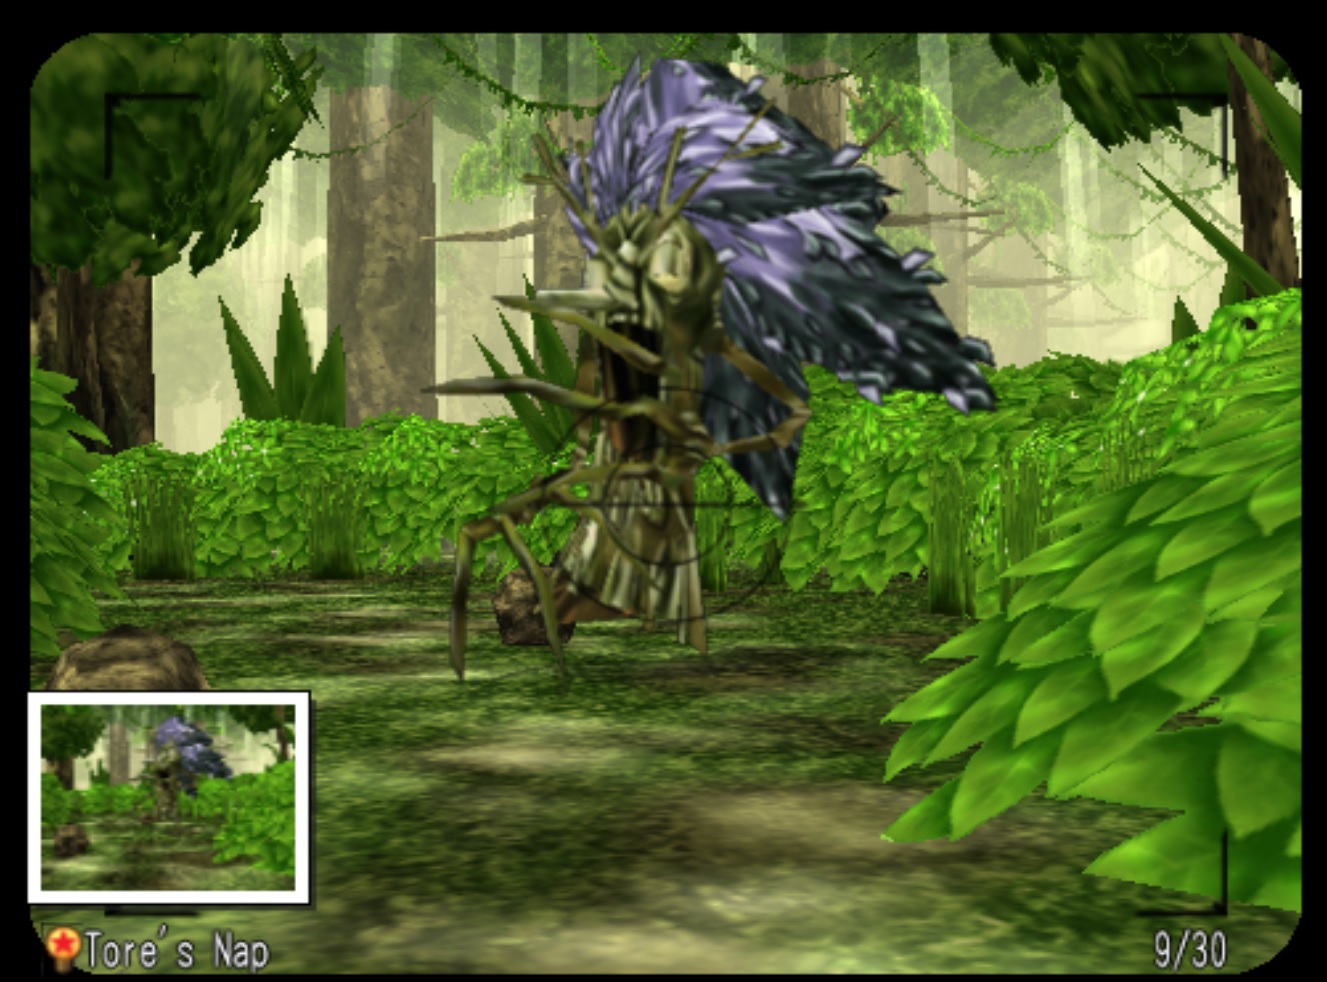
Tore's Nap (Rainbow Butterfly Woods)
For this Photograph you'll need to find a Tore in the Rainbow Butterfly Woods and snap a picture of it before it starts to move towards you/before it notices you. You'll be able to get close enough to it to take a picture without waking him/triggering the monster to attack you. If you forgot what a Tore is, it's one of the giant tree monsters in the dungeon.
You can find Tores on the second floor of the dungeon, "Strange Tree" and beyond.
Floating Earth Digger (Rainbow Butterfly Woods)
This photograph requires you to find a Moler mob in the Rainbow Butterfly Woods and to take a picture of him as he's jumping in the air. This can be a royal pain in the rear considering it mostly only jumps when you get close to it. Sometimes it can jump as it's running towards you but it's pretty uncommon. You'll most likely get hit a bunch while trying to take this picture so be sure to bring a lot of items to heal yourself.
You can find Molers starting on the second floor of the dungeon, "Strange Tree" and beyond.
Dangerous Pumpkin (Rainbow Butterfly Woods)
This photograph requires you to find a Pumpkinhead monster in the Rainbow Butterfly Woods and take a picture of him as he's spinning his spear around. He commonly does this before attacking or in place of attacking. It won't be too difficult to get this picture.
You can find Pumpkinheads starting on the second floor of the dungeon, "Strange Tree" and beyond.
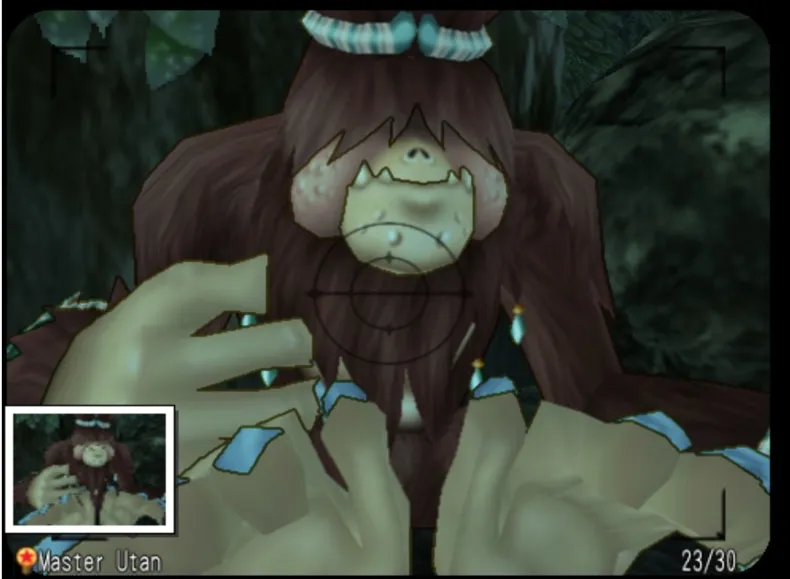
Master Utan (Rainbow Butterfly Woods)
Take a picture of Master Utan when he is sitting down under the Poison Apple tree or next to the boulders. To get this photograph to give credit you have to get right up into Master Utan's face. Take a look at my picture below of where to stand if you're having troubles.
King Mardan (Rainbow Butterfly Woods)
After you talk to Master Utan and learn about King Mardan you'll have to fish him up with a Poisonous Apple. After you do this snap a picture of him! This is a missable photo.
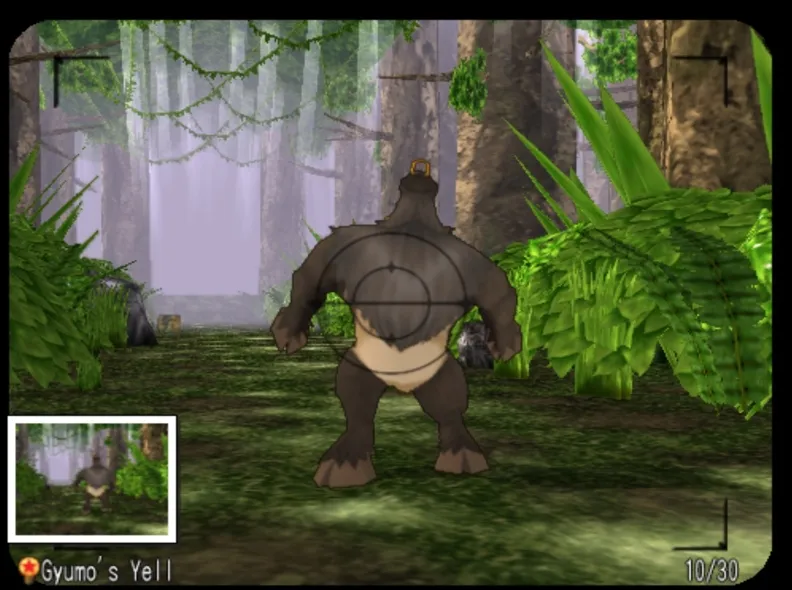
Gyumo's Yell (Rainbow Butterfly Woods)
For this picture you'll want to head to the Rainbow Butterfly Woods and find a Gyumo. They're the boar looking things. You'll have to wait until he throws his head back and howls to take the picture. If he isn't howling for you try wacking him and then backing away or blocking his attacks for a bit to anger him.
You can find Gyumo's starting on the "Legendary Killer Snake" dungeon floor.
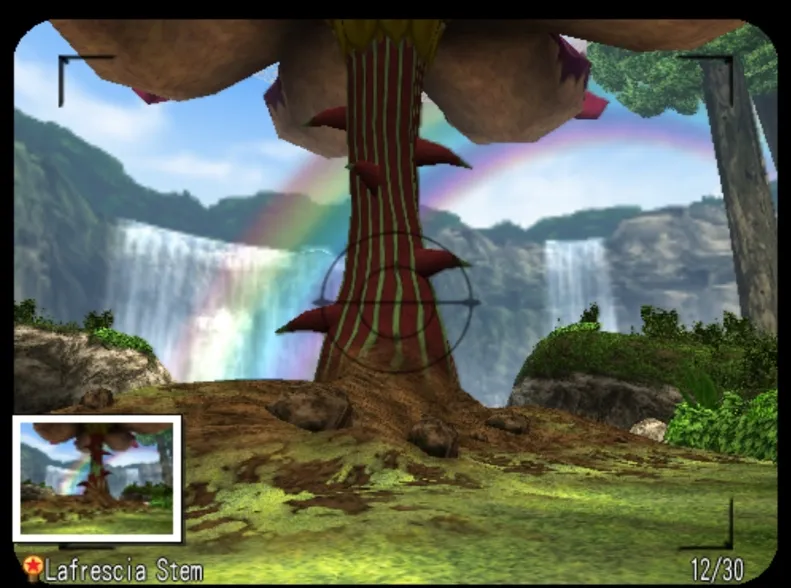
Lafrescia Stem (Rainbow Butterfly Woods)
For this picture you'll need to snap a shot of the giant flower you grow in the Rainbow Butterfly Woods. The best spot to stand in order to capture this photograph is right where you enter the area from. I literally just pressed Square and snapped a photo without moving after entering the Rainbow Falls area. If you still need help figuring out where to stand check out my picture below for guidance!
R. Butterfly United (Rainbow Butterfly Woods)
In order to take this picture you need to kill the butterflies in an incorrect order and then take a picture of them as they are reuniting above the flower. I just snapped a bunch of pictures really quickly since the moment you're waiting for is a fraction of a second after the butterfly completely forms again and before it flies away. This is a missable photo.
Chapter 3 Scoops
Moon Crystal (Future)
After you 100% Balance Valley you'll want to head to the future and take a picture of the Moon Crystal floating in the center of town.
Charging Ram (Starlight Canyon)
In Starlight Canyon find a Ram enemy and take a picture of him as he's charging towards you. A tip for a lot of the enemies in this dungeon is you can get them stuck on the corner of the bridge which crosses the canyons. If you back yourself onto the bridge properly as they're coming at you they'll get themselves stuck leaving you free to grab a picture of them without them being able to reach you.
You can find Rams on the very first floor of Starlight Canyon, Headlong Dash.
Face Behind the Devil Mask (Starlight Canyon)
In Starlight Canyon you'll want to find a Masked Tribesman enemy and take a picture of his face when he opens the mask to try and bite you. You can also stun him with a boulder and take a picture then as well, which is much easier. A tip for a lot of the enemies in this dungeon is you can get them stuck on the corner of the bridge which crosses the canyons. If you back yourself onto the bridge properly as they're coming at you they'll get themselves stuck leaving you free to grab a picture of them without them being able to reach you.
You can find Masked Tribesman on the first floor of Starlight Canyon, Headlong Dash. They will also stop appearing in later floors.
Changing Dog Statue (Starlight Canyon)
In Starlight Canyon find a Dog Statue enemy and take it's picture when it transforms from a block into a dog. You can make him change by hitting him with a long range weapon, after you do that whip out your camera and start snapping! If you are fast enough you should be able to get a picture of him easily enough.
You can find Changing Dog Statues on the Earth-Shaking Demon dungeon floor.
Hooray for Rock Man! (Starlight Canyon)
For this one you'll want to find a Golem in Starlight Canyon and take a picture of him when he lifts both of his arms. He only has two attacks, one where he tries to punch you and the other where he lifts his arms and slams the ground. You'll have to get pretty close to him for him to attack you so I recommend my tip; for a lot of the enemies in this dungeon is you can get them stuck on the corner of the bridge which crosses the canyons. If you back yourself onto the bridge properly as they're coming at you they'll get themselves stuck leaving you free to grab a picture of them without them being able to reach you.
You can find a lot of Golems on the Warrior in Starlight Canyon dungeon floor.
Spinning Ivanoff (Starlight Canyon)
For this photograph what you'll want to do is head to Starlight Canyon and find an Ivanoff enemy. They're the spinning balls with a mouth. You'll have to snap a picture of this guy as he's rolling at you. A really quick way to get this picture is to shoot him with your gun and then whip out your camera. He takes a moment to turn around at which point just snap a photo as he starts to roll for credit.
You can find Ivanoffs on Nature's Threat dungeon floor. It's one of the final floors of Starlight Canyon.
Nice Massage (Starlight Canyon)
You'll have to head to Starlight Canyon and find a Priest of Rama monster and snap a picture of him while he's giving himself a shoulder massage. He does this animation almost immediately after gaining interest in you or while at a distance. What I did is I waited like a hunter in the bush until he agro'd me at which point he got a little closer than patted himself on the back for doing such a good job of coming at me. Then, I snapped a photo!
You can find Priest of Rama on Nature's Threat dungeon floor. It's one of the last floors in Starlight Canyon.
Burning Dragon Fire (Starlight Canyon)
In Starlight Canyon find a Dragon enemy and snap a picture of him while he's breathing fire at you. What I did is got in range to have him come at me then when he got close I just started spamming the camera. He hit me once or twice but I got the scoop without any real issues.
You can find Dragons on the Nature's Threat dungeon floor. In the final floors of Starlight Canyon.
Phantom Memo Eater (Starlight Canyon)
When the Phantom Memo Eater is torn out of Lin you'll want to snap a picture of him during the boss fight. He doesn't have to be doing any particular animation. This is a missable photo.
Flying Battleship (Starlight Canyon)
When you're defending the Lighthouse and protecting Lin from the fires you'll want to take a moment to snap this picture of the Flying Battleship. There will be other moments in later Chapters as well, just remember to bust out your camera when you have control of max to snap a shot! This is a missable photo.
Chapter 4 Scoops
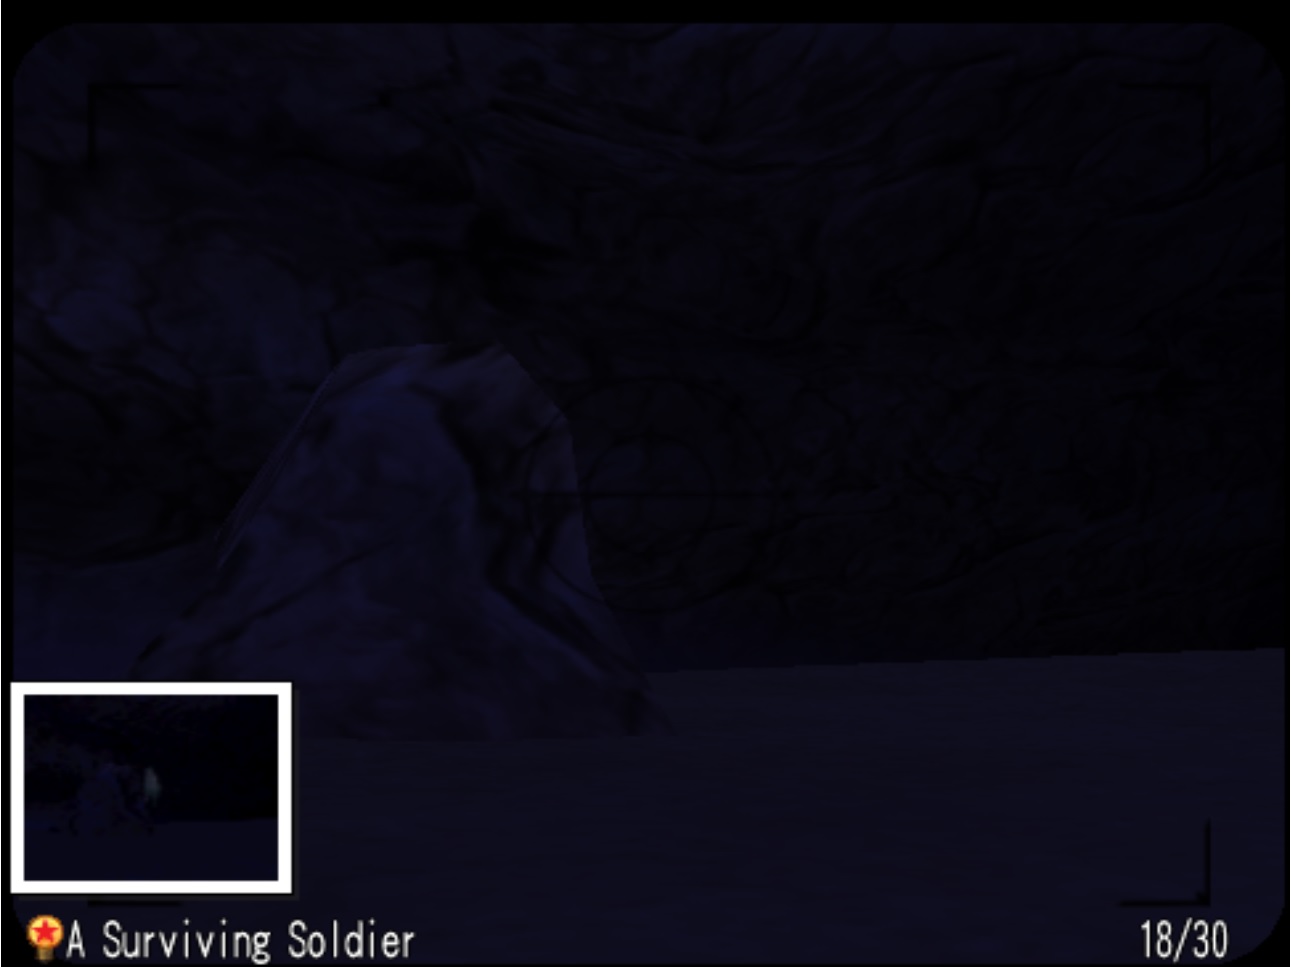
A Surviving Soldier (Veniccio)
This is another one of the ghost scoops in the game. For this one what you'll want to do is head to Veniccio and to the cave which is on the opposite beach of Pau's house and where Ocean's Roar Cave is. The cave dead ends with an invisible wall and has a rock on the left hand side of the end of the passage. Behind this rock, between the hours of 12pm and 4am you'll be able to snap a picture of A Survive Soldier for this scoop. You can see where I am aiming in the picture below if you need more guidance.
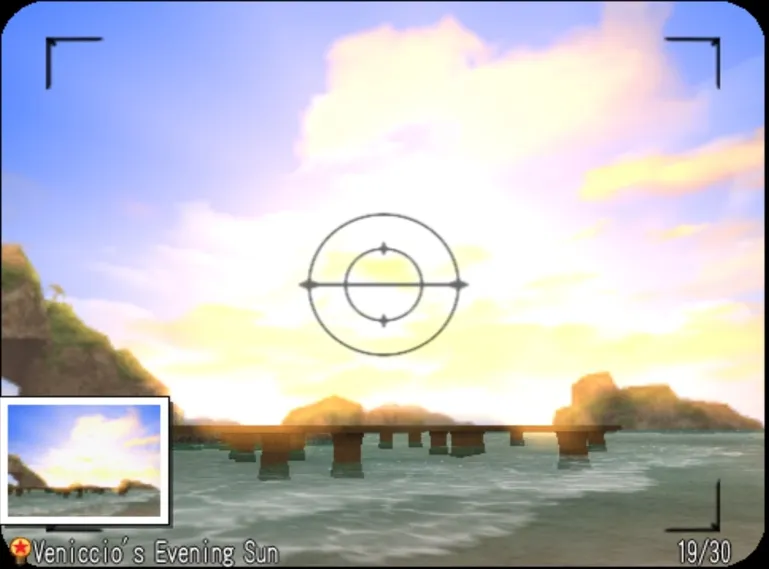
Veniccio Evening Sun (Veniccio)
Take a picture while the Sun is setting in town. The best location to take this photograph is where you place the Georama pieces. I stood on the beach and looked in the direction the sun sets and waited. Keep taking a picture of the sun every 20 seconds or so as it's setting and eventually instead of getting credit for "The Sun" you'll get credit for Veniccio Evening Sun!
Symbol of Luna Lab (Future)
After you restore the Luna Lab in future Veniccio you'll want to take a picture of the symbol ontop of the lab. When you arrive at the Luna Lab just run up the main path until you get to the central building. There's a huge yellow symbol atop it, snap a picture of this for the credit.
Puppet Shingala (Ocean's Roar Cave)
Take a picture of Shingala while he is being controlled on the dungeon floor, Cave of the Ancient Mural. You don't need to wait for him to do any sort of animation, just snap a photograph of him during the fight! This is a missable photo.
Ancient Mural (Ocean's Roar Cave)
On the dungeon floor, Cave of the Ancient Mural take a picture of the Ancient Mural that's located on the wall. It's a huge picture, you can't miss it. It's also the picture shown at the start of the game!
Doctor Jaming (Ocean's Roar Cave)
On the Shigura Village floor when you face Doctor Jaming take a picture of him when he is on his hover platform. You will have to be really close to him almost directly under him, for the picture to count. If you wait by Shingalas with their heads down it'll make it easier that way you know you won't be getting hit from behind. This is a missable photo.
If you missed a picture of the Flying Battleship in the last dungeon you should be able to take a picture of it during this fight!
Chapter 5 Scoops
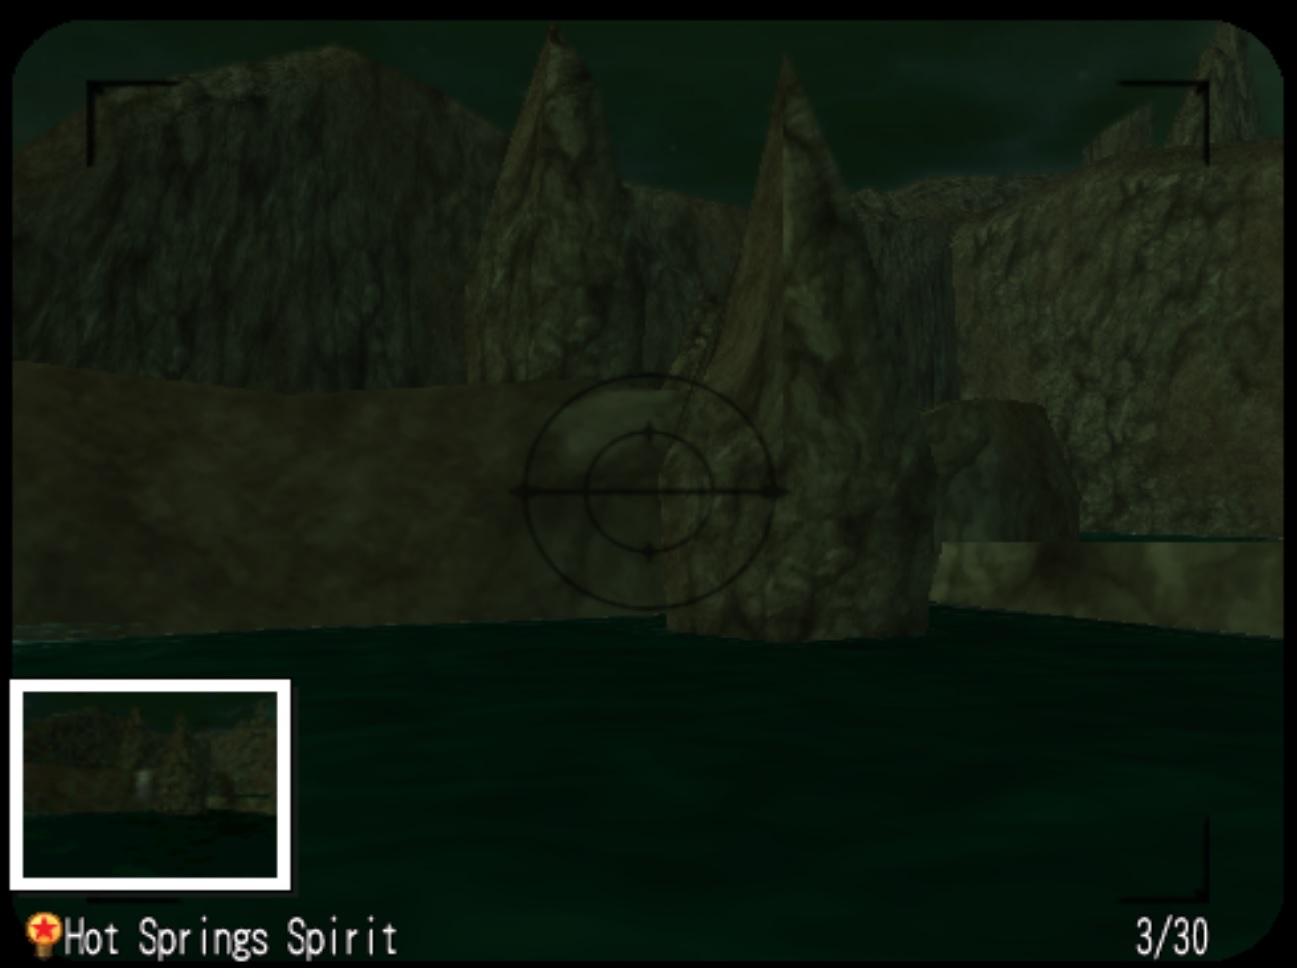
Hot Springs Spirit (Heim Rada)
This photograph is another one of the ghosts scoops in Dark Cloud 2. For this one what you're going to want to do is port to Heim Rada and run down to the bottom of the Hot Springs. If you're running down the path then go to the right at the bottom and near the edge of the water. At the first wall of the Hot Springs you'll see a jagged pointing rock. The ghost appears by this rock between midnight and 4am. If you are having trouble locating him take a look at my picture below for some guidance.
Paznos (Future)
After you fully restore Heim Rada you'll want to take a picture of Paznos, the giant floating fortress in the center of future Heim Rada.
Bomber Head Boom (Mount Gundor)
For this scoop what you'll want to do is beat up a Bomber Head until it gets really low health. Once he's low health his head will expand and he'll levitate up into the air as he chases you. Let him get close and then back away before pulling out your Camera. Take a picture of him right after he explodes but before his body disappears. If you snap a bunch of pictures really fast you shouldn't have any issue getting one of him.
You can find Bomber Heads on Danger Zone dungeon floor.
Fire Squall (Mount Gundor)
On the Mount Gundor Peak floor take a picture of the Fire Squall before you blow it up.
Flying Battleship (Mount Gundor)
If you missed this photograph during Chapter 2 this is your last chance to take a photograph of it!
Faintin' Bone Lord (Mount Gundor)
For this Photograph you'll want to find a Bone Lord in Mount Gundor and stun him by throwing a rock at him. After you do this, while he has the stars floating around him snap a picture.
You can find Bone Lords on the Burning Undead dungeon floor.
Lava Road (Mount Gundor)
For this photo what you'll want to do is take a picture of the path you form when you cause the lava to part on the Mount Gundor Mouth dungeon floor. In order to do this you'll need the horn from future Heim Rada. It's part of the storyline and this photograph isn't missable.
Fallen Battleship (Mount Gundor)
On the Mount Gundor Mouth floor take a picture of the crashed battleship.
The Ultimate Gaspard (Mount Gundor)
While fighting Gaspard take a picture of him when he turns into a lava giant. This is a missable photo.
Chapter 6 Scoops
Ixion (Moon Flower Palace Station) - Unavailable during Chapter 8
When you reach Moon Flower Palace's train station take a picture of Ixion the time train.
Moon Flower Palace (Moon Flower Palace Station) - Unavailable during Chapter 8
Take a photograph of the door that leads into the Moon Flower Palace. Not the gate that leads to the courtyard, but once you go through the courtyard and up the first set of stairs.
Griffon's Real Face (Moon Flower Palace)
In the Moon Flower Palace dungeon you'll want to take a picture of Griffon's face right when the fight starts. This is a missable photo.
Kazarov Stonehenge (Kazarov Stonehenge) - Unavailable during Chapter 8
Take a picture of the central stones in Kazarov Stonehenge. Not the stones you put the gems into but rather the three stones in the middle of the ruins. Take a look at my picture below if you're having trouble with positioning.
Gigantor Paznos (Kazarov Stonehenge) - Unavailable during Chapter 8
For this photograph you'll need to wait until Paznos turns into a giant robot later in the game. Once you advance the story far enough and he does, go up to where the altars are located and turn to face Ixion. Paznos will be above Ixion where you can snap a photograph of him.
Earth Gem Altar (Rainbow Butterfly Woods)
You'll first need to advance the story far enough to where you acquire the Star Key and are able to visit each of the four altars. The Earth Gem Altar is located on the Chamber of the Sleeping Earth Gem dungeon floor.
Wind Gem Altar (Starlight Canyon)
You'll first need to advance the story far enough to where you acquire the Star Key and are able to visit each of the four altars. The Wind Gem Altar is located on the Chamber of the Defending Wind Gem dungeon floor.
Water Gem Altar (Ocean's Roar Cave)
You'll first need to advance the story far enough to where you acquire the Star Key and are able to visit each of the four altars. The Water Gem Altar is located on the Chamber of the Sleeping Water Gem dungeon floor.
Fire Gem Altar (Mount Gundor)
You'll first need to advance the story far enough to where you acquire the Star Key and are able to visit each of the four altars. The Fire Gem Altar is located on the Chamber of the Blazing Fire Gem dungeon floor.
Chapter 7 Scoops
Flower of the Sun (Moon Flower Palace Dungeon) - Unavailable during Chapter 8
For this photograph you'll want to take a picture of the Sunflower while it's sitting on the table on the "Garden" floor of the dungeon or after you've put it into the vase in Alexandria's Room dungeon floor.
Sun Chamber Gatekeeper (Moon Flower Palace Dungeon) - Unavailable during Chapter 8
In the Moon Flower Palace you'll want to take a picture of one of the two Gargoyles perched next to the golden door on the Sun Chamber dungeon floor.
Legend of the Moon (Dream Spiral)
At the top of the Dream Spiral during Chapter 7 you'll need to snap a picture of the moon once you reach the top of the stairs on the Palace Terrace floor. You can see the moon before reaching the top but the photograph won't count until the fight starts and you take a picture then. This is a missable photo.
Chapter 8 Scoops
Flotsam Revived! (Zelmite Mines)
Take a picture of Flotsam in the Zelmite Mines on the Suspicious Opening dungeon floor. This is a missable photo.