
Northern Crater (Part 1) - FF7 Walkthrough
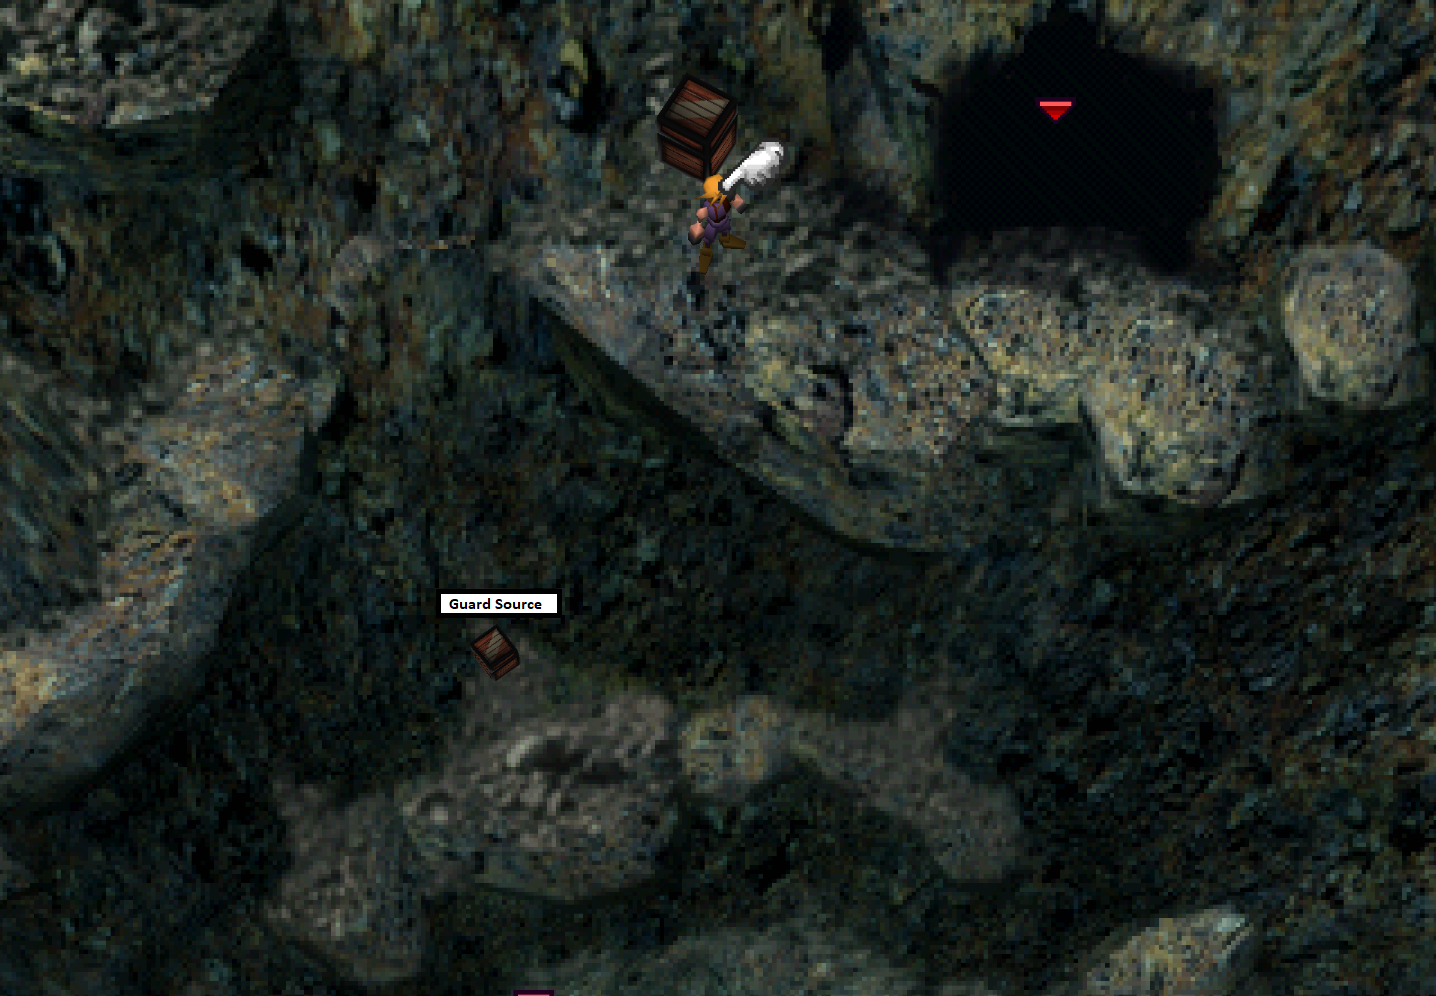
The very first chest that you will come across in the Northern Crater is one with a Save Crystal inside of it. This item allows you to create a Save Point anywhere in the Northern Crater but if you're playing on the Ps1 version of the game it is extremely buggy and can F*** up your whole game. For more information about this bug check out this page.
After you grab the Save Crystal jump down the path to the left and continue going down until you come across the next treasure chest which has a Guard Source inside of it. There are no other treasures in this area so continue down further.
**Enemy Skill Tip** Dark Dragons in this area can be Manipulated and used to teach your party the Dragon Force Enemy Skill as well as the Laser Enemy Skill.
**Enemy Skill Tip** Parasite enemies in this area can be Manipulated and used to teach your party the L5 Death Enemy Skill as well as the Magic Breath Enemy Skill.
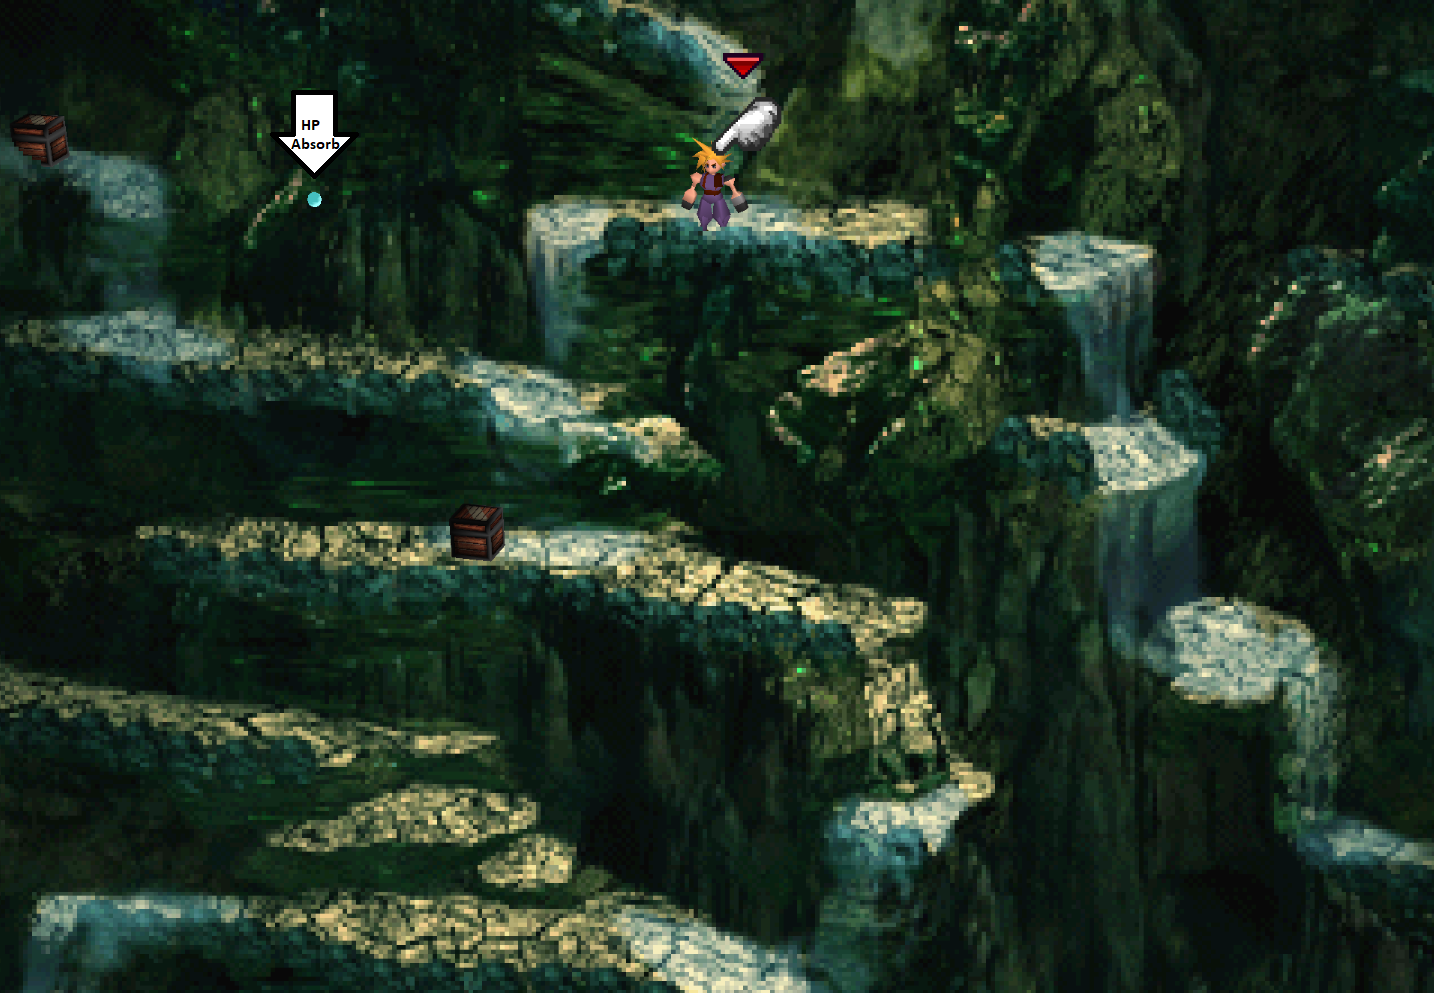
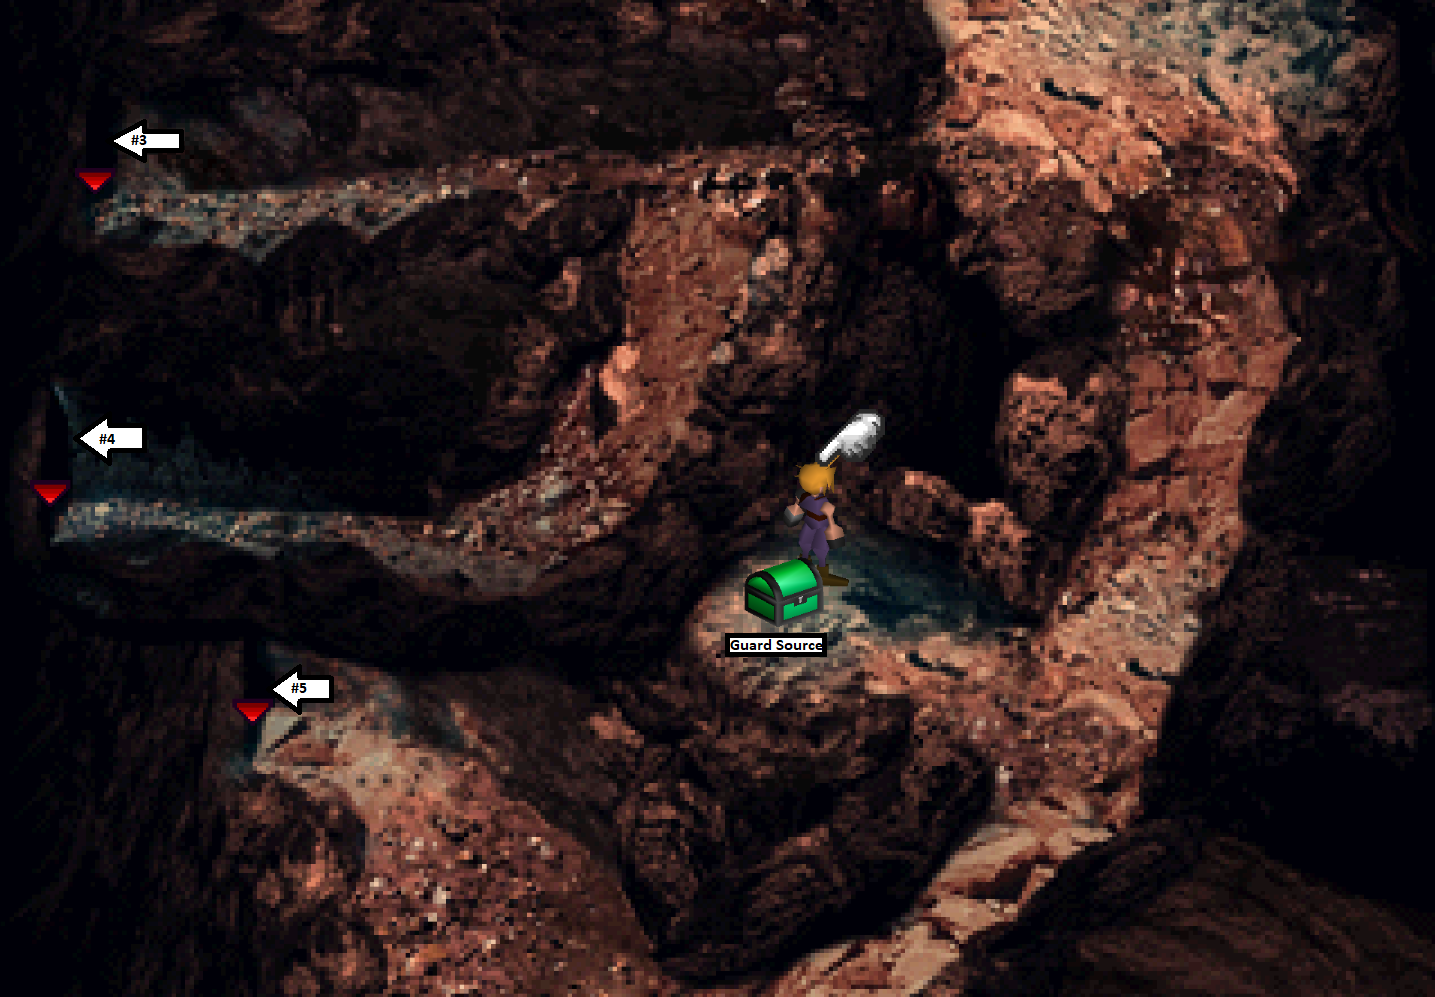
On this next screen there are two paths that both lead you to the same spot on the bottom. There's treasures along both paths so you're going to have to take both of them anyway. I'd recommend starting with the right side, you can grab the Guard Source and Mind Source on your way down, then climb back up the left side and grab the other four treasures over here.
If you're having trouble finding the HP Absorb Materia, it's on the same ledge as the chest with the Elixir. Use my screenshot above if you're having trouble locating it.
Right Path:
Guard Source
Mind Source
Left Path:
Elixir
HP Absorb Materia
Power Source
Magic Source
**Morph Enemy Tip** The Master Tonberry enemies in the Northern Crater can be Morphed into Ribbons, one of the best accessories in the game. Use Yuffie's Conformer Ultimate Weapon and equip the Morph Materia on her. This weapon is unique since it ignores the 1/8th damage aspect of Morph and does full damage instead.
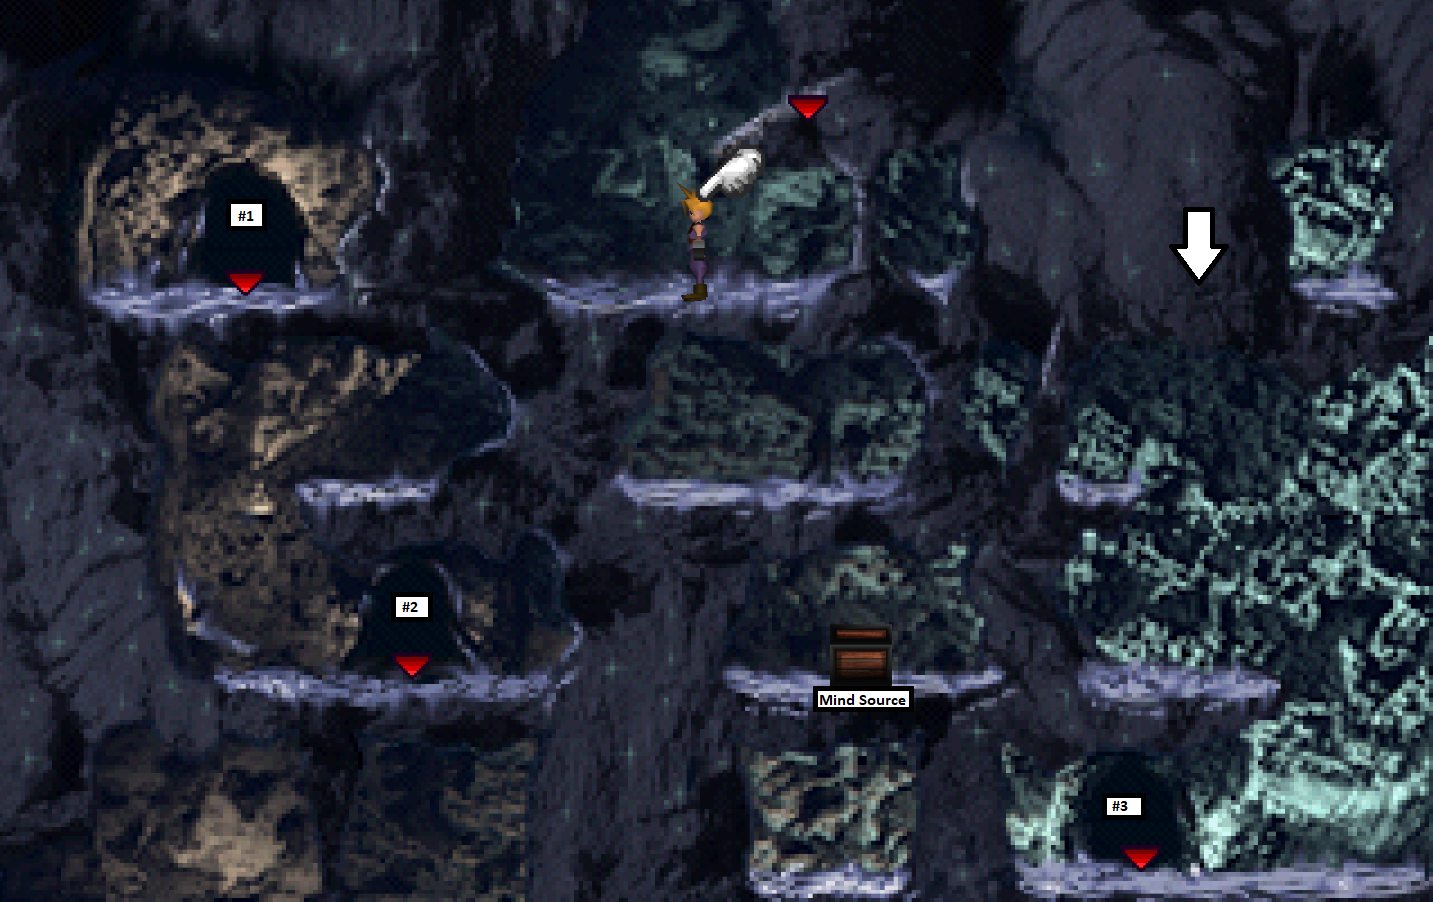
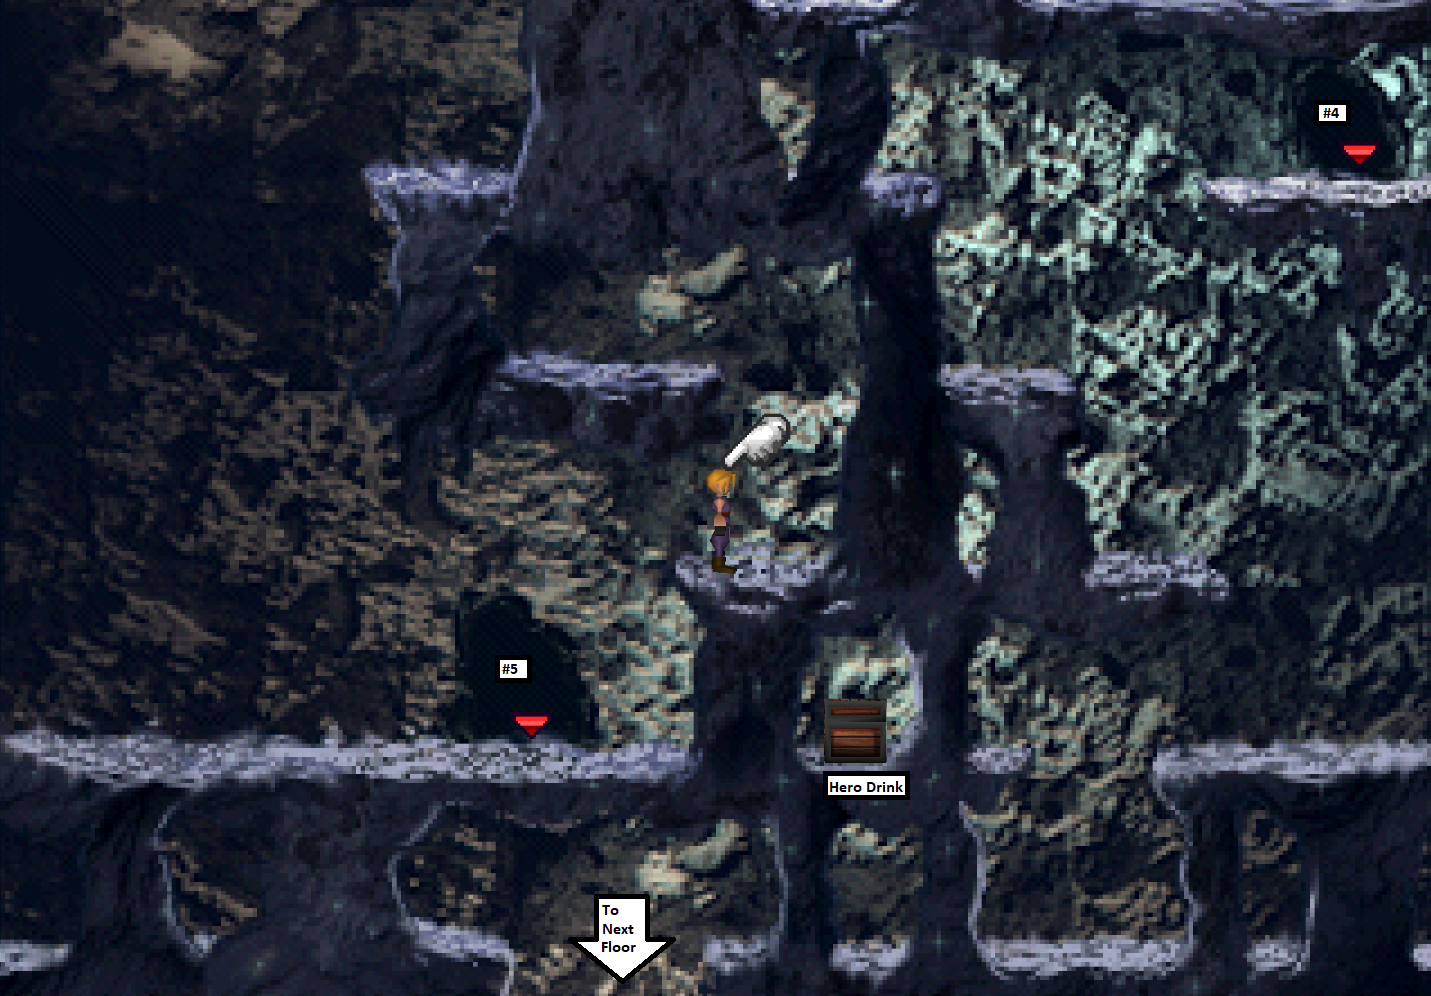
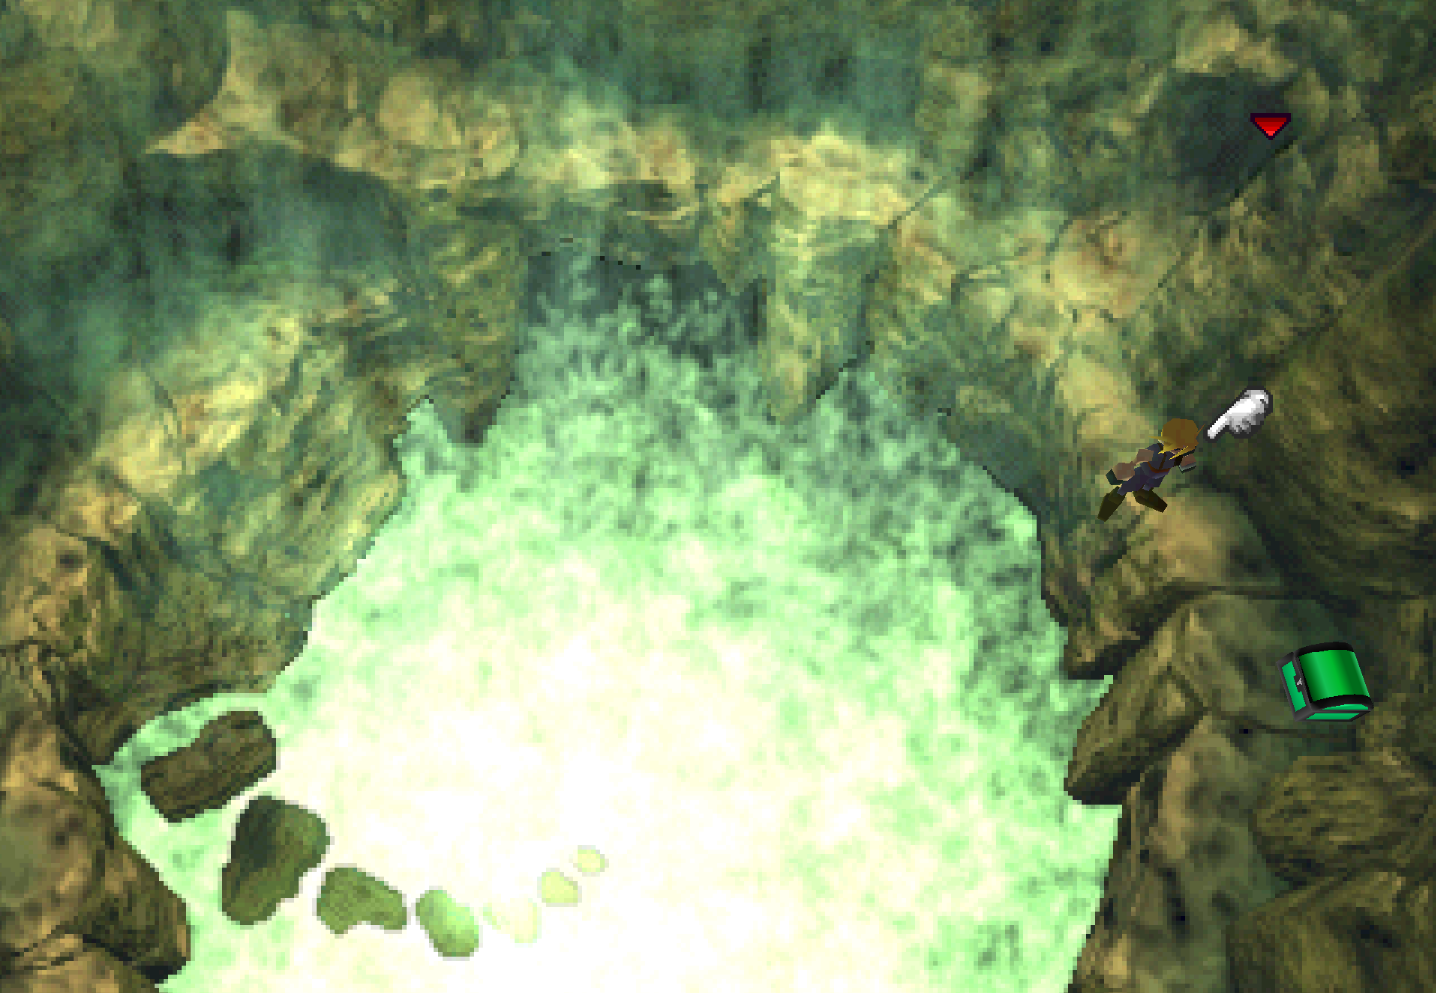
This next area is a bit of a maze and giving you directions is probably going to be more confusing than you figuring it out yourself. So instead I am going to guide you to the next room as well as to the most out of the way treasure. To get down to the bottom and progress to the next part of the dungeon you're going to want to fall down where the white arrow is on the right hand side at the top of the maze.
You'll land on the ledge with a Mind Source on it, jump off and go into the doorway below (labeled #3) and you'll come out at the doorway just below that (labeled #4). From this platform you're able to jump down all of the stone platforms until you find yourself at the lowest level. If you'd like to see a video of me completing this puzzle follow the link.
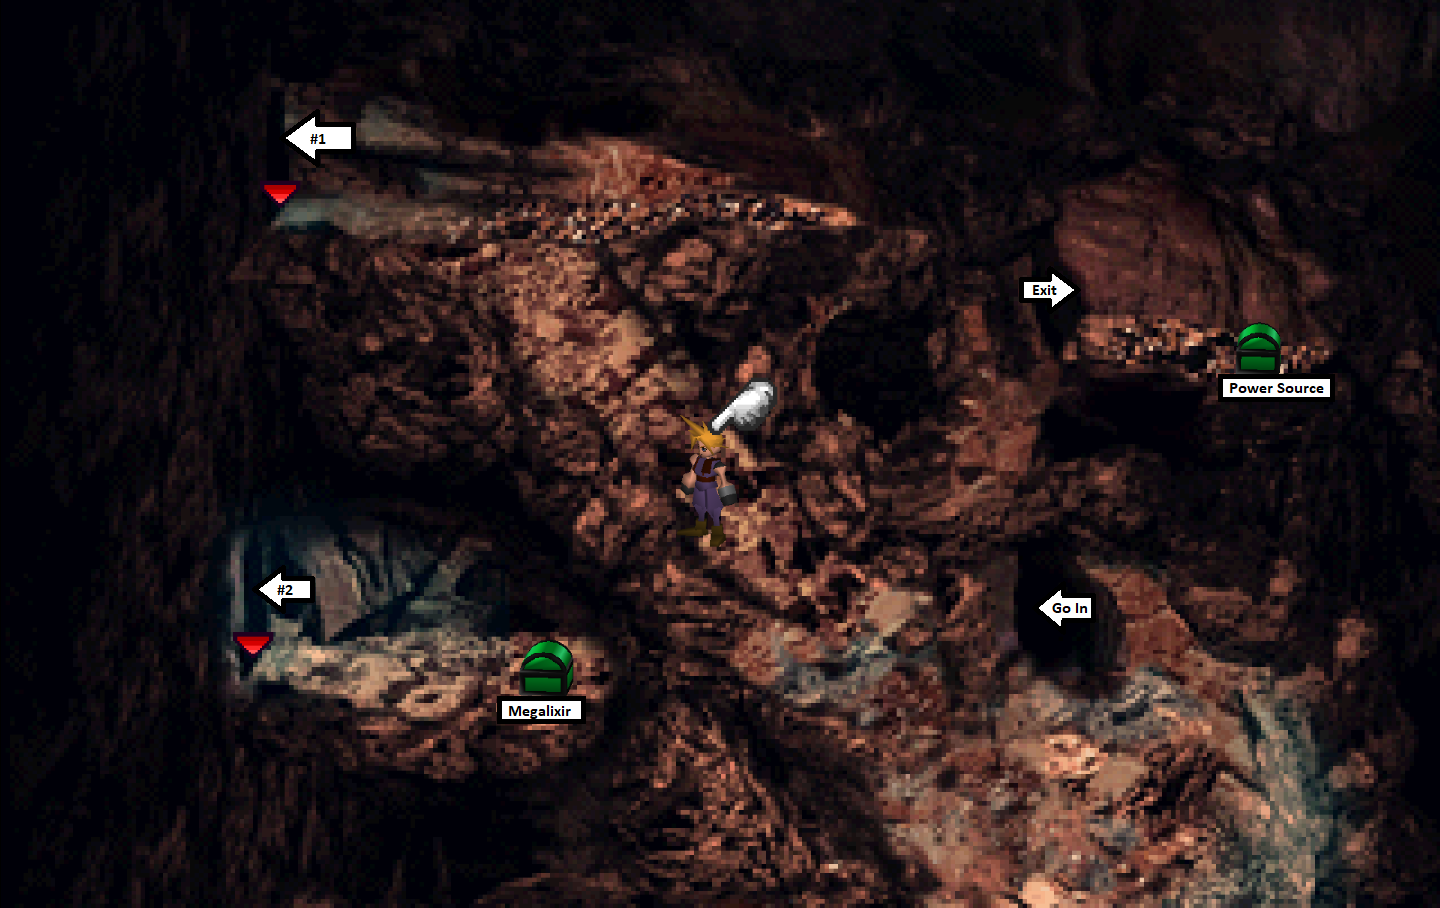
How to Reach Megalixir: At the top of this area fall down where you see my white arrow, instead of jumping off this ledge jump UP to the nearby ledge. You'll be prompted to jump up when you're standing in the right place, just wait for the dialogue box then press the confirmation button. After you jump up you can run across the ledge and jump down to where doorway #2 is. For a video of me doing all this click here.
Mind Source
Megalixir
Guard Source
Hero Drink
Power Source
**Important** At this point I strongly recommend you turn around and leave the Northern Crater to save your game before continuing. It's easy to mess up this next part and miss out on duplicates of some armor and Materia that is the best in the game.
Additionally, if you do this next part correctly so that you can receive duplicates of the best Materia/armor, you're going to have a party of Cloud, Vincent and Cait Sith for 20 - 30 + random encounters. If your Vincent and Cait Sith aren't very high level I would recommend making sure you have some good Armor not equipped on some characters for them (All Materia is stripped later so that's no problem).
The point of no return...
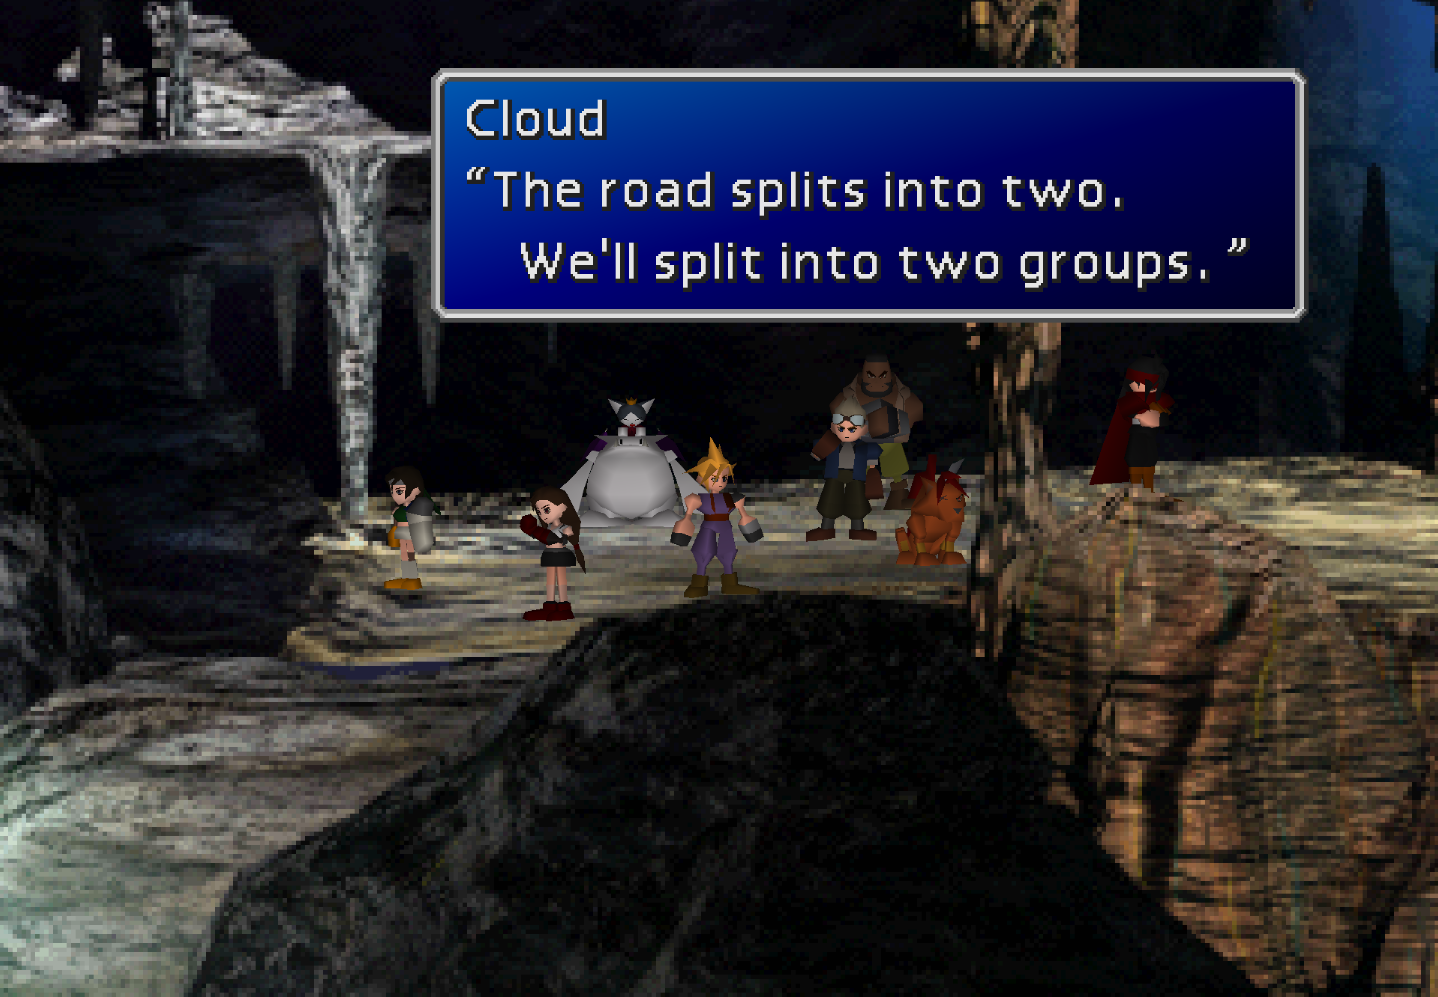
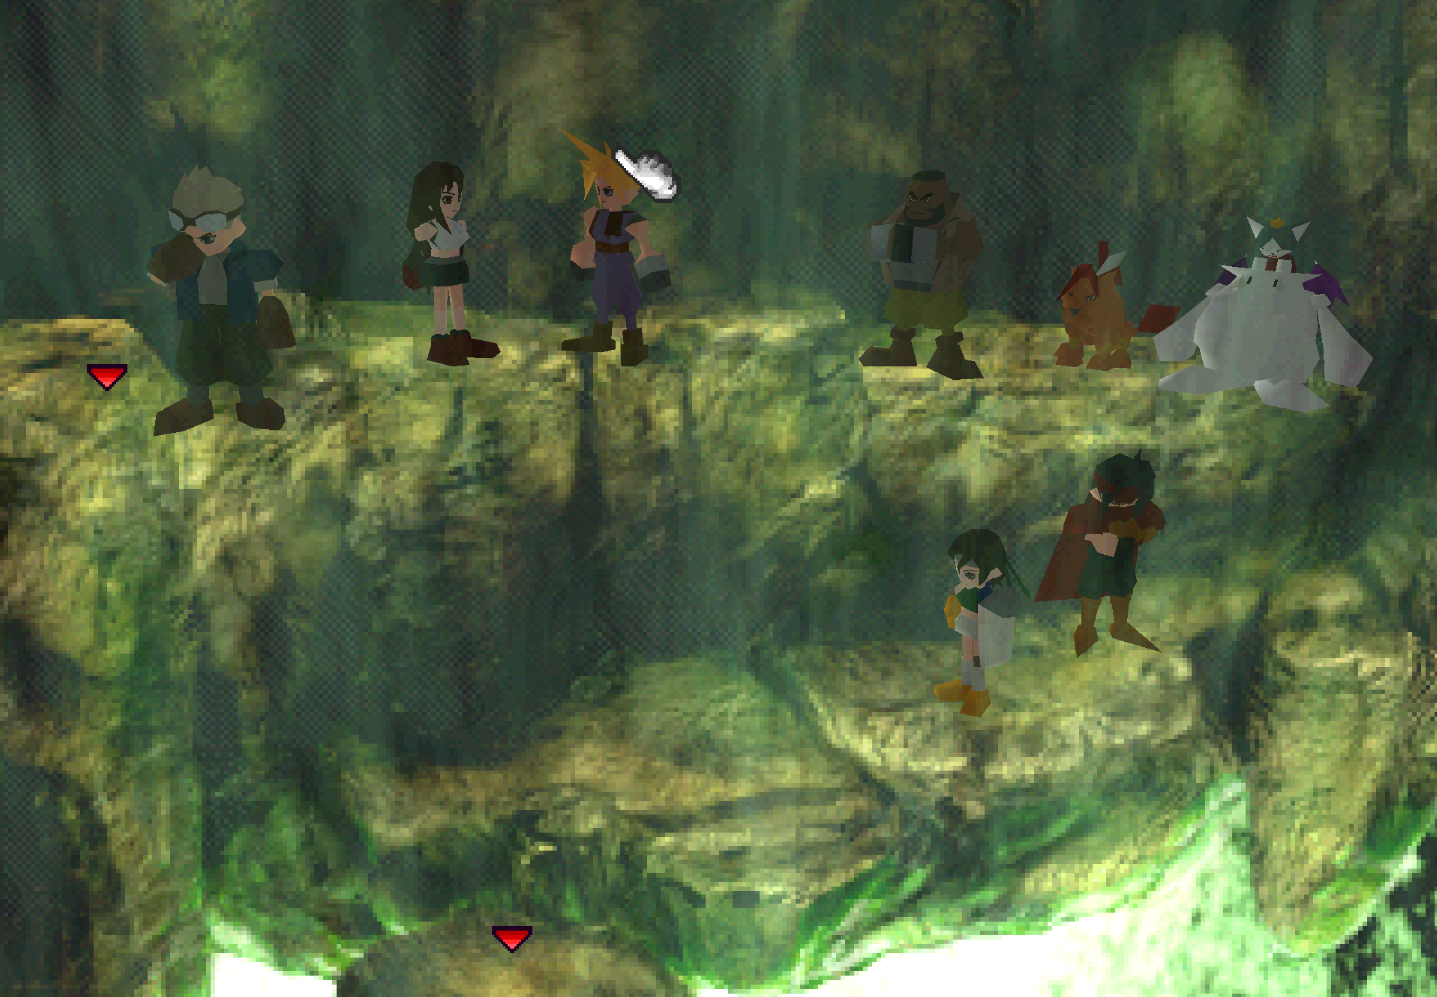
After the maze room you're going to enter a room where the road splits up and so does your party. This is the first of two splits and there's a way for you to get duplicates of all treasures coming up - so pay attention! At the first split you're going to want to send your entire party left except for Tifa, she goes right by herself.
When we meet up with Tifa again in a little she'll give you a Mystile piece of armor for doing this, one of the best armors in the game.
Tifa: Right
Everyone: Left
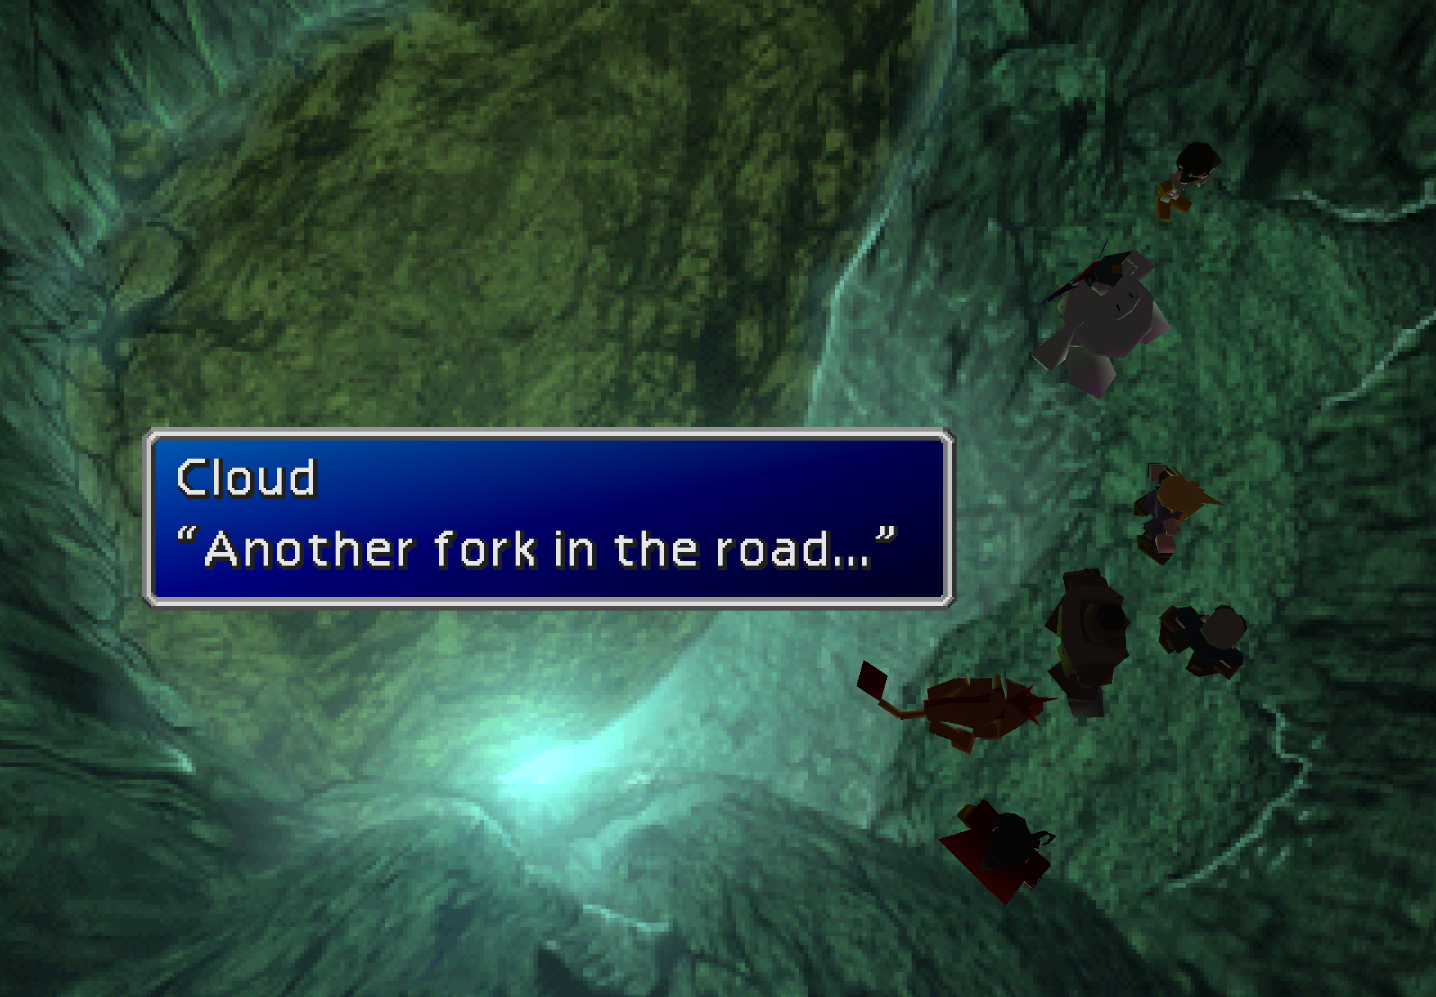
The path will split again immediately on the next screen, this time you're going to send most people Up... However Cloud, Cait Sith and Vincent are going to be sent Down. These three characters are also going to be your party for the second half of this dungeon... Hopefully you took my advice earlier and saved appropriate armor and Materia for them.
Cloud: Down
Barret: Up
Red XIII: Up
Cait Sith: Down
Yuffie: Up
Vincent: Down
Cid: Up
Lower Left (Rocky) Path - Your First Route
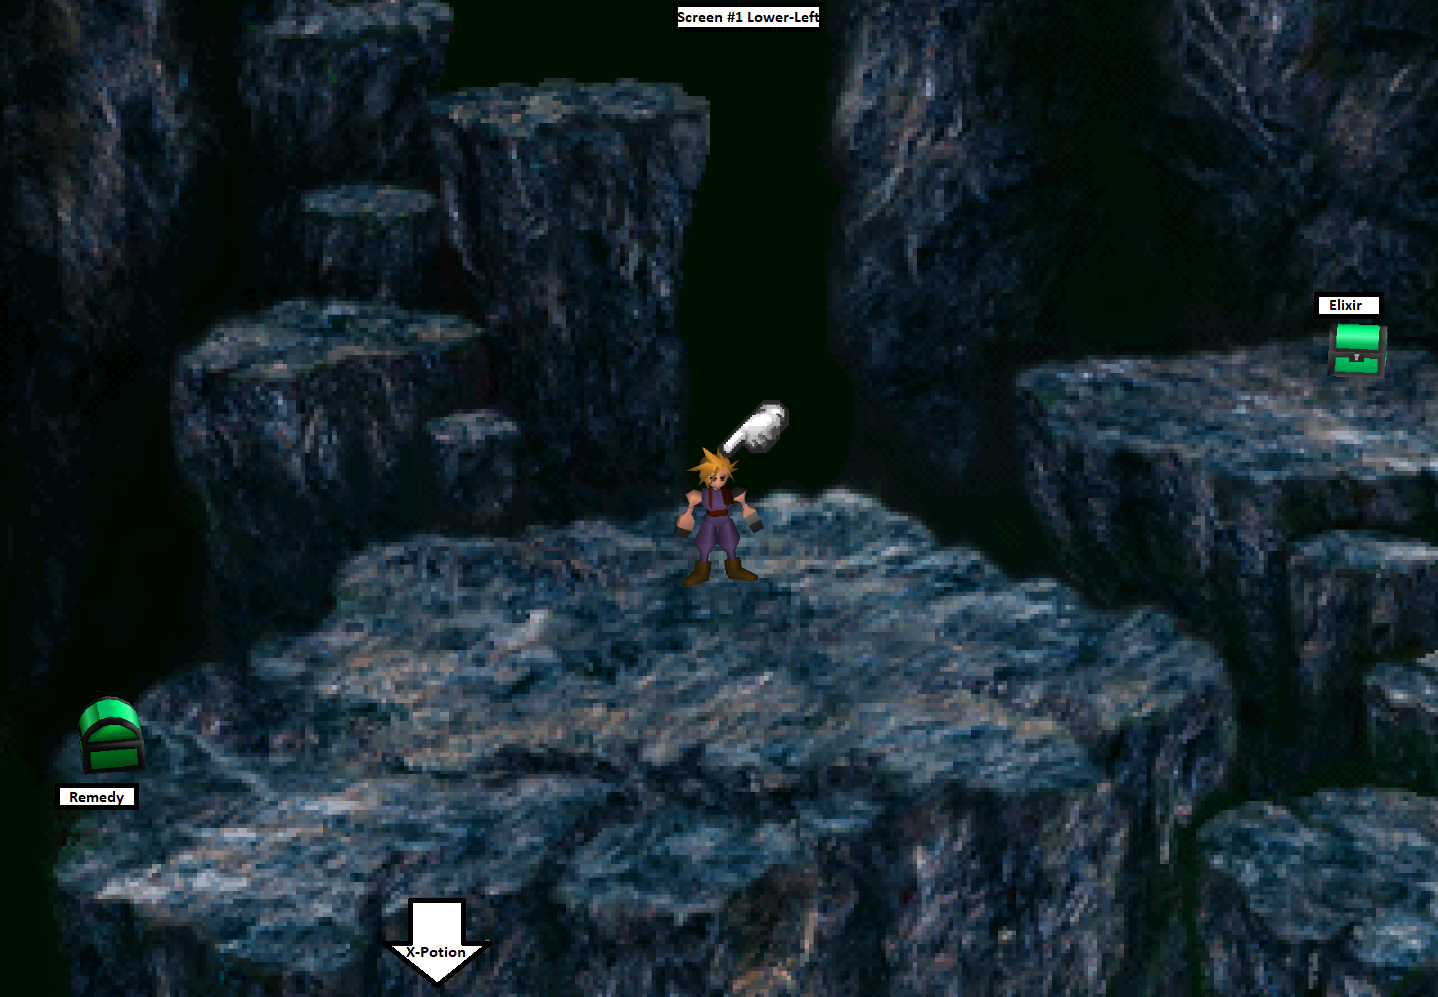
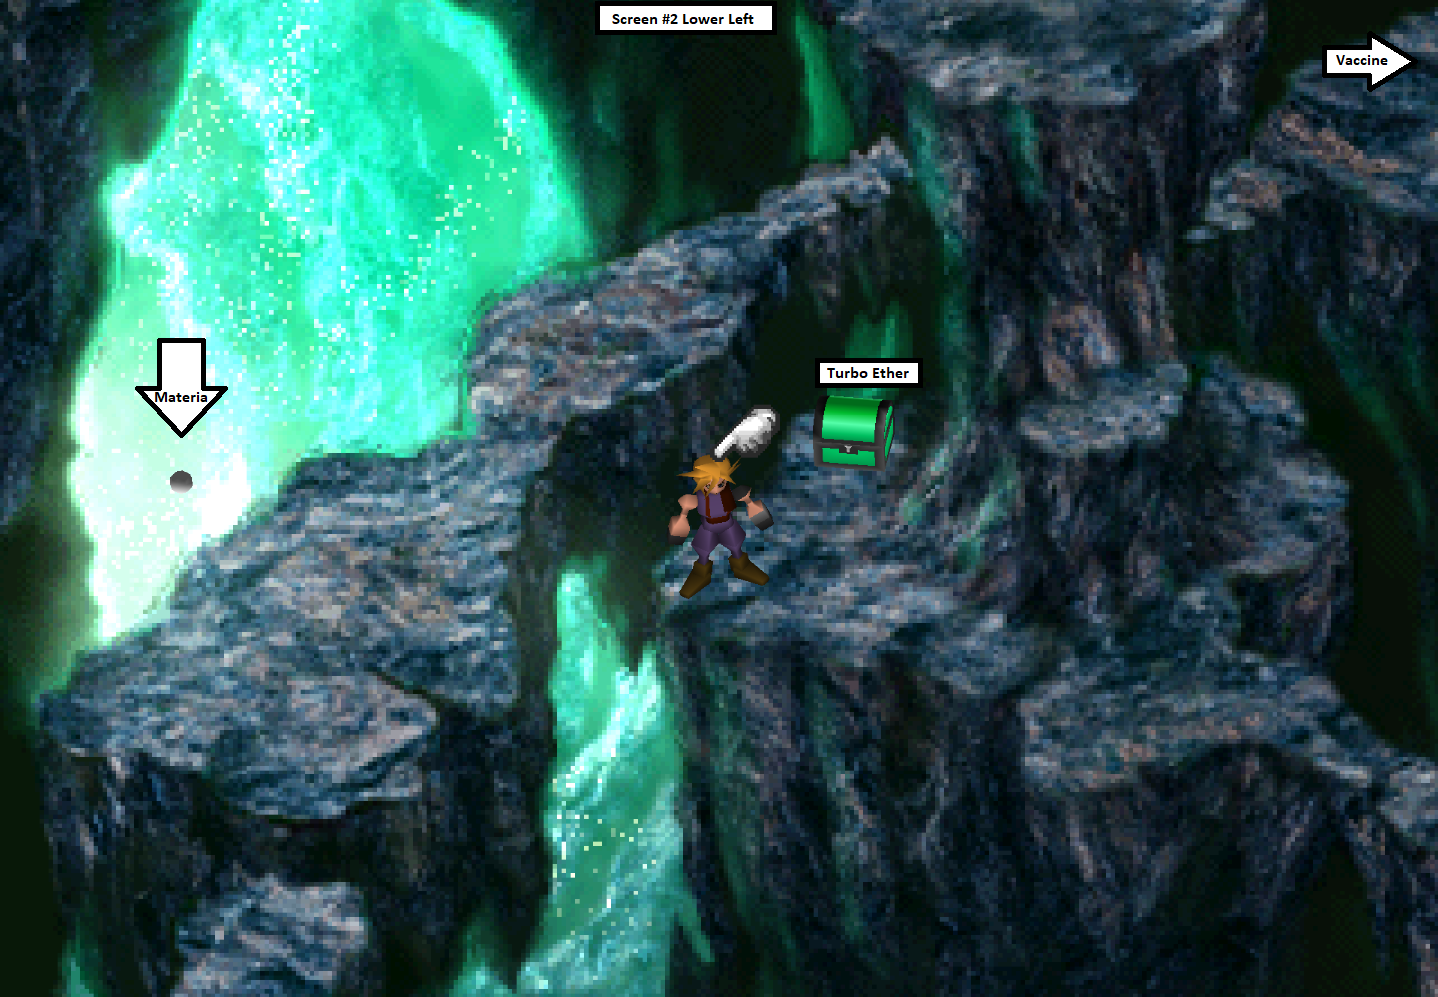
If you're following my guide - or basically any other guide for this game, this is the first path you'll be doing in the Northern Crater after the paths split. The first screen is self explanatory as is most of the second screen. Only the Magic Counter Materia is difficult to find. On the Ps1 or any older version this Materia is very difficult to see but on Steam and Ps4 it's a bright white.
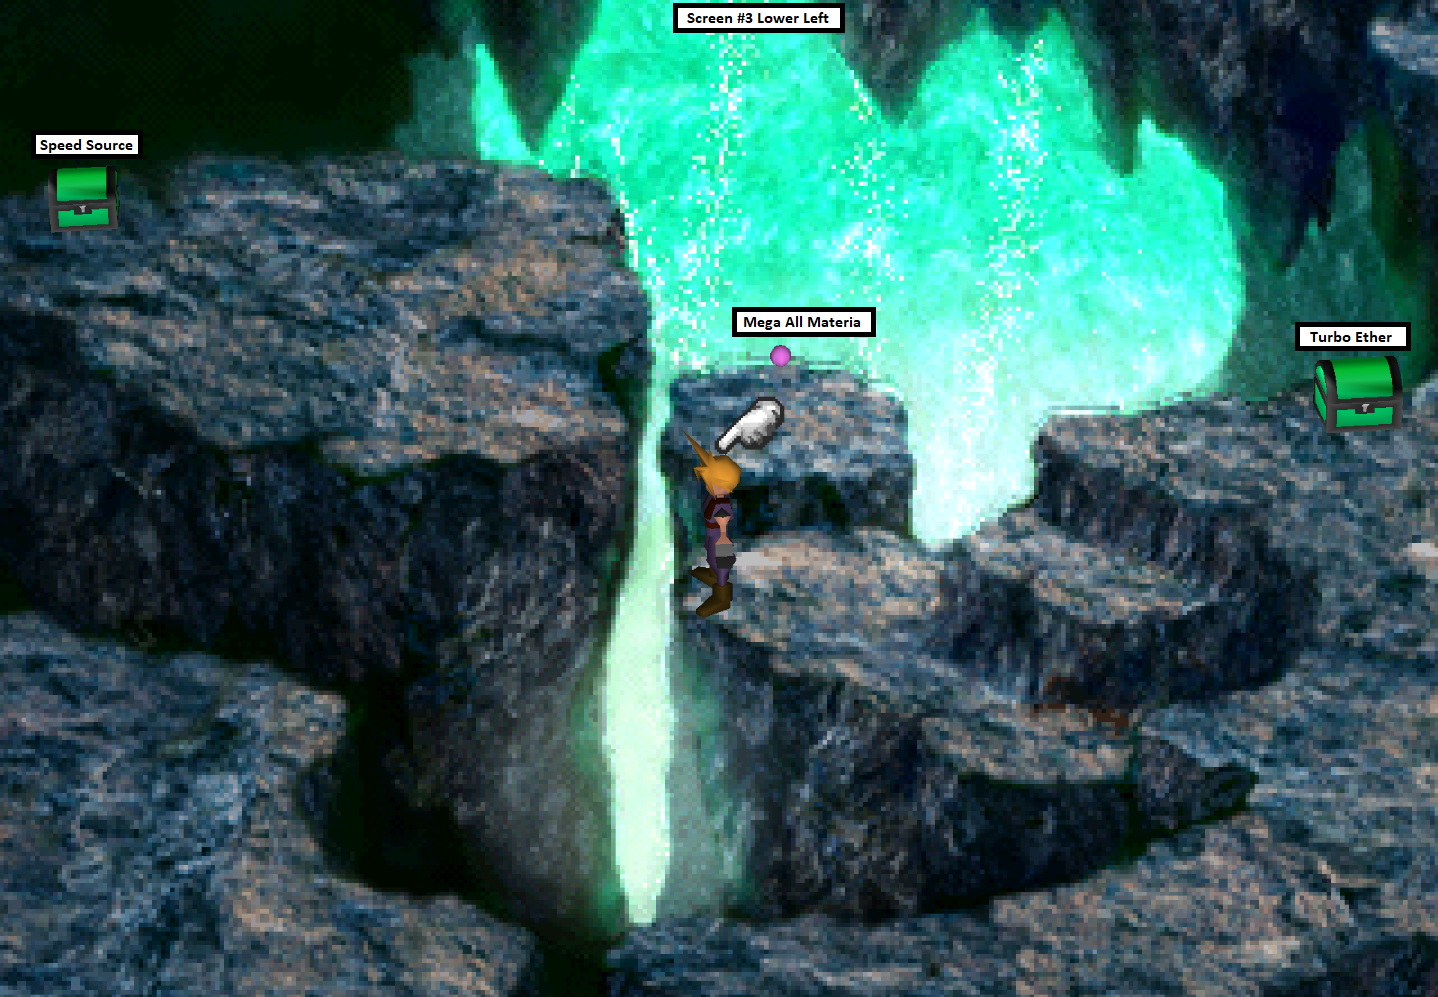
The only treasure on Screen #3 that's difficult to get is the Mega All Materia. To pick up this treasure you're going to want to spam the confirmation button as you're jumping across the platform that has it. Again, players on Ps1 or an older version of the game will not see the Mega All Materia sitting on this platform but anyone on Steam/Ps4 will.
After you collect all of the treasures you'll want to go down one screen then turn around immediately. Scroll down a bit past the next two parts to see the screen that I mean. If you progress past this screen you'll meet up with your party again and be unable to duplicate the treasures.
Treasures in the Lower-Left (Rocky) Path
(Screen 1) Remedy
(Screen 1) Elixir
(Screen 1) X-Potion
(Screen 2) Turbo Ether
(Screen 2) Vaccine
(Screen 2) Magic Counter Materia
(Screen 3) X-Potion
(Screen 3) Turbo Ether
(Screen 3) Mega All Materia
(Screen 3) Speed Source
Right (Dragon Graveyard) Path - The way Tifa went
You can reach this area by returning to where you first split up your party and sent Tifa off to the right. This is a rather short part and it also contains one of the hardest Enemy Skills to get in the entire game, Pandora's Box.
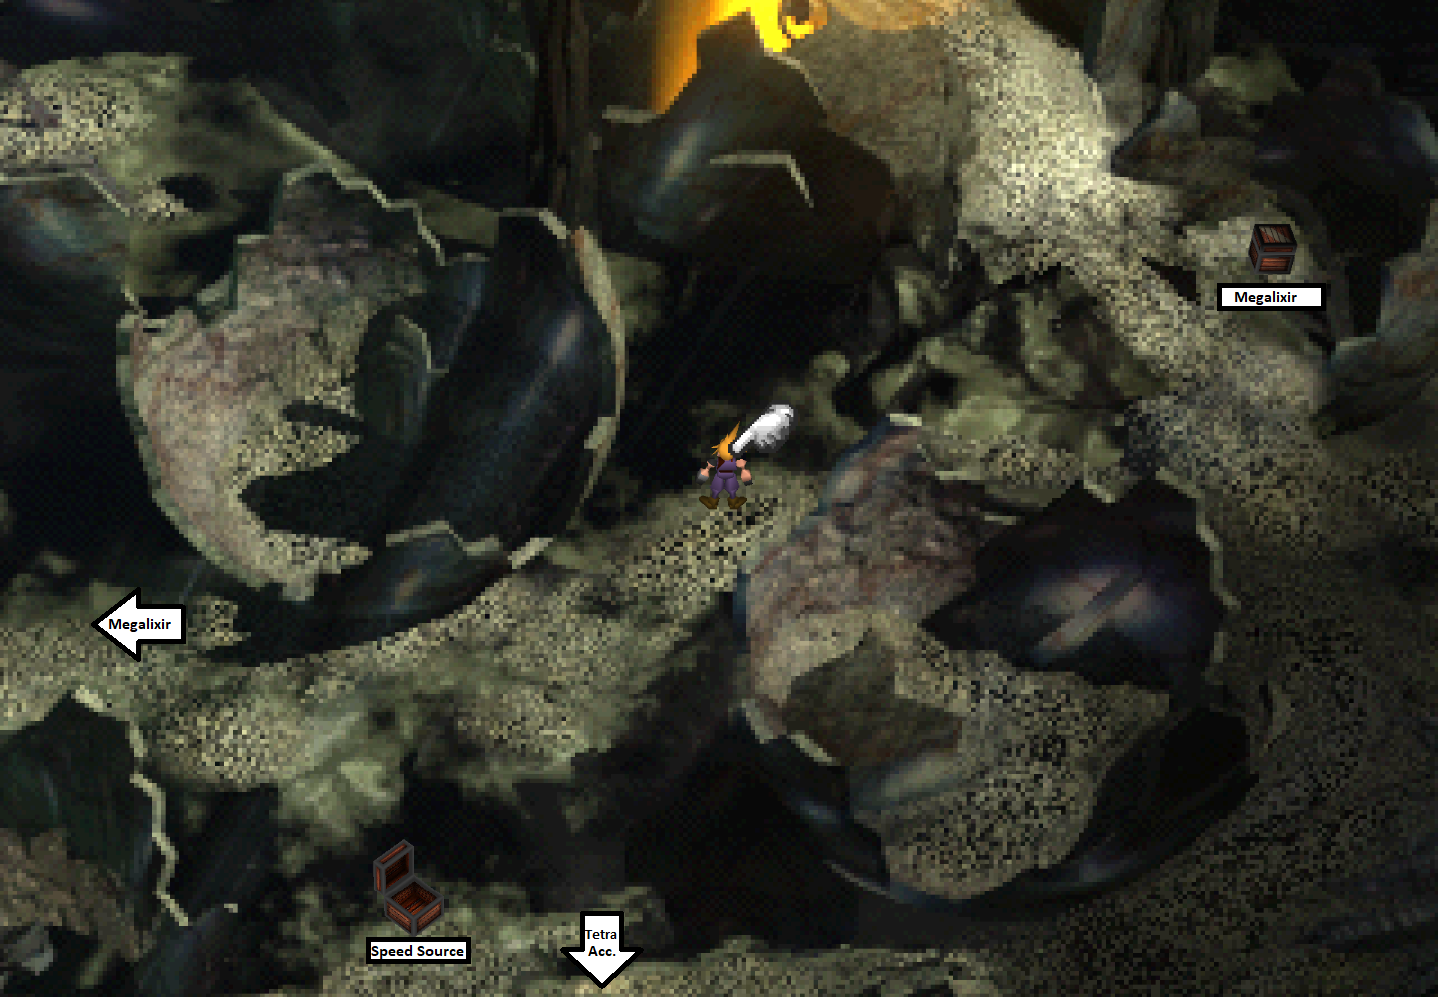
As for the treasures in this area, the Mystile and Elixir are basically impossible to miss as is the Speed Source and one Megalixir. You pass by all of these just going through this area. There's another Megalixir and a Tetra Elemental that you have to run off the path a little to reach, use my screenshot above for some guidance in finding them.
**Enemy Skill Tip** The Dragon Zombie enemy in this area only uses the Pandora's Box Enemy Skill ONCE per playthrough. If your goal is to collect this Enemy Skill you will have to save prior to coming to this location and equip all 4 Enemy Skills on your characters. Note: If you don't defeat the Dragon Zombie fast enough it'll use all its Skill Points and fail to cast Pandora's Box - this also means he will never use it again. Dragon Zombies can also teach you the Shadow Flare Enemy Skill.
**Enemy Skill Tip** The Marlboro enemies in this area use the Bad Breath Enemy Skill. If you didn't get this in Gaea's Cliff before you can get it here now.
**Enemy Skill Tip** The Death Dealer enemies in this area use the Roulette Enemy Skill.
**Enemy Skill Tip** The Pollensalta enemies in this area can be Manipulated and teach you the Angel Whisper Enemy Skill. This is a much more powerful version of White Wind that will even resurrect fallen allies!
Treasures in the Right (Dragon Graveyard) Path
Mystile
Elixir
Speed Source
Tetra Elemental
Megalixir
Upper-Left (Swamp) Path
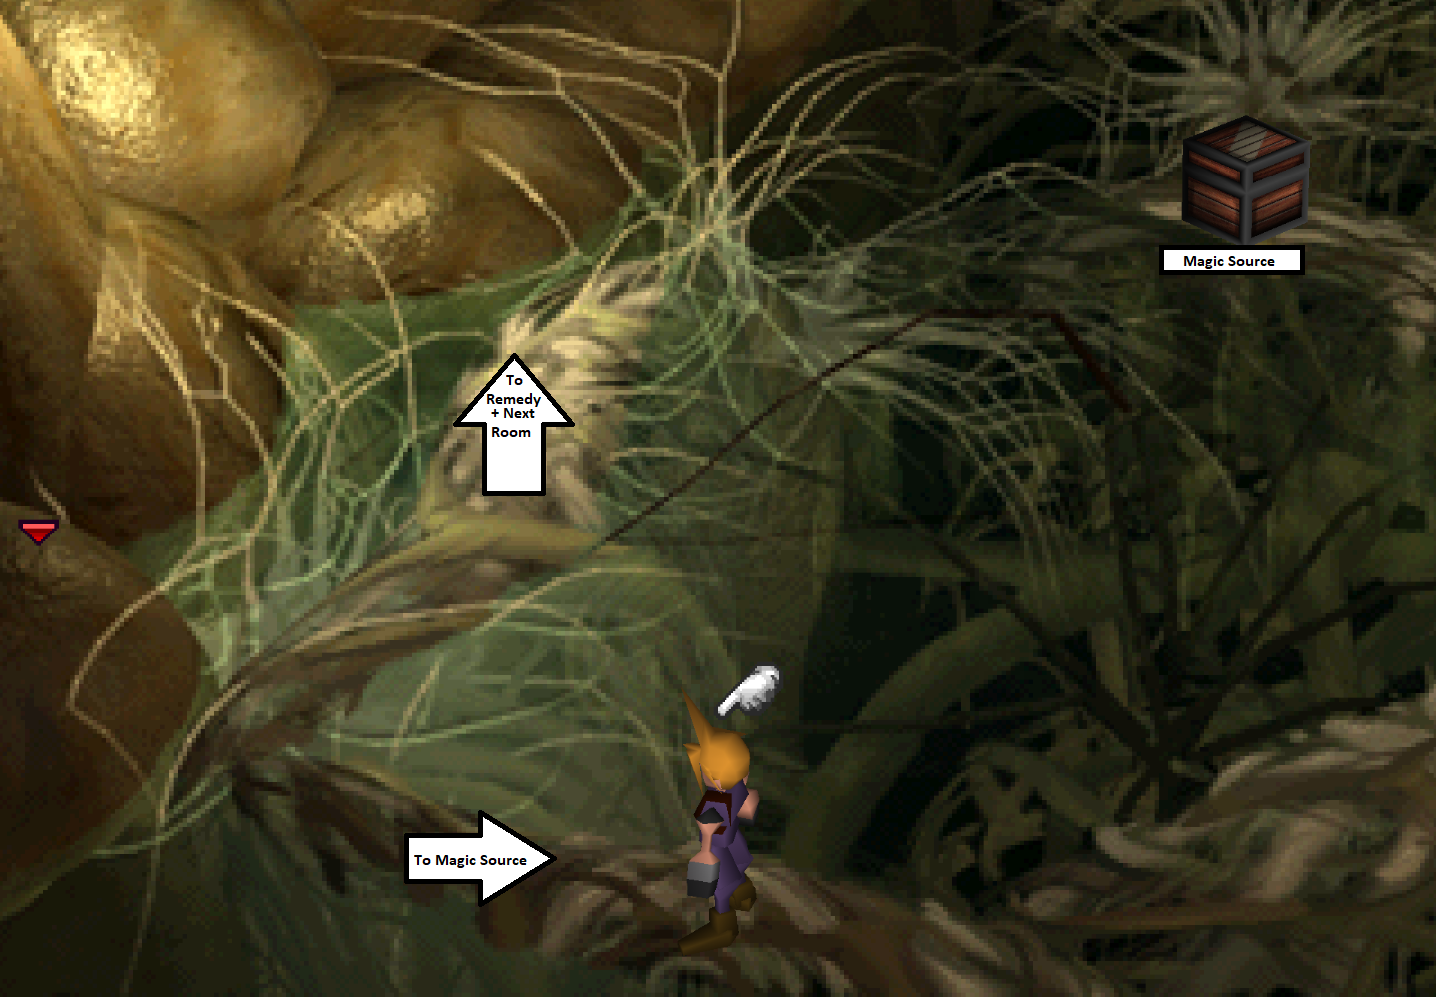
Out of all the areas this one is by far the most confusing.... Thankfully the random encounters in this area are extremely rewarding though. In this area you'll find Magic Pots which you have to give an Elixir to before you can defeat them. They'll reward you with 1000 AP and 8000 EXP if you defeat them after feeding them an Elixir.
To make things even better there's another enemy in this area called Movers. They're little bouncing balls that don't have very much HP and are very rare spawns in this area. Defeating Movers rewards you with 0 EXP however they give you a ton of AP after each battle. Typically a battle with 3 Movers (which is how many you usually get) will reward you with a total of 2400 AP.
For more information about the Magic Pots and Movers I recommend you check out my Northern Crater Leveling Location page. It goes into much more detail about these enemies and this specific leveling location. It's definitely worth your time learning about it and grinding here as there is no better place in the entire game to earn EXP and AP.
**Enemy Skill Tip** Christopher enemies in this area can be Manipulated to teach you the Frog Song Enemy Skill.
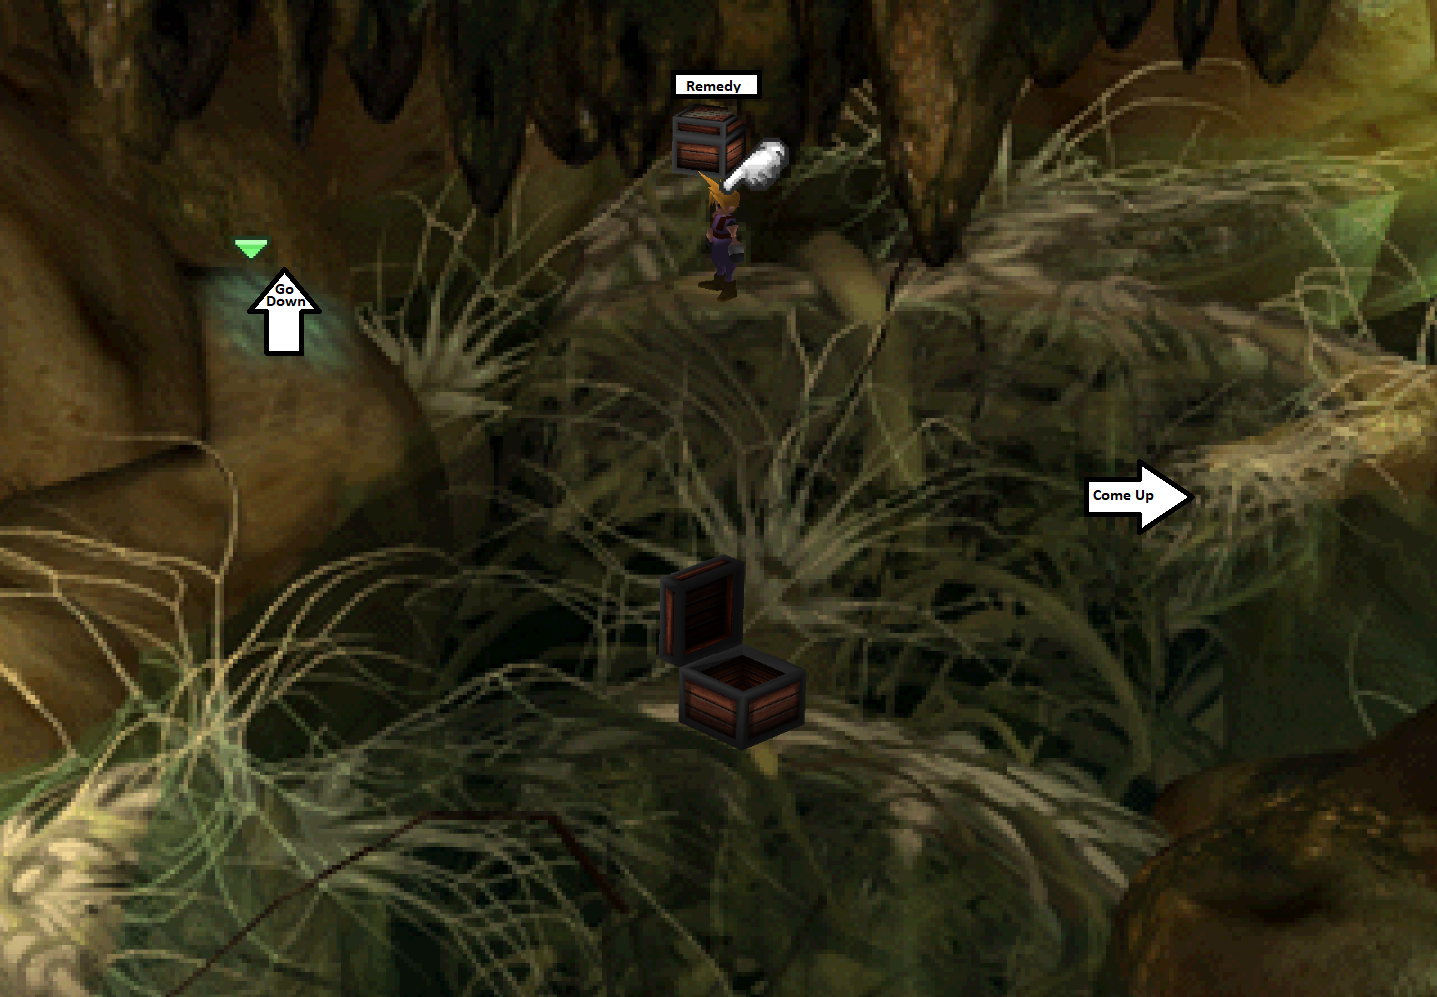
Treasures in the Upper-Left (Swamp) Path
(Screen 1) Remedy
(Screen 1) Magic Source
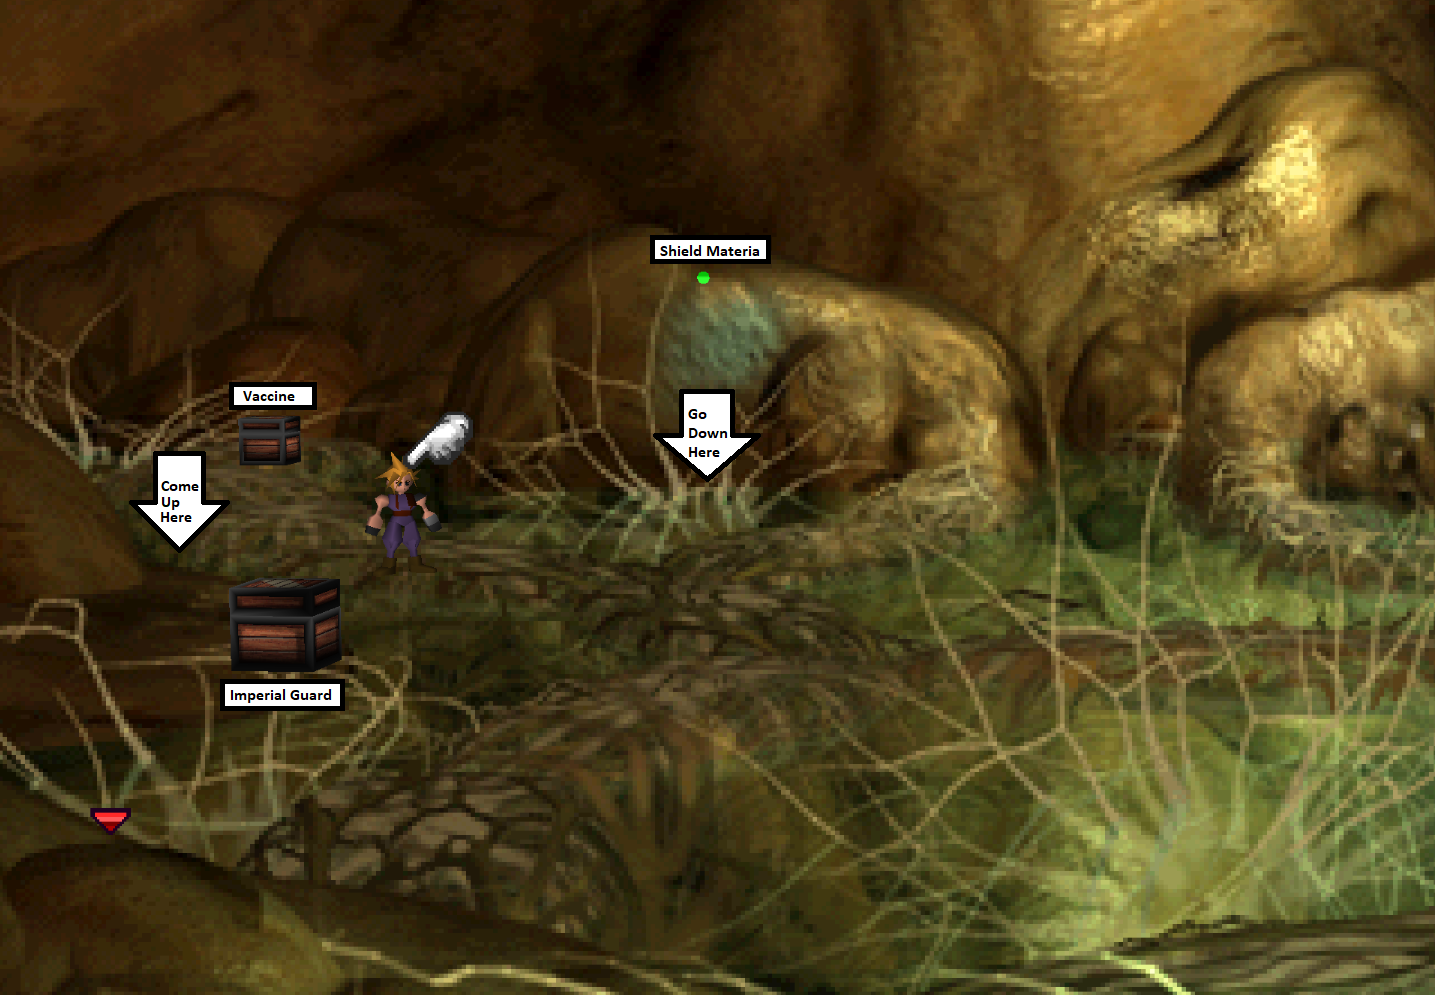
(Screen 2) Vaccine
(Screen 2) Shield Materia
(Screen 2) Imperial Guard
(Screen 2) Hero Drink
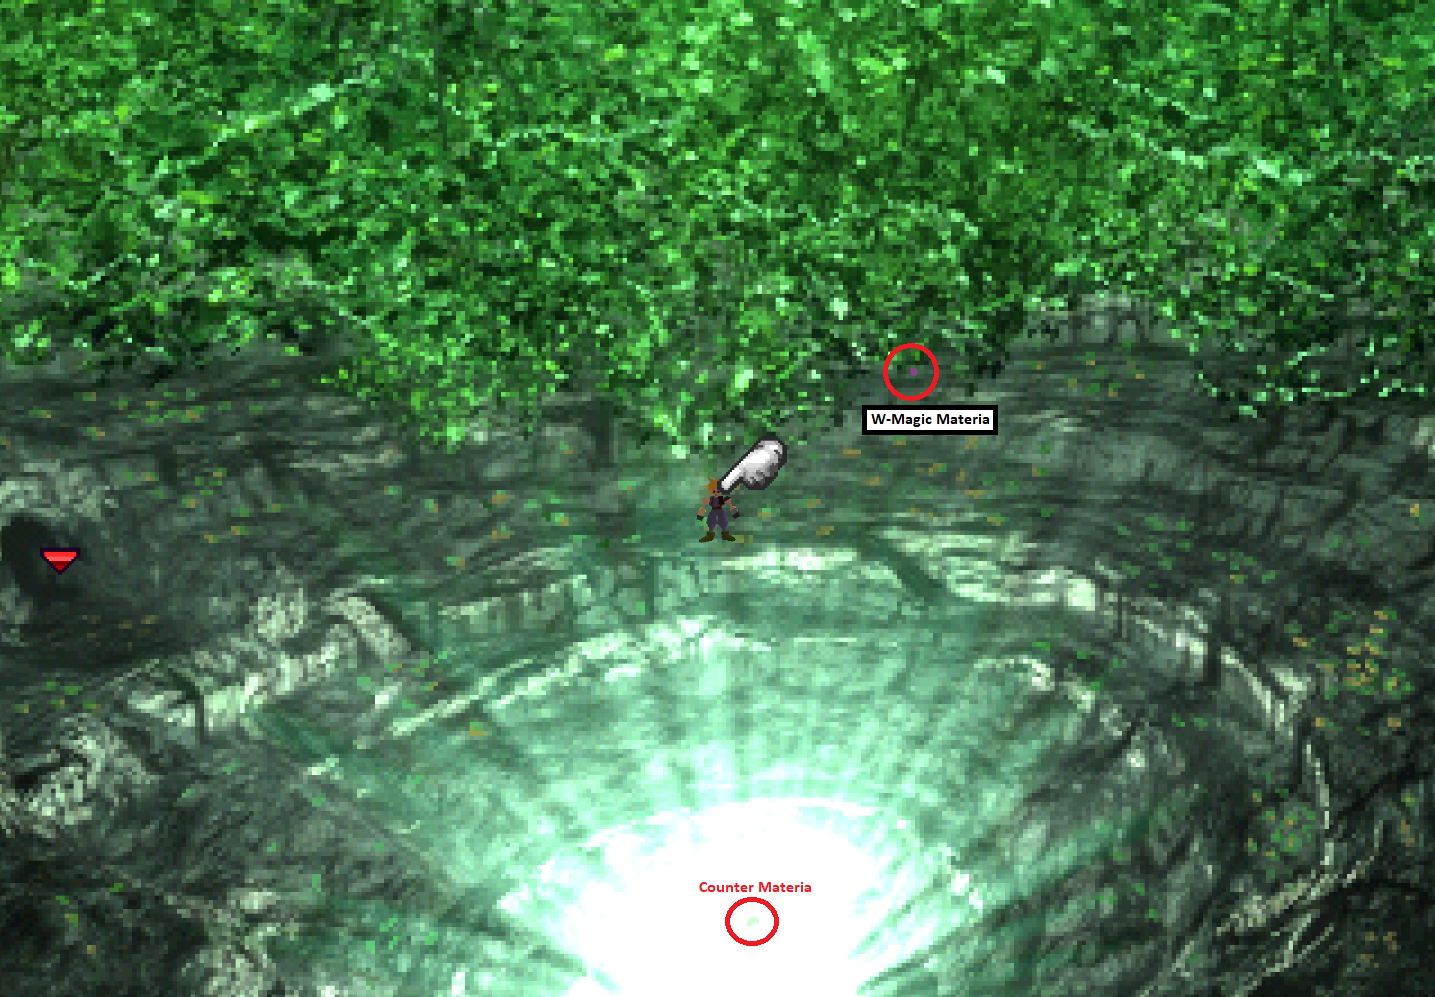
(Screen 3) W-Magic Materia
(Screen 3) Counter Materia
The room you want to stop and turn around at:
When you pass by the area shown in the screenshot above you will no longer be able to collect duplicates of the best treasures mentioned above. You do however have to come to this screen at least once otherwise Cloud won't be able to access the other paths.
Each time that you come to the room shown in the screen shot above you'll want to venture back up the Lower-Left Path that you first came down. This will lead you back up to both areas that your party split up and you're going to do each one of those areas for all of the available treasures.
**Do not go past this point until you've collected all of the treasures above**
**Do not go past this point until you've collected all of the treasures above**
**Do not go past this point until you've collected all of the treasures above**
Once you have collected all of the available treasures you can go down the stairs until you reach the screen below at which point you'll want to talk to all of your party members and collect the items they found. DO NOT go past this point as going to the next screen is the official point of no return for the Northern Crater.
Your party members will give you the following items:
Cid: Imperial Guard
Tifa: Mystile
Barret: Vaccine
Red XIII: Shield Materia
Yuffie: Counter Materia
Note: The game incorrectly calls the item Tifa gives you Mythril but I assure you it's a Mystile.
This is the final screen you can turn around at in the Northern Crater.
I strongly recommend you go back and save before proceeding forward. You most likely still have Ruby Weapon and Emerald Weapon left to fight as well as Sephiroth, so you want a save file that's free to do that but still has all of the Northern Crater loot.
If you want advice on beating Emerald and Ruby Weapon either go to each of their respective guides by following the links or return to my The Beginning of the End (Disc 3) Guide. That will share plenty of information to help you tackle these bosses. When you're ready to proceed and take out Sephiroth, follow the link below.
**Past this is the point of no return for Northern Crater**
**Past this is the point of no return for Northern Crater**
Continue to Northern Crater (Part 2) Walkthrough
Return to The Beginning of the End (Disc 3) Walkthrough