
Fear Effect Walkthrough - Disc 4
Disc 4 Video Walkthrough: Fear Effect Disc 4 Walkthrough
You begin Disc 4 with one of the more annoying movement puzzles in this game, we need to navigate across these floor tiles without falling into the black sludge. For this puzzle you will need to be both quick and accurate with your movements. The ideal path is to take the block on the left and follow the obvious path across to the bridge in the southeast.
The only part of this puzzle that will likely trip you up is the final step to the last block. Both of the blocks only overlap by a little bit and you will only have like one second to move from one to the other. Once you clear this puzzle you will have a very large land block to explore with over a dozen screens.
You will quickly notice that all enemies in this area drop 'paper' ammo and items. All of these items are useless to you until you burn them at a fire and turn them into things that you can actually use. The first fire available to us is created with a lightning strike near the village.
When you approach the village in Hell turn left and you will find the area pictured below. The fire that you see in the distance is what you'll need to use to ignite the paper ammo and many of the quest items that you find.
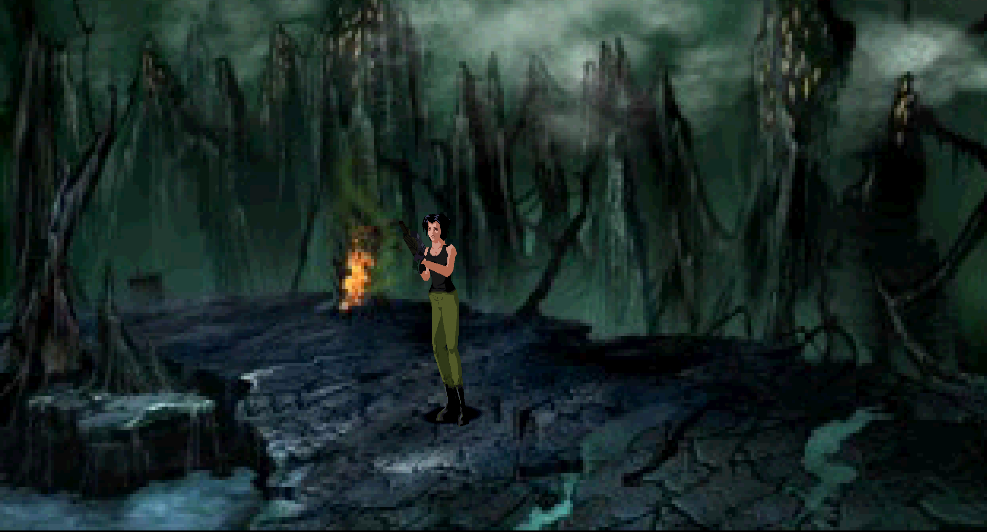
Note: You can make ammo at other locations with fire by burning the paper, but the quest item Paper Gate must be burned at the location above.
Our first real task in Hell is to locate the Paper Gate item which is dropped from an enemy. Once burned the Paper Gate will open up a gate nearby where it was found; which is why it's a good idea to remember where you found the item!
Inside you will find Madam Chen chained up against the wall, talk to her and you will get a cutscene along with the Doll item. She asks you to find her daughter and give the Doll to her, you've probably seen the location with the child already, it's not too far from Madam Chen ((If you run past the village again you're going the wrong way)).
When you find the girl, give her the Doll and there will be another scene. The next puzzle is by far the most annoying puzzle in the entire game if you're playing on an emulator. From what I have researched online, this puzzle is 'bugged' on emulators. When you look at it, there are two lines of "Four" and no "Five" on the clock. An example of what I am talking about is shown below.
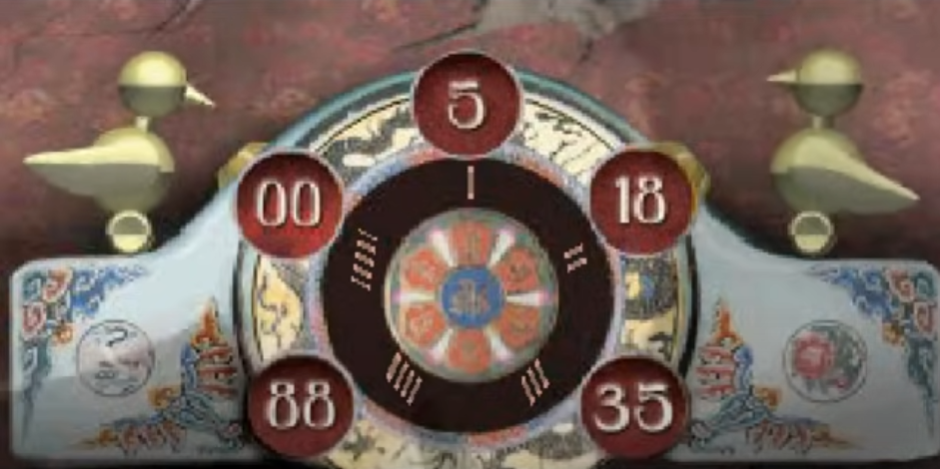
What the puzzle looks like on the original hardware (this is when you first interact with it, no movement has been made).
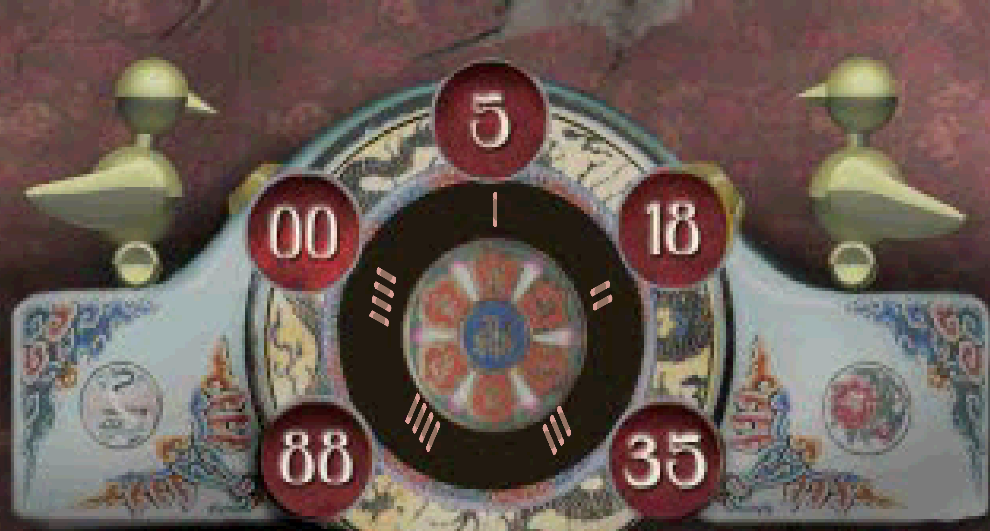
What the puzzle looks like on an emulator.
Emulators (for some reason) remove the fifth I from the 00. This results in both 00 and 88 appearing to have IIII when you first open the puzzle. This makes the puzzle significantly more annoying because you will sometimes have to guess which one is the correct one.
The best piece of advice I can give you is when you first interact with the puzzle, remember that #5 is under 00. Before you turn any knobs, if you know #5 is under 00 you can kinda work with that knowledge to solve the next few steps. With all of that out of the way, let's take a look at the solution to this puzzle.
You will need to line up the correct set of numbers under/next to each of the ages for Hana. Each time you are successful you will hear a noise and the Hana next to the puzzle location will change in age. We need to do this four times in total and in the correct order. Below is the best way I can explain this puzzle, if you'd prefer a video then check out Fear Effect - Hana's Age Clock Puzzle.
Hana Age Clock Puzzle Solution:
First Combo: 5 on Clock with #5 and #1 under it
Second Combo: 18 on Clock with #2 and #5 next to it (every other guide says you only have to hit 5 once, I had to hit it twice)
Third Combo: 35 on Clock with #1 and #5 next to it
Fourth Combo: 88 on Clock with #4, #4, #3 and #2 next to it
Solving this puzzle will net you the Stone Scroll item which you'll need to return to Madam Chen with. Use the item on her for a cutscene, you'll get the Tree Branch and some enemies will spawn. Remember that bonfire where we burned the Paper Gate item earlier? If you forgot, use my picture at the top of the page. We need to return to this location and use the Tree Branch on the bonfire to light it. Once that's done we need to light 3 braziers to open a door.
You can find one brazier near the bonfire, run one screen past it and you'll see the brazier (it's bronze). The next is by the village, run through the village and towards Madam Chen's area to find a silver brazier which you'll light. Finally, you'll find the gold brazier down the stairs from the silver one towards Madam Chen's area.
Bronze Brazier: Found near the bonfire, run one screen past it
Silver Brazier: On the right hand side of the village, on the way to Madam Chen's area
Gold Brazier: After the Silver Brazier, keep running over a few screens then down some stairs, you will find this one nearby
After lighting all 3 you'll open the door found between the silver and gold braziers. Enter this room for a cutscene, you'll receive the Stone Tree Half and Paper Gate Key, when the scene is finished some enemies will spawn. Return to the bonfire and burn the Paper Gate Key, this will make the real key spawn in the village (search the left-most hut).
Pick up Gate Key #2 and take it to the door past where we solved the Hana Age Puzzle earlier. Or past the area where you saw the little girl, whatever jogs your memory better. You'll find a door at the dead end down this way, use the Gate Key on it for a cutscene and a perspective switch.
Glas Walkthrough
We're now in control of Glas and this next part is rather linear. Follow the only path available to you and collect the Moon Key at the dead end. Turn around and go back the way you came, pass the blue dragon statue and use the Moon Key on the locked door at the far end of the hall.
Keep following Deke's ghost/the linear path and you will find a room with a red dragon inside, talk to it then climb down the vines nearby. Downstairs you will find two more dragons along with the Sun Key item between them, pick up this item and continue up the nearby vines.
There will be a few more rooms and another set of vines, eventually you'll find yourself in a large room with a bunch of symbols on the floor (pictured below). For this puzzle, you'll need to walk across the squares in the correct order or you'll fall through. In order to solve this normally, each of the dragons we passed had a symbol on it and the mirror at the bottom of the vines in this room shows us an order.
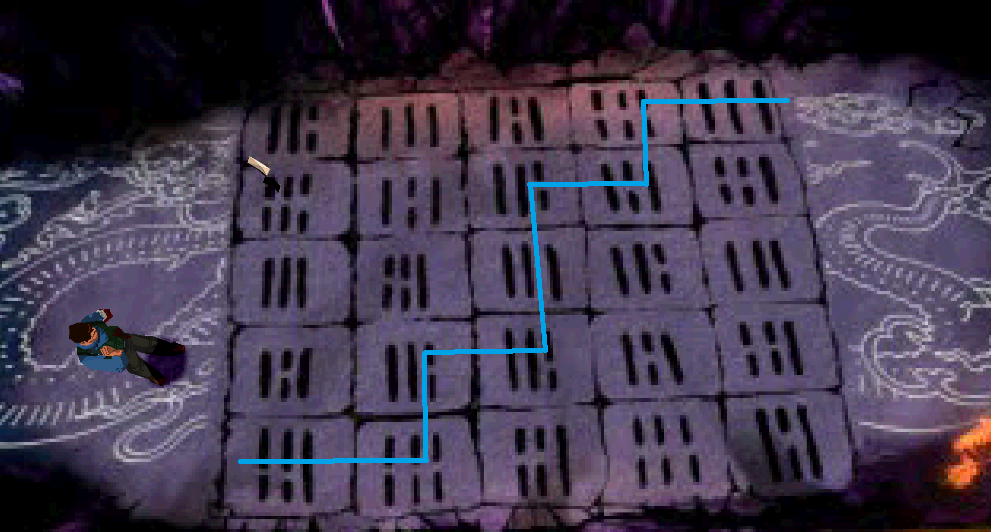
Of course, you're following a guide so just use the path that I have illustrated above. You'll find a Stone Sword across the gap, once you get this we have a lot of backtracking to do. We need to return to the blue dragon that we saw at the start of the Glas path and use the Stone Sword on it.
Doing this will open up a new path, continue until you trigger a cutscene and a boss fight. We'll be fighting Demon Deke, this is a movement puzzle combined with a boss fight. Throughout this fight Deke will swim under platforms and they'll disappear momentarily when he does. You will need to pick the right platforms to stand on and move around (a lot) until he shows himself. When he comes out of the sludge--that is your opportunity to shoot.
Once you defeat the boss there will be another cutscene after which you'll find yourself in control of Hana again.
Hell Finale
For this final part we will be switching back and forth between Hana and Glas. Continue forward with Hana for a scene, you'll get the Stone Willow item during the scene and you'll also want to pick up the Crank when it's done. Once you have both, return to the bonfire near the village (first picture on this page).
Near this bonfire you will find a well, you probably saw it earlier when we were going through solving all the puzzles around here. Approach the well and use the Crank item that we just got, this will get you the Stone Eye item. Run down a few screens, past the torch we lit earlier and you'll trigger a cutscene.
When the scene is over you'll be in control of Glas again, fight off the enemies and then you'll be back in control of Hana. Keep going forward through the remaining few areas until you reach the puzzle shown below. In order to solve this puzzle we'll need to use all of the key items we found in Hell leading up to it.
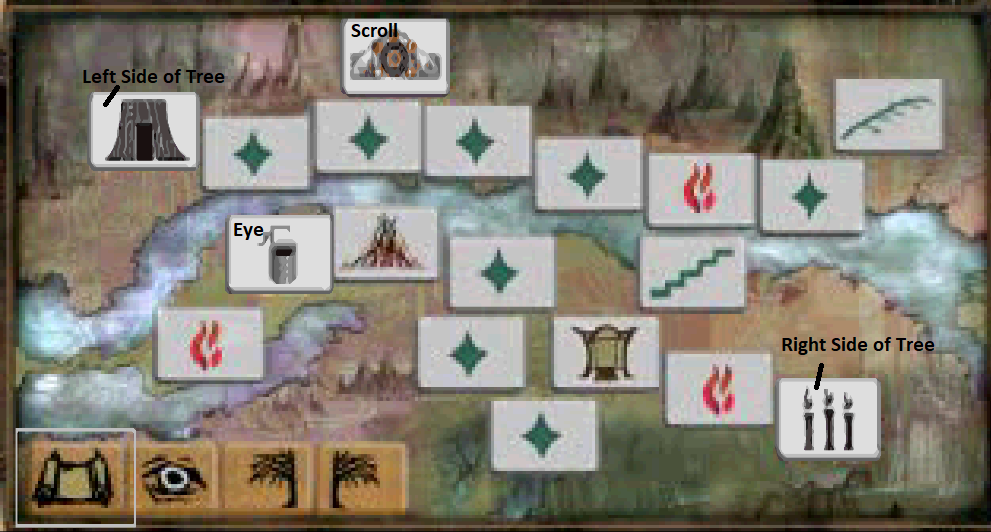
Basically, what you need to do is place each of the items from the bottom left corner into the picture slots I have marked above. Each successful match will make fire appear in place of the picture, once you match all of them you will trigger another cutscene and be prompted to change the Disc.
After the Disc change you'll find yourself in a small room. Use any Paper ammo at the fire and then use the Paper Doll item that you have to start the final portion. For this next part you need to walk around the room that you're in and use one of your Stone key items at the fiery symbols you find on the ground.
You can look at the furnace and match what item to use at what symbol, but I personally find it easier to just try my items until one works. There will be another scene when this is finished after which the game will branch in one of two directions depending on what difficulty you are playing on.
When playing on Easy, you will be given a choice to side with either Hana or Glas (pictured below). Choosing one means the other person will die, with Glas you will fight Wee Ming as the final boss. If you choose Hana you'll fight the King of Hell.
When playing on Hard, you will get a third option - work together. This will allow both Hana and Glas to survive and get you the 'canon' ending for the game. Your boss on Hard is also the King of Hell, the same boss you'll fight with Hana on Easy.

Wee Ming Strategy: Defeat the two weaker/lesser demons then take her out.
King of Hell Strategy: The only way to damage this boss is by burning the Paper Money item at one of the two fires on the sides of the boss arena. Basically how this fight works is he will summon two imps to fight you as he blasts the floor in various spots with lightning. Occasionally, Paper Money will spawn in the boss arena and you'll have to grab it then burn it at the fires to damage him. The best tip I can give you is to stand near the fires, you will avoid all of his attacks in this area.