
Breath of Fire Walkthrough - Chapter 4
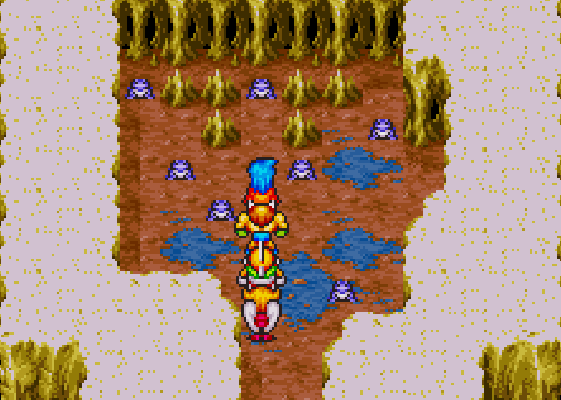
The previous chapter ended with us arriving at the Hidden Fort dungeon which is west of Prima. Once here you will want to put Ox in the front of your party because there will be many boulders/rocks that you'll need him to destroy with his special strength. For the most part navigating this dungeon is pretty easy - there will be boulders and walls for Ox to smash all over the place.
Some of the broken walls will lead you deeper into the dungeon and others will lead to chests. Many of the chests out in the open will be guarded by people that will run up to you and attack once they see you. Don't worry about this, you can easily defeat everyone who attacks you and there is no penalty for taking them out either.
Once you progress far enough into the dungeon you'll meet the boss - a giant frog that goes by the name Toad. Since this is a water creature I recommend using Ryu's ThrDr skill to deal extra damage to it since it's vulnerable to thunder damage. After eliminating the boss you'll get a scene during which you'll learn about Nabal.
There is an exit to this dungeon in this room - you can smash through the wall by the captives and exit onto the overworld. This takes you to a new portion of the world that we can't do much of anything in yet. Before we can actually go to Nabal though and do the stuff there we need to repair the B. Rang that we got in Krypt earlier. If you just started reading this guide now you probably missed this part, it was the final portion of the Chapter 3 walkthrough. Head back there and check it out for more information.
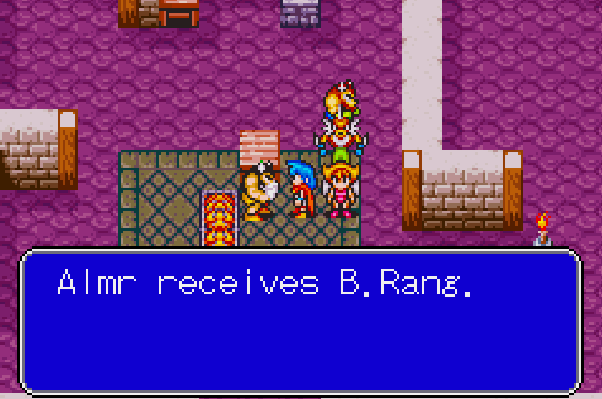
Return to Gant and visit the blacksmith building that we have been to multiple times already (the northern most building). Talk with the blacksmith here and he will repair your B. Rang for you. I won't mention this again, but if you haven't gotten Karn's spell that allows you to fuse Bo, Gobi and Karn together into one super being... make sure you get it now at the blacksmith's house. Top right of this building, move the bookshelf and talk to the NPC in the new room with Karn.
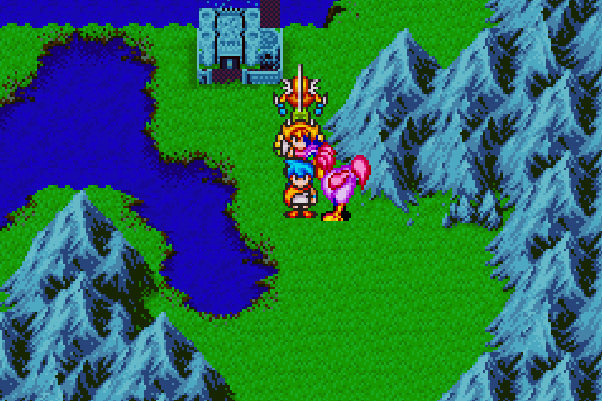
When you are ready to continue with the story exit Gant and follow the linear path across the overworld as far east as it can go. You will find a lone hut surrounded by trees which you can enter. In there you'll find an old man with a goat, he will be happy when he sees that you have a boomerang with you. Then he tells you about a species of bird and how stealing their egg makes them go berserk... okay.
Once you talk with the old man and get the required dialogue it's time to return to that hidden fort we went through with Ox earlier (at the top of this page). We'll be going through the entire dungeon for a second time until we get to the final room - smash through the wall and exit to the overworld just like we did before.
Go north when you exit the hidden fort until you run into a forest, touch the forest and you will zone into a new area called GrimFowl Wds. In this forest you'll want to inspect one of the eggs to anger the birds. You'll be attacked immediately after you inspect the egg and then you'll be followed by the GrimFowl birds when you're in these woods.
This next part is really annoying, what you need to do is get one of the birds to follow you and very slowly lead it up to the north exit. If you're successful you'll be able to see the GrimFowl on the World Map with you, just like in my picture below. Lead this GrimFowl up to the fort a little further north and watch the scene.
Head inside of Nabal and before you go down the stairs in the first room you can push the pots in the hallway and inspect the ground below them for a Life2 and a SkullRG. Continue through the linear dungeon until you find the wall for Ox to knock down. Bust it down and continue through to the boss room of this dungeon. You'll have to fight 3 SlimeX enemies (which are very easy); once they're defeated they will merge into one SlimeX enemy who will pose a bit more of a threat.
Defeat the big SlimeX and you will have a long scene during which you will save the females of Gant. You'll learn that the Dark Dragons are firing a torpedo at Prima as well and when you regain control of Ryu you'll be back in Prima at the guild hall. The next thing you need to do is go upstairs in the guild and talk with the old man sleeping in the bed. He will jump out of his bed when you talk to him - crawl into the bed and inspect the pillow for a Statue, this is all we need.
Exit Prima and return to the surface, use Nina's Warp spell and teleport to the town of Arad. When you were here earlier in the game you may or may not have seen the very small town that moves around just north of Arad (pictured below). This is the town of Wisdon and now that we have the Statue we're able to enter it.
Wisdon is the very small one and Arad is the larger town
When you enter the town of Wisdon you'll notice that the entire town has been turned into ghosts. There isn't much to do in town currently except to go down the stairs in the middle of town into the dungeon. As far as dungeons are concerned this place is extremely linear. You'll need Ox to lead your party since there are tons of walls and boulders he can break down which will reveal the path ahead or treasure chests.
There are also a lot of chests to collect throughout this dungeon, as always it's up to you how many you want to go out of your way for. After going down a few staircases you will eventually reach a large open room with many different smaller rooms inside of it. Each of these smaller rooms will have a breakable wall and treasure chests in them - one has stairs that go down and lead to another small room with treasures in it too. You can find the dungeon exit in this large room as well, it's in the north central part.
Go up the stairs and you will leave the Wisdon dungeon only to appear back in the town of Wisdon. In front of you will be a giant castle - enter inside to continue. Go north in the castle and you will find a pool of water that you can drink from to fully restore your HP. There isn't anything else for us on this floor so head upstairs to fight the boss of this dungeon and to meet Bleu (pictured below).
Walk up to the ghosts and interact with them to trigger the boss fight. You will have to fight each of these ghosts one by one - when the fight is over you'll have a talk with Bleu. She asks you to take the OldEgg that she gives you to a volcano - that makes our next destination an area underwater north of Prima called the Sea Volcano.
Exit the town of Wisdon and use Nina's Warp spell to return to Gant. Enter the water and go as far north as you can until you find the underwater cave - this is the Sea Volcano. This dungeon is pretty big and has a couple of twists and turns that will lead to optional loot, it's up to you to explore and gather all of the goodies that you want.
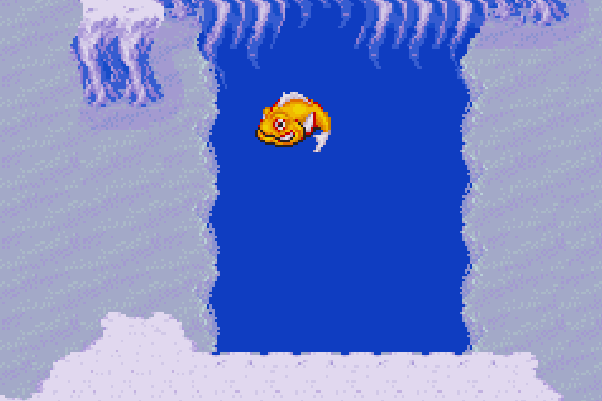
Our goal to advance the story is at the bottom of the Sea Volcano, you'll find a ledge you can step out on (pictured below) and from this ledge you can toss the OldEgg into the volcano. This is all we need to do inside of the dungeon, once you place the egg into the volcano you'll get a scene during which a lot of things happen. You will ride around on a big fish and attack some Dark Dragon ships and Bleu will also join your party.

You'll regain control of Ryu on the overworld just north of Prima. Before you do anything I recommend you merge Karn with Bo and Gobi again to make the super saiyan and re-arrange your party so that you have Bleu as a party member and Ox sits out. Alternatively, if you don't like having casters in your team let Bleu sit out... her damage with regular attacks and 'Auto' is very low. She isn't worth using unless you plan to actually make use of her spells.
When you're ready to continue with the story go north of Prima and you'll find a battle taking place. Head into the center of all the units fighting and you will automatically get thrown into a battle against the Dark Dragon battalion leader that is here. For this boss fight you'll be fighting against a giant crab named Pincher.
I recommend you use thunder based attacks against this boss including Ryu's ThrDr skill. You may also want to buff up your team with Nina's Shield spell which will reduce the amount of magical damage you take. Even if you don't use this on your entire team buffing up your weakest characters is a good idea since this boss will hit pretty hard when it gets low on HP.
After the fight is finished watch the scene, when you regain control of Ryu you'll get a message from Gobi saying that he is missing something. Enter back into Prima and visit the guild again, talk to the guild master and he will give Gobi back his Sphere and a MystSF. I believe the Sphere is his 'license' that everyone talks about but I am unsure.
The guild master tells you that Gobi is able to transform into a giant fish when you use the Sphere item. We'll need to use this ability to reach our next destination, the town of Tunlan. So exit back to the overworld and run up to the Sea Volcano area again. Put Gobi in the front of your party and press A to activate the giant fish transformation.
Use Gobi's fish transformation to swim over the large gap by Sea Volcano!
While transformed as a giant fish you can avoid all battles and you will also be able to go over most terrain that would normally block you. One such example is the large gap to the west of the Sea Volcano (pictured above). You can swim right over top of this while transformed as a giant fish and as you can imagine this will grant us access to a whole new part of the World Map!
Our first destination is the town of Tunlan, after you swim across the gap go south until you hit the wall then swim west until you find a small island that you can surface on. The island itself is quite small and the only thing on it is a few trees and the town of Tunlan. Inside of Tunlan you'll want to do any shopping that you want and exploration to find the goodies in town.
The main thing that we're in Tunlan for is actually optional stuff - we're after the Rod5 item which is a powerful fishing rod for Ryu. With this rod you'll be able to fish up some very powerful upgrades for Ryu which will make future battles much easier. These upgrades will also give us access to more Dragon Shrines which will let us get more powerful dragon abilities on Ryu!
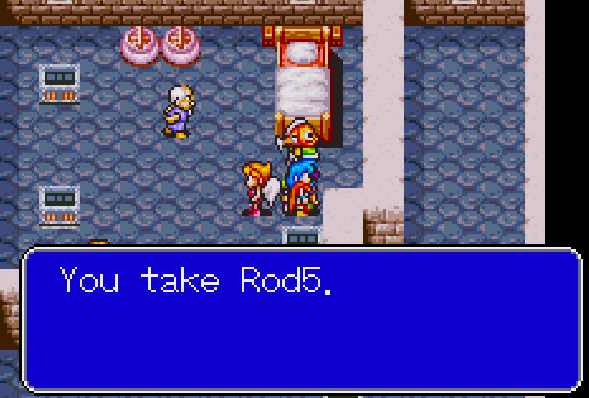
You can find the Rod5 in the northern-most house in Tunlan. Enter into the large castle and go up the top right stairs on the first floor. This will lead you to a room that has a locked door and four large statues - approach the treasure chest in the top left of this room and a statue will come alive and push you into a hole.
You'll fall down into a small room with an old man who says, "If you want to make a big catch, you'll need what's under the box". He's talking about the box that is just below the bed in this room. Push it out of the way and then search the floor to find the item we're after, Rod5!
After acquiring the Rod5 you'll want to push the box in the bottom left of this room to uncover a trap door that lets you escape Tunlan. For now we're finished in this city - our next few stops are going to be all optional content using the fishing rod that we just acquired. I don't recommend you skip this content even though it's optional though because the upgrades we get for Ryu will be a big deal and they will unlock Dragon Shrines as I said earlier.
The first destination on our list is the town of Auria because we need to purchase some Worms for fishing. I recommend you buy 9 and sell any extras that we're left with later when we're done fishing. In order to fish using Ryu what you'll want to do is equip the fishing rod and your bait in Ryu's Misc slots. You'll likely have to unequip some rings to do this but that's ok - we can put them back on later.
Once you have your bait use Nina to Warp to Romero and travel northwest through the forest. The first item we're going to get is the DragonSD.
DragonSD: Northwest of Romero, go through the woods beyond the Karma Tower dungeon. Behind Karma Tower there is a mountain range, you can fit between the mountain range and the edge of the cliff allowing you to reach a new part of the World Map. In this new part of the World Map you will find a stone well that looks pretty beat up - fish in this well using Ryu for the DragonSD, a new weapon for Ryu.
DragonHT: Warp to Arad using Nina and go south until you are aligned with the Krypt dungeon - from there go directly west until you reach the shoreline. Hug the shoreline and travel south until you reach another well that looks just like the previous one. Much like before fish in the well to acquire our next item, DragonHT. This is a new helmet for Ryu.
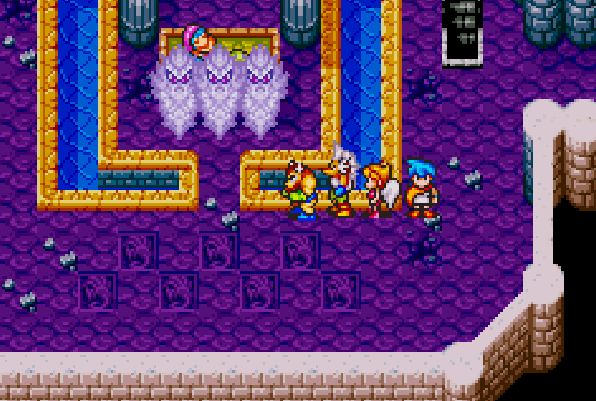
Dragon Shrine: Do you remember the Nabal dungeon from earlier? If not you can scroll up to the top of this page for some more information on it. We have to head back to this location, so use Nina to Warp over to Gant and travel through the underwater route and past Prima again. Travel through the Hidden Fort yet again so that we can come out on the other side of the World Map. From here it's north to the GrimFowl forest and south to destination we need - the Dragon Shrine!
The Dragon Shrine south of Nabal
This Dragon Shrine works the same as the previous one, only Ryu will be allowed to enter and fight the boss. If you're struggling with this boss I recommend you transform into a ThrDr on Ryu and auto attack the boss to death. All in all this fight should be a piece of cake. Victory will net you 4 more Dragon transformations for Ryu, you'll get IceDgn, FirDgn, BltDgn and GldDgn.
Ice, Fire and Bolt are all elemental transformations - the final one is Gold Dragon which will deal Holy Damage. As you can see these skills cost a ton of AP so you'll want to save them for the toughest fights (typically bosses) that you get into. We're all done with optional stuff now, it's time to teleport back to Tunlan using Nina.
When you arrive in Tunlan you'll want to go into the ocean to the south - once you're underwater you'll want to go far north until you hit a row of pink corals. North of these pink corals you'll find another area that you can surface back onto land, you'll want to go up here. Follow the linear path along the landmass until you reach the town of Gust.
Once you're in Gust the first thing I recommend that you do is visit the shops and purchase any available upgrades. The items for sale here are much better than the stuff we have been able to get previously and some of our characters are in need of better gear. After you're done the shopping spree it's time to grab another fusion spell for Karn.
Enter inside of the house that's to the left of the pond in town; you'll find an old man inside that is walking circles around the table. To the right of this old man you'll find a box that you can push to the side which will reveal a hole - Ryu will automatically fall down and into a new room. Just above you will be a set of 6 barrels - you can only move each barrel once. Our goal is to clear a path so we can get into the adjacent room. Use my screenshot below for the solution to this puzzle.
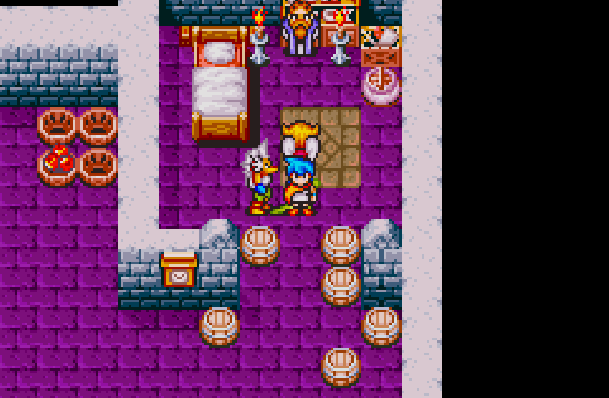
Arrange the barrels the same way you see in my picture to get past.
Move the barrels out of your way and put Karn in the front of your party. Once you've done this talk with the old man in this spare room and he will teach you Debo. This spell allows Karn to merge with Ox and Gobi but it will only work when he is underwater which makes it a lot less useful than the previous spell.
Now that you have this fusion spell exit the area we're in via the staircase in the south, enter back into Gust and this time exit the town via the path that goes north. This will put you back on the World Map but north of Gust instead of to the south. Follow the linear path north until you enter a new area - continue north and you will run into a circle of pink flowers.
Step on the flowers and your characters will start tripping, north of these flowers you'll find a door which you can open. Do this to enter the next dungeon, Lab. The first thing you'll notice about this dungeon is that there are Rogue enemies that appear in each of these small rooms throughout. Defeat them for lots of EXP and to collect the loot they're guarding (when they are).
You'll eventually meet someone named Cort - there will be an anime like scene with him where he'll test a new formula on your party that shrinks everyone in your team down to the size of a mouse. After this happens go north until you hit the wall then east until you find a small mouse hole in the wall.
As you may expect, inside of this mouse hole you'll find some mice. One of them will run an Inn too so rest here for free to make one of the other mice move and clear a path. Following this new route will lead you to a group of cockroaches which we need to eliminate. This will actually be a boss fight, the boss' name is K.Roach.
Defeat the group of roaches and then return to the room with all of the mice. Talk with the mouse who is blocking the room with the two chests, he will move to the side once you speak with him. The chest on the left has an Herb inside of it, the chest on the right has an M. Cura which will allow you to transform back to your normal size. Grab the Herb first because once you grab the M. Cura you'll automatically become big again.
Once you're big again head up the stairs to the next room of the dungeon - there will be some lava below along with floating pads similar to some of the previous dungeons we've been in. Follow the linear path around the lava until you reach the platform with Cort; he'll flee but you'll have to fight against his minion RugaX.
When you regain control of Ryu you'll be outside of Gust and Bleu will have left your party for the time being. The first thing you will want to do is fuse Karn together again using Shin and then enter Gust. In the top left of Gust you'll find a man standing outside of a cave entrance - head inside and defeat the G. Fly boss that you find, once beaten pick up the corpse for the G. Fly item.
The next thing you'll want to do is use Nina to Warp to Tunlan, enter the water and swim east using Gobi until you hit the wall. Nearby where you hit the wall you will find a few stalagmite outcropping things that you can only swim over if you're using Gobi. Swim over top of them and go back onto land to find the Frog Cave (pictured below).
The frog in the north-central part of this cave will trade you the Oil for the G. Fly. Speak with the frog and make the trade then exit this cave and return to the town of Gust. To the right of the entrance in Gust is where you'll find the sick man and Bleu, talk with Bleu and watch the scene. When the scene is over return to that pink flower north of Gust.
You'll run into Cort again and this time you'll battle his pink flower. The name of this boss is FlowerX. Once defeated you'll get a scene, return to Bleu in Gust and talk to her again. There will be another simple boss fight after which you will want to exit Gust to the north and return to the area with the purple flower. Northeast of the purple flower area you'll find Nicholie passed out a bridge he just finished making for you. Run up to this location and Cort will appear - this time he will fight you himself.
Cort transforms into a giant toad and attacks you, his boss name is HornToad. Use lightning attacks to deal a lot of damage to him, otherwise treat it like a normal boss fight. Before we go to the next town you'll want to return to Gust, to the left of the fountain in the middle of town you'll find a house with an old man inside. This is the same house where we got Karn's second transformation from earlier. When you talk to the old man he will tell you about the flute that he has hidden under his bed, press A while standing in the bed to pick up Maestro.
Now that you have the instrument leave town via the northern exit and cross the bridge that we faught Cort on. This will give us access to an entirely new portion of the World Map. Our first destination is the town of Gramor which you can find far to the southwest of the bridge. What you're looking for is a hole in the ground in the middle of a desert area; there will also be a little girl peeking her head out of this hole when you first approach, she will go back inside once you get close. Check out my picture below to see what I am talking about.

Inside of Gramor you will want to follow the same little girl we saw before; this time she is peeking out of the middle doorway. Talk to her along with some of the others in the room to learn that these are Mole People and they're currently experiencing a problem. When you talk with the guy standing next to the bed you will be asked to visit Tunlan for them and to get an item from that town.
Agree to help this Mole Person and they will give you a Cowl which will allow you to understand everyone in Tunlan. With the Cowl and the Maestro together we will be able to understand the people of Tunlan and communicate with them. Use Nina's Warp spell to return to Tunlan and this time you'll want to return to the large building in the north-central part of town.
Our goal is to get the Bolster item from Tunlan but in order to do that we'll have to complete a couple of story steps. To make things easier for you I am going to list these steps in a different format.
How to get Bolster in Tunlan:
1. Talk with the old lady in green that's inside of the castle (the north-central building in town) and agree to help
2. Go up the stairs behind the old lady during the day to speak to the Princess (blue haired girl)
3. Follow the old lady in green to the safe (we were here for the Rod5 earlier) and talk to her again
4. Exit town and come back at night
5. Visit the palace during night time and head towards the safe room. Before going down the stairs that lead to the safe go through the hole in the wall to the left of them.
6. Stand behind the palm trees and you will gaze at the Princess' back "Blue, red and white from left to right" will be the message you get
7. Talk to the old lady who is standing next to the safe; then interact with the left door that leads into the safe
8. Interact with the right door next and you will trigger a scene
When the scene is finished return to the room that previously held the safe and open the treasure chests that are here. They will contain two Melons and M. Drop and, of course, the Bolster. That's all we need in Tunlan for the time being so exit town and use Nina's Warp to return to Gramor.
Continue to Breath of Fire Walkthrough (Chapter 5)
Return to Breath of Fire Walkthrough (Chapter 3)