Breath of Fire Walkthrough - Chapter 2
Inside the Forest of Despair you will find many different routes that have treasure chests for you to collect. As always I leave it up to you if you'd like to explore a bit and grab the chests or go straight for the end of this dungeon. When you're ready to advance the story you'll want to go as far north as you possibly can in the Forest of Despair then turn east. Following the right path will lead you to a stone building with two guards inside that you'll need to talk to.
Talking to the guards will get you into a battle with them; once they're defeated you'll now have access to our next dungeon - Dark D. Fort (at least that's what it is called in game). After defeating the guards try to go north and you'll fall into a trap door - this will take you down to the basement where you'll find four treasure chests. In one of them you'll find a new weapon for Ryu, if you'd like to upgrade from the one you have now.
You'll find a couple more trap doors throughout this dungeon, it's kinda the gimmick of this place. For the most part navigating this dungeon will be pretty straight forward, you just need to remember where each of the trap doors are so you don't hit them numerous times.
Tip: For this dungeon the indirect route is normally the one without any trap doors. If you see a treasure chest and there is a route that goes straight there and a route that loops around the long way - always choose the long one.
Note: The monsters in this dungeon really kick things up a notch - I recommend you spend a bit of time grinding here if you're lower than level 12 on your characters.
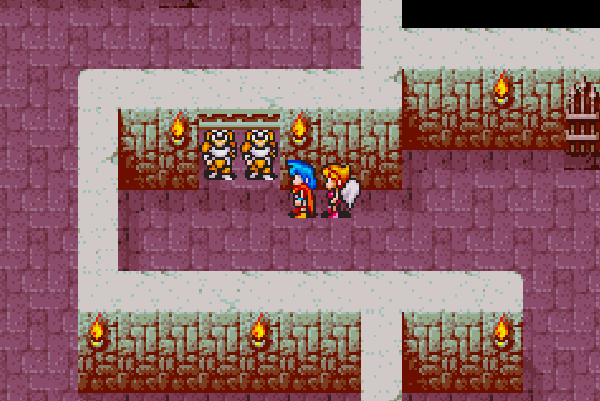
When you're ready to advance the story in this dungeon go to the north end of the first floor and you'll find two more guards that are blocking a room with a staircase that we need (pictured below). Much like before talk to these guards to engage them in combat and beat them to clear the path.
After eliminating these two guards go south a little bit and you can grab another set of four treasure chests. Once you've collected them head down the staircase nearby; follow my advice from earlier and take the indirect route to the treasure you see. In the northern portion of this room you'll find another set of 3 guards blocking the route to an elderly man.
Eliminate the guards and the old man will ask you to accompany him to a nearby jail cell. It turns out to be a trick though and he will summon a large monster to fight you, this is the first boss fight of the dungeon. You'll be fighting against a giant monster called Pog. My advice for this fight (and the next) is to pay attention to your HP and heal whenever it gets below 30. Other than that just keep attacking and you'll win. If you'd like you can also buff up Ryu with Atk-Up and/or give Nina Fort - both are good options but not necessary for enemies this weak.
Once Pog is defeated you'll get a quick scene during which Bo will join your party. After he joins you'll be thrown into another boss fight, this time against General. This one is pretty tough especially if you're low health from the previous. Defeat him and then it's time to exit this dungeon/area. You can leave anyway that you wish - we're done here.
Now that we have Bo in the party there is a trick we can do to navigate forests on the World Map. Put Bo in the front of your party (pictured below) and you'll now be able to move through forests!
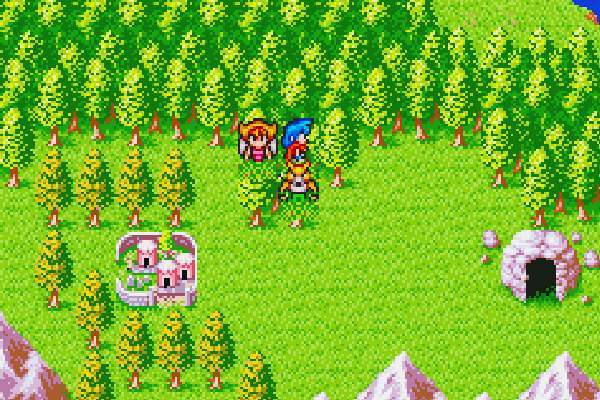
Put Bo in front of your party on World Maps and you can move through forests!
There are a couple of different things we have to do in order to advance the story. In order to make things easier for you I have created a quick list of sorts which will list each of the required steps below.
1. Visit Tuntar and talk to the chief; he will mention a Stone Robot that can unblock the river.
2. Put Bo in the front of your party and return to Romero (pictured above).
3. Enter Romero during the day and speak with the villagers in the graveyard - if you talked with the chief in Tuntar they will mention Zombies and corrupted soil.
4. Talk to the chief in the northeastern building of Romero; he'll tell you about Agua if you rid Romero of the zombies
5. Exit Romero and roam around until it's dark out - then return to the town.
6. Talk to the woman in the graveyard at night to reveal a hidden passage under a tombstone
7. Fall down into the hidden passage and grab the WtrJr that you find. We need this to advance the story.
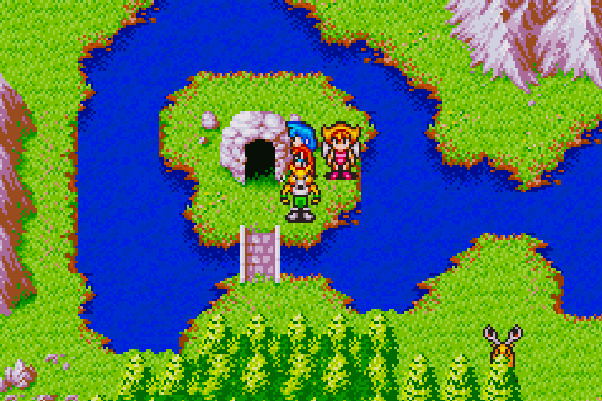
Once you have the WtrJr it's time to visit our next dungeon, Ease Cave. You can find the Ease Cave dungeon southwest of Romero, put Bo in front of your party if he isn't already so you can travel through forests and look for the cave on a small island surrounded by water (pictured below).
Ease Cave is pretty linear, just like all of the previous dungeons. There are a few twists and turns that lead to treasures but all of that is optional. Our destination is in the bottom of this dungeon, when you go down far enough you will come to a large room with a small island surrounded by water. Walk down the stairs and interact with the water to fill up the WtrJr; you'll get a notice "You receive the Cleansing Water!" and you'll hear a chime.
Ryu will automatically return to Romero and use the Cleansing Water to cure the land - as thanks the chief of Romero will give you a couple treasure chests to loot, one of which has the Tablet. We need this item to access Agua so make sure you loot it along with the other treasures before leaving.
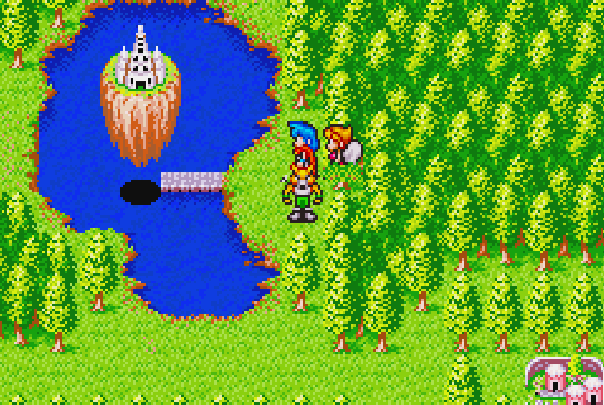
Our next destination is extremely close to Romero; a tad bit northwest of Romero you'll find a lake with a floating castle above it (pictured below). As with the last few areas you'll have to put Bo in front of your party to move through the forest to reach it.
Approach Agua Tower via the bridge and when you reach the end of the stone road you'll read the Tablet which lowers the tower down to you and lets you enter. Head up the stairs into the dungeon and the first room you come across will have 6 treasure chests visible to you along with a locked door and a floating platform. The gimmick of this dungeon is these floating platforms, when you step on them they will carry you over top the gap that they're in.
Step onto the first floating platform to traverse the gap and begin the dungeon in earnest. I recommend you go out of your way to collect all of the treasures you see in this dungeon since they give good and valuable items. Especially the treasures on the 2nd and 3rd floors with all of the floating platforms! It may be confusing to reach some of them but it's worth grabbing all of the treasures you can and equipping any upgrades you find immediately.
Tip: If you haven't gotten Nina to level 13 yet I strongly recommend you do so inside of this dungeon. The first reason is you need the levels but the second and more important (arguably) reason is because Nina learns Warp at level 13 and this lets you Warp to any town you've visited - so long as you're not in a dungeon or someplace that isn't the overworld (aka the World Map).
When you reach the top of Agua Tower you'll find a purple ball thingy on top of a pillar. Interact with it for a boss fight against Wisp, defeat it and then interact with the pillar again to pick up the KngKey. We now have the item we need to use the Stone Robot, which is our next destination.
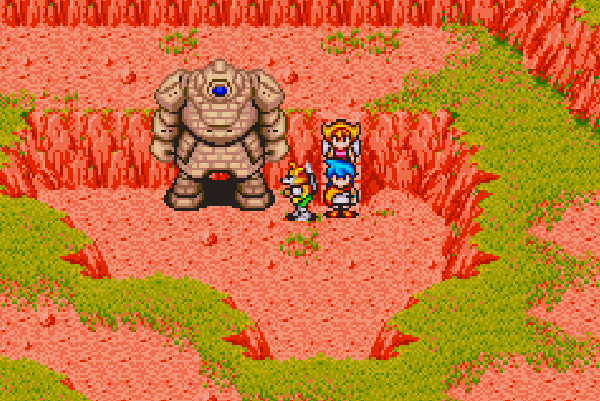
You'll find the Stone Robot to the east of Agua Tower and Romero, a picture of what you're looking for is in the screenshot below. You'll need Bo in front of your party to travel through the woods on the way here but other than that it should be easy to find.
Enter the Stone Robot by going into the left leg. There will be multiple sets of stairs for you to go up until you reach a chamber which is best described as the 'heart chamber'. You'll see a large stone heart on top of a platform with many tubes connecting to it and a group of guards blocking the path to it. There will also be blue circles in this room on the ground which will teleport you when you step on them; however they wont work until we activate the Stone Robot.
When you're ready to proceed talk with the guards in front of the heart for another boss fight. After you've eliminated the boss and his henchman interact with the panel in front of the heart to activate the Stone Robot as well as the teleportation circles. Now is when the dungeon gets a bit confusing because you will have to step on multiple teleportation circles to advance. Sometimes you will teleport to a room with two circles, one will go to a chest and then back to the heart and the other will advance you forward in the dungeon.
The upside to this part of the dungeon is you won't have to worry about random battles anymore, the downside is you will have to memorize which circles to step on to advance through this area. When you reach the final room you'll find a pillar that you can interact with and use the key on; interact with it for a scene during which the Stone Robot will destroy the large stone rock blocking the river.
Once you regain control of Ryu you'll want to exit the dungeon and return to the town of Tantar. Inside of the chief's hut (the purple building in the town center) you'll want to speak with the blue guy sitting on the chair. He will tell you to find the Ring and use the Key that he has hidden downstairs to find it. He'll move his chair and reveal a hole in the ground for you to climb down and get the Key (pictured below).
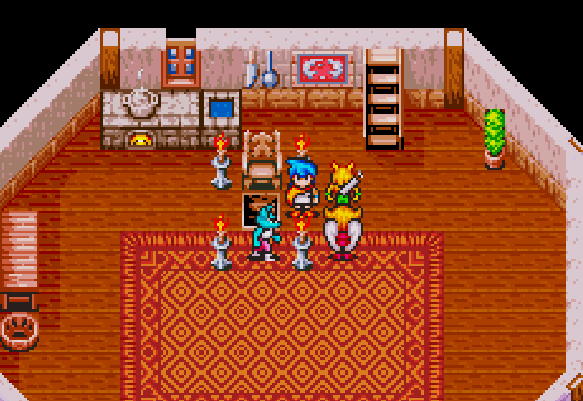
You can find the Key inside of the Chief's basement in Tantar
Now that you got the Key you'll want to head back to the Stone Robot that we left to the north. Right next to the Stone Robot you'll find a cave that's called Lake Cave. You may have been inside of this dungeon earlier in the game if you did some exploration; make your way through the linear cave and you'll come back out on the World Map.
When you exit back onto the World Map you'll find another cave a tad bit west of this one - this one is called Lake Shrine and it's our next dungeon. Enter this cave and use the Key you were given on the door that blocks your way, then head down the stairs into the dungeon. This dungeon is pretty straight forward, at the bottom you'll find a chest with a Ring inside which is the item we came here for. Grab this from the blue chest and then take the teleporter next to it back to the entrance.
I recommend that you equip the Ring we just got onto Ryu because it will boost his attack by 10 points. Once you're ready to continue with the story return to Tantar in the south and talk to the Chief in his house to watch a wedding ceremony. When the ceremony is over exit the town and watch the scene that unfolds as the town of Tuntar is destroyed.
Our next step is pretty obvious, head inside of the Stone Robot and eliminate the General who is currently in control of it! This time you'll have to navigate the interior of the robot with enemies - my advice for getting through here as easily as possible is always go to the furthest teleporter. When you teleport to a new room that has 2 teleportation pads the furthest one always takes you further into the dungeon. The closest one always goes to a treasure chest.
This boss fight will be one of the harder fights yet, at least depending on the level of your characters. Defeat the Gremlin and watch the scene that unfolds, when the scene is over the dry river that was previously not crossable will now be passable.
Return to town to rest at an Inn (you'll definitely need it). When you're ready to continue with our adventure cross the hardened lava river south of the volcano that the Stone Robot perished in and enter the Dragon Shrine (pictured below). The Dragon Shrine is a tiny building that is surrounded by 4 trees. It is very easy to miss if you're not looking for it.
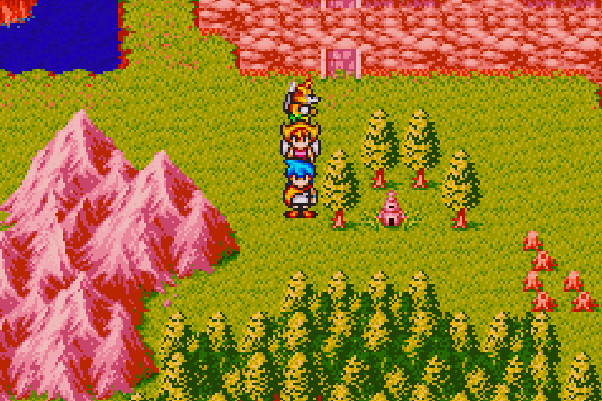
The first Dragon Shrine on the Overworld
For this dungeon there is only a single boss fight and for that fight you'll only have Ryu. I recommend you stock up on Herbs and other healing items if you're low since this fight's difficulty depends on how many healing items you have and use. Just like the fights we did at the start of the game with Ryu you'll be trading hits back and forth the entire time while healing yourself.
Your reward for beating Talon is some spells on Ryu! He will learn SnoDr, FlmDr and ThrDr - these are Ryu's Dragon abilities. The first 3 letters correspond to the type of elemental attack and the Dr is an abbreviated version of Dragon. Finally we have a use for the AP on Ryu that we never use!
After you've beaten Talon exit the Dragon Shrine and head southwest through the woods. In the middle of the woods just south of the Dragon Shrine you'll find a patch of flowers that stands out amongst the trees; this patch is circled in red below. There is another patch of flowers a tad bit east of this one in the open field.
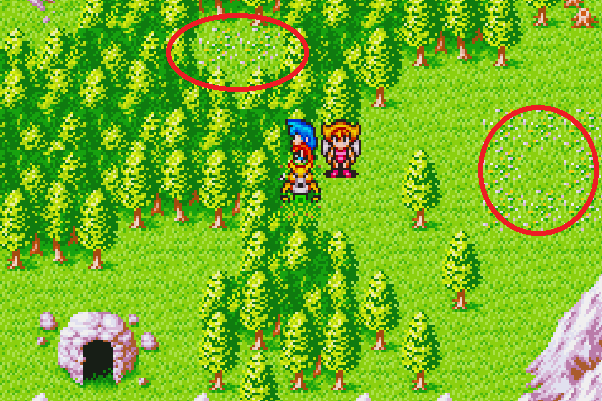
Fairy Woods are circled in red; the cave is Cape Cave
To advance the story we'll need to trigger some dialogue in these locations. Visit the first Fairy Woods in the actual woods and talk to the Fairies here. They all say the same thing so you only need to talk with one, after you do that go to the other patch of flowers (also called Fairy Woods) nearby and talk with the boy who is running circles around a patch of flowers.
After you've talked to both people head over to the nearby cave and enter into it. Our next destination is the town of Auria but in order to get there we must travel through the Cape Cave first. You can find the cave southwest of both Fairy Woods, it's the same cave shown in the picture above.
Cape Cave is extremely linear, there is one fork at the end which will lead you out of the cave or to a breakable wall that we can't break yet. Take the southern fork to end up on a new part of the World Map (pictured below).
When you enter Auria the first thing that happens to you is you're thrown into jail. Inside of the jail cell you'll want to inspect the sink/fountain in the top right for a PrisnCL item. Next, speak with the other prisoner who is sleeping in the bed and he'll open the jail cell door for you.
As we make our way around Auria you'll want to avoid the gaze of guards otherwise you'll be thrown back into jail, to escape you'll have to talk with the sleeping guy just like before. We have a few things to do in this town while we're here, to make things easier for you I have created a to-do list for you to follow!
Auria To-do List:
1. Purchase a Pouch and a Vitamn from the Item Shop
2. Sell all of your old equipment that you aren't using - we need money
3. Go upstairs in the item shop and give the Vitamn to the guy sitting at the table with hiccups. He'll give you 5000GP
4. At the end of the docks in town you'll find a man guarding a ship, speak with him and he'll tell you Ross owns it.
5. Visit each of the buildings in town and loot the chests & inspect the drawers for items and gold.
6. Talk to the woman in the northwestern building (it's just below the palace and next to a water fountain). She will mention her son who has had a spell cast on him by fairies - sound familiar?
7. Raid the palace (the northern most building in town) and loot the G. Tiara from a chest on the second floor. This sells for 10000GP!
8. Inside the same building where you got the G. Tiara talk with the man on the first floor who is pacing around. He'll offer you his ship if you agree to save his daughter.
9. Purchase the G. Bar item from the shop for 65000GP
That covers all of the things we must do in Auria - you should be around 30k gold after raiding the town and selling off old equipment. Gold is our main focus right now because we need to purchase the G. Bar item that's currently for sale for 65000GP at the item shop - this will be required to advance the story in a little bit, it's best to purchase it early though.
For the other 20-30k gold that we need we'll have to return to the Fairy Woods and rescue that woman's son who is currently being held captive by the fairies. Visit the fairies in the wooded area first and speak with them, they'll offer to let the kid go if you make him stop logging - agree to their terms and then return to the area with the kid and speak with him and the fairies next to him too.
Exit the Fairy Woods and use Nina's Warp spell to teleport back to Auria. Return to the woman and speak with her, she'll give you 20,000GP as a reward for saving her son! You should be within 10k of purchasing the G. Bar at this time - all that's left is to sell the G. Tiara and any other items you have that you need to sell to afford the G. Bar.
If you're still short on money I recommend you sell some Cure, Life or M. Drop items. All of these items have high sell prices and you technically don't need to use any of them as long as you play smart or do some extra grinding so that you out level your opponents. If you don't want to sell these (or you already used them) that's ok because we can come back for the G. Bar in a little bit.
Our next destination is L & D Cave which is east of Auria. This dungeon is pretty linear - there will be a fork at the very end of it where one path leads out and the other path goes deeper into the dungeon; take the fork that goes deeper into the dungeon and you will eventually come across two switches on the ground. Step on the one that is not pressed and you will open the gate you saw at the start of the dungeon. It doesn't stay open forever, sadly, but this is good to remember in the future for faster travel.
Exit the cave to find yourself back on the World Map. Bleak is our next destination and you'll find it due east of where we exit the cave; you'll pass a large tower too called L & D Tower, this is a future dungeon. Once you're in Bleak the first thing you'll want to do is rest at the Inn for free.
If you purchased the Pouch from Auria the Innkeeper will try to steal it as you sleep and you'll catch him. He'll apologize to you and give you 5000GP if you promise to keep this between you and him. For those of you who have not purchased the G. Bar yet from Auria, this should be the last bit of gold that you need... If not then you will have to do some grinding to earn more gold. You can raid the buildings in Bleak for gold too but there isn't much of value to find here.
Once you have the G. Bar you'll want to visit the northern most building in Bleak and speak with the old man. He'll tell you about someone named Karn who is currently in Krypt and he will offer to trade you an Icicle for the G. Bar that you have. Sounds like a fair trade right? Frozen water for a solid gold bar.

Trade the G. Bar for the Icicle in Bleak
You don't really have much of a choice, so trade the G. Bar for the Icicle and then leave the town of Bleak. Southwest of Bleak you'll find a cave called Desert Cave - this is our next destination.
Continue to Breath of Fire Walkthrough (Chapter 3)
Return to Breath of Fire Walkthrough (Chapter 1)

