
Planar Sphere Overview - Baldur's Gate 2
The Planar Sphere is a multiple map zone that is found in the northern portion of the Slums District of Athkatla. In order to access this zone you'll need to have Valygar in your party or have his body in your inventory. Valygar is a potential companion that you can recruit in this game and he is found in Umar Hills.
In order to get Umar Hills added to your World Map you'll need to accept one of 2 side quests, either The Hunt for Valygar Corthala or Investigate the Deaths in Umar Hills. Both of these can be picked up in the Government District of Athkatla. Once you have used Valygar to open the front doors of the Planar Sphere you can kick him from your party if you wish.
When you open the first locked door in the Planar Sphere with the Planar Key you'll begin the side quest, Inside the Planar Sphere. If you'd like an indepth walkthrough for this dungeon I recommend you check out that page instead of this one.

Level 1 is the main floor of the Planar Sphere and by far the biggest. Most of the other levels are linear and easy to figure out but this one will have a few puzzles. The first puzzle you'll encounter requires you to create a golem in the Golem Forge room. You'll need a Golem Head, Golem Arm as well as 3 Coal to do this. The Coal should be placed inside the Furnaces in the Furnace Room; the Golem Head and Golem Arm will need to be used on the Golem Forge machine to build the golem once all 3 Furnaces are active.
Once you've completed the golem he'll open the doors leading east to the Navigator's Room as well as reveal another puzzle to you. The Rune Puzzle requires you to activate 4 runes in a specific order to open the path to Level 2. Check my entry below for the correct order.
Storage Room: In this room you'll find a Clay Golem that will be immune to all types of damage except crushing. Upon searching the chests you'll also find a Planar Key, Golem Arm and Coal - all of these are items you'll need while in the Planar Sphere.
Hard Halflings: At this location you'll encounter a group of very hard halflings, they will drop Coal, Hands of Takkok and Ripper +2.
Golem Forge: In order to create a golem at this location you'll have to first do a few things. You'll first need to start the furnaces in the room north of this one. All of the Coal you've been collecting is used on the furnaces here. With the furnaces lit place the Golem Arm and Golem Head into the Golem Forge (just left click) and then interact with the Forge.
Furnace Room: When you first enter you'll find some enemies, one of which will drop Stiletto of Demarchess +2. Once the enemies have been dispatched you'll want to click on each of the furnaces in this room 2 times. Your character will add coal to the furnace (which lights it) and summon a fire elemental that you'll have to defeat.
Golem Head: You will find many Stone Golems in here along with an Iron Golem and Adamantite Golem. Much like with the other golems we've encountered you can only damage these with crushing damage... Additionally, Adamantite and Iron Golems can only be damaged with +3 weapons. Once all enemies are defeated search the container in the center of the room for a Golem Head and Coal.
Rune Puzzle: At this location you will find a Rune Puzzle which will require you to click on the runes in the appropriate order to open up the door to Level 2. The correct order for these runes is North, South, East and West.
Planar Sphere - Navigator's Room
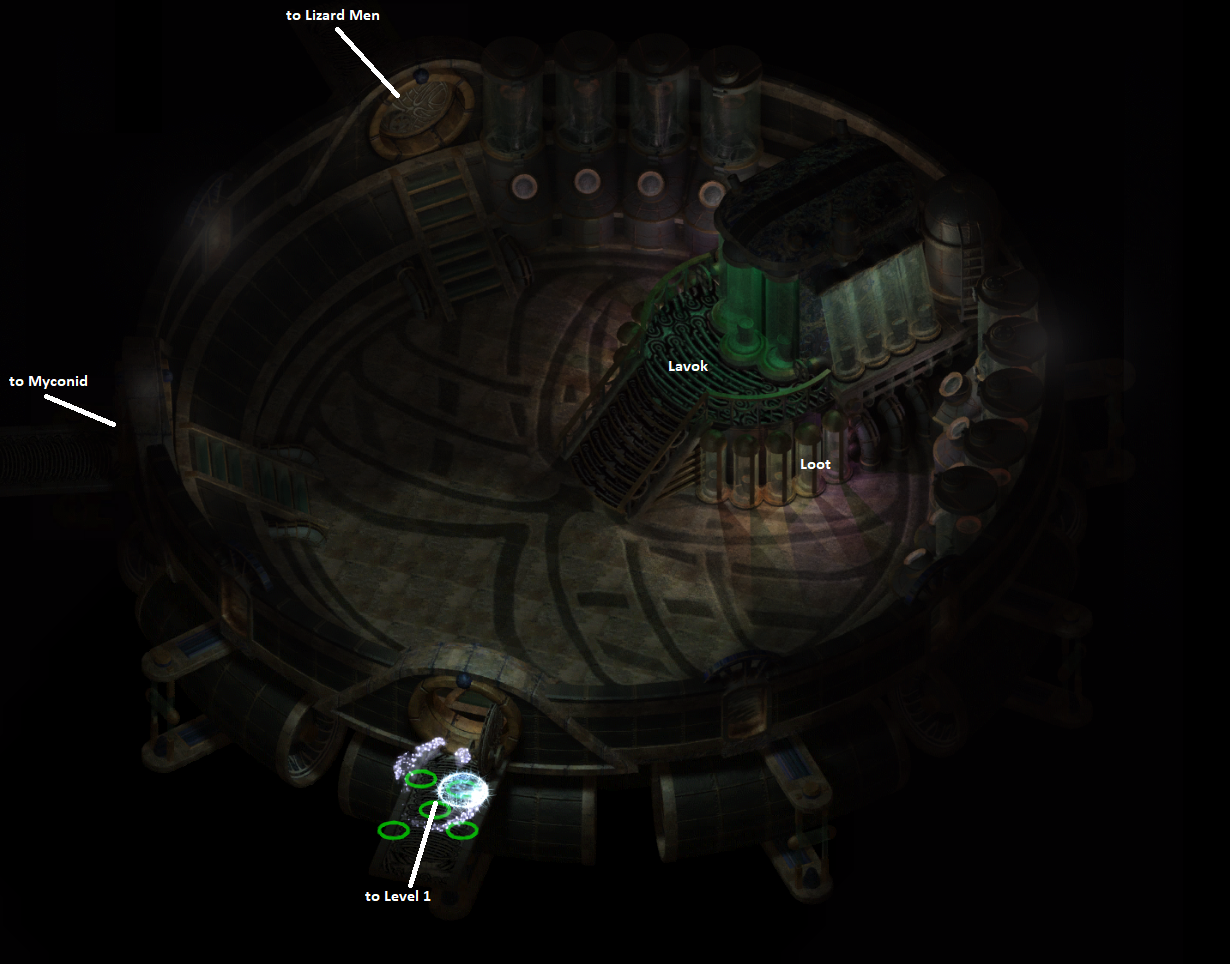
The Navigator's Room is where you'll meet Lavok and also where you'll find a couple of good magical items. Hold TAB or whatever button it is that highlights containers and you'll find a container below Lavok that typically has a few high level spells you can use along with gems and money. Don't forget to search the northern and western side rooms while you're here as well.
Lavok: Here is where you'll find the head honcho of the Planar Sphere, Lavok. After defeating him there will be some dialogue during which he'll make a request of you. I recommend you check out my Inside the Planar Sphere quest write up for more information about this quest and your options.
Myconid Room: This is an optional side room with some Myconid enemies. You'll find a Sling +2, Quarterstaff +1 and some other goodies in a container in this room.
Lizard Men Room: Another optional room with some Lizard Men enemies inside of it. Inside a container in the room you'll find Ninja-to +1, Battle Axe of Mauletar +2 and the Protector of the Second +2.
Planar Sphere - Level 2
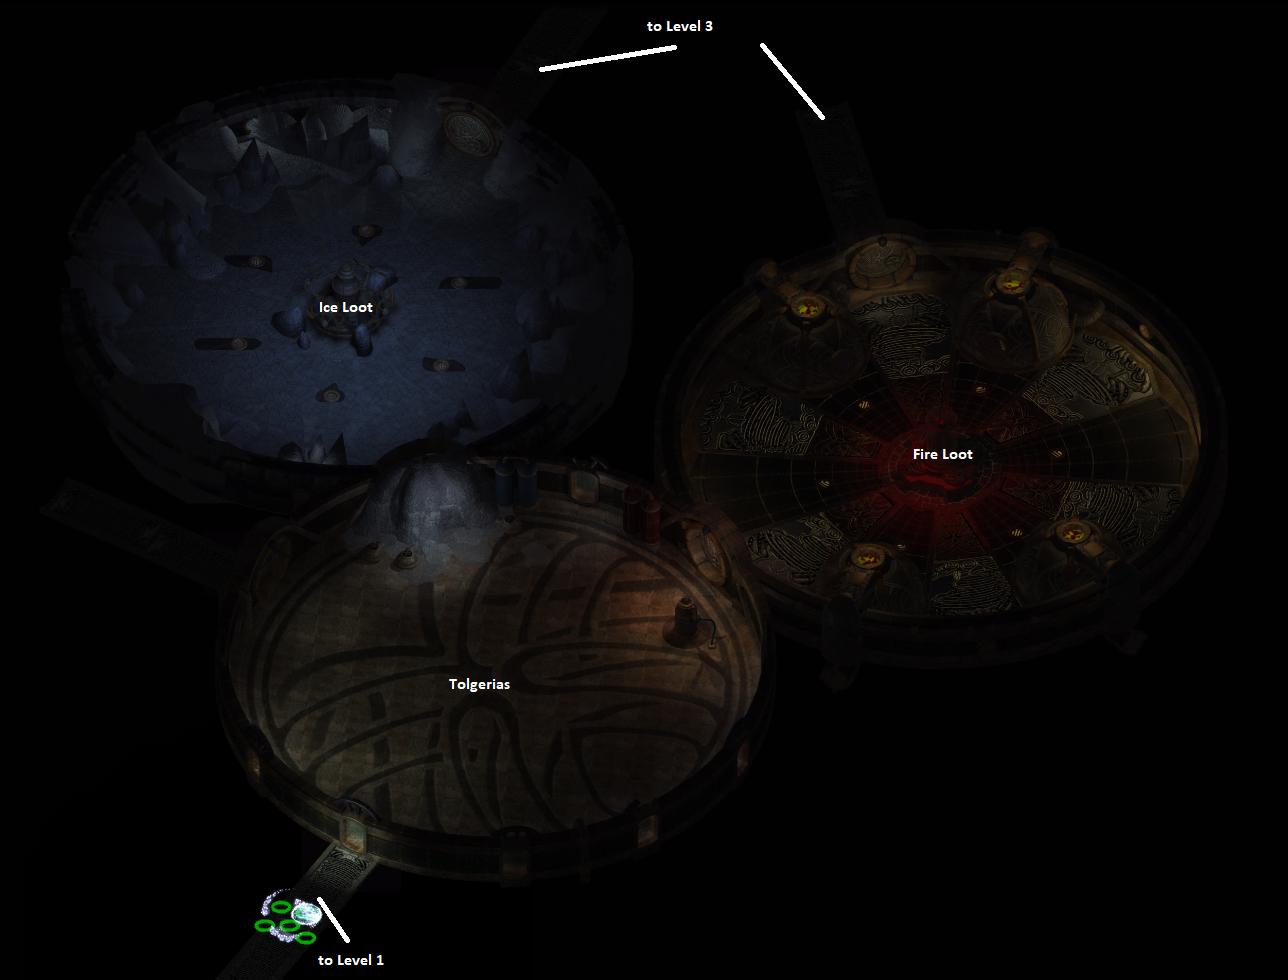
There is nothing special for me to say about this floor, you'll be passing through here on your way to Level 3 and that is about it. Be sure to grab the loot!
Tolgerias: The Cowled Wizard Tolgerias is found in this room with one other mage. He drops Ring of the Ram when you defeat him.
Ice Loot: You can find a few items in this stash but the only one worth mentioning is Gift of Peace.
Fire Loot: A few items can be found in this stash but the 2 magical items are Shield of the Falling Stars +1 and Staff of Fire +2.
Planar Sphere - Level 3
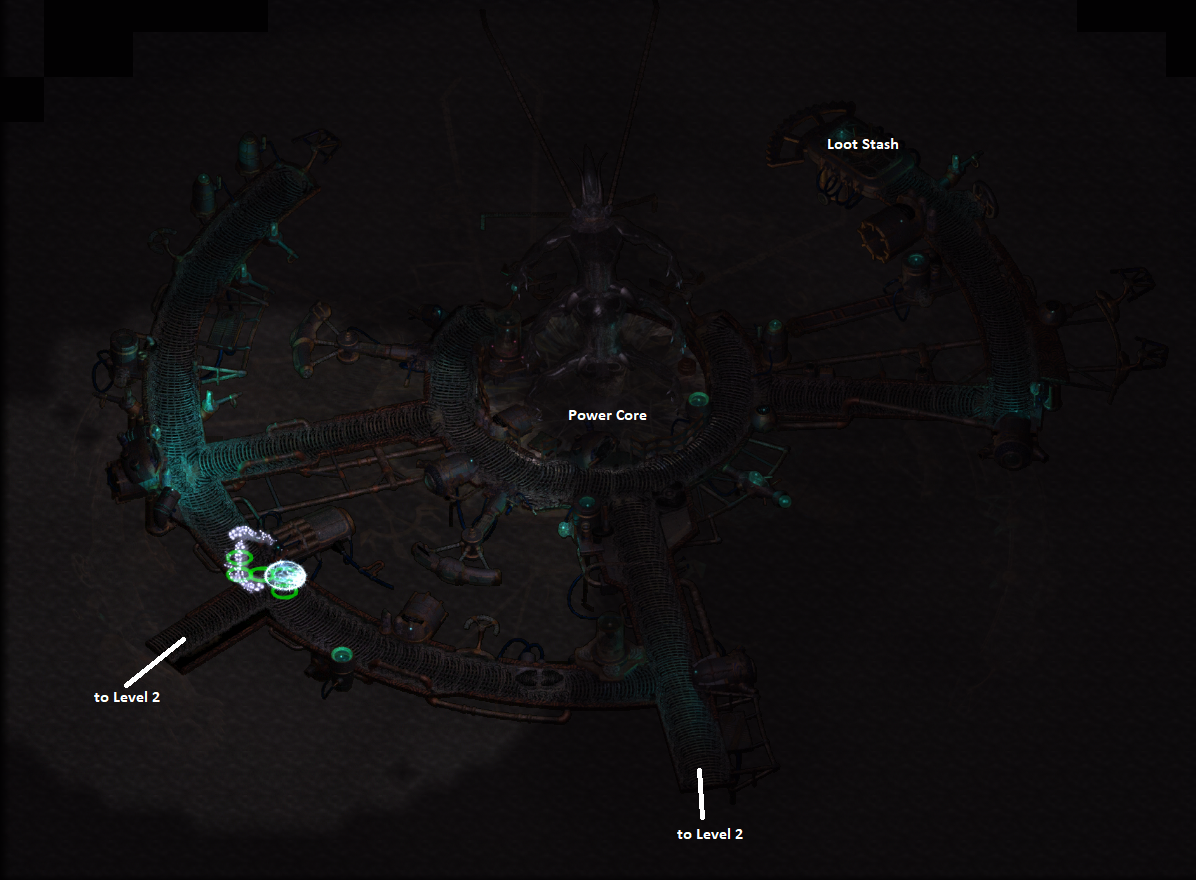
On this floor you will find many different golem enemies; the Stone Golems are easy but the Iron or Adamantite Golems can be challenging. Depending on what level your party is you'll get either Iron Golems (lower levels) or Adamantite Golems (higher levels) to spawn. You can only hit these enemies with +3 weapons that deal crushing damage. Something like Defender of Easthaven or Flail of the Ages are your best options.
Something to keep in mind is the large Golems you encounter on this floor will have a hard time maneuvering around. When you come here for the Inside the Planar Sphere quest you can simply run past all of them and place the Demon Heart into the Power Core then leave while they get stuck on the narrow catwalks.
Power Core: During the Inside the Planar Sphere quest you will have to place a Demon Heart into the Power Core to make the Planar Sphere return to Athkatla.
Loot Stash: In the northeastern corner of this area you'll find a stash of loot with a Ring of Danger Sense and Bala's Axe: Wizard Slayer (if it wasn't imported from BG1).
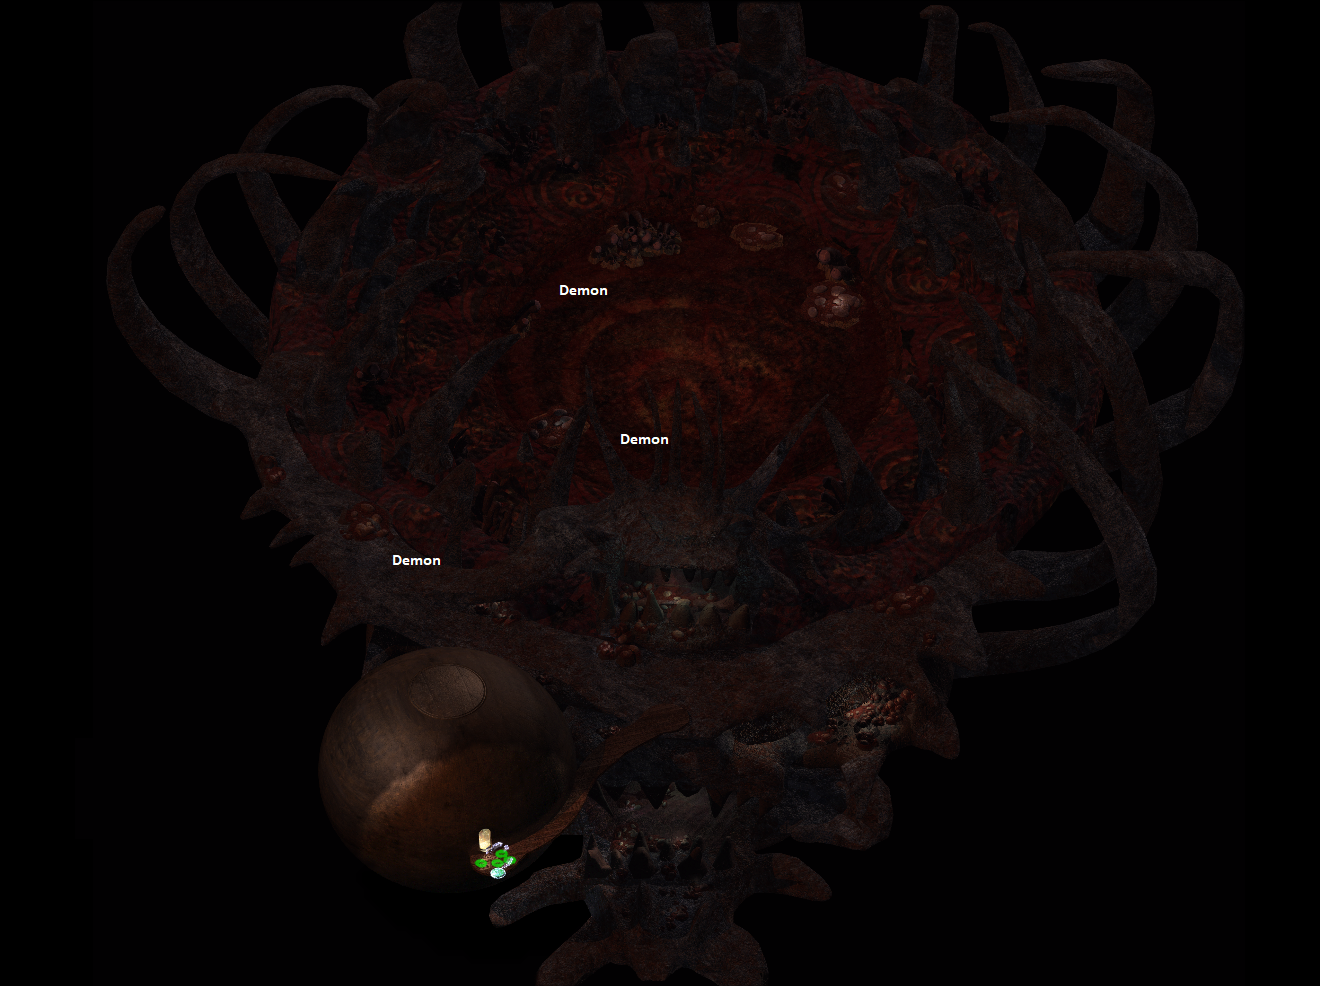
When you enter the Planar Sphere and cause it to depart from Athkatla it'll arrive in an area called The Abyss. This area is filled with demon enemies and you'll need to come here and slay them for a Demon Heart. You can find 3 Demon Hearts throughout the area on powerful demons.
Demon: There are a total of 3 demons you can defeat for a Demon Heart. Each of their locations are marked on my map above. Keep in mind you only need 1... However I do recommend you clear the whole map for EXP.