
Prologue Walkthrough for Baldur's Gate: Siege of Dragonspear
When you first begin the Siege of Dragonspear Expansion you'll find yourself in Korlasz's Tomb. All of the items and party members you had with you at the time of defeating Sarevok will still be with you now but not for long. Once you complete the Prologue your party will disband and all of their items will be placed inside of a chest in the Ducal Palace - keep this in mind, I will remind you about it later too.
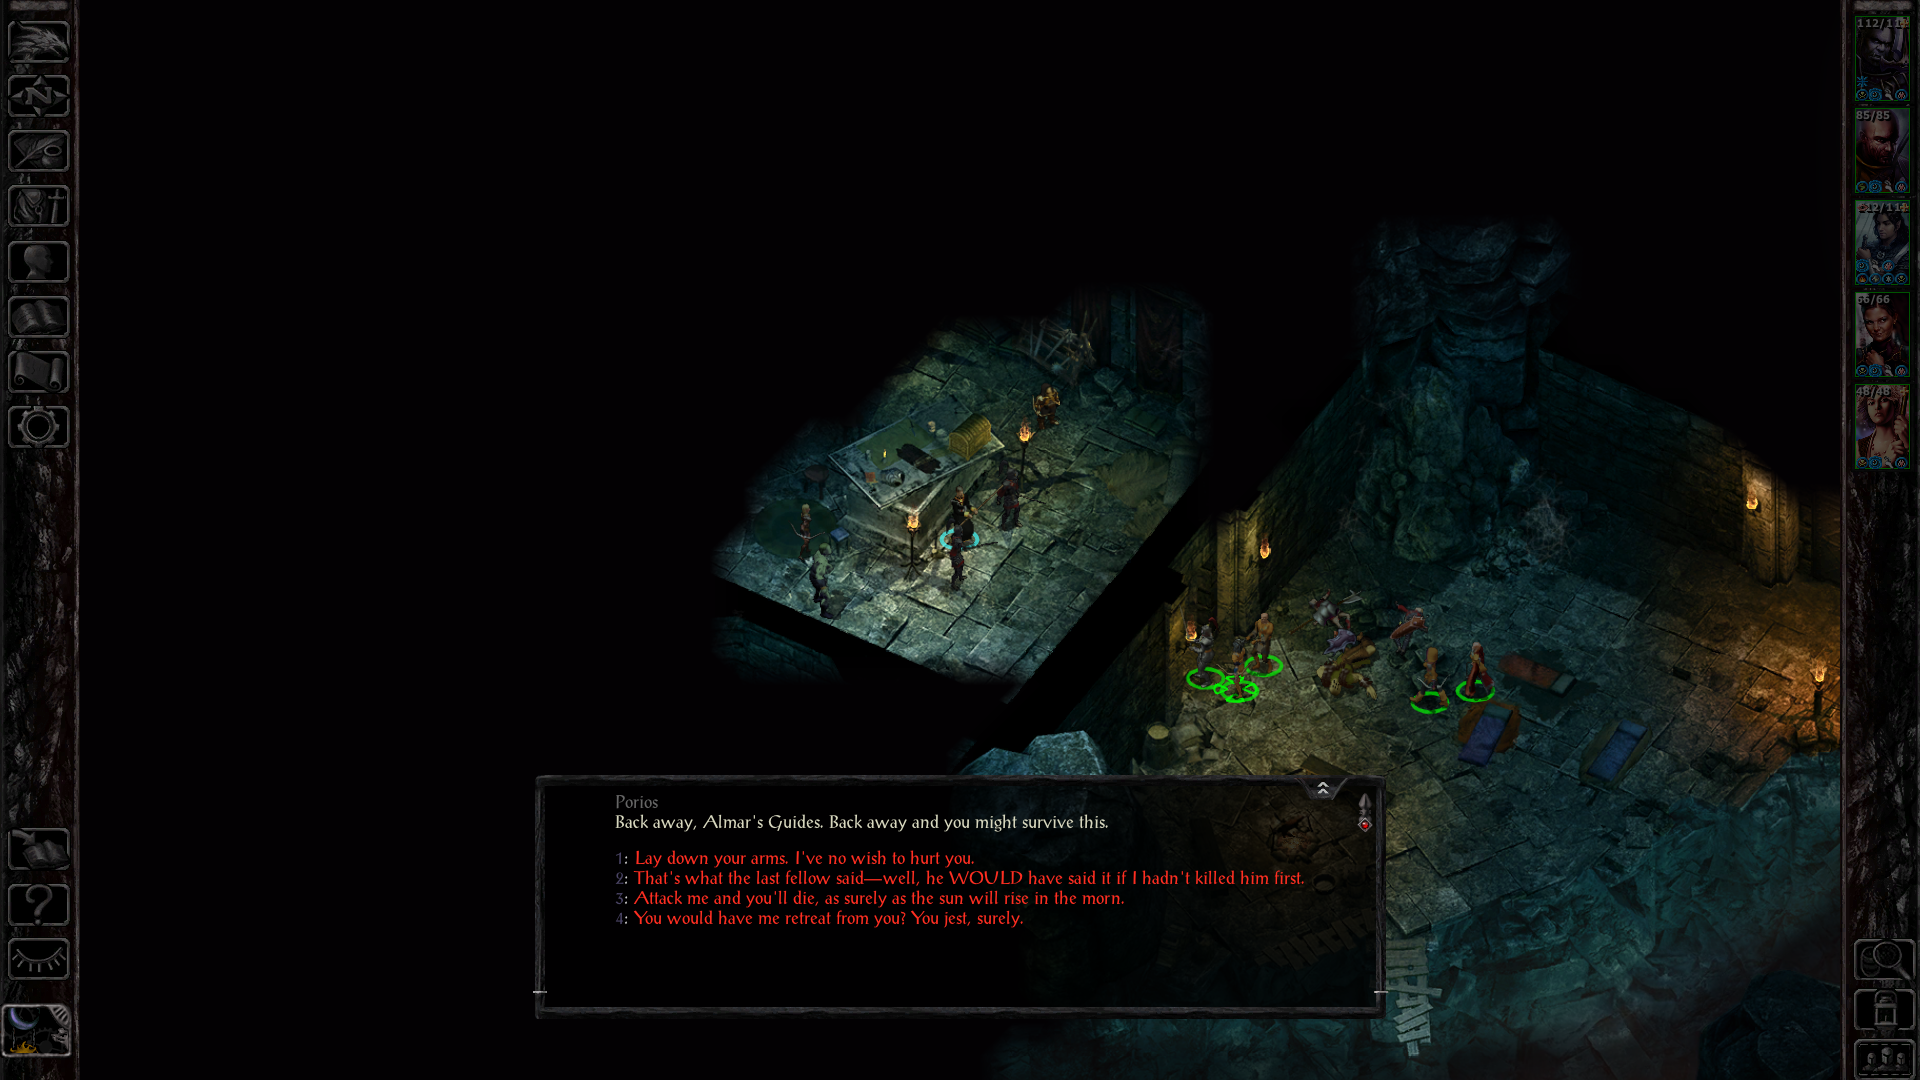
Korlasz's Tomb is a pretty linear dungeon and as the name of this dungeon suggests - our goal is to find Korlasz and her minions who are on the floor below us. In the second room of this dungeon you'll find Ammon who starts the Tome of Great Value side quest (explanation below). To reach the 2nd floor you'll either need a character who is capable of lock picking or to take the key from Porios, an NPC in the northwestern portion of this area (pictured above).
Porios can be intimidated and forced to surrender or you can provoke a fight with him and all of his guards. Either way you'll get the same EXP and items. Make sure to grab the Tomb Key off the ground if you kill Porios, if he surrenders he'll give it to you. This key will give you access to the northern most room which is where you'll find the second side quest after opening the crypt, The Mummy's Orders. Stairs to the 2nd floor can also be found northeast of this room through the door.
1st Floor Side Quests:
Tome of Great Value: Speak with Ammon to begin this side quest. You're tasked with obtaining some Cobalt Moss from inside the crypt and returning it to Ammon. Cobalt Moss can be found on the top floor of the tomb but it's behind a barricaded door that can only be opened after exploring the 2nd floor of the dungeon. From the 2nd floor of the dungeon you'll climb up a rope which puts you in the western portion of the first floor where this moss is.
The Mummy's Orders: Before venturing down to the 2nd floor of Korlasz's Tomb you'll come across a mummy named Fanegonorom who begins this quest. Essentially all Fanegonorom asks you to do is kill Korlasz and her minions (which we need to do anyway) which makes this one of the easier side quests for you to complete.
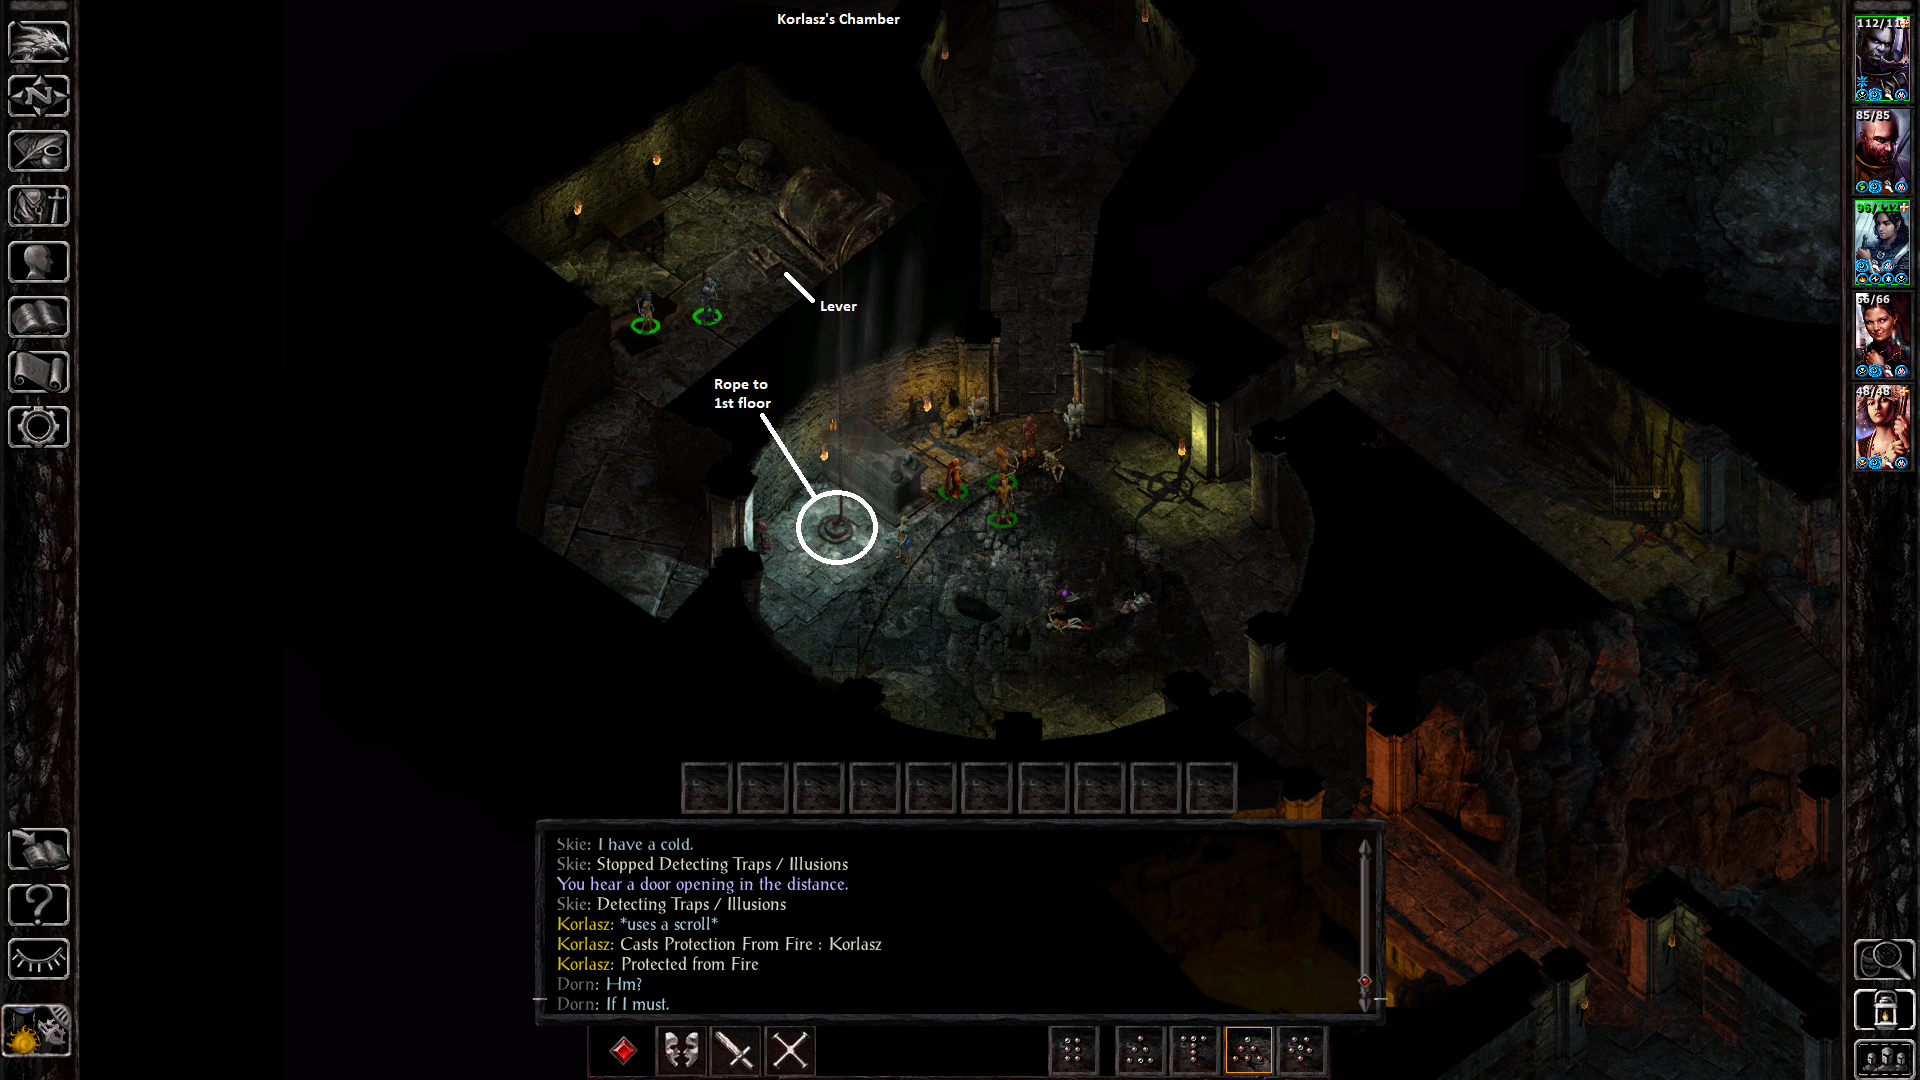
On the 2nd floor of this dungeon you can find Korlasz in the northern most room. In order to open the door leading to Korlasz's chamber you'll have to pull the lever in the room to the southwest of hers with the two mercenaries inside arguing. I've included a picture of this area in the screenshot above.
Korlasz can be found in the northern most room of the 2nd floor. No matter what you say during the dialogue it'll end up in a fight, when you get Korlasz to about 40% health she will surrender so it's fastest if you focus exclusively on her. It's up to you whether or not you accept her surrender.
After you've killed all of the enemies in the area Imoen and the group of Flaming Fist mercenaries will move up to the circular room south of the lever. When they reach this room they'll create a way back to the first floor which is where you'll have to go after defeating Korlasz.
Before leaving the 2nd floor of this dungeon there is one side quest you can do and another that you can start. It's up to you if you want to do either, information about both can be found below.
The Shattered Staff: You can begin this quest by speaking with the Restless Spirit in the central portion of level 2. Cross the wooden bridge then open a tomb and you'll find him (he'll also be marked on the map once you discover him). He asks you to retrieve 2 pieces of a staff, Ornate Headpiece which is found in a locked box in Korlasz's Chamber in the north. Wooden Staff is the next piece and you can find it in the beetle's lair in the eastern section of the map with the flowing lava. Return both of these pieces to the Restless Spirit and place them inside the tomb for a reward.
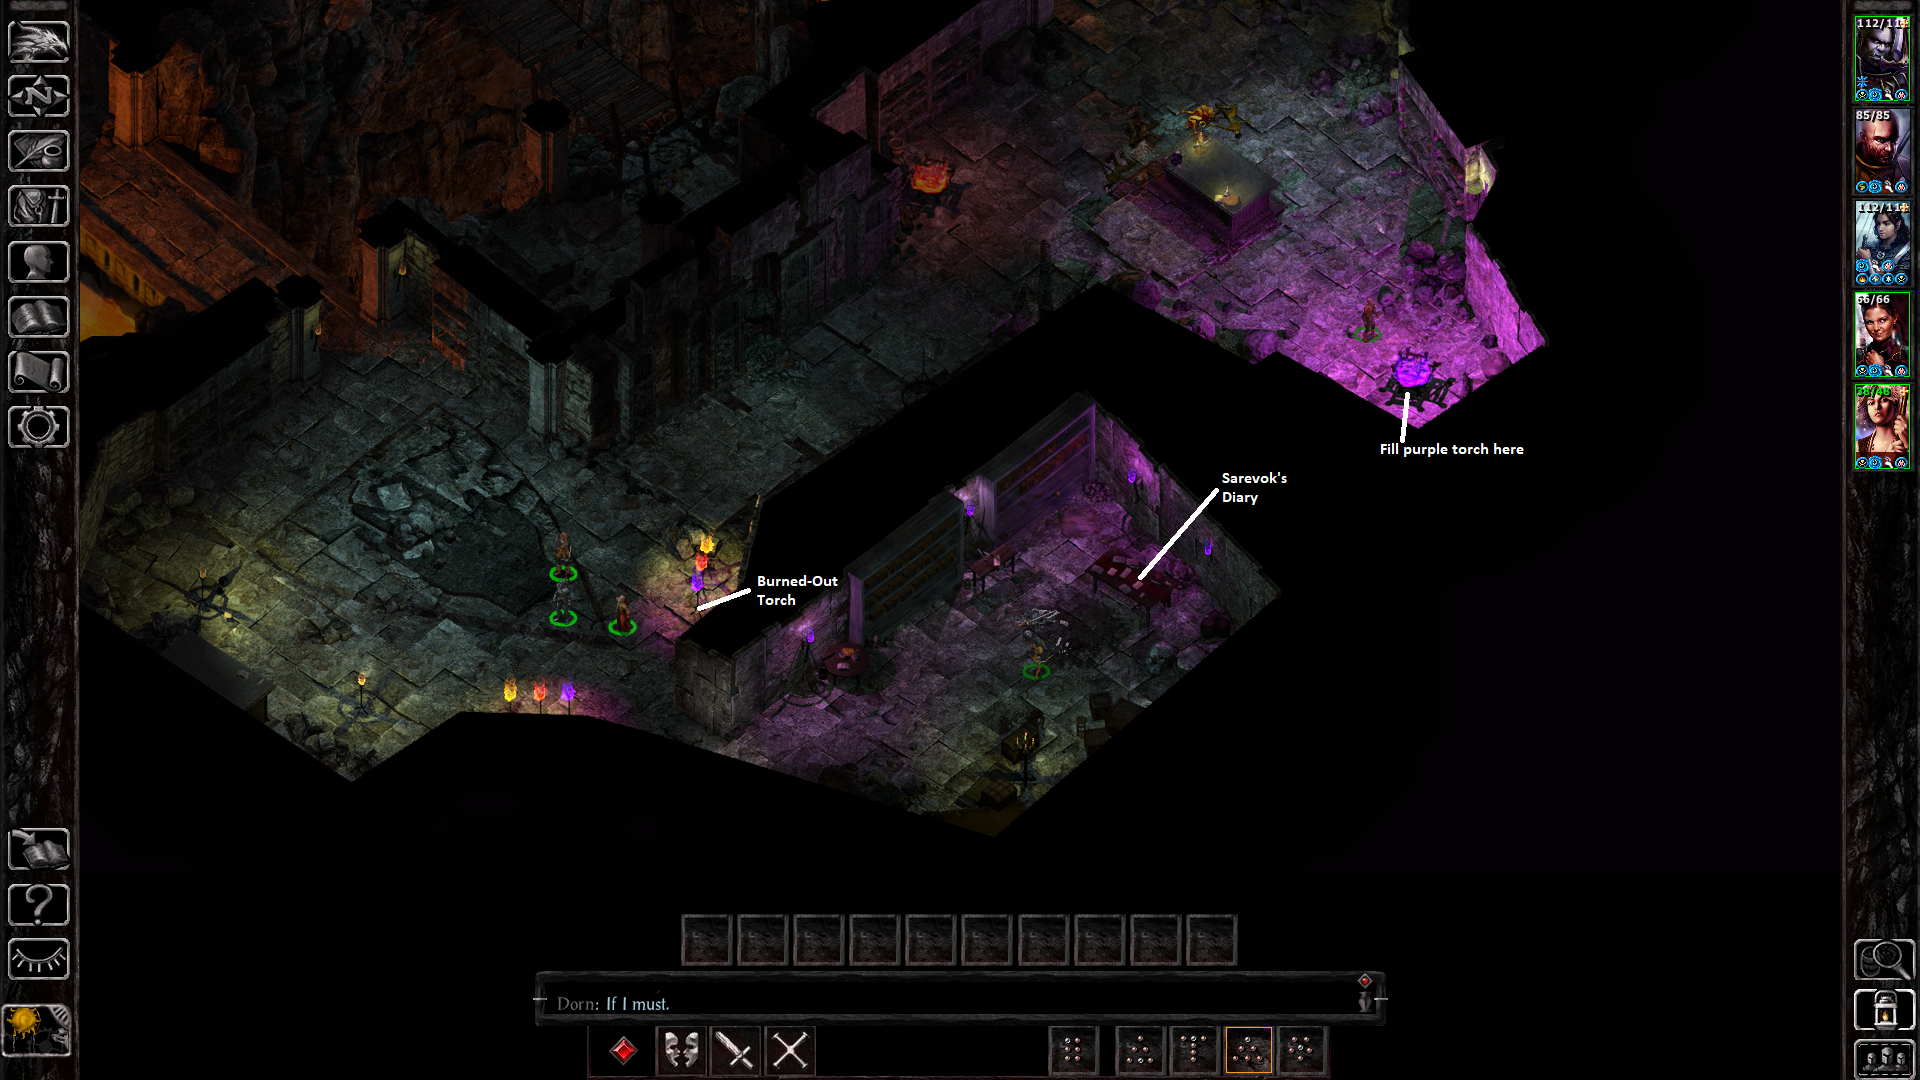
Sarevok's Secret: Sarevok's Secret Side Quest is a side quest that can't be finished until Chapter 10 but starts here in Korlasz's Chambers. In the southern most portion of this area you'll find 4 torches of different colors; hold down TAB and you'll see a small nook you can investigate next to the red and yellow torches. This is actually a torch holder that is burned out (hard to tell cause of the graphics). Collect the Burned-Out Torch from this and take it to the large purple fire a little bit to the east. Click on the fire to light the torch then bring the torch back to this holder and place it inside to reveal a secret area. Inside you'll find Sarevok's Diary in the table, grabbing it will begin this quest.
When you're ready to proceed with the dungeon go up the rope pictured above and you'll find yourself on the western portion of the 1st floor. Grab the Cobalt Moss from the tomb if you are doing the Tome of Great Value side quest and give it to Ammon on your way out. To leave Korlasz's Tomb you'll want to go into the room our adventure here started in and take the rope out.
Note: Upon leaving Korlasz's Tomb you'll lose your entire party and all of the items they have equipped as well as what is in their inventories will be placed into a chest in Ducal Palace. It's recommended that anything you consider especially important you put on your main character. Sometimes items are lost in this process.
Continue to Siege of Dragonspear Chapter 7 Walkthrough
Return to Baldur's Gate Chapter 7 Walkthrough