
Dino Crisis Guides & Walkthroughs
The first split involving Rick takes place after the scene in the Control Room, Regina agrees to help Rick find the comrade who sent out a distress signal instead of helping Gail with the mission.
<Add more info>
When this path begins you'll want to follow Rick to The Backyard.. so basically you need to go back the way we just came to get to the Control Room. When you enter The Backyard there will be a short scene of Rick walking, follow him to an area with 2 raptors and some items. He was kind enough to leave the enemies for us to deal with.
The next room will have a DANGER event when you enter it, make sure you grab the weapon Regina drops at the start of it and then go through the door in the northeast. This leads you to the Large Size Elevator Control Room where you'll have a scene with Rick and Tom. You'll get DDK Code Disc L when the scene concludes and you should pick up DDK Input Disc L from ontop of the computer after the scene.
Go into the room next to you and check the map on the wall for some data to update our own map. When you're all done go out of the door across from the map; this next room has two flying dinosaurs so just avoid them and run to the next door. Climb down the ladder and pick up the B1 Crane Card from the floor, as you may suspect this room is our next puzzle.
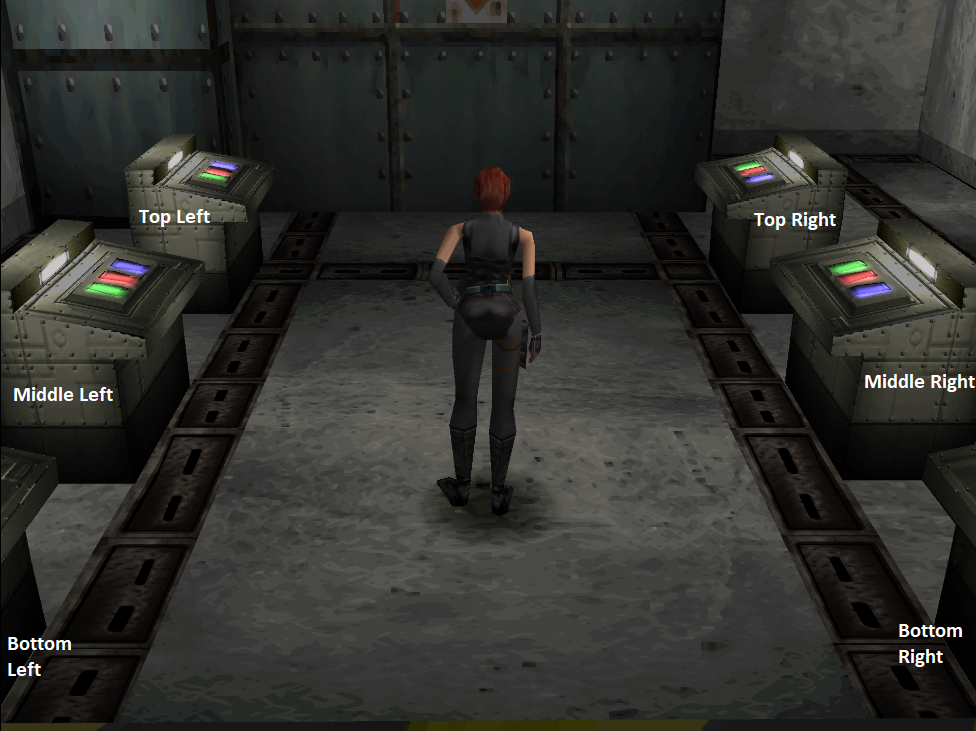
If you stand in the middle like I am in the picture above you will have 3 panels to your right and 3 to your left. You can press one colored button on each side to align pipes above, once you press that button it goes out on the rest of the computers on that side. Below are the correct combinations.
Top Right: Red
Bottom Left: Red
Top Left: Blue
Bottom Right: Blue
Middle Buttons: Green
Leave this area through the same door we came in from and you'll get a DANGER sequence again. Continue through the couple of rooms until you reach the Large Size Elevator again. There's no birds around to bother us now so we can use the elevator without any issue. Interact with the computer panel next to the green light and turn it on before going back to Rick and Tom.
You will have some scenes after which you'll automatically end up in the Carrying Out Room B1. Climb the ladder and push the shelf for an item - after that interact with the computer nearby and use the B1 Crane Card to gain access to the crane (you will need to use the item from your inventory). This next part requires us to solve another puzzle, you need to pick multiple options from this computer on how to move the crane.
A picture of the computer interface is shown below.
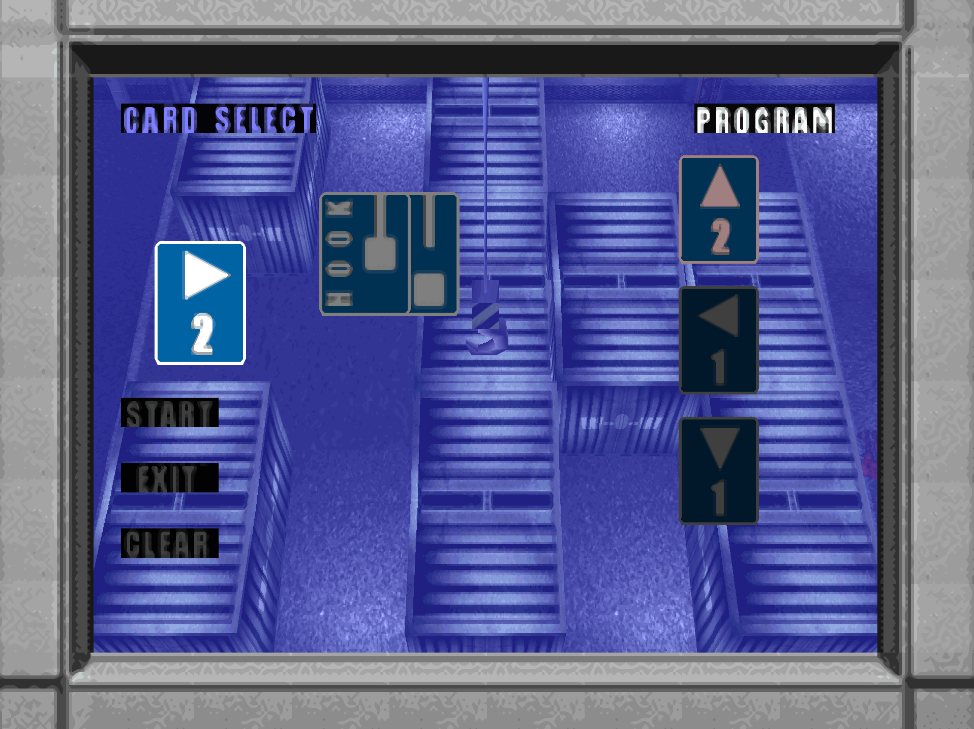
In the picture I am half way done moving the first crate, as you can see I already chose Up 2, Left 1 and Down 1. Next is choosing Hook, Right 2 and Release. Once you select everything you'll press Start and it'll go through the process. The second crate we abort half way and make the crane hold it in the air instead of putting it down.
Crate 1: Up 2, Left 1, Down 1, Hook, Right 2, Release
Crate 2: Up 2, Hook, Down 1 and Release
After moving both crates go back downstairs and head over to the other side of the room - go through the smaller of the two doors. In the Hallway for Carrying In Materials, unlock the grey door to create a shortcut back to the first area of the game and then disable the laser grid nearby. Go down the corridor in this area and you have a high chance of triggering another DANGER event with a raptor. The door we need is at the other end of the corridor and leads to the Hall B1.
Ignore the next batch of enemies you come across and make your way to the Medical Room, it's a save area and has some goodies. Search the cabinet for some items, the ID Card from the desk and the Plug from the cardboard box nearby where you entered.