
How To Use Codes on Project 64
Want to see a video guide on how to set this up instead of a written one?
This guide is designed to help you add more codes to the Project N64 Emulator or edit the codes that are currently a part of it. If you'd like to see a long list of codes that are available for this console I recommend you check out my N64 Walkthroughs - I have a couple hundred games worth of codes that you can use.
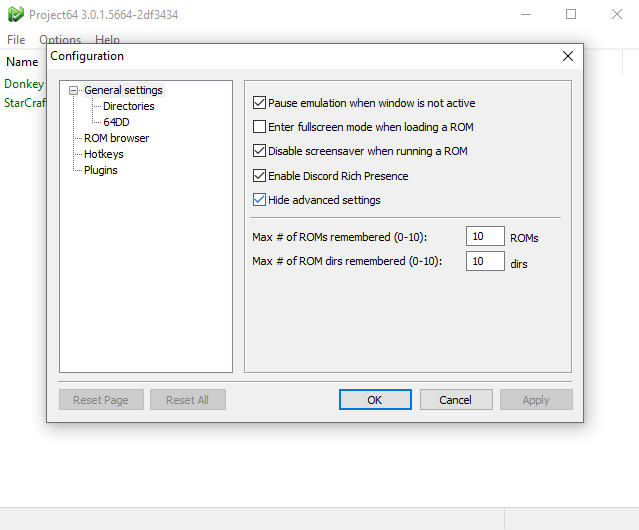
In order to use codes on the Project 64 Emulator you'll first need to click on "Options" and select "Configuration". This will open up a new window for you that will allow you to modify some settings in the Emulator. All we need from this window is to check "Hide Advanced Settings" off.
For those of you who don't need your hand held with setting up these cheats, I have designed a quick list below which will walk you through all of the steps in this guide in a much faster way. If you get confused or stuck on any of these steps feel free to scroll down and keep reading my guide - I provide pictures for most parts.
How To Enable Codes Quick List:
1. Go into Options and select Configuration
2. Disable Hide Advanced Settings
3. Launch your game that you want to modify/add codes for
4. Select System on the toolbar at the top and Cheats from the drop down
5. Click on the arrow bar on the right hand side of the Cheats window to expand it
6. Input the new cheat information and click Add Cheat
7. Enable the cheat on the left hand side of this window
8. Tab back into your game and check if it works
Click to enlarge this picture
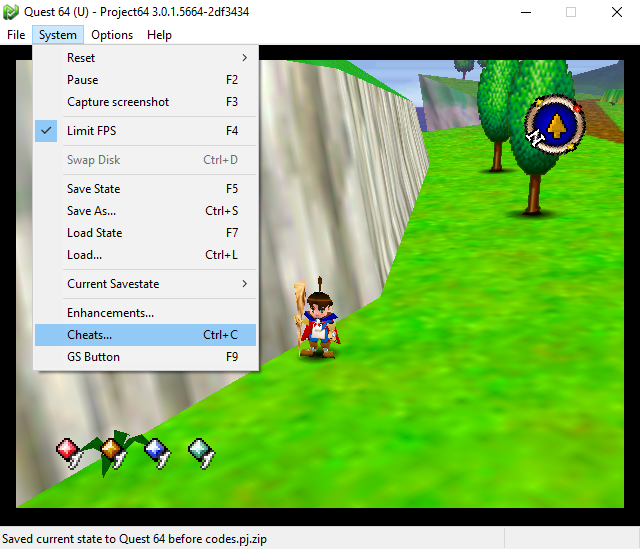
Now that we have turned Hide Advanced Settings off the next thing we need to do is launch the game we want to add cheats for and go into "System" at the top on the toolbar (pictured above). For the purposes of this guide I am going to be using Quest 64 as my example game. At the bottom of System you'll see an option for Cheats (there is a hotkey for this too - you can press Ctrl + C to immediately skip to this window).
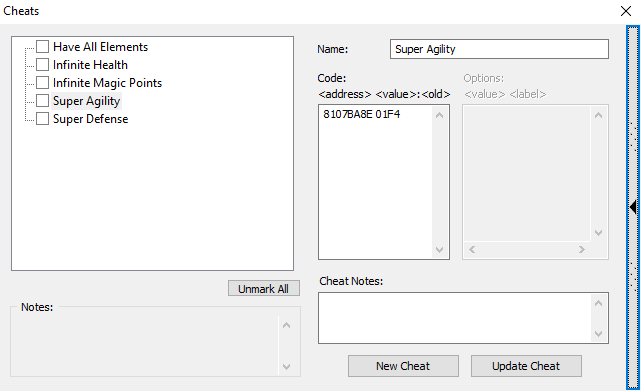
The Project 64 Emulator comes loaded with many of the most popular and most used cheats by default. More often than not the cheat you want will be found in this list for the game that you're playing and you won't even have to add any cheats. However, if you do want to add another cheat - that's exactly what we're going to show you in the rest of this guide!
Since we turned Hide Advanced Settings off you'll now have a small bar on the right hand side of the Cheats window. Click this to expand the window and you will see the same thing pictured below. When you click a cheat it will now tell you the memory address on the left and any comments that may be relevant.
Click to enlarge this picture
As you can see from the picture above, Quest 64 is very limited on what cheats it has available. There are many more available on my website but we'll focus on two for our demonstration, No Random Battles and Walk Through Walls. If you'd like to see No Random Battles working check out my How To Use Cheats on Project 64 Emulator Video.
Walk Through Walls/No Clipping: 8107BAA0 01F4
No Random Battles
8108C574 0000
8108C576 0000
Let's get Walk Through Walls working since I can show you that it works in a screenshot! The first thing you'll want to do is click New Cheat and that will give you a fresh area to input the information. Copy and paste the code from my website into the same box you see that I used below. The box is marked Code: and the box above that is marked Name: - they're both pretty self explanatory.
Once you've added the code click the Add Cheat button in the bottom right of the window. This will add the cheat to the other box on the left hand side of this window. You're now finished with the hard part of this process! Click the little box next to the cheat on the left hand side and this should enable the cheat ingame. I say should because some problems can still occur which I will get to below.

All that's left once you have enabled the cheat is to close this window and go back into your game and see if the code works. Take a look at my screenshot below and you'll see that Brian (the main character) is standing on a wall side that is typically inaccessible to him - the cheat works! If the cheat isn't working for you this may be the result of a few different things.
The first solution I would recommend is run Project 64 as an Administrator - I had to do that actually to get any cheats to work for me. Another issue that you may be having is an outdated version of Project 64 or something is wrong with your install. Check out Project 64's Website and try to download a new one. Last but not least, it may be file permissions on your computer, try restarting it then trying again. Yes, I know, turn it off and on again that's the joke but it really does work for me most of the time to fix most issues.
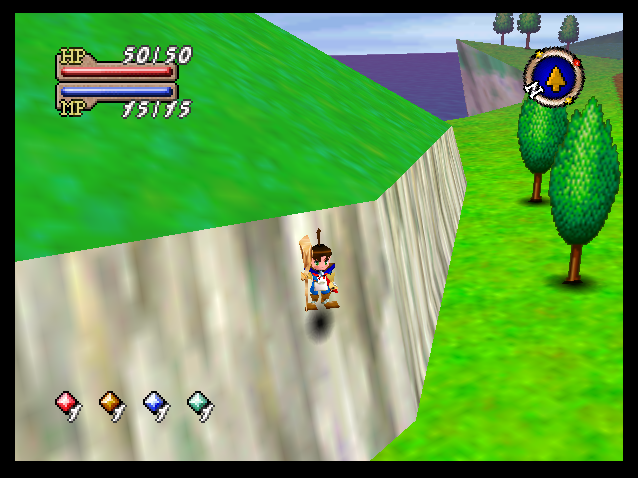
Walk through walls is enabled