
Snow Queen Route Walkthrough - Persona 1
The Snow Queen Quest is one of two routes available to you for the main story in Persona 1. If you are playing the Playstation 1 version of this game then the Snow Queen Quest is unavailable to you - it was cut from the game during the localization for an unknown reason. Only players who are playing on a Japanese version or the PSP release will be able to do this route.
In order for us to start the Snow Queen Quest you'll have to complete a total of 6 specific tasks while you're inside St. Hermelin High for the second time. After you arrive back at the school with Elly during the start of the game you'll have an opportunity to roam around the school - during this period is when you can start this quest. If you're worried about advancing the story too far and missing your opportunity to begin this quest I recommend you check out my Persona 1 Walkthrough Introduction; this page goes into detail about exactly when the "shared" route ends and where the SEBEC Route and Snow Queen Quest begin.
Below are the steps you'll have to follow in order to begin the Snow Queen Quest:
How To Start Snow Queen Quest:
1. Speak with the female student inside Class 2-4
2. Talk with Tsutomu inside of the Library on the 3F
3. Visit the Drama Club near St. Hermelin Gym 1F and speak with everyone inside of the room
4. Talk with everyone inside of the Student Council Room on the 3F
5. Speak with Principal Ooishi inside of the Principal's Office on the 1st Floor
6. Enter the St. Hermelin Gym and go through the door near the stage. This is the Gym Storage Room and you'll be automatically removed from this room unless you completed all of the above steps. If you did all of the steps listed above then you will be able to loot the Snow Queen Mask and begin this quest.
Once you pick up the Snow Queen Mask you'll get a cutscene after which you'll officially begin the Snow Queen Quest.

Ice Castle 1F Map
During the first part of the Snow Queen Quest you'll be tasked with exploring Ice Castle 1F and recruiting 2 additional party members. You'll have a choice between Nanjo, Elly and Brown to fill your two vacant spots. Who you choose is completely up to you.
Nanjo: Found in the Infirmary
Elly: Found in the Library
Brown: Waiting inside of the Cafeteria
After you recruit who you want visit the Cafeteria to trigger a cutscene and advance the story forward. Once you complete the scene inside the Cafeteria the 3 towers will become available to you and you'll be able to start the Snow Queen quest in earnest.
How the Snow Queen Quest works is pretty different from the SEBEC Route and may be confusing if this is your first time doing it. For this story route there are 3 different towers that you will need to complete - two of which are timed dungeons. Inside each of these towers you'll be able to perform secondary tasks that reward you with Mirror Shards. If you collect less than 8 Mirror Shards you will get the Bad Ending, if you collect more than 8 Mirror Shards you'll get the Good Ending.
Collecting 12 Mirror Shards will get you a bonus set of gear (Spiegel Set) for your Main Character once you progress to the upper floors of the Ice Palace. Below is a list of all the Mirror Shards available during the Snow Queen Quest and how you can obtain them.
Mirror Shard #1: Hypnos Tower 3F. Pinch Principal Ooishi and Vice-Principal Hanya in the Dream World, then talk to them on the 3F.
Mirror Shard #2: Hypnos Tower 3F. Pinch Tadashi and Tamaki inside of the Dream World then speak with them on the 3F.
Mirror Shard #3: Hypnos Tower 8F. Defeat the boss of Hypnos Tower.
Mirror Shard #4: Nemesis Tower 1F. Make the choice not to save Toro and Tsutomu, you'll be lead to a large chest on the first floor with this Mirror Shard and Michiko's Letter. Do not take this Mirror Shard if you want to obtain all 12!!
Mirror Shard #5: Nemesis Tower 5F - 7F. Defeat the final boss of Nemesis Tower.
Mirror Shard #6: Cafeteria. After you beat all of Nemesis Tower speak with Toro inside of the Cafeteria in the Ice Castle. He'll give you 2 Mirror Shards if you didn't open the chest on Nemesis Tower 1F with the Mirror Shard #4.
Mirror Shard #7: Cafeteria. After you beat all of Nemesis Tower speak with Toro inside of the Cafeteria in the Ice Castle. He'll give you 2 Mirror Shards if you didn't open the chest on Nemesis Tower 1F with the Mirror Shard #4.
Mirror Shard #8: Tartarus inside of Thanatos Tower. You'll find this Mirror Shard inside of a chest in Tartarus.
Mirror Shard #9: Tartarus inside of Thanatos Tower. You'll find this Mirror Shard inside of a chest in Tartarus.
Mirror Shard #10: Tartarus inside of Thanatos Tower. You'll find this Mirror Shard inside of a chest in Tartarus.
Mirror Shard #11: Tartarus inside of Thanatos Tower. Pay Mariko 5,000 Yen for this Mirror Shard.
Mirror Shard #12: Thanatos Tower 6F. Choose the treasure chest on the left when give the option to choose between two chests.
Mirror Shard #13: Thanatos Tower 7F. Defeat the final boss of Thanatos Tower.
Note: There are 13 Mirror Shards in total but the most you can obtain is 12. Mirror Shards 6 and 7 are a pair -- you must decide between getting these two Mirror Shards or Mirror Shard #4.
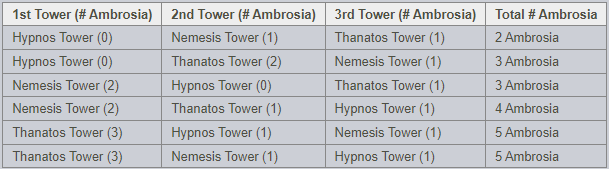
In addition to Mirror Shards there is another item you will collect during the Snow Queen Quest called Ambrosia. You will be rewarded Ambrosia for beating the towers and for completing them in a specific order. Ambrosia is used for Totems, if you're unfamiliar with a Totem it's an item that you can use during the fusion process to make a unique Persona.
Ambrosia is more of an optional reward and it's not something I recommend you pay much heed to. You'll get 2 Ambrosia guaranteed for finishing all 3 towers which is more than enough to get the best Ultimate Personas. If you want more than 2 Ambrosia then what you'll need to do is beat the harder tower(s) first. Beating Thanatos Tower first is how you'll guarantee yourself all 5 Ambrosia but that will also be extremely hard.
Conquering Nemesis Tower first will get you at minimum 3 Ambrosia, you'll get 4 Ambrosia if you do Nemesis then Thanatos. Below is a chart that shows you how much Ambrosia you'll get for each tower depending on your order.
Unless you spent a lot of time grinding before starting the Snow Queen Quest it's very unlikely that you'll be able to do Thanatos Tower first. Thanatos Tower has a lot of one-shot mechanics combined with various other really annoying mechanics. It's not a friendly place for people who are low level or are unfamiliar with Persona games and how to negate one-shot mechanics.
Below are each of the three towers and how difficult they are when compaired to each other. Which order you choose to do them in is totally up you.
Hypnos Tower is the easiest tower and can be accessed via the Fencing Club
Nemesis Tower is the medium difficulty tower and can be accessed via the Library
Thanatos Tower is the hardest tower and is accessed through the door in Class 2-1
Devil's Peak is an optional dungeon and your only place to grind EXP and Spell Cards early on. You can access this dungeon through the door in Class 1-1
Tip: Time only passes inside of these towers when you are exploring them in first person mode. Any time that you spend inside rooms, menus or battle does not pass time.
Each time you beat one of these towers you will unlock additional floors inside of the Devil's Peak dungeon. Devil's Peak is going to be the only place where you can reliably level up and get new Spell Cards during the Snow Queen Quest. I recommend you visit Devil's Peak each time you complete a tower to do some grinding and to collect Spell Cards for new Personas.
It's up to you how many Mirror Shards and Ambrosia you wish to collect - I would argue that collecting all 12 Mirror Shards is a lot more important than collecting all 5 Ambrosia. You shouldn't worry too much about doing Thanatos Tower first if you try it and you realize that it's far too difficult.
Once all 3 towers are defeated it'll be time for you to challenge the Snow Queen. You can find the Snow Queen inside of the Ice Castle 1F Courtyard. She can be a really tough fight if you're not prepared for it - I recommend fusing some Personas that are heavily resistant or immune to Ice damage to make things easier. You should also stock up on Dis-Para items before challenging the boss.
Note: If you collected less than 8 Mirror Shards you will fight a different boss and after beating that boss you'll watch the Bad Ending. I won't cover this boss since the game ends after this route; however the boss is mostly similar anyway.

The first and most important thing you can do to prepare for this fight is to fuse some Personas together that are strong against Ice and/or Wind attacks. Any Persona that is heavily resistant to Elemental damage is probably your best choice. You should also choose Skill Tablets (like Scorching Tablet) when fusing together Personas that have Nuclear and Blast spells on them.
Once the fight begins my advice to you is to spam your strongest Nuclear/Blast attacks and use Dis-Para any time you need to cure a party member. Having a character with Mediarahan or Mediarama will be a massive help too. If you're struggling with this fight it's most likely because of your Persona choice. You should check out my Best Personas Guide for more information about which Personas are the best and how to make a good Persona.
Lady Masquerade Weaknesses: Wind, Electric, Nuclear and Blast damage
Lady Masquerade Strengths: Absorbs Ice and Gravity damage; Resists Weapons
Recommended Personas: Lilim (Moon), Nike (Judgement), Hermod (Magician), Hathor (Priestess), Take-Mikazuchi (Hierophant)
After you've beaten this boss you will have some scenes and dialogue after which you'll regain control of your characters inside of the Ice Castle. Now that we've defeated the boss we'll have access to the upper floors of the Ice Castle. You can reach these floors by going into the southern room on Ice Castle 1F - on my map at the top of the page it's the room marked with the red tornado icon.
Inside of this room you'll find a Sphere of Light that will teleport you up to Ice Castle 2F when you touch it. Floors 2, 3 and 4 are all pretty straight forward - the only thing to note is Raiho on the 3rd floor. Raiho is a demon you'll encounter a few times throughout the Ice Castle, when you talk to him in the western room on the 3rd floor you will be able to trade Ambrosia to him for Totems. You can only reach this room via a pitfall from the floor above.
You'll also found Raiho again in the southeastern portion of the 4th floor. Speak with Raiho here and he'll teleport you up to Ice Castle 5F to the start of the maze. Ice Castle 5F to Ice Castle 8F is all one giant maze, I recommend you use my screenshots below for help navigating it.
The final floors of the Ice Castle (9F - 11F) operate more like your standard dungeon. You'll find a Trish's Fountain, Velvet Room and an Agastya Tree on Ice Castle 9F - these are the last shops you'll encounter before the final boss of the dungeon. The final boss is on Ice Castle 11F.
Ice Castle 3F: If you got all 12 Mirror Shards you'll be able to get the Spiegel Set from the central room. Also on this floor is a Jack Frost demon named Raiho whom you can trade Ambrosia to for Totems - you can find him in the western room. You can use Totems in the Persona fusion process; check out my Items Used In Fusion Guide for more information. The western room on this floor can only be accessed via the pitfall from the floor above.
Ice Castle 4F: Speak with Raiho in the southeastern room to be teleported to the 5F at the start of the maze.
Ice Castle 8F: A Light Puzzle and also someone who will teleport you to the next floor
Ice Castle 9F: Trish's Fountain, Velvet Room, Agastya Tree and a Teleporter to the entrance or 5F
Ice Castle 11F: Final Boss

Ice Castle 2F Map

Ice Castle 3F Map

Ice Castle 4F Map

Ice Castle 5F Map
Ice Castle 5F - Ice Castle 8F is one giant maze that is all intertwined. You'll need to go up and down throughout these floors multiple times to complete this maze and explaining how to navigate it through text is a bit challenging. My screenshots on this page point out the staircases that you'll need to go up or down to advance through this maze. I only labeled the staircases found at a crossroads though where there are multiple routes available.
For linear routes where there is only one way you can go - I expect you to figure that out on your own (hopefully you can). For those of you still confused by this maze, I have created a video that demonstrates how to get through the entire thing from start to finish. Check out my Ice Castle 5F - 8F How to Navigate the Maze Youtube Video. Use that video if you need assistance.
Once you reach Ice Castle 8F you'll find a light puzzle which needs to be solved before you're able to progress. My map screenshot below shows you what lights you need to step on in order to solve it -- but if you'd rather see a video instead check out my Ice Castle 8F Light Puzzle Solution Youtube Video. That is a short 30 second video that will show you how to quickly solve this puzzle and move to the next floor.

Ice Castle 6F Map

Ice Castle 7F Map

Ice Castle 8F Map

Ice Castle 9F Map

Ice Castle 10F Map
The final floor of this dungeon is Ice Castle 11F - I didn't take a map screenshot for it because the floor is small and extremely linear. All you'll find on the final floor is a few hallways and a room with the final boss inside of it. For the final boss of the Snow Queen Quest you'll be facing an enemy named Queen Ashura.
As far as preparation for this fight goes, protecting yourself from Elemental damage is generally the best thing you can do. Items that restore health and resurrect fallen party members are also something good to stock up on incase something goes wrong.
Queen Ashura Persona Recommendations: Lilim (Moon), Azrael (Judgement)
For the battle itself, it's kinda uneventful for a final boss but the recommended strategy is typically to use your weapons and attack her with either melee or Guns. Queen Ashura will occasionally change her face during this battle which will change her weaknesses and strengths; however it's typically best to just focus her down with melee and Gun based attacks.
That's really all there is to it - once you beat Queen Ashura you'll officially be done with the Snow Queen Quest route in Persona 1! If you're interested in doing the final floors of the Devil's Peak Dungeon then stick around until the ending credits are done and you'll get a message letting you know that the final floors of Devil's Peak have been unlocked. This serves as your post-game content for Persona 1.
Continue to Devil's Peak Walkthrough
Return to Persona 1 Guides Index