
Riftseeker's Sanctum - Post Mercenary Leveling Guide

Riftseeker's Sanctum is one of the largest zones added in Omens of War and has dozens of different areas for you to camp as well as multiple different raid bosses which can be found in zone. One is located at the tippy top of the zone, another at the very bottom and two more in rooms just off the stairwells leading to the top and bottom.
The first floor of Riftseeker's is fairly safe for hunting since the zone out is in the middle of the room. Also the entire area around in the zone in/out is safe from enemies unless someone trains you or pulls mobs over into this area.
If you're here solo/with a mercenary I recommend you stay on the first floor where it's safest. Those who are boxing more than one character or with a group should be strong enough to venture around the zone. It's extremely important though that you take your time and go slow - the mobs here are actually rather difficult.
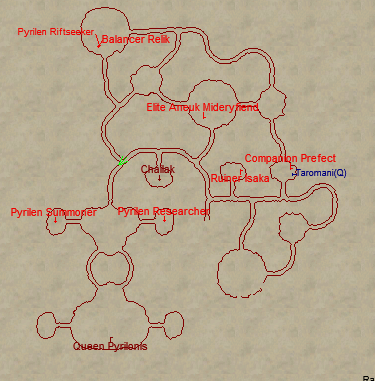
Second floor of Riftseeker's Sanctum
As you can see on the map above you have a few different nameds to choose from if you come up here. On the map above, Chailak and Queen Pyrilonis are both the raid targets you'll want to avoid. The rest of the names in red that you see are group level nameds.
That's a list of all the different nameds you'll encounter in the upper floors of Riftseeker's Sanctum. The enemies here have a very large agro radius which makes finding an actual 'safe' group location nearly impossible. Your best bet for a safe location is in the hallways, not as many enemies roam through them as the rooms.
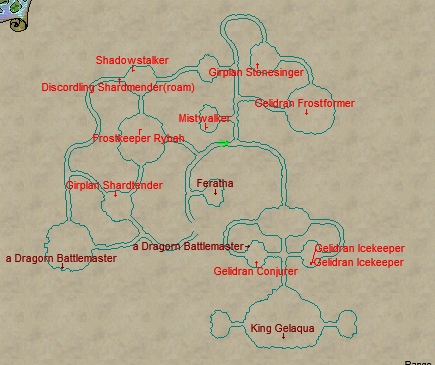
Now, as for the lower floors of Riftseeker's Sanctum you'll have basically an equal amount of nameds to kill as well as two raid bosses to avoid. On the map above the names Feratha and King Gelaqua are the raid bosses which you'll be avoiding. The rest of the names are group level named enemies.
As far as the loot goes in Riftseeker's Sanctum you're going to get a ton of different gem drops here. From Emeralds worth 10pp each to Diamonds worth over 200! Aside from the gems there isn't really much else you'll want to pick up (or that I recommend you pick up). There'll be some vendor trash here and there but the gems sell for the most and take up the least amount of room.
That's basically all there is to Riftseeker's Sanctum! While killing here I strongly recommend you save the Pyrilen Flames you come across as they're used for Artisan's Prize - an extremely good aug which is introduced into the game sometime around the TBM era.
Additional Information
- You can reach Riftseeker's Sanctum by traveling through Muramite Proving Grounds (MPG).
- There is a zone wide Hotzone aug that drops from here, Frozen Pyrilen Eye.
- Hang onto any Pyrilen Flames you find. They're very valuable since they're so rare and used for Artisan's Prize.
- If you're having trouble managing your Inventory Space I highly recommend you invest in some Extraplanar Trade Satchels which are 32 Slot Tradeskill Bags. Alternatively you could also buy Unexpanded Tailored Backpacks as well. Though, the Backpacks will likely be more expensive. Follow the links provided to learn more about each item.
- If you need more plat while leveling I strongly recommend you check out my How to make more plat while leveling by Bartering Guide. It'll give you a list of all the different items you should be keeping an eye out for to Barter/Sell!
Riftseeker's Sanctum Allakhazam Zone Information
Riftseeker's Sanctum TLP Leveling Guide