
Riftseeker's Sanctum - Omens of War Leveling Guide

Riftseeker's Sanctum is one of the largest zones added in Omens of War and has dozens of different areas for you to camp as well as multiple different raid bosses which can be found in zone. One is located at the tippy top of the zone, another at the very bottom and two more in rooms just off the stairwells leading to the top and bottom.
The first floor of Riftseeker's is fairly safe for hunting since the zone out is in the middle of the room. Also the entire area around in the zone in/out is safe from enemies unless someone trains you. If you don't have a full well geared group I highly recommend you stay on the first floor.
Boxers or those in well geared groups can move up to either the second floor or the lower floors where you'll find some nameds for you to kill. The screen shot below is of the second floor of the zone.
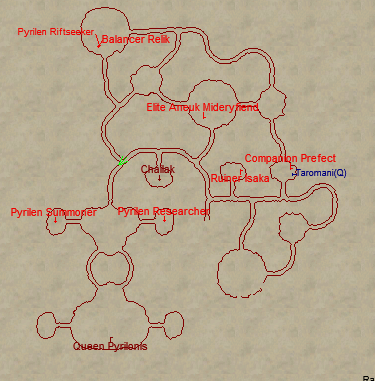
Second floor of Riftseeker's Sanctum
As you can see on the map above you have a few different nameds to choose from if you come up here. On the map above, Chailak and Queen Pyrilonis are both the raid targets you'll want to avoid. The rest of the names in red that you see are group level nameds.
Ruiner Isaka: Ikaav Summonstone, Vest of the Serpent
Companion Prefect: Celestial Lorica, Gleaming Stone of Ferocity
Elite Aneuk Miseryfiend: Chain of the Tormentor, Stone of Mind Control
Balancer Relik: Bracer of Burning Links, Sphere of Swirling Flame
Pyrilen Riftseeker: Bow of Leaping Flames, Flameshield Stone
Pyrilen Summoner: Flamelicked Claws, Heatstone of Memory
Pyrilen Researcher: Trident of the Pyrilen, Gemstone of Fiery Might
That's a list of all the different nameds you'll encounter in the upper floors of Riftseeker's Sanctum. The enemies here have a very large agro radius which makes finding an actual 'safe' group location nearly impossible. Your best bet for a safe location is in the hallways, not as many enemies roam through them as the rooms.
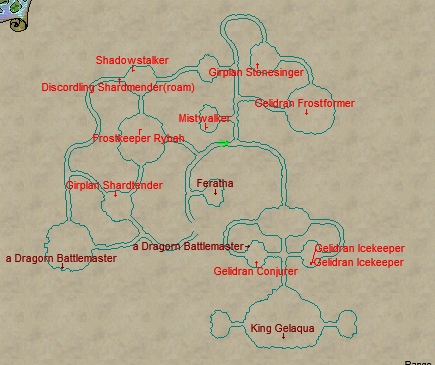
Lower floors of Riftseeker's Sanctum
Now, as for the lower floors of Riftseeker's Sanctum you'll have basically an equal amount of nameds to kill as well as two raid bosses to avoid. On the map above the names Feratha and King Gelaqua are the raid bosses which you'll be avoiding. The rest of the names are group level named enemies.
Girplan Shardtender: Ore of Stone Strength, Rifttorn Robe, Flintforged Shoulderguards
Frostkeeper Rybah: Arcane Tome of the Gelidran, Bracelet of Frozen Air, Veil of Frozen Flame
Mistwalker: Shield of Twisted Reality, Shrieking Band of Despair
Discordling Shardmender: Belt of Dripping Spines, Lute of the Mischiefmaker
Shadowstalker: Feranclaw Blade, Flayed Tentacle Choker
Girplan Stonesinger: Flintforged Shoulderguards, Trickster's Chalice
Gelidran Frostformer: Frosted Gem of Ferocity, Icestrike
Gelidran Conjurer: Icy Riftshard, Icespark Stone
Gelidran Icekeeper: Frostcaller, Icestrike
That's basically all there is to Riftseeker's Sanctum! While killing here I strongly recommend you save the Pyrilen Flames you come across as they're used for Artisan's Prize - an extremely good aug which is introduced into the game sometime around the TBM era.
Additional Information
- The fastest way for you to reach Riftseeker's Sanctum is by getting a portal to Wall of Slaughter and traveling north to MPG. Riftseekers is just off this zone. If you can't get a portal to WoS you'll need to travel through Dranik's Scar.
- Named enemies in OoW zones drop spell runes which are used in the Omens of War Class Spells Quest. These runes are as follows... Glowing Muramite Rune (70), Greater Muramite Rune (69), Muramite Rune (68), Lesser Muramite Rune (67), Minor Muramite Rune (66).
Riftseeker's Sanctum Allakhazam Zone Information
Riftseeker's Sanctum TLP Leveling Guide