
Setting Up Your Interface
Now that we've learned Kissassist and gotten that out of the way - the next thing we need to do is setup our ingame interface for boxing. After we setup our interface we can move on to setting up Kissassist and getting that rolling. Before I get started with this guide you'll need the following things to move forward (at all).
- You have setup Isboxer as well as MacroQuest 2 and you are able to log into the game on your team. If you haven't setup Isboxer yet you'll want to read my Setting up Key Maps for Isboxer in Everquest Guide. The reason I am telling you to also set up Isboxer and not EQBC is because I feel the program is more efficient at what it does. See my EQBC vrs Isboxer Argument page for more information about that.
- You have read (or at least skimmed) the entire Learning Kissassist Guide. After we figure out how to setup our interface the next step is going to be setting up Kissassist!
- You should skim over the Almar's Interface & List of Macros page before proceeding as well. It has a TON of useful information for boxers.
- You should read my Getting Started with Isboxing In Everquest Guides. They are going to cover a lot of the same material since both of these playstyles have a lot of overlap. If you're confused by any part of this guide it'll probably be explained differently in the Isboxing ones. And vice versa.
- If you already possess some boxing knowledge and just found my boxing guides this page is the best place to start to learn more.
With all of that out of the way, let's get started with setting up our interface! Below this paragraph you'll find a picture of my main hotbar. All of the keybinds on the hotbar that's shown are Isboxer only keybinds. This means that I used the Key Maps Wizard with Isboxer and made them into keybinds. What this also means is these keybinds are specifically for boxing - they're completely useless unless I am on my box team with Isboxer loaded.
![]()
The macros you see before you in the picture are blank and they're specifically named and color coded on my tank's screen so I can remember what is bound to that hotkey. I highly recommend you do something similar while setting up your interface as it'll help you out substantially remembering what your keybinds are.
Now, before taking another step forward you need to decide what keys you'd like to make into boxing hotkeys and what keys you'd like to make into character specific hotkeys. Let me explain what both of these things are in a slightly easier format below.
Boxing Hotkeys: These keys are setup to work only on your boxteam. You have them bound in Isboxer under Key Maps as well as in Everquest under Options (Alt + O).
Character Specific Hotkeys: These keys will work only on individual characters. You have them bound in Everquest under Options (Alt + O).
As aforementioned the Hotkeys shown in the hotbar above are Boxing Hotkeys. The hotbar below is a demonstration of my Character Specific Hotkeys. Moving forward you'll need to setup at least 10 Boxing Hotkeys and at least 6 Character Specific Hotkeys.
![]()
If you need more detail on Character Specific Hotkeys and Boxing Specific Hotkeys I recommend reading over my Getting Started with Isboxer Series. I go into much, much more detail about everything in those guides which are meant for people whom are just getting started with this whole process.
After you set up all the hotkeys that you need the next important thing to do is make the macros that we need to play the game. For this part we're not going to be using Macroquest 2 yet - we're going to be using the Macros that are available to us in Everquest itself through the Social Window.
Note: I realize that I am going to teach you how to use Kissassist later which will basically do all of this for you. The reason I am teaching you how to set it all up now is because sometimes we're going to need to "over ride" Kissassist so to speak. When it's doing something stupid there's no alternative for human intervention.
Follow each of the links provided to learn more about the macro, how to set it up and exactly what it does. It's extremely important that you get all of these setup as they're going to be essential for our box team. You'll probably be using all 5 of these macros each and every time you play the game.
Once you've created all of the macros it'll be time for you to play around with them a little bit in game. Bind the Assist macro to the appropriate slot on every character, target something on your tank then spam your assist key. Check every character and make sure they assisted the tank (your healer is supposed to target the tank).
Make your Heal macros and group heal macros and from your main screen (your tank) hit the Heal/Group Heal buttons and make sure that they fire off. Rinse and repeat for the DPS macros that you've made and finally you'll want to test your Follow Macros.
Though, since we're using MacroQuest 2 I highly recommend you make a slight alteration to the Follow Macro. Instead of /follow you'll want to use /afollow on. The on at the end is extremely important because we're going to be spamming the Follow button. You don't want follow turning on/off each time you hit it - that'll make it useless. Putting in 'on' means that spamming it will actually work.
The follow macro we'll be making since we use MacroQuest 2 is found below.
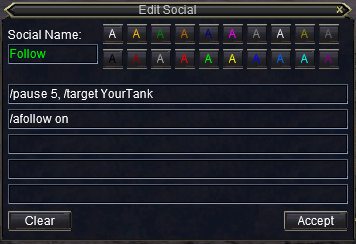
Additionally we're going to want to make one other macro which turns Advanced Follow (afollow) off. You can't break this follow by just side strafing your characters or moving them around. It can only be broken with a /command which is why we need the macro that's found below too.
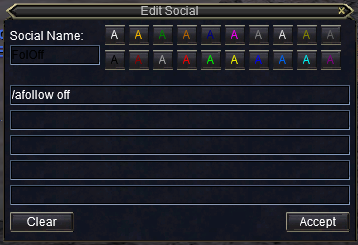
I'd recommend that you place these two macros right next to each other. My Keybinds for them are F5 (Follow Off) and F6 (Follow On). Depending on what keybinds you chose yours will probably be a little bit different... Keep in mind too that we're going to need to add more Boxing Keybinds relatively soon. If some of the new keybinds you made feel uncomfortable then just look for a better place for them once we add more keybinds.
Normally what I try to do is organize my interface by how often the key is used and whether or not it needs to be used in combat or not. I place my combat keys closest to my movement keys and anything that's guaranteed to be used out of combat usually gets is bound to an F1-F12 key where I have also hold down Ctrl or Alt to press it.
Once you feel that your interface is setup well enough it'll be time to move onto the next guide, Learning How to Play & Integrate Kissassist